Hello friends!
It's Juliana with you today to share a
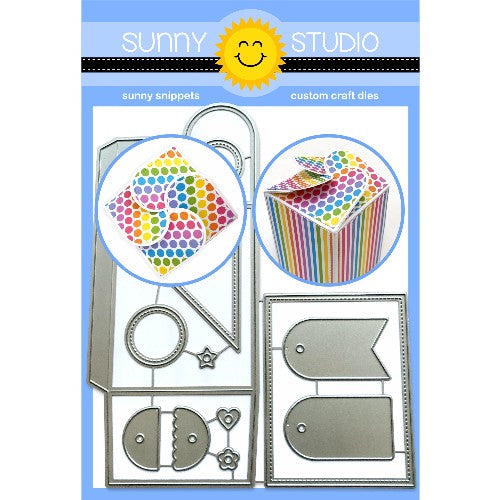
Happy Birthday gift box featuring the Wrap
Around Box Dies and a mix of stamps from the Best
Fishes Stamps and Oceans of
Joy Stamps. I recently shared a sloth
themed birthday gift box featuring this Wrap Around Box Dies.
To get started
I took a piece of Bristol Paper and die cut the gift box using the Wrap
Around Box Dies. Following the instructions, I assembled the box and put it
to the side. Next, I took the stitched rectangle die included with this die set
and cut 4 panels from Bristol Paper. I choose to use Bristol Paper because I
wanted to color them using Distress Inks and I find this ink blends wonderfully
on this paper.
I knew I wanted
to create an underwater ocean scene. However, instead of regular die cutting
and layering, I decided to go for an inlaid design. To achieve this, I took the
Catch
A Wave Dies and the Woodland
Border Dies and used them to create an inlaid design on the die cut
stitched rectangles. Using Therm O Web Purple Tape, I taped the dies down onto
the die cut rectangle piece and ran them through my die cut machine. I then
applied Distress Oxide ink in Salty Ocean to the water pieces and Frayed Burlap
and Vintage Photo to the bottom piece.
To give the
wave die cut pieces a more underwater look, I splattered water onto them and
dabbed it dry with a paper towel. This removed some of the ink and gave me the
look of water bubbles. For the sand, I splattered these pieces with watered
down brown and black paint. White I waited for everything to dry, I die cut 4 more
stitched rectangles. I then put each of the panels back together, and adhered
them to the rectangles. They were then ready to attach to the gift box. For the
top section of the gift box, I once again used Bristol Paper and inked it with
Salty Ocean Distress Oxide.
I then went
about stamping and coloring a bunch of images from the Best
Fishes Stamps and Oceans of
Joy Stamps. To color the images, I used Copic Markers and then die cut them
using the Best
Fishes Dies and Oceans of Joy
Dies. Once all of the coloring was finished, I began grouping the images
together to create a scene for each side of the box. I used double sided foam
adhesive to adhere some of the images for a bit of dimension.
To complete the
gift box, I die cut a tag from Wrap
Around Box Dies and then added a sentiment and a couple of starfish from
the Best Fishes Stamps. I then punched a hole in one of the top pieces of the
box and tied on the tag with a piece of green and white baker's twine.
Thanks so much
for stopping by today! I hope you enjoyed this bit of birthday gift box
inspiration featuring the Wrap
Around Box Dies!
---------------------------------------------
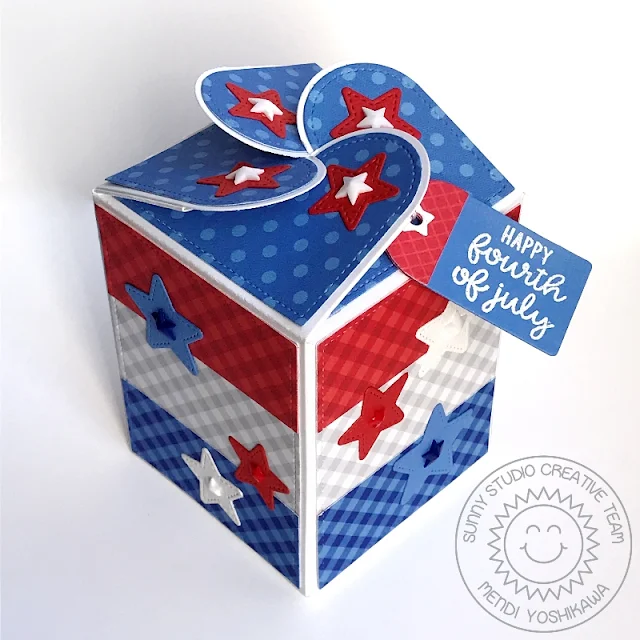
Hello there! Mendi here, filling in for Angelica today. I'm excited to be sharing a patriotic themed treat box using the Wrap Around Box dies. To carry out my theme, I turned to my favorite Classic Gingham and Polka-dot Parade 6x6 Paper Packs.
I started by cutting four of the box panels from white cardstock and then four of the stitched rectangles to decorate the sides from the white gingham patterned paper. This type of pattern doesn't matter which direction it's turned so I was able to get all four sides from a single 6x6 sheet, by turning the die horizontal for two and and vertical for the remaining two. I then just die-cut portions of the rectangle from the red and blue versions, hanging the die off my paper and trimming them down to just over an inch.
To embellish my box, I turned to star dies from our Window Trio Square Dies and Fancy Frames Square Dies sets, cutting them from Red, white and blue textured cardstock. To add a little something extra, I then layered each of them with some Americana Star Crystals.
As a last touch, I created a matching tag from my scraps using the Wrap Around Box die set, stamping and heat embossing it with a sentiment from our Happy Thoughts Stamps (and the word "happy" from our Fabulous Flamingos Stamps).
I hope we've inspired you to create some fun summer themed treat boxes of your own. They are so much fun to decorate for all sorts of occasions!
Sunny Studio Supplies Used:
 Oceans of Joy Dies Shop at: Sunny Studio |
 Oceans of Joy Stamps Shop at: Sunny Studio |
 Fancy Frames-Square Dies Shop at: Sunny Studio |
 Window Trio- Square Die Shop at: Sunny Studio |
 Classic Gingham 6x6 Paper Shop at: Sunny Studio |
 Polka-dot Parade 6x6 Paper Shop at: Sunny Studio |
 Happy Thoughts Stamps Shop at: Sunny Studio |
 Woodland Borders Dies Shop at: Sunny Studio |
 Catch A Wave Dies Shop at: Sunny Studio | |
 Wrap Around Box Die Shop at: Sunny Studio |
 Best Fishes Stamps Shop at: Sunny Studio |
 Best Fishes Dies Shop at: Sunny Studio |
 Fabulous Flamingos Stamps Shop at: Sunny Studio | |


