Monday, January 14, 2019

Miss Moo Cards with Leanne and Eloise

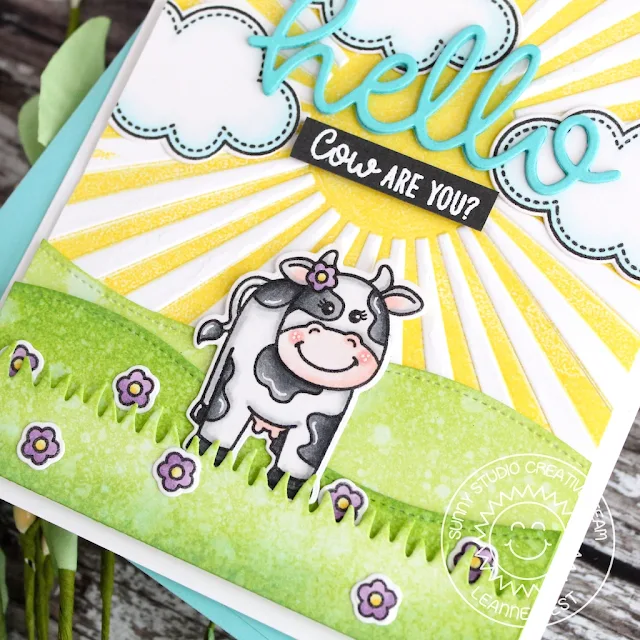
Hello! Cow are you? Leanne here with you today. Don’t you just love a good pun? I sure do especially when it’s paired with an adorable image like Miss Moo. I’ve created a fun pasture scene to showcase Miss Moo and the coordinating punny sentiment. 

Sunny Studio Stamps: Miss Moo Sunny Sentiments Woodland Borders Hello Cards by Leanne West

I started with a panel of heavy weight white card stock cut slightly smaller than A2 size. I very carefully applied yellow ink with an ink pad to one side of the Sunburst Embossing folder. I centered the white card stock in the folder and ran it through my die cutting machine. The result is just fabulous! Great texture and color at the same time.  

Sunny Studio Stamps: Miss Moo Sunny Sentiments Woodland Borders Hello Cards by Leanne West

I added some clouds which are from the Sunny Sentiments stamp set. I used the Hello Word die to die cut the hello part. I die cut 3 times and adhered them together. For the stamped part of the sentiment, I used “cow are you” from Miss Moo which I white heat embossed onto some dark gray card stock.  

Sunny Studio Stamps: Miss Moo Sunny Sentiments Woodland Borders Hello Cards by Leanne West

I created a layered pasture using the hill borders from the Woodland Border die set and the grass border from the Sunny Sentiments die set. To color the pasture pieces, I sponged on some Mowed Lawn Distress Oxide ink and spritzed with water. I stamped and Copic colored the images and die cut with the coordinating dies. I scattered the flowers over the pasture area and adhered Miss Moo with foam tape. I added the completed panel to an A2 side fold card base.  

Thank you for stopping by and have a moo-valous day! 

---------------------------------------------

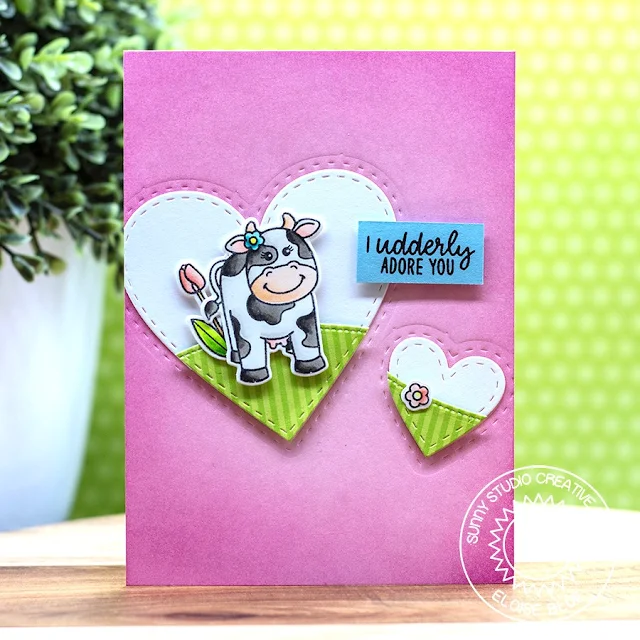
Hey everyone, it's Eloise here. To start off my project today I stamped and coloured with Copics my images from Miss Moo and Spring Greetings. I then cut them out using the coordinating dies. While I had my die cutting machine out, I also cut two hearts from the Stitched Hearts die set from white cardstock and also green patterned paper from Dots & Striped Pastels. I then used Woodland Borders and cut hills from the green pieces. 

Sunny Studio Stamps: Miss Moo Stitched Hearts Spring Greetings Love Themed Card by Eloise Blue

(Copic Markers Used: Y00, Y13 / YG01, YG23, YG17 / R00, R20, R22 / E53, E55 / W00, W0, W1 / W3, W5, W7 / E000, E00, E21 / BG11, BG13, BG49)

I added foam tape to the backs of the green pieces and images and adhered them onto the white hearts. I took a piece of pink cardstock, ran through the same sized hearts with a tan embossing mat and embossed the stitching details into the background. 

Sunny Studio Stamps: Miss Moo Stitched Hearts Spring Greetings Love Themed Card by Eloise Blue

I then took Spun Sugar and Picked Raspberry Distress inks and ink blended a little around the edges. I adhered my hearts on flat and stamped the sentiment 'I udderly adore you' onto a strip of blue cardstock that I adhered onto the panel as well. 

Sunny Studio Supplies Used:

Stitched Heart Dies
Stitched Heart Dies
Shop at:
Sunny Studio
Sunny Sentiments Dies
Shop at:
Sunny Studio
Sunny Sentiments Stamps
Shop at:
Sunny Studio
Hello Word Die
Hello Word Die
Shop at:
Sunny Studio
Woodland Borders Dies
Shop at:
Sunny Studio
Dots & Stripes Pastels 6x6 Paper
Shop at:
Sunny Studio
Sunburst Embossing
Sunburst Embossing
Shop at:
Sunny Studio
Spring Greetings Stamps
Shop at:
Sunny Studio
Spring Greetings Dies
Shop at:
Sunny Studio
Miss Moo Stamps
Miss Moo Stamps
Shop at:
Sunny Studio
Miss Moo Dies
Miss Moo Dies
Shop at:
Sunny Studio

Saturday, January 12, 2019

Guest Designer Spotlight: Cards with Isha Gupta

Hello everyone, it’s Isha Gupta here! I am so excited to be here as a guest today. I’m sharing two cards with you using the new release products. I used Everything's Rosy stamp set along with the coordinating dies, Frilly Frames Lattice dies, and the Flirty Flowers 6x6" pattern paper pack. 

Sunny Studio Stamps: Everything's Rosy Frilly Frames Lattice Dies Floral Congratulations Cards by Isha Gupta

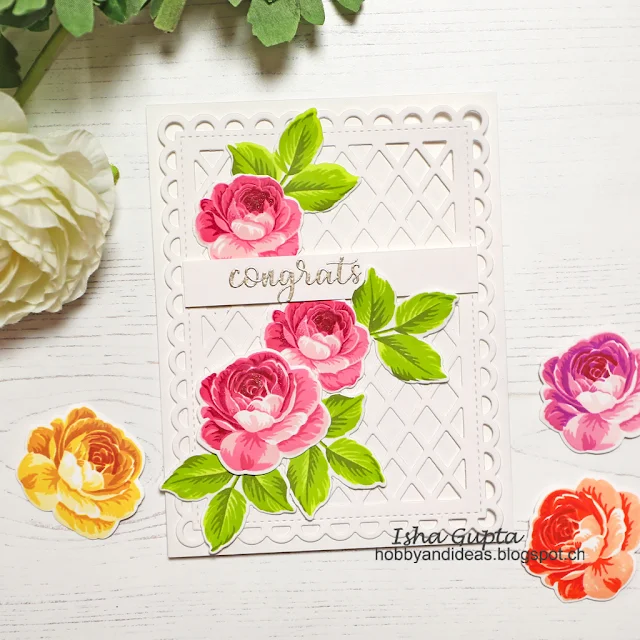
For my first card, I used the pattern paper as my card base. I then die-cut the lattice plate die using white cardstock. I then stamped the GORGEOUS layered roses using the coordinating Altenew ink 4-packs and die-cut them. I created the floral cluster according to my liking. 

Sunny Studio Stamps: Everything's Rosy Frilly Frames Lattice Dies Floral Congratulations Cards by Isha Gupta

I adhered the pattern paper to the card base and glued the lattice piece to it. I then adhered the flowers. To finish, I simply stamped the sentiment to a stripe. 

Sunny Studio Stamps: Everything's Rosy Frilly Frames Lattice Dies Floral Congratulations Cards by Isha Gupta

These layered roses are so so pretty, they look so real. I stamped all the layers of flowers and leaves using various inks and die-cut them. I kept my card base white and die-cut the lattice plate die using white. 

Sunny Studio Stamps: Everything's Rosy Frilly Frames Lattice Dies Floral Congratulations Cards by Isha Gupta

White on white gives this card a elegant look and emphasize onto the pretty florals. I stamped and embossed the sentiment onto a white stripe and then adhered the flowers around it.

I really love the new release as it is so super adorable and versatile too. I had so much fun playing with the new Everything's Rosy set. Thank you Mendi for having me on the blog :)

Altenew Mini Ink Cube Sets Used:


Sunny Studio Supplies Used:

Flirty Flowers 6x6 Paper
Shop at:
Sunny Studio
Everything's Rosy Stamps
Shop at:
Sunny Studio
Everything's Rosy Dies
Shop at:
Sunny Studio
Frilly Frames Lattice Dies
Shop at:
Sunny Studio

Friday, January 11, 2019

Love Monkey Cards with Rachel & Lexa

Hello, crafty friends! Rachel here today and I am so excited to be joining the wonderful talent on the Sunny Studio Stamps Creative Team! I have a fun shadow box card to share with you featuring the new and adorable Love Monkey Stamp Set.

Sunny Studio Stamps: Love Monkey Botanical Backdrop Die Shadow Box Love Themed Card by Rachel Alvarado

Aren't these monkeys just the cutest? They're perfect for Valentine's Day or pretty much any other occasion during the year depending on how you decide to color them. To start, I stamped my images with Copic friendly black ink onto a sheet of Neenah Solar White 110lb card stock. I then colored the images with Copic Sketch markers and used the coordinating dies to cut them out.

(Copic Makers used: Monkey Bodies: E30, E31, E23, E27, E49; Monkey Faces: E0000, E000, E21, E11, E04; Branches: E30, E31, E23, E27, E29; Copic Colored Leaves: G20, YG01, YG13, YG17, G28; Pink Hearts: RV0000, RV00, RV52, RV55; Red Heart: R05, R27, R46, R59, RV99)

Sunny Studio Stamps: Love Monkey Botanical Backdrop Die Shadow Box Love Themed Card by Rachel Alvarado

To create my shadow box, I simply cut two pieces of white card stock to 4.25" x 7" and scored each piece at 1.5" and 5.5". I folded my paper along the score lines and used these two pieces as the outer portion of my box. I then die cut a circular window in one of the pieces for the front of my card. For the inner shelves, I trimmed two pieces of white card stock to 4.25" x 4.75" and scored them each at 3/8" and 4 3/8". Once done with this part, I die cut a circle window into each piece to line up with the one that I made for the front of the card. This helps to create depth and an easy way to attach your images from all angles inside of your card.

Sunny Studio Stamps: Love Monkey Botanical Backdrop Die Shadow Box Love Themed Card by Rachel Alvarado

To create the large leafy greenery throughout the card, I used the gorgeous Botanical Backdrop Die and die cut it a few times on some green card stock. I then trimmed off a few of the green leaves in small sections and blended them with some Distress inks (Mowed Lawn, Crushed Olive, and Peeled Paint). I then glued these to the back of each window section to add some more depth and look as if the monkeys were hanging out in the trees.  I also added a piece of patterned pink paper from the new Flirty Flowers 6x6 Paper Pad to the very back section of my card.

Sunny Studio Stamps: Love Monkey Botanical Backdrop Die Shadow Box Love Themed Card by Rachel Alvarado

Lastly, I adhered a couple of the monkeys, the vines, and the tree branch to the inside of my card with some liquid adhesive. I attached the last monkey to the outside of my card with some 3D foam adhesive squares. I then heat embossed my sentiment with Fine Detail white embossing powder onto some black card stock.

Thank you so much for dropping by! I hope you enjoyed my card today! Wishing you all a wonderful weekend and see you next week!

-------------------------------------------------------

Hello everyone! Lexa here today with a card featuring the brand new stamp set and the coordinating dies that called Love Monkey. And yes, there are so much to love about this new stamps! Those adorable little cheeky faces that will be what you need for everyday cards and Valentine's. Other than that, I also use the super fun Staggered Circle dies on this card. I'm swooning over this new release.
Sunny Studio Stamps: Love Monkey Card by Lexa Levana (using Background Basics Stamps & Scattered Circle Dies)
First, I cut the circles using the Staggered Circle dies and blended some colorful Distress Inks on each circles. Then I stamped the polka dots background using Background Basic Stamps. I stamped all the images using Versafine black ink on the watercolor paper. After that, I use my Distress Markers to color each images and run them through die cutting machine. I think Sunny Studio has one of the best coordinating dies, they're perfectly line up on each images, sharp and those thin white line is just so satisfying.

Sunny Studio Stamps: Love Monkey Card by Lexa Levana (using Background Basics Stamps & Scattered Circle Dies)

The most fun part is always arranging every images to the scene. I adhere them using foam tapes to create some dimensions. I choose happy colors for this birthday card. I hope it will bright up one's day!

Thank you so much for stopping by today. I hope you enjoy today's post and have a great day!

Sunny Studio Supplies Used:

Background Basics Stamps
Shop at:
Sunny Studio
Flirty Flowers 6x6 Paper
Shop at:
Sunny Studio
Love Monkey Stamps
Love Monkey Stamps
Shop at:
Sunny Studio
Love Monkey Dies
Love Monkey Dies
Shop at:
Sunny Studio
Botanical Backdrop Die
Shop at:
Sunny Studio
Staggered Circles Die
Shop at:
Sunny Studio

Thursday, January 10, 2019

Over The Rainbow Cards with Anja & Vanessa

Hello everyone, Anja here and I'm so excited to share my very first post as a new Creative Team member. Today, I'm showcasing the Over The Rainbow Stamps. This 3x4 stamp set comes with a ton of fun sentiments and many options to combine them with the word "rainbow".

Sunny Studio Stamps: Over The Rainbow Rainbow Word Frilly Frames Cards by Anja Bytyqi


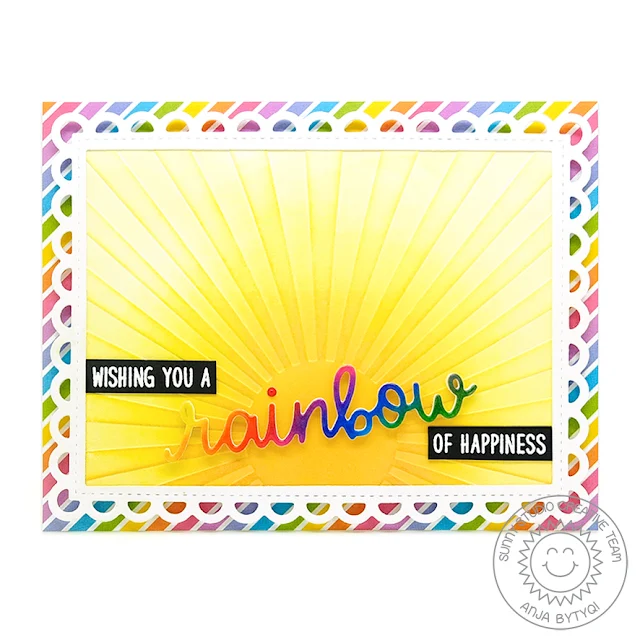
On my card I also used the new Rainbow Word Die to build the sentiment. I white heat embossed two of the sentiments on strips of black cardstock. I die cut the word "rainbow" four times – 3 from regular white cardstock and one from Strathmore Bristol smooth cardstock which I colored with ZIG Clean Color Real Brush Pens in rainbow order before die cutting. I stacked them together and clear embossed the die cut for a glossy finish.


To go on with the rainbow theme, I picked the pretty striped paper from the Spring Sunburst 6x6 Paper pack and adhered it to my card base. Next, I used the Sunburst Embossing Folder and did some ink blending with Distress Oxide Inks (Squeezed Lemonade, Mustard Seed, Wild Honey) to make it a bright shining sun. I cut the Frilly Frames Lattice Dies from white cardstock (without the lattice insert) and created a scalloped stitched frame by also die cutting a rectangle from the center. 

I assembled the card and adhered the rainbow word at an angle. The dot over the "i" was made with Nuvo Red Berry Crystal Drops so I would not have to glue together all the tiny die cut dots ;-)

Sunny Studio Stamps: Over The Rainbow Rainbow Word Frilly Frames Cards by Anja Bytyqi

As a little bonus, I created a second card using the Inlaid Die Cutting technique that came to my mind when I saw the previously released Fancy Frames Circle DiesFirst, I die cut the stitched scalloped circles and heart from the Dots & Stripes Pastels 6x6 Paper and the parts in between from white cardstock. Next, I die cut a white cardstock circle (as big as the biggest blue circle) with a layer of Ken Oliver Stick it on top. It's like doing a puzzle when inlaying the die cuts.

I adhered the rainbow circle a bit off to the right side of my white card base and trimmed the excess with my paper cutter. Finally, I heat embossed another Over The Rainbow sentiment in silver and cut the Rainbow Word Die from black glitter cardstock. 

Thank you so much for stopping by! Have a wonderful day!

-----------------------------------------------------

Hello everybody! Vanessa here today with a happy card using the wonderful new stamp sets Over The Rainbow and Love MonkeyAfter all the cozy, glittery, festive Christmas cards, I feel the urge to make something colorful. This lovely new spring release makes it easy!

Sunny Studio Stamps: Over The Rainbow Love Monkey Rainbow Word Card by Vanessa Menhorn

I started with a panel of watercolor paper and applied a soft wash of watercolors. Then I stamped the sentiment and adhered the panel to the card. I colored a scrap of white cardstock with Copics, die-cut the Rainbow Word Die from it and adhered the word to the card.

Sunny Studio Stamps: Over The Rainbow Love Monkey Rainbow Word Card by Vanessa Menhorn

Now I stamped the adorable monkey onto white cardstock, colored it with Copics, die-cut it with the matching die, backed it with fun foam and adhered it. Finally, I added little heart and circle sequins around the image.

I hope to have brought some color into your life today! Thank you for stopping by!

Sunny Studio Supplies Used:

Fancy Frames-Circle Dies
Shop at:
Sunny Studio
Spring Sunburst 6x6 Paper
Shop at:
Sunny Studio
Dots & Stripes Pastels 6x6 Paper
Shop at:
Sunny Studio
Sunburst Embossing
Sunburst Embossing
Shop at:
Sunny Studio
Love Monkey Stamps
Love Monkey Stamps
Shop at:
Sunny Studio
Love Monkey Dies
Love Monkey Dies
Shop at:
Sunny Studio
Over The Rainbow Stamps
Shop at:
Sunny Studio
Rainbow Word Die
Rainbow Word Die
Shop at:
Sunny Studio
Frilly Frames Lattice Dies
Shop at:
Sunny Studio