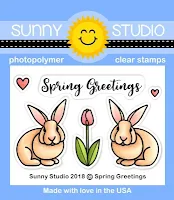
Today I am showcasing our new Chubby Bunny stamps and dies, Spring Greetings stamps and dies, 4 new Pastel Paper Packs and 2 new 6x6 embossing folders! Yay!!!
Card No. 1: For my first card I used our new Chubby Bunny set to create a sweet Easter card. This set comes with a darling Easter banner that is so much fun to color! I used a sheet of lilac striped paper from our new Dots & Stripes Pastels Paper Pack (along with a new stitched scallop Frilly Frames Polka-dot die that I will be showcasing more of tomorrow).
Card No. 2: For my next card I had a number of strips of paper leftover from creating display cards for stores and I hate letting scraps go to waste so I adhered them to a piece a printer paper in a rainbow pattern. I then used our Ric Rac Border dies to add a little detail to my white panel going down the center. This time I colored my Easter banner in a rainbow pattern going the opposite direction and sponged on some tumbled glass distress ink behind each little bunny in my grid using a little foam dauber.
Card No. 3: Up next is a card using a fun striped rainbow print from our new Spring Sunburst 6x6 Paper Pack. I paired it with a polka-dot background from our new Frilly Frames Polka-dot die which was layered together with our Fancy Frames Rectangle die. To fill my dotted background with color, I adhered thin strips of cardstock scraps on the back of my card panel to match the colors in my striped paper. I then framed my little chicks in a grid pattern using one of the circles from our new Staggered Circles die (which will be featured more on Wednesday) using our new Flirty Flowers 6x6 Paper. There's a lot going on in this card, but I love how it all came together!
Card No. 4: For this card I created rows of grass to tuck my bunnies and eggs into using our Sunny Sentiment dies together with our new Dots & Stripes Pastel 6x6 Paper, alternating the dots and stripes. To frame my little scene, I punched out 1/4" circles with a hole punch and adhered them to the back of my Frilly Frames Polka-dot panel using a liquid glue pen. I adore how the colors mimic the colors of the little eggs in the grass. I finished off my card by mounting it onto some lavender floral paper from our Flirty Flowers 6x6 Paper Pack and stamped it with an Easter sentiment from our Happy Thoughts stamps.
Card No. 5: For my last Chubby Bunny project of the day I thought it would be fun to create some happy Easter tags perfect for tying to treat bags or the handle of an Easter basket. For these tags I used our Build-A-Tag #2 die together with papers from three of our four new 6x6 paper packs. I just adore how these papers mix and match together! I finished my tags with that same sentiment borrowed from our Happy Thought stamps.
Card No. 6: For those who prefer less cutesy and a bit more realistic images, I have an Easter card featuring our sweet new mini stamp set called Spring Greetings. For this card I paired the bunnies and tulip from the set with the cross & sentiment from our Easter Wishes stamps. For my sunburst sky and grass I cut them from our new Spring Sunburst 6x6 Paper Pack using a circle die and our Woodland Border Die. I finished my card by cutting a stitched scallop frame using our Fancy Frames Circle dies and mounted it onto a piece of heavyweight cardstock which was embossed using our new Sunburst 6x6 Embossing Folder.
Card No. 7: For my last card of the day I have one more Spring Greetings card. This time I paired the bunnies with an Easter basket from our A Good Egg stamps. To create my background I embossed a piece of white cardstock using the same Sunburst 6x6 Embossing Folder and then blended on spun sugar, squeezed lemonade, twisted citron, tumbled glass and shade lilac distress inks using my favorite Jumbo Dauber. By inking my panel after it was embossed, it emphasizes the sunburst pattern more than it would have if I had inked up my panel beforehand.
To frame my sentiment, I cut two little stitched pennants from our Fancy Frames Rectangle dies and turned them both inward to hide the little tails under my bunnies and basket. I then added a little decorative edge using our Ric Rac Border dies.
I'm so happy you've joined me for today's sneak peek! I'd love to give a $25 gift code to one lucky winner. Make sure to keep checking back all this week for more peeks & prizes for up to five chances to win. The contests run through Saturday at Midnight PST with winners announced here on Sunday, January 6th. :)
a Rafflecopter giveaway Here's a closer look at the new stamps & coordinating dies, 6x6 paper packs and embossing folders used today (available for purchase on Friday, January 4th).
Other Sunny Studio Supplies Used:
 A Good Egg Dies Shop at: Sunny Studio |
 A Good Egg Stamps Shop at: Sunny Studio |
 Easter Wishes Dies Shop at: Sunny Studio |
 Easter Wishes Stamps Shop at: Sunny Studio |
 Sunny Sentiments Dies Shop at: Sunny Studio |
 Memento Tuxedo Black Marker Shop at: Sunny Studio |
 Tsukineko Jumbo Dauber Shop at: Sunny Studio |
 Versafine Onyx Black Ink Shop at: Sunny Studio |
 Ric Rac Border Dies Shop at: Sunny Studio | |
 Fancy Frames-Circle Dies Shop at: Sunny Studio |
 Fancy Frames- Rectangles Shop at: Sunny Studio |
 Happy Thoughts Stamps Shop at: Sunny Studio |
 Build-A-Tag #2 Dies Shop at: Sunny Studio | |


