Friday, June 9, 2017

A Bird's Life Birdhouse Shaker Card with Lexa

Hello everyone! Lexa here with a super fun and sunny shaker card starring the adorable A Bird's Life Stamp and the coordinating dies. All the elements in this set are so sweet – with the little birdies and the bird houses. There are so many possibilities to use this set, and for this card, instead of hanging the tiny houses I used the wooden posts to set them on.


Sunny Studio Stamps: A Bird's Life Birdhouse Shaker Card by Lexa Levana

I started my card with some blending of Spiced Marmalade, Wild Honey and Mustard Seed Distress Inks to create a gradation that looks like a sunset sky. As for the background of my shaker window, I use some patterned paper that looks like a blue sky and a green bush. Mixed yellow sequins are a perfect pair for the color scheme I use. I stamped all the images with Versafine black ink and watercolor them with Distress Markers. I die cut them all together with the coordinating dies after I finished with the coloring. I love the perfect thin white lines around the images. It works like magic!


Sunny Studio Stamps: A Bird's Life Birdhouse Shaker Card by Lexa Levana

I stamped the sentiment on a piece of fishtail banner and adhered it with some foam tape. I just bought a couple of Nuvo Drops and they are so pretty. They look like enamel dots once they settled out. The yellow dots on this card are using the Nuvo Drops.

Thank you so much for visiting the blog today. I hope you have a great day.

Sunny Studio Supplies Used:
  

Thursday, June 8, 2017

Heartfelt Wishes Birthday Candle Wishes Card with Vanessa

Hello fellow stampers! Vanessa here with a birthday card using Heartfelt Wishes. This set may be small, but it is amazingly versatile nevertheless! I didn't want to add anything else and wanted to make it shine on its own. Here comes what I made with it:

Sunny Studio Stamps: Heartfelt Wishes Birthday Candle Wishes Card by Vanessa Menhorn

First, I trimmed a piece of watercolor paper slightly smaller than my card base. Then I stamped and heat-embossed the words for my sentiment. Now I masked off stripes over the words and applied various inks with an ink blending tool. After I had removed the masks, I adhered the panel to the card.

Sunny Studio Stamps: Heartfelt Wishes Birthday Candle Wishes Card by Vanessa Menhorn

I stamped the three candles onto cardstock, colored them with Copics and die-cut them with the Heartfelt Wishes Candle die. Finally, I adhered the images with foam tape and finished the card off with sequins.

A wonderful little set, don't you think? Thank you for stopping by today!

Sunny Studio Supplies Used:
  

Wednesday, June 7, 2017

Two Scoops Ice Cream Parlor Inspired Card with Amy

Hello everybody! Amy here, and today I have a card that features Two Scoops, a fun layering stamp set. This set is perfect for making summer cards and/or for someone that loves ice cream (and who doesn't love ice cream). The results of the stamp layering will definitely "WOWthe recipient. I know I was taken back by how awesome they looked once I found the right color combinations.
Sunny Studio Stamps: Two Scoops Ice Cream Parlor Inspired Card by Amy Yang

To begin, I stamped the ice creams with various dye inks and cut them out with their coordinating dies. I added Ranger Stickles Glitter Glue in Icicle to add shine to the ice creams. After, I put them aside to dry.

Sunny Studio Stamps: Two Scoops Ice Cream Parlor Inspired Card by Amy Yang

To add more interest to the card front (a play on the awning of ice cream parlors), I added a border that I die-cut with one of the dies from Stitched Scallop Dies. I used masking tape to help me color in the sections with alternating dye inks. I adhered the scallop border with two layers of foam adhesive. I just love adding lots of dimension to my cards.

Before adhering the ice creams with a single layer of foam tapes to the card front, I stamped the sentiment "Have A Sweet Day" from Perfect Popsicles set.

Sunny Studio Stamps: Two Scoops Ice Cream Parlor Inspired Card by Amy Yang

For that extra sweetness, I tied a hemp cord around the card front and adhered some pretty sequins for more sparkle. I added fun foam behind it, except in the areas with the cord. To finish, I adhered it to the card base.

Thank you for stopping by the blog, and have a great day!

Sunny Studio Supplies Used:
      

Tuesday, June 6, 2017

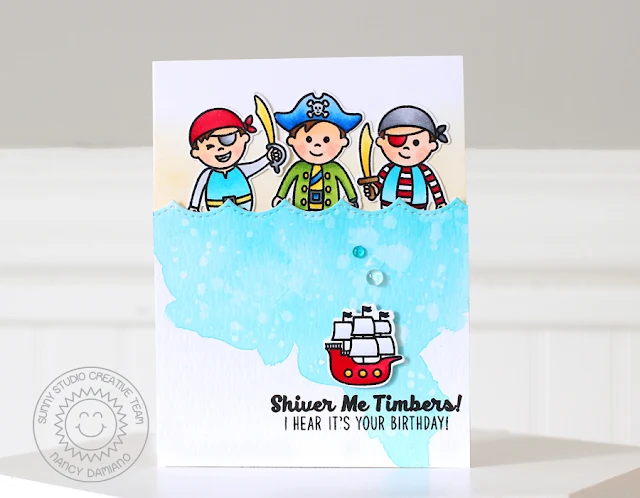
Pirate Pals Boy Themed Birthday Card with Nancy

We are so very excited to welcome Nancy Damiano to our Sunny Studio Stamps design team! Let's get to know Nancy a little better, and check out her first card share she's created for us. 


Hey there Sunny Studio fans, I'm Nancy Damiano and I live in central NJ with my husband and sun. I've been lucky enough to work in the scrapbook industry for 10+ years for many different manufacturers. Recently I took the leap into cardmaking and I'm in love! Coloring my heart out to create a small token of appreciation for family and friends - that's definitely for me. I'm enjoying learning all the crafty techniques that go into these small works of art. When I'm not crafting, I'm traveling, reading and binging on Netflix. I have a passion for the color aqua, Disney World, and paper goods. I’ve been making things for as long as I can remember. I learned long ago that the best things are handmade. 

You can find Nancy on social media here:
Blog | Twitter | Pinterest | Instagram | Facebook

For my first card, I'm sharing a birthday card using the fun Pirate Pals stamp set and coordinating dies. I love these little characters and they were so much fun to color with Copics!

Sunny Studio Stamps: Pirate Pals Boy Themed Pirate Birthday Card by Nancy Damiano

I started the card by using Distress Ink in Broken China on watercolor paper to create the drippy goodness on the front of the card. Next, I used the Stitched Scallops dies to cut a fun wave border. This was the perfect spot for those pirates to peek out of.


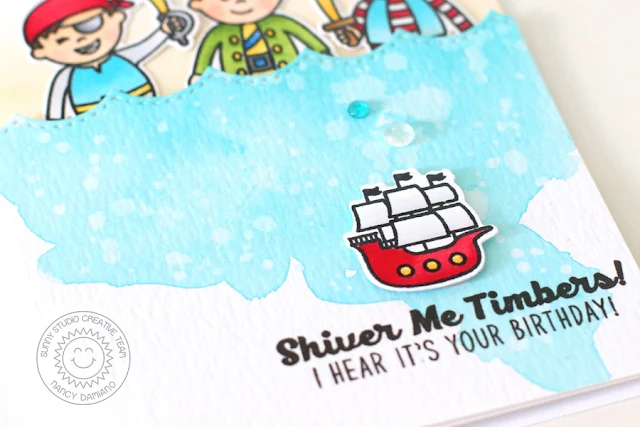
Sunny Studio Stamps: Pirate Pals Boy Themed Pirate Birthday Card by Nancy Damiano

Here’s a close up view of the watercolor and background. I added two sentiments to the lower right hand corner of the card with black ink. It’s the perfect design shelf for that little pirate ship! Two dew drop gems connect the two halves of the card.


Sunny Studio Stamps: Pirate Pals Boy Themed Pirate Birthday Card by Nancy Damiano

Two dew drop gems connect the two halves of the design. This completes the card! I hope this has given you some ideas when creating some Pirate Pal cards of your own.

Sunny Studio Supplies Used:
    

Monday, June 5, 2017

Magical Mermaids Ocean Shaker Card with Eloise

Hi everyone, Eloise here and today I'm using the Magical Mermaids stamp set to create an ocean shaker card. I'm also using pastel colours - which is very different for me. I love using bright and bold colours, not soft pastel colours. So this was indeed a challenge for me today.

Sunny Studio Stamps: Magical Mermaids Ocean Shaker Card with Eloise Blue

To begin I stamped and coloured all my images from the Magical Mermaids stamp set. I tried to use my lightest Copic Markers that I owned to create the soft look in my colouring. Once everything was coloured I used the coordinating dies to cut them out. 

Next up I needed to create the window in my panel. I first cut two 1 1/2" slits in the top and bottom of my panel and then used my knife to create the curved edges going from each cut line. This created the fun wave effect going down the card. I could have used dies, but I figured this would be easier. Once my panel was cut I adhered a piece of acetate behind the opening and then put a double layer of foam tape on the back of the panel and around the opening. 

For my background, I took three colours of Distress Oxide inks and ink blended onto some watercolour cardstock, and then covered it with some snow sparkling embossing powder from WOW! and heat set it. I then filled my shaker panel with a ton of different sequins and seed beads from Pretty Pink Posh and also adhered down some fish and other little accents to my coloured background piece. I then took off the foam tape and adhered my coloured panel to my shaker panel.

Sunny Studio Stamps: Magical Mermaids Ocean Shaker Card with Eloise Blue

I used foam tape to adhere the rest of my images to the front of the shaker panel and then stamped my sentiment also from the Magical Mermaids stamp set onto the white area on the left. 

To finish up the card I added some sparkle onto my mermaids and adhered my panel onto a piece of mint cardstock that I adhered onto a card base. 

That finished up my card for today and I hope you got inspired. I'm still not sure I love the pastel look for me - I love when others do it, but I still think I prefer my bright and bold style! 

Anyway, thanks so much for stopping by!

Sunny Studio Supplies Used: