Monday, December 19, 2016

Simple Gleeful Reindeer Gift Tags with Eloise

Hello everyone, Eloise here and today I'm showing three simple tags using the Gleeful Reindeer stamp set along with the Semi Circle Dies, Fishtail Banner Dies (I and II) and the Merry Die as well. I love creating small scenes on tags - so much fun!

Sunny Studio Stamps: Gleeful Reindeer Christmas Gift Tags by Eloise Blue (using Sunny Semi Circle and Fishtail Banner Dies)

To begin my tags I took some blue cardstock and used the Semi Circles dies to cut off the top of my pieces. I then cut them down to size so I could create arched tags. I then took the Fishtail Banners dies and cut off the bottom of the tags making a upside down v shape on the bottom. Then I took some white cardstock pieces and did the same. I used the Fishtail Banners die on the bottom and then used the Fishtail Banners II set to give the little pierced edge to them, looks so fun! I then used my scissors to cut the top of the white piece, to give it a snowy hill look. I then adhered down the white pieces to the blue tags and cut off the excess. 

To finish up the background on my tags I took a white gel pen and added some dots to look like snow.  I then pulled out the Gleeful Reindeer stamp set and stamped out the reindeers and trees and used my Copic Markers to colour them in. I also used the matching dies to cut them all out. Once they were done I added foam tape and adhered them to my tags. 

Sunny Studio Stamps: Gleeful Reindeer Christmas Gift Tags by Eloise Blue (using Sunny Semi Circle and Fishtail Banner Dies)

For the sentiment I used the Merry die - I love this one and cut it from fun foam and then from silver glitter paper and adhered the two together and then to the bottom of my tags. To finish up my tags I punched a hole and added a silver reinforcer at the tops and then strung through some silver sparkle twine and added a twine bow around the top as well, to make them look a little more finished. I also added some clear wink of stella to my images as well - they have to sparkle, it's Christmas time! :)

Thanks for stopping by today - I hope you got inspired! Check out the rest of the week to see lots of other last minute tag ideas.

- Eloise

Sunny Studio Supplies Usesd:


- Gleeful Reindeer 
- Gleeful Reindeer Dies
- Semi Circles Dies
- Fishtail Banner Dies
- Fishtail Banner II Dies
- Merry Die

Saturday, December 17, 2016

Loads of Christmas Card Inspiration with Juliana Michaels

Hi everyone! It's Juliana Michaels and I'm so happy to be guesting again here on the Sunny Studio blog. Today, I have four cards to share with you using some of the new stamps and dies from the Winter release. These stamps are perfect for creating both Christmas and Winter themed cards.

For my first card, I created a fun Christmas shaker card using the Gleeful Reindeer set. I stamped two flying reindeer images, colored them with Prismacolor Colored Pencils and then die cut them using the coordinating dies. I then created a shaker card and used the snowflake stamps to create a background for inside the shaker. I stamped the sentiment onto white cardstock and adhered it to the front of the card. The final step was to adhere the adorable reindeer to the front of the shaker card so that they look like they are flying across the snowy sky.


Sunny Studio Stamps: Gleeful Reindeer Shaker Christmas Card by Juliana Michaels.

My second card is another Christmas card. I again stamped the images from the Gleeful Reindeer set, colored them with Prismacolor Colored Pencils and die cut them using the coordinating dies. I created the snowy sky background by applying Distress Ink to the cardstock using a foam blending tool. After applying the ink, I used a paint brush to splatter water onto the paper and then dried it by dabbing it with a paper towel. This is such a quick and easy way to create a snowy looking background. I then adhered all the cute images to the card front to create a sweet little scene. For a bit of dimension, I adhered some of them with double sided foam tape.


Sunny Studio Stamps: Gleeful Reindeer Holiday Christmas Card by Juliana Michaels.

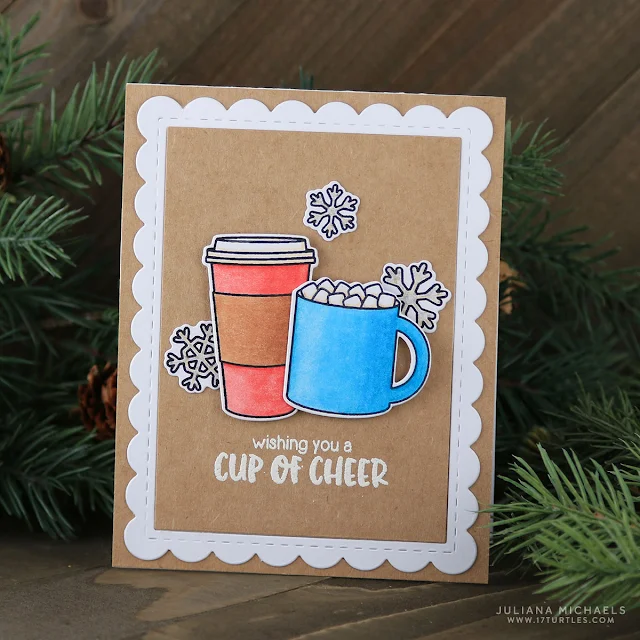
These next two cards use the Mug Hugs stamp and die set. Since I'm a coffee lover, I really enjoyed creating and playing with this set. On the Wishing You A Cup of Cheer card, I used Prismacolor Colored Pencils to color in the mug and cup images. I used a Sakura Gelly Roll Pen in Metallic Silver to color in the snowflakes and add a bit of shine. I stamped the sentiment using Versamark Embossing Ink and heat embossed it with white embossing powder.


Sunny Studio Stamps: Mug Hugs Cup of Cheer Christmas Card by Juliana Michaels.

For my final card, I again used Prismacolor Colored Pencils for my coloring. These are a new to me coloring medium, and I've really enjoyed learning how to color with them. I again used the Sakura Gelly Roll Pen in Metallic Silver to color the snowflakes. I created the background behind the cups by apply Distress Ink to the cardstock using a foam blending tool. For this one I did an all over application of the ink to allow the stamped and die cut images to stand out against it.


Sunny Studio Stamps: Mug Hugs Christmas Card by Juliana Michaels.


Thanks again to Mendi for having me as a guest here at Sunny Studio. I wish all of you a very Merry Christmas and a Happy New Year!

HUGS!
Juliana

Sunny Studio Supplies Used:
      

Friday, December 16, 2016

Merry Christmas From Our Home To Yours Card by Lexa

Hello everyone. Lexa here again with another inspiration for a holiday theme card. I mixed non-holiday stamps and paired them with a Christmas sentiment. I must say that I love how it turned. I've never seen real snow in my life (ever), but I imagine it would be pretty to see snow falling on Christmas night.

Sunny Studio Stamps: Happy Home & City Street Winter Scene Christmas Card by Lexa Levana.

I don't know if you notice it or not, but I used the panel with the Sunny Semi Circles dies that was a leftover from my last card. Never waste them, I'm pretty much a scrapper. Hehe. I stamped some images from different sets :

- The house and mailbox are from Happy Home
- The trees are from Gleeful Reindeer
- The lights and the dog are from City Streets

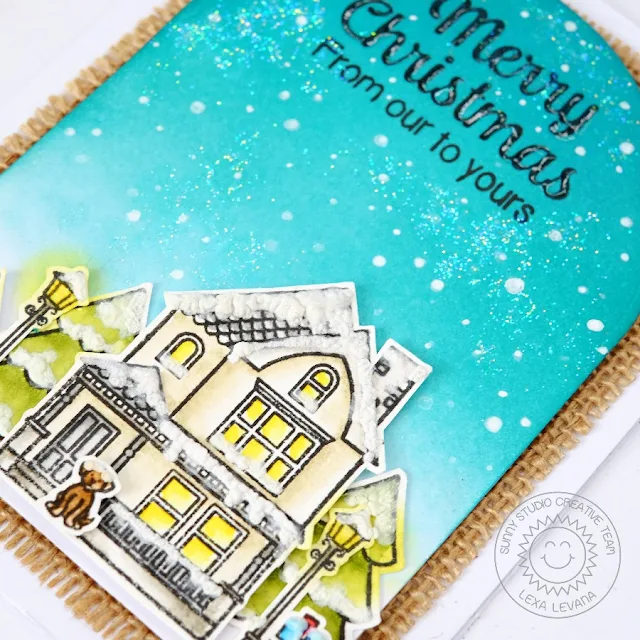
I stamped all of them with Versafine black ink and watercolored them with Distress Markers. After I finished with the coloring, I die-cut all of them with the coordinating dies which was a time saver. I blended Peacock Feathers Distress Ink in the background and then added some snow with a white gel pen. I also added some snow on all the images in the scene, letting a snow marker do it's magic. For an extra sparkle I added Stardust Stickles on the night sky.  It looks so pretty. I stamped the Merry Christmas from Merry Sentiments stamp followed by "from our to yours" from Happy Home stamp set. As a last step, I added the scenery on a piece of burlap with foam tape. Here's a closer look...

Sunny Studio Stamps: Happy Home & City Street Winter Scene Christmas Card by Lexa Levana.

Thank you so much for stopping by. I really hope you like my card. Have an amazing day!

Sunny Studio Supplies Used:


Thursday, December 15, 2016

Festive Holly & Candy Striped Merry Card with Vanessa

Hi everybody! Vanessa here with a shiny, glittery Christmas card using various stamps and dies. I had this metallic candy cane striped patterned paper in my stash and wanted to use it for a card base:

Sunny Studio Stamps: Merry Sentiments Holly Christmas Card by Vanessa Menhorn.

First, I stamped and heat-embossed the sentiment from Merry Sentiments onto a strip of black cardstock, trimmed it and adhered it to the card that I had made from the patterned paper. Now I applied Versamark ink onto a small piece of red cardstock, applied red glitter embossing powder and heat-embossed this. Then I die-cut the merry from it, as well as from black fun foam, layered the die-cuts and adhered them to the card. Using an ink blending tool, I applied green ink to a scrap of white cardstock, die-cut the holly leaves from it and adhered them. Finally, I added red "sequinberries" to the leaves. 

Sunny Studio Stamps: Merry Sentiments Holly Christmas Card by Vanessa Menhorn.

All that glitter. It's really difficult to show on a photo, but let me assure you, it is very festive irl :)

Thank you so much for stopping by today!

Wednesday, December 14, 2016

Wishing You A Merry Christmas Card With Lindsey

Hi, Lindsey here today sharing a card using Holiday Style, Merry Sentiments, and the new Merry word die. All the new holiday sets just work so well together. It's fun to mix and match them to create different looks. Let's get started on how this card came together.


Sunny Studio Stamps: Holiday Style and Merry Sentiments Christmas Card by Lindsey Sams.

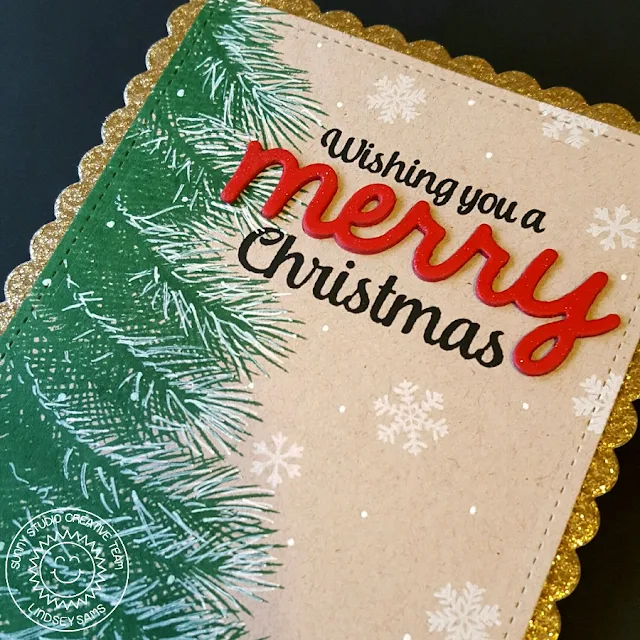
I began by cutting a scalloped rectangle out of gold glitter paper. Then, I cut a smaller stitched rectangle from Kraft card stock. I used the branch from Holiday Style  to create an evergreen tree on the left side of the Kraft rectangle. After I finished the tree, I used a white gel pen to add "snow" to the edge of the branches. Then I stamped part of my sentiment from Merry Sentiments in black. I left a space for the Merry die cut in between. I cut the Merry die three times from red card stock and stacked them together to add some dimension to the card. To finish the card off, I added some snowflakes from the Bundled Up stamp set and some white dots with my gel pen.


Sunny Studio Stamps: Holiday Style and Merry Sentiments Christmas Card by Lindsey Sams.

I love how this card turned out. I think it looks very elegant with the gold trim and bright red "Merry" just popping off the card. It was relatively simple to create, and I hope you'll give these sets a try yourself. Thanks for reading and have a great day!

Sunny Studio Supplies Used: