Friday, November 6, 2015

Happy Home Neighborhood Scene Card with Marion

Hi there, it's Marion here. I hope you have been enjoying all of the Design Team's projects this week using the Happy Home stamp set.

For my card today, I stamped a row of houses from the set and coloured them with Copic markers.  I then fussy cut around the row of houses so I could pop the whole front panel up with foam squares. Before adhering the front panel of houses, I sponged in a sky using Salty Ocean distress ink onto the card base.


I also fussy cut around the tree and popped it up with foam squares, to add another colour to my scene.


Sunny Studio products used:
Thanks for stopping by today,

Marion

Thursday, November 5, 2015

Congrats On Your New Home Card with Elise

Hi everyone! It's Elise today to share with you a card that features the Happy Home stamp set! This set is great for making cards to congratulate friends on their new home!

For this card, I stamped a cute scene with the house, tree, flower and cloud stamps. I colored the scene with Prismacolor pencils and then used a circle die to cut out the scene. For the sentiment, I stamped it onto white card stock and used the Fishtail Banner Dies to add some detail to the edge of the banner. I then attached everything to the card base with some foam tape to give it some dimension.


Here is a close up on part of the cute scene. I really like all of the details that are on the house - it looks so realistic!


Thanks for stopping by and don't forget to stop by again tomorrow for some more design team inspiration! :)

Wednesday, November 4, 2015

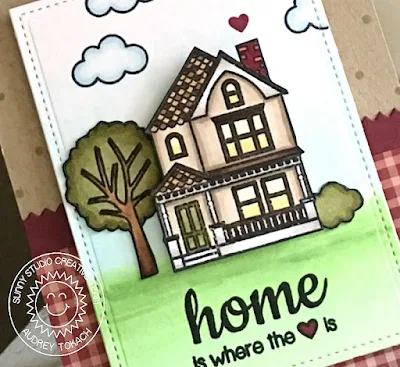
Home is Where the Heart is Happy Home Card with Audrey


Hello there!  Audrey here with a homespun card to share with you!  The new Happy Home stamp set is perfect for lots of occasions.  With several house designs, you can build adorable little scenes.  

I started off my card with a kraft card base.  On the top of the card base, I stamped the tiny sprinkle dot from the Birthday Smiles stamp set to make a subtle polka-dot pattern.  On the bottom, I used a piece of gingham patterned paper from my stash.  To create the focal point for the card, I used my Copic markers to add some color to a diecut rectangle.  Then I stamped, colored and fussy cut the house and tree from the Happy Home stamp set.  The tiny bush on the right side of the house is actually a cloud, but I think it works nicely as shrubs too.  I stamped a sentiment, also from the Happy Home stamp set, on the bottom of the scene, and added some clouds to the sky.  Of course, no happy home is complete without tiny hearts bursting out of the chimney. :)


I hope you enjoyed my project today!  Be sure to check back again tomorrow for lots more inspiration from the design team!  Have a great day! :)

Tuesday, November 3, 2015

A Couple of Happy Home Victorian House cards with Heidi

Hello everybody, Heidi here, welcome back to the Sunny Studio Stamp blog. This week we are introducing the Happy Home stamp set. I create two cards using the Victorian style house that comes in the set. I really love that house and as soon as I saw it I thought of the Disney movie "Up" So here are the cards that I created. I hope you'll enjoy them and that you try this adorable stamp set.


For this card I created a cloudy background by cutting out a cloud border out of a piece of cardstock, and using it to apply light blue ink with a blending tool (you could also use a piece of masking paper or post it note). Then I stamped, colored and cut the house and the balloons. I placed all the elements on the cloudy panel using foam adhesive and added few 4mm red sequins. Finally I stamped the sentiment directly on the panel because the sentiments from this set are bold and sized nicely.


For the second card I stamp the same house and colored it again using Copic Markers. I then cut a heart out of some grey striped patterned paper and I adhered the house using foam adhesive.  Finally I stamped the word "home" directly on to the card and the rest of the sentiment on a banner that I placed by the house.

I love that the houses from this set can be customized the way you want and you can also combine sentiments. The "Happy Home" stamp set is available at the Sunny Studio Stamps shop and right now you can get $5 off your purchase when you spend $49

Thanks so much for stopping by.  We can't wait to see what you create with this set.  Don't forget to tag your creations with #SunnyStudioStamp.  Have a lovely day!

Monday, November 2, 2015

Happy Home Victorian House & Apple Trees Card with Melissa

Hi Everyone, Melissa Here. Today I am going to share a card with you using the Happy Home set. I think these houses are sooo cute! I also love how this set makes it super easy to make a fun scene with the clouds, grass and all the other cute little details. 


To create this card I first stamped the house and the trees on a white piece of card. After I stamped them I masked them off with masking paper. I then stamped the sentiment with white embossing powder, I did this first because when I add the distress ink the embossing will resist it. I then masked off the area where the hill would end up and inked up the sky with Salty Ocean, Tumbled Glass and Faded Jeans Distress Inks. I then removed that mask and masked over the sky that had just been inked. I applied Mowed Lawn and Peeled Paint Distress Inks to that area to make the little grassy hill. I then colored the house and trees with Copic markers. After that I die cut an arch at the top of the card and mounted it onto a plain white card base.


As a finishing touch I added some sequins to the trees to look like little berries or apples and added a little love heart sequin to the sentiment. I hope you enjoyed it! 

Thanks for stopping by!