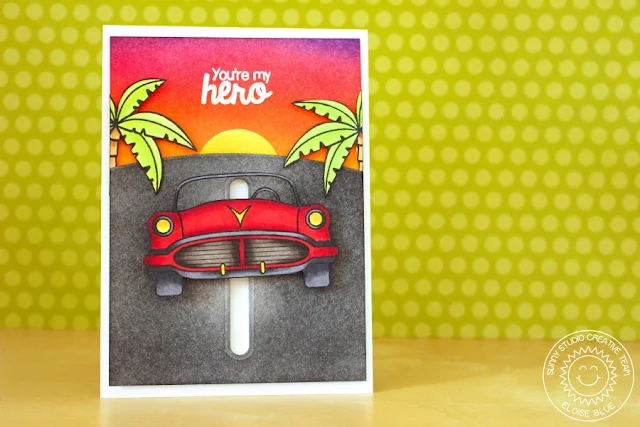
Hello everyone, Eloise here and today I have a fun slider Father's Day card featuring the new Sock Hop stamp set along with a couple of stamps sets from the past release - Island Getaway and Stars and Stripes. I was really inspired to make this card for my Dad for Father's Day, since he loves old cars and I think this car image is perfect for a interactive card.
To begin my card today I stamped out my images from the Sock Hop and Island Getaway stamp sets and used my Copic Markers to colour them in. I then fussy cut out the images with some scissors right along the black line.
I then moved on to creating my scene. For my background I used various colours of Distress Inks to create a sunset, I like to blend on watercolour cardstock because I find it gives a nicer blend. Once I blended the sunset, I used a yellow Distress Ink to make a sun on a separate bit of watercolour paper and then used the circle die from the Fresh and Fruity Coordinating Dies to cut it out. Once that bit was done I cut another piece of watercolour cardstock down and used a curved die to cut the curve on the top of the piece of paper - you could use scissors to do that too. I then took a grey and black Distress Ink to colour the curved piece to look like a road.
Once my ink blending was complete it was time to make the interactive portion of my card. I used a die to cut the the strip in the center of my black ink blended panel, but you could also use a exacto knife and a ruler to create the opening also - I just had a die so I used it. Once that was cut out of the panel I cut some squares of cardstock, adhered and layered them all up to create high enough block to allow my car to slide through - you could also use a coin or something else to do this, but I didn't want my car to slide without actually physically moving it myself. I then took the 'You're My Hero' sentiment from the Stars and Stripes stamp set and white heat embossed it onto my sunset panel in the center towards the top. Now it was time to put my card together.
I started off with adhering the sun flat onto the background also in the center. I then took the two palm trees I stamped, coloured and cut and then foam mounted them onto each sides of the card and cut off the excess. I then used some foam adhesive to pop up my black ink blended panel. But before I adhered it down to my card I cut a strip of white cardstock and placed it under the ink blended panel between the foam adhesive but so I could see it through the die cut strip in the cardstock. I then adhered down my square block onto that white strip and then adhered my coloured car on top of that square block piece. Now I could adhere down the black ink blended piece onto the card base and that finished up my card for today.
I hope you enjoyed my card today and got inspired to create an interactive card, they are so super fun to make! Make sure you check out the blog the rest of the week for more fabulous cards by the design team!
- Eloise
Sunny Studio Products Used:


Super cute slider! TFS
ReplyDeleteOh my goodness, this is so cute!
ReplyDeleteWow! What an awesome card! Your ink blending is so good! Love it all!
ReplyDeletethis one is so much fun, Eloise. any dads would love to receive this card.
ReplyDeleteWow, that is amazing, I need to try this! And your inking is gorgeous!
ReplyDeleteWow, that is amazing, I need to try this! And your inking is gorgeous!
ReplyDeleteWOW super cute slider card!!! LOVE that retro car!!!!
ReplyDeleteHugs,
Jo
This is so exceedingly AWESOME and COOL - what talent you have - the shading and coloring is PERFECTION!!
ReplyDelete