Thursday, September 22, 2016

Autumn Splendor & Woodsy Creatures Fall Card with Vanessa

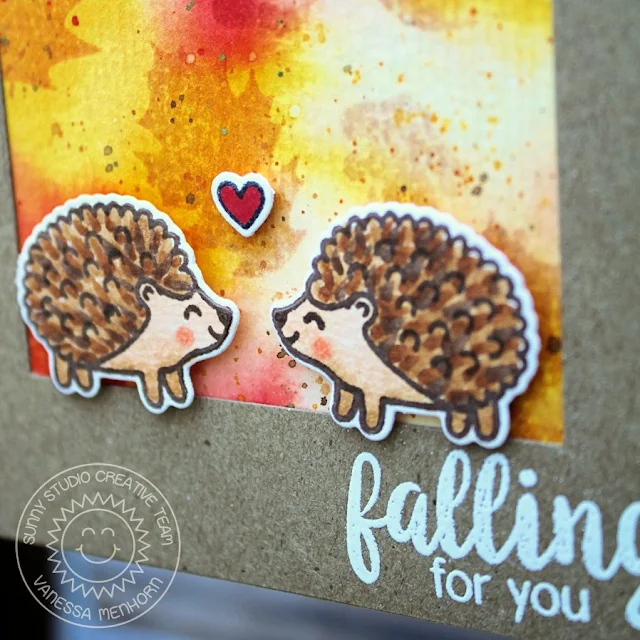
Hey everybody!! Vanessa here with a card combining the cute hedgehogs from Woodsy Creatures with the gorgeous Autumn Splendor set. 


Sunny Studio Stamps: Autumn Splendor & Woodsy Creatures Hedgehog Fall Card by Vanessa Menhorn.

First, I stamped the leaves from Autumn Splendor with Distress Inks onto a panel of watercolor paper. Then I applied water over the stamped images until I was satisfied with the result. I added spritzes of gold, brown and red ink, let the panel dry and adhered it to my card base. Now I trimmed a panel of Kraft cardstock to fit the card, die-cut a rectangle from it and stamped/heat-embossed the sentiment. After I had adhered the frame, I stamped the images, colored them with Copics, die-cut them with the matching dies and adhered them with foam tape. 


Sunny Studio Stamps: Autumn Splendor & Woodsy Creatures Hedgehog Fall Card by Vanessa Menhorn.

I love that the Autumn Splendor set is so versatile! You can easily create clean and graphic designs, as well as a bit messier ones with Distress Inks! I hope you liked today's card! Thanks for stopping by!

Vanessa

Sunny Studio Supplies Used:
      

Wednesday, September 21, 2016

Autumn Splendor Fall Wreath Thank You Card with Lindsey

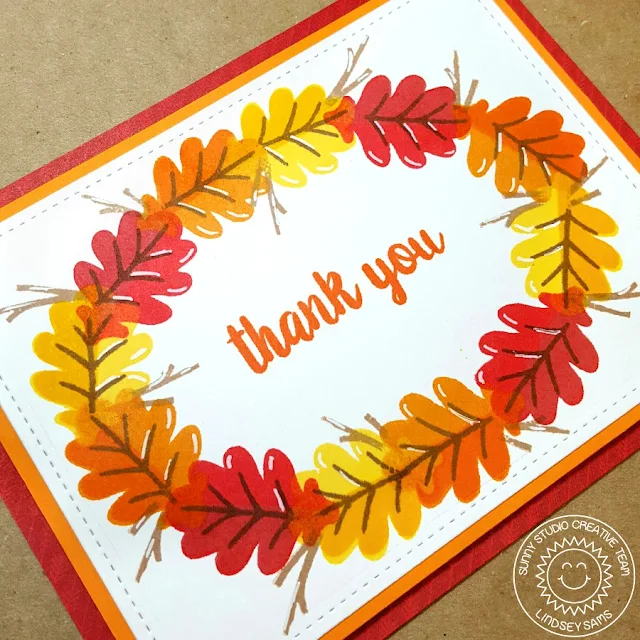
Hi! Lindsey here today sharing a card using the fun leaf layering set Autumn Splendor. I chose to do a fun wreath design using some fall colors, so let's get started on how I created this card.

Sunny Studio Stamps: Autumn Splendor Fall Leaves Thank You Card by Lindsey Sams.

To begin, I cut a medium-sized stitched rectangle from white cardstock. This is the paper I did my stamping on. Before I began stamping, I traced the outline of an oval to give me a guide while stamping my leaves. I chose some reds, oranges, and yellows for the leaf colors. I thought those autumn colors would make a beautiful wreath. Because I knew that some of the leaves would overlap, I started with the darkest color first and worked my way to the lightest color. Then I used the little branch stamp to add a little more pizzazz to the wreath. 

I stamped my sentiment in the middle of the wreath using one of the orange inks. As a final touch, I added some highlights with a white gel pen. Once that stamped panel was finished, I simply double-mounted the white rectangle with an orange and red piece of cardstock. That does it for this card.

Sunny Studio Stamps: Autumn Splendor Fall Leaves Thank You Card by Lindsey Sams.

This card was a lot of fun to make. I had not had much experience with layering stamps, but they are not as challenging as I had thought. I hope you'll give this set a try, and I can't wait to see what you create! Have a great day.

Tuesday, September 20, 2016

Autumn Splendor: Birthday Wishes by Anni

Hey stampers, Anni here.

I had some leaves left over from this card. I often keep stamped images that I didn't use on a project. But to be honest I don't use them a lot.  This time I stored the stamped images with the stamp set (by the way it is the set Autumn Splendor). And obviously that was a good idea because when I grabbed the set I was inspired by the already stamped leaves.


Sunny Studio Stamps: Autumn Splendor Fall Leaves Birthday Card By Anni Lerche.


To achieve the varying colors  I inked up the stamps and added ink in a different color with a Q-tip. The leaf-veins I embossed with copper embossing powder. I am totally in love with copper right now! I then die cut the leaves with the coordinating dies.

To add a little more copper to my card I created a nest of thread and adhered it to my cardbase with some glue dots. 

The sentiment I got from the set Sweet Shoppe. I embossed it in white on a piece of brown cardstock.

I assembled the card and added some sequins and enamel dots. For the finishing touch I made some blots of gold shimmer paint.


Sunny Studio Stamps: Autumn Splendor Fall Leaves Birthday Card By Anni Lerche.

So what about you? Do you keep your stamped (and maybe already colored) images and use them later? Let me know, I'm curious.

Thanks for stopping by and have a sunny week.
Anni


Sunny Studio Supplies Used:
    

Monday, September 19, 2016

Fishtail Banner Challenge Winner & A Holiday Sneak Peek

Hi there!  I just wanted to pop in and share the winner of the Fishtail Banner challenge from last week. Kimberly Rendino is the lucky winner of two stamps from our holiday release and a guest spot on our blog in the coming months.  Yay!


Sunny Studio Stamps: Fishtail Banner II & Autumn Splendor Fall Leaves Card by Kimberly Rendino.

Thank you to everyone who participated.  It means so much to me.  Your designs were all so beautiful and it breaks my heart that you can't all be winners.  I have plans for another challenge next month with a general fall theme so feel free to get a head start and start working on those projects now.  ;)

For those of you who don't follow us on instagram or facebook, I shared a little peek this weekend of what's coming soon as part of our holiday release.  We will have 8 new stamp sets, their coordinating dies and some new standalone dies that I'm pretty excited about too.


They will be coming out on October 7th with a preview week the first week of October so make sure to keep checking back.  In the meantime, Eloise has a beautiful fall card she's sharing in the post below for today so make sure to keep scrolling down.  :)

Big Hugs!


Sunday, September 18, 2016

Autumn Splendor Watercolour Leaves Background with Eloise

Hi everyone, Eloise back today featuring the new Autumn Splendor stamps and dies. I love this set so so much and I knew as soon as I saw this set that I had a specific technique in mind for this. I wanted to use my Distress Inks for stamping. Which we all know Distress Inks don't work well for stamping, but if you spritz them with a little water first, you get a decent impression that I knew would work well for these leaves, especially since leaves aren't perfect anyway. 

Sunny Studio Stamps: Autumn Splendor Distress Watercolored Fall Leaves Card by Eloise.

To begin my card today I first started off with the background. I used a piece of watercolour paper by Tim Holtz since the one he offers is a bright white and I knew a lot of white would be showing today. I then took the stamps from my Autumn Splendour stamp set and put them on different acrylic blocks, it just seemed easier this way. I then inked up the image with a colour of Distress Ink, spritzed a little water (probably from around 20cm (7-8 inches) away) and then stamped down on my cardstock. It takes a little practice to get to know how much water to get on your stamp, but I personally only like it a little wet and not dripping for my stamping - but you have to play around with it a little to get the feel for it right.

Once I stamped all the first layers and the were dry I moved on to the second layers. Did I tell you this is a layering stamp set? It's amazing right?! But it's not an ordinary layering set, the images in this have the half leaves so it works out great. So I just used a darker shade of the same colour in the Distress Ink line, lined it up as best I could (I didn't get it perfect in anyway) and then stamped down, using the same technique as before. I also then used the stem images in the set also and stamped them all down in a brown Distress Ink - I personally didn't bother spritzing for this step, since I didn't feel like it needed it. Once the leaves were done I moved onto the little berries image in the set and filled in some of the gaps, using the same technique as before as well.


Sunny Studio Stamps: Autumn Splendor Distress Watercolored Fall Leaves Card by Eloise.

Once I was done the background I moved onto my focal point. I used the Fishtail Banner Dies to create a vellum banner for the centre of my card. I then had also stamped some extra leaves onto some more watercolour cardstock and die cut them out. Before adhering them down to the vellum banner, I white heat embossed the 'thank you' sentiment from the set onto some black cardstock and then cut that into a banner shape. I foam mounted that onto the vellum banner and then used flat adhesive as well as dimensional adhesive to adhere all the extra leaves and berries coming out from the banner. Once they were all adhered down I flipped over the vellum banner and put adhesive where it wouldn't show and then stuck it down onto the background. I also used a piece of hemp natural twine to tie a bow at the top of my banner. I used a foam sheet behind my panel to adhere down to a kraft card base. For a finishing touch I used a little Wink of Stella in the clear to put on top of my die cut leaves.

That finished up my card for today, I hope you enjoyed and got inspired. Make sure you stop by the blog for the rest of the week to see how the ladies used this stamp set also! It's gonna be a great week. :) 


Sunny Studio Supplies Used: