Thursday, March 9, 2023

Spring Bouquet Cards with Marine and Waleska

Hey crafty friends! Marine here, back with more flowers to brighten your day! Today's card features Spring Bouquet, a beautiful layering stamp set that includes three types of flowers: daffodil, hyacinth and iris. 

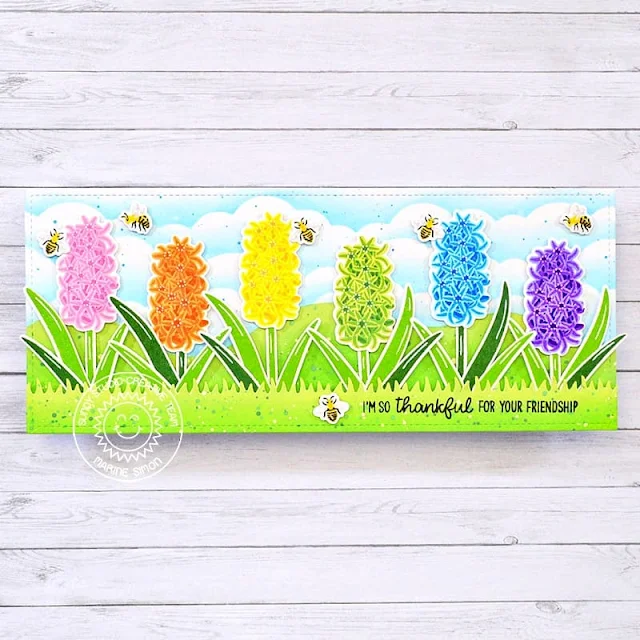
Sunny Studio Stamps: Spring Bouquet Friendship Card by Marine Simon (featuring Sunflower Fields, Words Of Gratitude, Picket Fence Border Dies)

I decided to go with hyacinths only in order to create like a field of flowers, and the first thing I did was to stamp six of them on Strathmore bristol smooth cardstock using distress oxide inks. Here are the color combinations I picked for each flower & greenery:

Pink: spun sugar + kitsch flamingo + picked raspberry
Orange: dried marigold + carved pumpkin + ripe persimmon
Yellow: squeezed lemonade + mustard see + fossilized amber
Green: shabby shutters + mowed lawn + rustic wilderness
Blue: tumbled glass + salty ocean + blueprint sketch
Purple: shaded lilac + wilted violet + villainous potion
Greenery: mowed lawn + rustic wilderness

Sunny Studio Stamps: Spring Bouquet Friendship Card by Marine Simon (featuring Sunflower Fields, Words Of Gratitude, Picket Fence Border Dies)

Because Spring is coming soon, I decided to add a few bees. These are from Sunflower Fields, and again, I used distress oxide inks to stamp the different parts: mustard seed for the body, black soot for the dark details, and lost shadow for the wings. Once the flowers, leaves and bees were done, I cut everything using the coordinating dies, and moved on to the background.

To be able to fit the six flowers on my card, I went for a slimline design. I cut an 8,5 x 3,5 inches Strathmore bristol smooth panel, and I did some stenciling using distress oxide inks. On the lower part, I created a hill border using shabby shutters + mowed lawn. And on the upper part, a cloudy sky using tumbled glass + salty ocean. Next I cut another 8,5 x 3,5 inches Strathmore bristol smooth panel, and cut a slim grass border out of it using a die from Picket Fence Border and I colored that grass border using shabby shutters + mowed lawn oxide inks.

Sunny Studio Stamps: Spring Bouquet Friendship Card by Marine Simon (featuring Sunflower Fields, Words Of Gratitude, Picket Fence Border Dies)

Next I stamped my "I'm so thankful for your friendship" greeting from Words Of Gratitude on the grass border using black ink, I attached the border at the bottom of my slimline panel using foam squares, and then the hyacinths, leaves and bees using foam squares again. And finally I added highlights and details on the images using a white gel pen.

And that's it! This card definitely calls for Spring, and I can't wait to see cute bees buzzing and flying from one flower to another in a few weeks! Thanks so much for stopping by, and see you next time!

-------------------------------------------

Hello there, Waleska here! Today's card is very colorful and brings you spring feel using Iris flowers from the Spring Bouquet Stamp from the latest release.

Sunny Studio Stamps: Spring Bouquet Miss You Card by Waleska Galindo (featuring Big Bold Greetings)

To start this card I stamped all the Iris flowers with the following inks: Lawn Fawn Fresh Lavender, Lawn Fawn Juice Box and Lawn Fawn Blue Joy and for the center of the flower I used a yellow copic marker,  I search for real Iris colors and this turned out exactly like the ones I like. I then stamped the leaves with Lawn Fawn Jalapeno Ink. I wanted a very contrasting background so I decided to use Oxide Inks in Colors Picked Raspberry and Wild Honey I added water splashes and some sparkle watercolor for more interest too.

Sunny Studio Stamps: Spring Bouquet Miss You Card by Waleska Galindo (featuring Big Bold Greetings)

I wanted my card to look like a field with Irises so I arrange them in a harmonic way and adhere them to the inked panel.  Finally I added the sentiment from the Big Bold Greetings.  This beautiful flowers look so realistic with all the layers and can be stamped with all kinds of different colors!

Thank you so much for stopping by today! Have a wonderful rest of your day!

Sunny Studio Supplies Used:

Picket Fence Border Dies
Shop at:
Sunny Studio
Words of Gratitude Stamps
Shop at:
Sunny Studio
Sunflower Fields Stamps
Shop at:
Sunny Studio
Sunflower Fields Dies
Shop at:
Sunny Studio
Big Bold Greetings Stamps
Shop at:
Sunny Studio
Big Bold Greetings Dies
Shop at:
Sunny Studio
Spring Bouquet Stamps
Shop at:
Sunny Studio
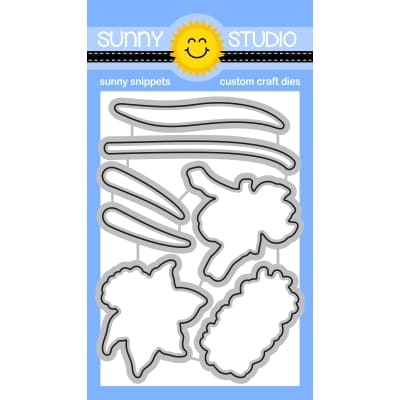
Spring Bouquet Dies
Spring Bouquet Dies
Shop at:
Sunny Studio

Wednesday, March 8, 2023

Build-A-Birdhouse Cards with Marie and Catherine

Hey there crafty friends, Marie here! Today I am sharing a very spring inspired birthday card featuring Sunny Studio Stamps' Build-A-Birdhouse Dies. These dies create the cutest little birdhouses that pair so perfectly with their Out On a Limb Dies

Sunny Studio Stamps: Build-A-Birdhouse Die Focused Card by Marie Marco (featuring Big Bold Greetings, Out On A Limb Dies)

To begin, I used an A7 size die to cut out my card base from 110 lb heavyweight cardstock paper. I used bristol smooth cardstock for my background panel which I ink blended using Salvaged Patina Distress Oxide Ink. Then I adhered my inked panel to my cardbase using double sided tape adhesive. 

Next, I die cut all the pieces from the Build-A-Birdhouse Dies, the Out On a Limb Dies, as well as the adorable tiny flowers from the Wonderful Windows Dies. I cut out my birdhouses from watercolor paper, and used watercolor pencils from Faber-Castell to color each one in a shabby chic style. To give the houses dimension I die-cut the roof about 5 times and stacked them up. For my flowers I cut them from pink shades of cardstock paper. All the tree limbs and leaves were cut from bristol smooth cardstock and inked using Vintage Photo and Mowed Lawn Distress inks. After inking, I went over some of the die cuts with color pencil for some extra shading.

Sunny Studio Stamps: Build-A-Birdhouse Die Focused Card by Marie Marco (featuring Big Bold Greetings, Out On A Limb Dies)

I positioned all my tree limbs to create a frame. From there, I built up my scene by adding all the leaves and flowers using Bearly Art Precision Craft Glue. The last thing I added were the birdhouses. I used some foam tape on the back of each house to create a floating dimensional look and I added some gold twine to the back of the houses and glued it to the top of the tree branch. I then created some super tiny bows and attached them to the top for the cutest hanging birdhouses! 

Sunny Studio Stamps: Build-A-Birdhouse Die Focused Card by Marie Marco (featuring Big Bold Greetings, Out On A Limb Dies)

Moving on to the inside of my card, I stamped out a big Happy Birthday Sentiment using the Big Bold Greetings Stamp and cut it out using the Big Bold Greetings Dies. I used some extra leaves and flowers to create some cute floral accents and called this card done! 

Thanks so much for joining me on this week's card inspiration! Until next time, Happy Crafting! 

--------------------------------------------

Hello Crafty Friends! Catherine here, and today I am so excited to share another card created with Build-A-Birdhouse Dies. I thought it would be fun this time to use a circle slider die so that the birds can fly around their homes. 

Sunny Studio Stamps: Build-A-Birdhouse Die Focused Card by Catherine Cohen (featuring Little Birdie, Fluffy Cloud Border Dies, Out On A Limb Dies)

There are many fabulous circle slider dies out in the market. The one that I used is a generic one listed in my blog link below. There are essentially three pieces that is required for the circle: circle slider track (A), circle used as a slide backer (B), slider disc (C). 

Sunny Studio Stamps: Build-A-Birdhouse Die Focused Card by Catherine Cohen (featuring Little Birdie, Fluffy Cloud Border Dies, Out On A Limb Dies)

To start, I ink blended two (one will be the front panel and the other will be the back) A2 white card stock with Tumbled Glass Distress Oxide using a cloud stencil that I created with Fluffy Clouds Border Dies. I splattered both with blue watercolor paint. Once dried, I die cut the front panel with the circle slider track (A). I die cut the slide backer out of white cardstock (B). I attached the slider disc (C) onto the slide backer (B) using a glue gun.  I put the slider disc inside front panel with the circle track. (A).  I attached the front panel onto the back panel with foam tape.

Next, I die cut the birdhouses from Build-A-Birdhouse Dies and branches from Out On A Limb Dies. I ink blended the birdhouses with Scattered Straw, Wilted Violet, and Shaded Lilac Distress Oxides. I ink blended the branches with Antique Linen and Tea Dye Distress Oxides and the coordinating leaves with Shabby Shutters and Bundled Sage Distress Oxides. I thought it would be pretty to add some flowers so I used the flower die from Window Quad Square Dies and ink blended the flowers with the same inks.

Sunny Studio Stamps: Build-A-Birdhouse Die Focused Card by Catherine Cohen (featuring Little Birdie, Fluffy Cloud Border Dies, Out On A Limb Dies)

I stamped and die cut the cute birds from Little Birdie Stamps and colored the birds with Copic Markers listed in my blog link below. I die cut an extra die cut for each of the two birds that I wanted to attach onto the slider discs for extra support. I glued the birds onto the slider discs with a hot glue gun. I attached the birdhouses onto the branches with some yellow bakers twine. I finished off the card with a reverse scalloped frame and a sentiment from A Bird's Life Stamps.

Thank you so much for joining me today. Please feel free to visit me at Crafti-Cat. Have a wonderful day!

Sunny Studio Supplies Used:

A Bird's Life Stamps
Shop at:
Sunny Studio
Fluffy Clouds Border Dies
Shop at:
Sunny Studio
Window Quad Square Die
Shop at:
Sunny Studio
Little Birdie Stamps
Shop at:
Sunny Studio
Little Birdie Dies
Little Birdie Dies
Shop at:
Sunny Studio
Out on A Limb Dies
Out on A Limb Dies
Shop at:
Sunny Studio
Big Bold Greetings Stamps
Shop at:
Sunny Studio
Big Bold Greetings Dies
Shop at:
Sunny Studio
Build-A-Birdhouse Dies
Shop at:
Sunny Studio
Wonderful Windows Dies
Shop at:
Sunny Studio

Tuesday, March 7, 2023

Big Bold Greetings Cards with Isha and Lien

Hello everyone, Isha here with you! Today I have a CAS floral card featuring the Big Bold Greetings stamp and coordinating dies. These sentiments are really lovely with beautiful fonts and size.

Sunny Studio Stamps: Big Bold Greetings Birthday Card by Isha Gupta (featuring Tranquil Tulips, Fancy Frame Dies)

I started by sponging squeezed lemonade distress ink to a white panel. Flick some water and white paint. I then stamped the tulips and leaves from the Tranquil Tulips stamp set, it has got layering stamps for beautiful results. Die-cut using the coordinating dies

Adhere the inside of the Fancy Frame Rectangle to the white panel. Adhere this panel to a pink card base.

Sunny Studio Stamps: Big Bold Greetings Birthday Card by Isha Gupta (featuring Tranquil Tulips, Fancy Frame Dies)

Adhere the images. Stamp the word "Happy Birthday" from the Big Bold Greetings stamp set using Versamark ink, sprinkle WOW! oiled slate embossing powder. Heat set and die-cut using the coordinating dies. Die-cut the word using dark pink card, stack this behind the embossed sentiment slightly offset.

Adhere to the card. Thank you for stopping by and have a nice day!

------------------------------------------

Hi crafty friends! It's Lien here, back with a very clean and simple card that makes your sentiments the star of the show. 

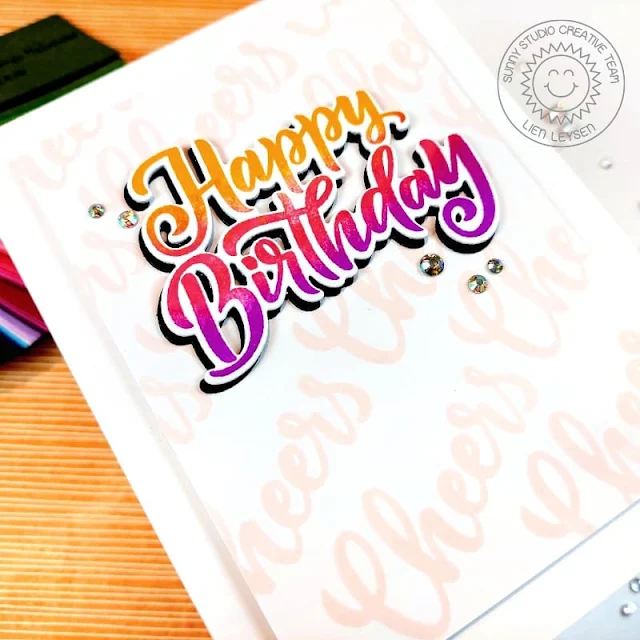
Sunny Studio Stamps: Big Bold Greetings Birthday Card by Lien Leysen

I'm using the 
Big Bold Greetings stamp set today and I started out by stamping my main Happy Birthday sentiment. I wanted to make it bright so I thought I'd do some ombre stamping with it. This is a very easy way to step up your large sentiment stamps if you have a Misti or another stamping tool. 

It's important to start inking with your lightest shade because you want to avoid cleaning your stamp as much as possible for the best result. I started with orange, inking up the top third of my stamp and dabbing away the harsh edge with a cloth before stamping it down onto my white cardstock. I then added some pink ink in the center and repeated the process a third time with purple. 

Sunny Studio Stamps: Big Bold Greetings Birthday Card by Lien Leysen

I cut it out with the Coordinating dies, also cutting out additional white layers and one layer of black cardstock. I'll stack the white layers behind the stamped sentiment and add those slightly offset on top of the black to add an additional shadow. 

For my background I used the Cheers stamp from the same Big Bold Greetings stamp set and stamped it repeatedly, diagonally across my background. I trimmed it down to leave a nice white border and propped it up on a piece of cardboard for sturdy dimension. I added the die cut sentiment on top and finished it up with a handful of Iridescent Jewels.

Sunny Studio Supplies Used:

Fancy Frames- Rectangles
Shop at:
Sunny Studio
Big Bold Greetings Stamps
Shop at:
Sunny Studio
Big Bold Greetings Dies
Shop at:
Sunny Studio
Tranquil Tulips Stamps
Shop at:
Sunny Studio
Tranquil Tulips Dies
Shop at:
Sunny Studio

Monday, March 6, 2023

Wonderful Windows Cards with Bobbi and Cathy

Hi friends! Bobbi here with the new Wonderful Windows dies by Sunny Studio Stamps. There is nothing I want more right now than a view out my window filled with flowers and singing birds! Unfortunately, all I see in Wisconsin today is barren trees and a snow-covered landscape. Spring is coming soon and this card makes me excited for the upcoming season. I’m using the Wonderful Windows Dies along with the Little Birdie stamps and dies for this card.

Sunny Studio Stamps: Wonderful Windows Die Focused Card by Bobbi Lemanski (featuring Little Birdie)

To make this 5″ X 7″ card, I cut my windows from white cardstock (Neenah 80lb Solar White) and added a little aging to the largest frame using Copics in a warm gray, W3, W1, W0.  I also cut the window frame from black cardstock and the curtains from white. This combination reminds me of the windows you’d see on older townhouses in New York City.  

Sunny Studio Stamps: Wonderful Windows Die Focused Card by Bobbi Lemanski (featuring Little Birdie)

Next, I adhered a yellow cardstock behind the black frames and shadowed the frames, rails, stiles, and muntins using a darker yellow with Copics Y28 and Y26. The curtain folds were shadowed with W4, W3, W1 to make the pleated layers stand out a bit more. I added 1/8″ strips of metallic gold cardstock to the tops of both frames. Once assembled, I added some white lines to the glass panes to resemble glare on the glass using my white Gelly Roll pen.

Sunny Studio Stamps: Wonderful Windows Die Focused Card by Bobbi Lemanski (featuring Little Birdie)

To make the 5″ X 7″ card background, I used a brick stencil and Distress Oxide Ink in Lost Shadow to create the light bricks on my card base’s front panel. I used a soft touch of Black Soot around the corners’ edges of the card for a scene shadow. Next, I added black window boxes and filled them with flowers and leaves from the die set. I added so many that you can’t see the black boxes! I kept the flowers simple in white and red with the green leaves. I wanted the boxes to flow over with flowers and foliage so I used my Copic marker in YG67 to create the trailing greenery and yellow pearl pen to add tiny yellow blossoms.

Sunny Studio Stamps: Wonderful Windows Die Focused Card by Bobbi Lemanski (featuring Little Birdie)


Lastly, I added two blue birds from the Little Birdie set. I colored them in BG72, BG11, B02, R11, and E50. I nestled one in the flower box and one in front of the window. I think the birds add just the right touch to finish this window scene!


Thanks for stopping by today. If you want to see more ideas and inspiration from me, subscribe to my blog, BobbiHartDesign.com. I’ll send you updates on new posts! You can also find me on Instagram as @BobbiHartDesign and on Facebook as BobbiHartDesign


---------------------------------------------


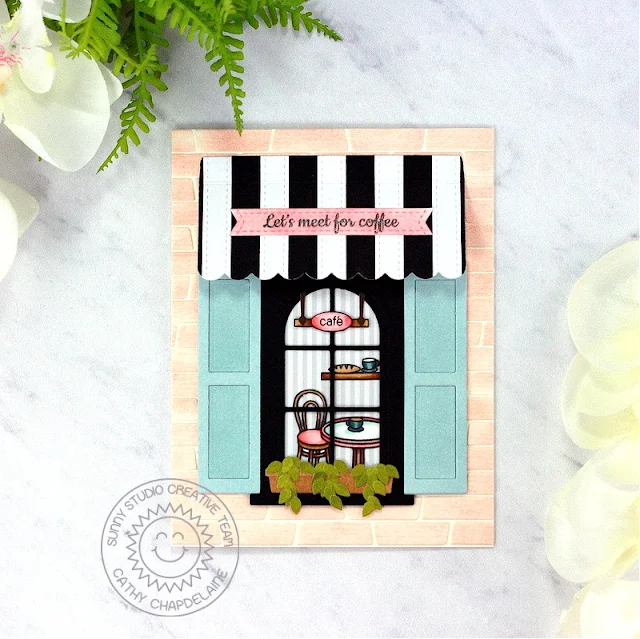
Hey friends! Cathy here today and I’m excited to share a Parisian Café inspired card featuring the Wonderful Windows Dies. There are so many ways to use these windows on your projects and I couldn’t wait to share this one!


Sunny Studio Stamps: Wonderful Windows Die Focused Card by Cathy Chapdelaine (featuring Sweet Treats House Add-On Dies, Paris Afternoon)
 
I started this A2 size card with the brick of the store front. I cut a piece of ivory cardstock 4 1/4" x 5 1/2". I inked a second piece of the ivory cardstock with Tattered Rose Distress ink and I die-cut this piece numerous times using a planter box die from the Sweet Treat House Add-on Dies. I adhered these pieces to the 4 1/4" x 5 1/2" cardstock piece starting at the bottom and working my way up. I then adhered the panel to an A2 card front.


Sunny Studio Stamps: Wonderful Windows Die Focused Card by Cathy Chapdelaine (featuring Sweet Treats House Add-On Dies, Paris Afternoon)
 
Next, I die-cut the large window from the Wonderful Windows Dies from black cardstock and adhered a 1 3/4" x 3” piece of acetate to the back of the window. I then cut a piece of patterned paper from the Subtle Grey Tones Paper 1 1/2" x 2 3/4” for the inside of the café.

I stamped a chair, table, coffee mugs and a baguette from the Paris Afternoon Stamps and a table from the Cozy Christmas Stamps (I used this for the shelf) on Neenah Classic Crest 80lb solar white cardstock, colored them with Copics and fussy cut them out. I then adhered them to the patterned paper making sure they would show through the windowpane. I applied adhesive to the back of the window frame and adhered it over the paper piece.


Next, I adhered the window to the card front, centered and 1/2" from the bottom of the card. I inked a piece of white cardstock with Speckled Egg Distress ink and die-cut the shutters. I die-cut the outer portion of the shutters twice and layered them for extra dimension. I inked a piece of white cardstock with Tea Dye Distress ink for the planter box and Peeled Paint Distress ink for the leaves.


For the awning, I cut a piece of white cardstock 2 1/2" x 4” and die-cut black and white cardstock with the ribbon die from the Ribbon & Lace Border Dies. Starting on one edge of the cardstock, I adhered the ribbon strips alternating in color.


I then placed the bag topper die from the Sweet Treat House Add-on Dies cutting face down on the ribbon piece (evenly positioned on the side black ribbon strips), taped it in place and die-cut the piece. I folded along the score line at the top, applied adhesive to just the top edge and adhered it 1/2" from the top of the card. Adhering just the top edge allows the awning to stick up a bit from the card front but will still push down flat to fit in an envelope.


Sunny Studio Stamps: Wonderful Windows Die Focused Card by Cathy Chapdelaine (featuring Sweet Treats House Add-On Dies, Paris Afternoon)
 
To finish, I stamped the café from the City Streets Stamps, colored the café sign and fussy cut it out. I die-cut 2 hinges from the Wonderful Windows Dies from black cardstock to hang the sign at the top of the window. I inked a piece of white cardstock with Saltwater Taffy Distress ink and die-cut it using the ribbon die from the Ribbon & Lace Border Dies. I then heat embossed a sentiment on it from the City Streets Stamps and adhered it across the awning.


I hope you enjoyed my café card and thanks for stopping by today! For more inspiration, please visit my blog www.inkredibleadventures.com and you can also find me on Instagram as @cathy.chapdelaine.


Sunny Studio Supplies Used:

City Streets Dies
City Streets Dies
Shop at:
Sunny Studio
City Streets Stamps
City Streets Stamps
Shop at:
Sunny Studio
Subtle Grey Tones Paper
Shop at:
Sunny Studio
Sweet Treats House Add-on
Shop at:
Sunny Studio
Little Birdie Stamps
Shop at:
Sunny Studio
Little Birdie Dies
Little Birdie Dies
Shop at:
Sunny Studio
Paris Afternoon Stamps
Shop at:
Sunny Studio
Paris Afternoon Dies
Shop at:
Sunny Studio
Cozy Christmas Stamps
Shop at:
Sunny Studio
Cozy Christmas Dies
Cozy Christmas Dies
Shop at:
Sunny Studio
Ribbon & Lace Dies
Ribbon & Lace Dies
Shop at:
Sunny Studio
Wonderful Windows Dies
Shop at:
Sunny Studio