Friday, September 3, 2021

Forest Tree Stencil Focused Cards with Audrey and Tammy

Hello friends! It's Audrey here with my first post as a new (returning) design team member and I couldn't be more thrilled! I have a card today using the fun new Forest Trees Stencils

Sunny Studio Stamps: Forest Tree Stencils Feeling Frosty Lacy Snowflake Dies Christmas Card by Audrey Tokach

To create my card, I started off with a piece of light aqua cardstock measuring 4" x 5.25". I used all three layers of the stencils, starting at the top of the panel with the lightest ink, getting darker with each layer. For this particular card, I used Salvaged Patina, Peacock Feathers and Lucky Clover Distress Oxide inks. Then, I splattered on some watered down white acrylic paint to add some snow. I stamped and colored three adorable snowmen from the Feeling Frosty stamp set, along with two trees from the set, and die cut them with the coordinating Feeling Frosty dies

Sunny Studio Stamps: Forest Tree Stencils Feeling Frosty Lacy Snowflake Dies Christmas Card by Audrey Tokach

To set the scene, I added a snow bank using the Slimline Nature Borders dies, and for some fun color, I added a tiny strip of striped paper from the new All is Bright 6x6 paper pad. I added a trio of Lacy Snowflakes to the sky, and stamped a sentiment from Feel Frosty onto a banner die cut from the Stitched Rectangles die set to finish off the panel, and then popped the panel up on an A2 card base with some foam tape.

-------------------------------------------

Hello! Tammy here with a Christmas card featuring the brand new, Forest Tree Stencils. I love that it has 3 stencils that layer perfectly to create the look of a lush forest, or you can use them individually to create a single row of fir trees! 

Sunny Studio Stamps: Forest Tree Stencils Gleeful Reindeer Santa Claus Lane Christmas Card by Tammy Stark

To begin, I cut an A2 piece of Bristol smooth cardstock and ink blended the top with Chipped Sapphire, Faded Jeans, and Stormy Sky Distress Oxide inks. Next, I placed the Forest Trees Stencils and ink blended Pine Needles, Evergreen Bough, and Picket Fence Distress Oxides to create the forest background. I then splattered some water onto the top part of the inked panel, then added some white acrylic paint onto the entire background to give it the look of fresh fallen snow.

Next, I stamped, colored with Copic markers, and die cut the images from the following sets:
Santa Claus LaneCoordinating Dies
Gleeful ReindeerCoordinating Dies

Sunny Studio Stamps: Forest Tree Stencils Gleeful Reindeer Santa Claus Lane Christmas Card by Tammy Stark

I attached the stamped images to the background using foam tape for dimension. To complete my card, I die cut white cardstock using the Fancy Frames Rectangle Dies and attached to my card with foam tape to frame the scene. Lastly, I white heat embossed the sentiment onto a strip of black cardstock to finish!

Thanks so much for stopping by! Have a fantastic weekend!

Sunny Studio Supplies:

Gleeful Reindeer Dies
Shop at:
Sunny Studio
Gleeful Reindeer Stamps
Shop at:
Sunny Studio
Stitched Rectangle Dies
Shop at:
Sunny Studio
Lacy Snowflakes Die
Lacy Snowflakes Die
Shop at:
Sunny Studio
Santa Claus Lane Stamps
Shop at:
Sunny Studio
Santa Claus Lane Dies
Shop at:
Sunny Studio
Feeling Frosty Stamps
Shop at:
Sunny Studio
Feeling Frosty Dies
Feeling Frosty Dies
Shop at:
Sunny Studio
Slimline Nature Borders
Shop at:
Sunny Studio
Forest Trees Stencils
Shop at:
Sunny Studio
All Is Bright Paper
All Is Bright Paper
Shop at:
Sunny Studio

Thursday, September 2, 2021

Bewitching Cards with Marine and Anja

Hello everyone, Marine here. I'm super excited to share my very first card with you on Sunny Studio's blog! It's a spooky cute Halloween interactive card showcasing the brand new Bewitching stamp set. And because I love to create stories on my cards, I also used a bunch of images from previous releases to make my scene come to life!

Sunny Studio Stamps: Bewitching Harvest Mice Farm Fresh Holy Night Seasonal Trees Halloween critter Card by Marine Simon

The story here is that during Halloween night three little mice are gathered in the woods to experience new magic tricks and unfortunately one of those mice is accidentally turned into a cat because the spell was wrong.

I stamped the images using an alcohol marker friendly black ink, cut them all using the coordinating dies, and then colored everything using my Spectrum Noir markers and Graph'it Brush markers.

Here are the stamp and die sets I used to create this card:
Bewitching: cat, witch hat, cauldron and sentiment
Harvest Mice: mice and pumpkins
Seasonal Trees: pine trees
Holy Night: stable
Garden Fairy: wand
Enchanted: stars
Farm Fresh: crows
Tiki Time: torch
Picket Fence: grass border

Sunny Studio Stamps: Bewitching Harvest Mice Farm Fresh Holy Night Seasonal Trees Halloween critter Card by Marine Simon

For the background, I used some oxide inks to create a night sky: peacock feathers, lucky clover, chipped sapphire and black soot. Added lots of texture to make that sky more interesting and pretty: water drops, white acrylic paint, black drops and liquid stardust.

I leave you with the link to the process video. Feel more than welcome to check it out to see the whole interactive process! Thank you so much for stopping by, see you next time!

------------------------------------------

Hi everyone, Anja here and I'm excited to share my first Holiday Release inspiration project. Today we're featuring the cute Bewitching Stamps.

Sunny Studio Stamps: Bewitching Harvest Mice Farm Fresh Fall Friends Halloween critter Card by Anja Bytyqi

I started off with a white A2 card base on which I added tiny black ink splatters. Next, I cut random strips from four colors of cardstock and repeated them to create a background.

The stamp set comes with the adorable kitty, a witch hat, a cauldron and a trio of bubbles. I also picked three pumpkins (Fall FriendsHarvest Mice) and a scarecrow (Farm Fresh) to create a little Halloween scene. All images were stamped in Memento Tuxedo Black Ink and colored with Copic Markers. I used the coordinating dies to cut everything out.

Sunny Studio Stamps: Bewitching Harvest Mice Farm Fresh Fall Friends Halloween critter Card by Anja Bytyqi

Finally, I stamped the sentiment in VersaFine Onyx Black Ink onto a white cardstock strip and assembled the card by adhering everything with liquid glue.

Thank you so much for stopping by! Have a great day!

Sunny Studio Supplies Used:

Tiki Time Stamps
Tiki Time Stamps
Shop at:
Sunny Studio
Tiki Time Dies
Tiki Time Dies
Shop at:
Sunny Studio
Picket Fence Border Dies
Shop at:
Sunny Studio
Bewitching Stamps
Bewitching Stamps
Shop at:
Sunny Studio
Bewitching Dies
Bewitching Dies
Shop at:
Sunny Studio
Fall Friends Stamps
Fall Friends Stamps
Shop at:
Sunny Studio
Fall Friends Dies
Fall Friends Dies
Shop at:
Sunny Studio
Seasonal Trees Stamps
Shop at:
Sunny Studio
Seaonal Trees Dies
Seaonal Trees Dies
Shop at:
Sunny Studio
Enchanted Stamps
Enchanted Stamps
Shop at:
Sunny Studio
Enchanted Dies
Enchanted Dies
Shop at:
Sunny Studio
Farm Fresh Stamps
Farm Fresh Stamps
Shop at:
Sunny Studio
Farm Fresh Dies
Farm Fresh Dies
Shop at:
Sunny Studio
Harvest Mice Stamps
Harvest Mice Stamps
Shop at:
Sunny Studio
Harvest Mice Dies
Harvest Mice Dies
Shop at:
Sunny Studio
Holy Night Stamps
Holy Night Stamps
Shop at:
Sunny Studio
Holy Night Dies
Holy Night Dies
Shop at:
Sunny Studio
Garden Fairy Stamps
Garden Fairy Stamps
Shop at:
Sunny Studio
Garden Fairy Dies
Garden Fairy Dies
Shop at:
Sunny Studio

Wednesday, September 1, 2021

Stitched Oval Die Focused Cards with Franci and Julia

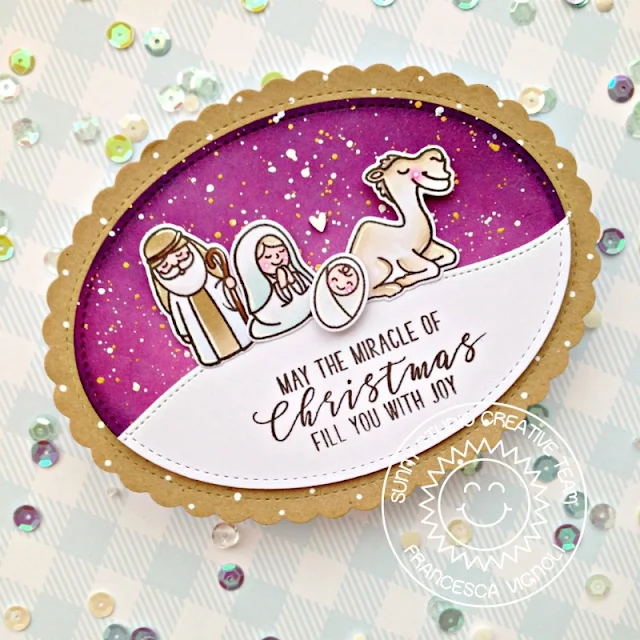
Hi there and happy Wednesday! It's Franci here with you today with a festive card featuring some of the new oval dies by Sunny Studio. These new dies are so much fun and creating shaped cards is always so cool! 

Sunny Studio Stamps: Stitched Oval Dies Scalloped Oval Mat Dies Holy Night Christmas Card by Franci Vignoli

For this one I chose one of my favorite sets and went for a non-traditional color scheme with rich purples and violet and lots of gold details. First of all I stamped all my images from the Holy Night set, colored them with Copics and die cut them out. Then I die cut 2 Stitched Oval 2 out of white cardstock and a Scalloped Oval Mat 1 out of kraft cardstock.

Working with the white ones: I created a hill out of the first using the Slimline Nature set and inked the second one with Distress inks + I added some splatters using my sparkle watercolors to create a starry night sky.

Sunny Studio Stamps: Stitched Oval Dies Scalloped Oval Mat Dies Holy Night Christmas Card by Franci Vignoli

I drew some little white dots with my Gelly roll pen onto the scalloped oval and glued all the layers together with liquid glue. I stamped my sentiment from the Inside Greetings set and added all the images with foam tape + a little heart. I created a coordinated card base out of white cardstock with the partial die cutting technique and mounted my decorated panel on top. 

I hope you like this Christmas card as much as I do and you are now inspired to create! Have a lovely day!

-----------------------------------------

Hello crafty friends! It’s Julia here and I am so excited to share my second fall card of the season with you!

Sunny Studio Stamps: Stitched Oval Dies Scalloped Oval Mat Dies Fall Friends Fall Card by Julia Englich


First, I stamped the images from
Fall Friends and Seasonal Trees onto Strathmore Bristol smooth cardstock and I colored them in using Zig Clean Color Real Brush Markers.

I die-cut the second to largest Scalloped Oval Mat 1 out of Neenah Desert Storm. Then,  I also die-cut the second to largest of the Stitched Oval 2 dies twice out of Bristol smooth cardstock. I used the Slimline Nature Borders to add a grassy edge to one of the stitched ovals. I ink blended both stitched ovals with Distress Oxide inks. 

Inks used: Salvaged Patina, Peacock Feathers, Twisted Citron, and Mowed Lawn Distress Oxides. 

Zig Markers used: 999; 41, 44; 76, 64, 65, 62;220, 269, 21.


After that, I die cut the fishtail banner from the Stitched Rectangle dies and heat embossed my sentiment from the Fall Friends set on it in white.

Sunny Studio Stamps: Stitched Oval Dies Scalloped Oval Mat Dies Fall Friends Fall Card by Julia Englich


I used the gorgeous teal patterned paper from the new 
Sweater Weather paper collection and added it to a kraft card base. I made sure to leave a nice 1/8" border. Then, I adhered the scalloped oval in the center with foam squares and layered the stitched ovals on top.

Lastly, I adhered all my images and the sentiment banner to the card. 


I had lots of fun creating this little scene and I really hope you like it!! Thank you so much for spending time with me today! Have an amazing day!


Sunny Studio Supplies Used:


Stitched Rectangle Dies
Shop at:
Sunny Studio
Fall Friends Stamps
Fall Friends Stamps
Shop at:
Sunny Studio
Fall Friends Dies
Fall Friends Dies
Shop at:
Sunny Studio
Seasonal Trees Stamps
Shop at:
Sunny Studio
Seaonal Trees Dies
Seaonal Trees Dies
Shop at:
Sunny Studio
Slimline Nature Borders
Shop at:
Sunny Studio
Holy Night Stamps
Holy Night Stamps
Shop at:
Sunny Studio
Holy Night Dies
Holy Night Dies
Shop at:
Sunny Studio
Inside Greetings-Christmas
Shop at:
Sunny Studio
Scalloped Oval Mat 1 Dies
Shop at:
Sunny Studio
Stitched Oval 2 Dies
Shop at:
Sunny Studio
Sweater Weather Paper
Shop at:
Sunny Studio