Tuesday, January 5, 2021

Sneak Peek: Eggs To Dye For, Layered Basket & Slimline Pennant Dies

Hello and welcome to day 2 of our Spring Peek Week!  All this week I am showcasing cards using our newest collection which will be available for purchase on Friday, January 8th.  

Today I'm sharing cards featuring two brand new layering sets that I'm super excited for, along with a brand new slimline die set that is good for so many everyday uses!

Card No. 1:  For my first card of the day, I used our new Eggs To Dye For Stamps which is a super easy layering set for beginners. Not only that, but they also only require two ink colors per egg which is always nice for those with a limited stash. The set comes with 8 patterned eggs, one solid egg to layer beneath them with a contrasting color and one outlined egg to use with the accompanying bunny and chick images. There are also a few sentiments that can be mixed and matched playing on the word basket (to go with our second stamp set of the day shared down below).

For my eggs shown here, I stepped up my stamping to another level by applying a little extra ink in the darker color along the left side of my solid egg while it was still positioned in my MISTI tool. To give my eggs a smooth shadow, I applied the ink to the edge of my clear stamp with the use of a small sponge finger dauber before impressing the image a second time. I love the extra dimension this simple step adds and how it really adds dimension.

For my sentiment, I cut the frame from our Gingham Pastel Paper using our Scalloped Circle Mat 3 dies together with our Scalloped Circle Mat 1 dies (to fill behind the openings) and our new Stitched Circle Large Dies to cut out the opening from the centers. I then backed the finished frame with some vellum to allow some of my eggs to still peek through, but not be quite as distracting. For my greeting, I die-cut pink cardstock with our Color Word Dies, pairing them with our Color Me Happy Stamps which were stamped with VersaMark Ink and heat embossed with Hero Arts White Detail Embossing Powder. To create my banner I used our Fancy Frames Rectangle Dies which I ran through my die-cutting machine twice to get the "v" cut from both ends (leaving part of the die hanging off the edge of my cutting platform each time so not to cut the other end off). 

Phew!  Are you still with me?  That was a mouth full.  ;)
Sunny Studio Rainbow Easter Egg Card (using Eggs To Dye For, Color Me Happy Stamps, Scalloped Circle Mat 3 Dies & Gingham Pastels Paper)

Card No. 2:  For this Eggs To Dye For card, I started by stamping my little bunnies using Alcohol Marker friendly Memento ink to stamp my egg bodies, bunny faces and ears in colored ink to match. When it came to stamping the eyes, I took a moment to first color my images with Copic Markers and then stamped the faces a second time while the face images were still in my MISTI stamping tool so that I could perfectly align stamping the eyes again in black ink. To achieve this, I carefully applied VersaFine Onyx Black Ink to the eye portion of the stamp using just the corner of the pad to each eye. The raised surface made this easier than it may seem and I love the way the eyes look when stamped in black! These chubby egg-shaped bunnies crack me up!

For my border of banners, I stamped tone-on-tone prints using colored cardstock and slightly darker ink with our Background Basics Stamps. I then die-cut them using our new Slimline Pennant Dies. I cut the grass for my bunnies using the border die from our Sunny Sentiments Dies and the stitched panel for my sky using our Frilly Frames Retro Petal Dies. I completed my card with a heat embossed sentiment using a punny greeting from our A Good Egg Stamps.

Sunny Studio Bunny Easter Egg Card (using Eggs To Dye For, Background Basics Stamps, Slimline Pennants Dies & Frilly Frames Retro Petals Dies)


Card No. 3: Up next is a grid style card. I took inspiration from Elle Woods with Legally Blond and channeled my inner Barbie Girl. I stamped my patterned eggs with VersaMark Ink which I then heat embossed with pearlescent and glitter embossing powders. 
Sunny Studio Pink Glitter Easter Egg Grid Card (using Eggs To Dye For, Happy Thoughts Stamps, Slimline Pennants Dies & Frilly Frames Hexagon Dies)
I love the way the specialty embossing powders catch the light. They add a bit of sparkle while still being really elegant. I mounted my finished eggs onto a scalloped panel using our Frilly Frames Hexagon Dies and then heat embossed my Easter sentiment with white embossing powder using our Happy Thoughts Stamps and the smallest pennant strip from our new Slimline Pennant Dies.

These dies only have the "v" cutout from one end, but it's super easy to shorten them to your desired length with the double "v" by flipping the die after the first cut, locking it into place with the previous stitched edge and running it through your die-cutting machine a second time. Love that! So nice to customize them to fit any length!

Sunny Studio Pink Glitter Easter Egg Grid Card (using Eggs To Dye For, Happy Thoughts Stamps, Slimline Pennants Dies & Frilly Frames Hexagon Dies)

Card No. 4:  Up next is the chick version with the egg stamps. For these chicks I first stamped them with the solid egg image in my MISTI, then double stamped a shadow around the edge using the sponge finger dauber described for my first card and finally stamped them again with the outlined egg stamps, adding the VersaFine Onyx Black Ink to the eyes (as described in my 2nd card). This may sound like a lot of stamping, but when mass producing cards for Easter assembly line style this was such a quick & easy way to color these guys without having to pull out my Copic Markers and fuss with getting my shading just right.

For this card design I cut a series of banners from our Spring Fling Paper prints using our new Slimline Pennant Dies together with the scalloped edge of our original Fishtail Banner dies. These were made with the same angle and work beautifully together! 

In order to fit all the pennants the way I had envisioned, I made this card a little larger at 6" wide x 4.5" high. Even then I realized I would still need to trim a couple of my pennants narrower to get them to fit three across, but I was able to blend in my trimmed edges by using the stitched die from our Slimline Basic Border dies set. I completed my card with heat embossed greetings from our Chickie Baby Stamps.
Sunny Studio Chick Easter Egg Card (using Eggs To Dye For, Chickie Baby Stamps, Slimline Pennants Dies, Fishtail Banner Dies & Spring Fling Paper)

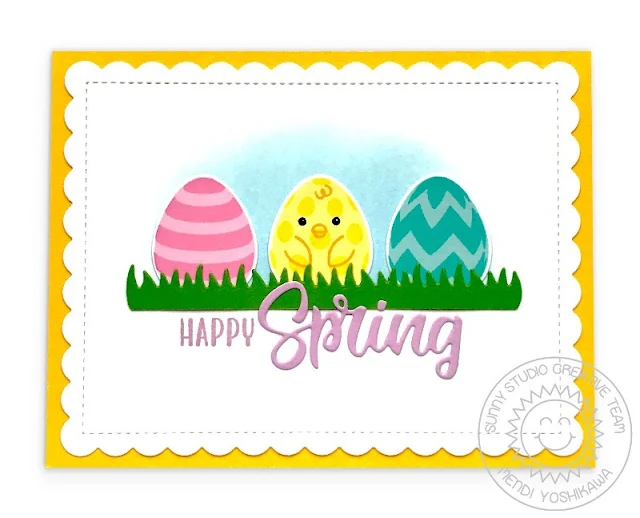
Card No. 5:  I mass produced this clean & simple card for the brick & mortar stores who carry our products. I started by cutting a white scalloped mat using our Frilly Frames Hexagon Dies. I then inked up the top, center portion of my panel with a bit of tumbled glass distress ink using my favorite Jumbo Dauber. For my little chick, I gave him a fun polka-dot print which is a bit difficult to see here in my photo, but the cute, subtle detail makes me happy. him. For my grass I cut a border using our Sunny Sentiments Dies, rounding the edges with my scissors. I then stamped the word "happy" using our Cheerful Daisies Stamps and the word Spring from our new Layered Basket Dies (shown below) die-cut from matching lilac cardstock.
Sunny Studio Chick Easter Egg Card (using Eggs To Dye For, Cheerful Daisy Stamps, Sunny Sentiments Dies, Slimline Pennants Dies, Frilly Frames Hexagon Dies)

Card No. 6:  Up next is an Easter card pairing our Eggs To Dye For Stamps with our new Layered Basket Stamps. This is probably not the best example to start with because I went with super light inks for this one trying to create the look of a white washed basket, but this is such a fun basket image that is perfect for Easter, spring flowers and so much more!

I used a flower print from our Spring Fling Paper pack for my background sized to 4.5" x 4.5" and then framed my basket scene with a piece of coordinating aqua cardstock cut using our Stitched Circle Large Dies and the grass border from our Sunny Sentiments Dies. A sentiment from our the Eggs to Dye For stamps completed my card.
Sunny Studio Easter Egg Basket Card (using Eggs To Dye For, Layered Basket Stamps, Sunny Sentiments Dies, Stitched Circle Dies & Spring Fling Paper)

Card No. 7: For my last card of the day I used those same Layered Basket stamps with our popular Berry Bliss Stamps. There were so many cards I knew I wanted to create with these basket stamps that I didn't find the time to get to for today, but this pairing was at the top of my list! To add to my card's country feel I stamped the gingham print using our Background Basics Stamps and then added a scalloped and stitched edge to my white cardstock panel using our Slimline Basic Border dies

I share all the ink colors I used below, but to add an extra touch of realism to my strawberries, I stamped my strawberry seeds with Versamark ink and heat embossed them using a yellow embossing powder. I love how this extra step made my berries come alive! The embossing powder makes them pop so much more than yellow dye ink. O
n a side note, I adore Ranger's colored embossing powders--I've found their rainbow colored powders are some of the best quality I've come across.

As a final touch I added a little punny thank you sentiment from our Fresh & Fruity Stamps. I'm such a sucker for gingham and fruit images so this card was so much fun to create!
Sunny Studio Strawberry & Blueberry Red Gingham Card (using Layered Basket, Berry Bliss, Background Basics Stamps, Fresh & Fruity Stamps and Slimline Basic Border Dies)

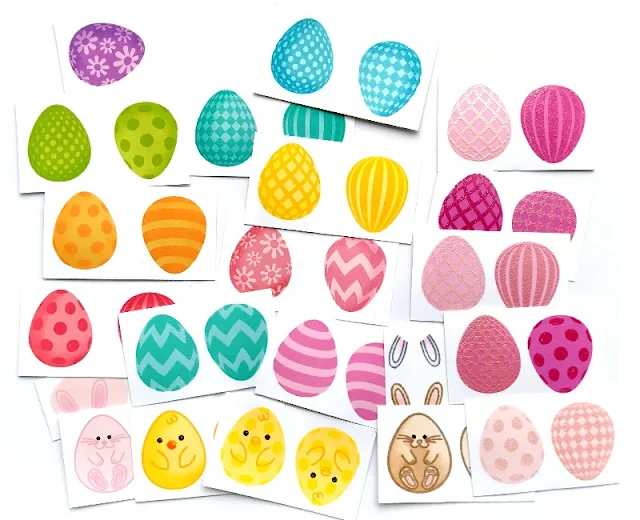
Here's are some examples of the egg combinations I stamped out:

Sunny Studio Stamps Easter Eggs To Dye For Layered Layering Examples


I frequently am asked which ink colors I used for my layered images.  While I think there are so many great options out there, these are the colors I used today for my stamped images:


Layered Basket (card no. 6)
Skipped Lightest Layer
Hero Arts Soft Sand
Memories Soft Sand or Gina K. Sandy Beach
Memories Sand

Layered Basket (card no. 7)
Hero Arts Soft Sand
Gina K. Sandy Beach
Memories Sand
MFT Kraft

Strawberries (card no. 7)

Concord & 9th Honeysuckle
Gina K. Red Velvet
Concord & 9th Cranberry
Gina K. Lucky Clover
PinkFresh Evergreen


Blueberries (card no. 7)
PinkFresh Blue Jay
PinkFresh Sapphire
Hero Arts Navy
 (or Gina K. In the Navy)

That wraps up today's sneak peeks. I'm so happy you spent a part of your day with me today. I read all your comments and they mean so much!  I'd love to give a $50 gift code to one lucky winner using the rafflecopter below.  Make sure to keep checking back all this week for more peeks & prizes. The contests run through Saturday, January 9th at Midnight PST with winners announced here on Sunday, January 10th. :)

a Rafflecopter giveaway
Here's a closer look at the our new Eggs To Dye For Stamps & Dies, Layered Basket Stamps & Dies and our Slimline Pennant Dies used today (available for purchase on January 8th). 

I ran out of time to create them for today, but these slimline dies are also the perfect size for scrapbooking. I can't wait to try them on my next page!

Sunny Studio Eggs To Dye For Layering Layered Easter Egg 4x6 Clear StampsSunny Studio Layered Basket Layering 4x6 Clear Photopolymer StampsSunny Studio Stamps: Slimline Pennants Banners & Scalloped Borders Metal Cutting Dies

Sunny Studio Stamps Eggs To Dye For Metal Cutting Dies  Sunny Studio Stamps Layered Basket with Spring Word Metal Cutting Dies 

Other Sunny Studio Supplies Used:

A Good Egg Stamps
A Good Egg Stamps
Shop at:
Sunny Studio
Color Me Happy Stamps
Shop at:
Sunny Studio
Color Word Die
Color Word Die
Shop at:
Sunny Studio
Sunny Sentiments Dies
Shop at:
Sunny Studio

Versafine Onyx Black Ink
Shop at:
Sunny Studio
Fancy Frames- Rectangles
Shop at:
Sunny Studio
Berry Bliss Stamps
Berry Bliss Stamps
Shop at:
Sunny Studio
Berry Bliss Dies
Berry Bliss Dies
Shop at:
Sunny Studio
Background Basics Stamps
Shop at:
Sunny Studio
Happy Thoughts Stamps
Shop at:
Sunny Studio
Gingham Pastels 6x6 Paper
Shop at:
Sunny Studio
Frilly Frames Hexagon Dies
Shop at:
Sunny Studio
Frilly Frames Retro Petals Dies
Shop at:
Sunny Studio
Cheerful Daisies Stamps
Shop at:
Sunny Studio
Chickie Baby Stamps
Chickie Baby Stamps
Shop at:
Sunny Studio
Spring Fling Paper
Spring Fling Paper
Shop at:
Sunny Studio
Slimline Basic Borders
Shop at:
Sunny Studio
Scalloped Circle Mat 3 Dies
Shop at:
Sunny Studio
Stitched Circle Large Dies
Shop at:
Sunny Studio
Hero Arts White Detail
Shop at:
Sunny Studio

Fishtail Banner Dies
Shop at:
Sunny Studio
Fresh & Fruity Stamps
Shop at:
Sunny Studio
Tsukineko Jumbo Dauber
Shop at:
Sunny Studio
Versafine Onyx Black Ink
Shop at:
Sunny Studio


Monday, January 4, 2021

Sneak Peek: Meow & Furever, Lovable Llama & Circle Mat Dies

Hello and welcome to the first day of our Spring Peek Week!  All this week I am showcasing cards using our newest collection which will be available for purchase on Friday, January 8th. 

I'm kicking off the day with two new critter stamp sets and 5 new mix and match basic circle dies. Let's jump right in!

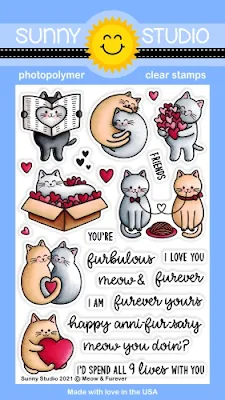
Card No. 1:  My first set of cards features our new 4x6 Meow & Furever Stamps & Dies which showcase 7 cute kitty images, along with 7 mix and match punny love themed sentiments (but I made sure when creating this set to include a couple greetings that would be suitable for sending cards to friends too). I just have to say I don't know what it is about cats and cardboard boxes, but my 12+ pound fur baby still prefers to find a good box laying around to his cat bed every single time. He did it just last week and it made me think of these stamps.

I started by coloring my images with Copic Markers and framed each image on a 1-3/4" stitched circle from our Staggered Circle Dies, layering them together with our new Scalloped Circle Mat 1 Dies cut from charcoal grey cardstock. I then mounted them onto a piece of hot pink patterned paper from our Polka-dot Parade Paper pack, stamping my sentiment along the bottom onto a little banner from our new Slimline Pennants Dies being shared more tomorrow.

Sunny Studio Blog: Hot Pink Kitty Cat Love Themed Valentine's Day Card (using Meow & Furever Stamps, Stitched Circle Dies, Scalloped Circle Mat 1 Dies & Polka-dot Parade Paper)

Card No. 2: Up next I thought I would make a set of gift tags perfect for mass producing for Valentine's Day. I started by cutting my tags from turquoise cardstock using our Scalloped Square Tag Dies and then cut 2-3/4" squares from a slightly lighter shade using my paper trimmer to layer over the top. I then die-cut my hearts from red patterned paper using that same Polka-dot Parade Paper pack and our Stitched Heart Dies. I used the little circle reinforcer from our Build-a-Tag Dies and adhered some bows to the top made from bakers twine.

As a final touch, I used that same new Slimline Pennant Die to cut little sentiment strips for my tags. This die only has the "v" on one end, so after die-cutting it the first time, I flipped it around making sure to lock it in place with the existing stitch marks before running it through my machine a second time.

Sunny Studio Blog: Red & Turquoise Kitty Cat Love Themed Valentine's Day Gift Tags (using Meow & Furever Stamps, Stitched Heart Dies, Scalloped Square Dies & Polka-dot Parade Paper)

Card No. 3: While thinking about mass producing Valentine's I thought it would be fun to create some mini cards perfect for a child's classroom or tying to small gifts. I pulled out our Slimline Scalloped Frame Dies to form my card base which when folded in half to make cards that are 3-1/2" x 4-1/4" in size. I also used the interior stitched rectangle from that same set with half on the front of my card and half on the inside, stamping my "Happy Valentine's Day" greeting inside from our Happy Thought Stamps.
Sunny Studio Blog: Red & Pink Kitty Cat Love Themed Valentine's Day Kids Classroom Card Set (using Meow & Furever Stamps, Slimline Scalloped Frame Dies, Stitched Circle Large Dies & Dies & Gingham Pastel Paper)

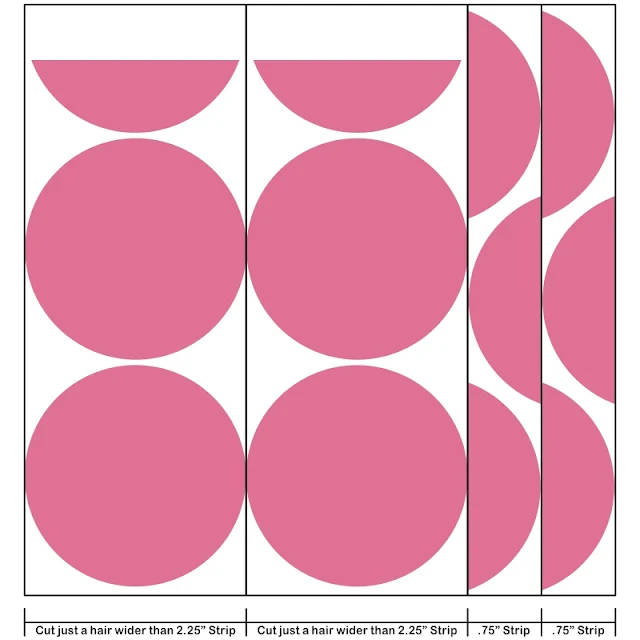
For my card front, I die-cut my 2-1/4" wide circles using our new Stitched Circle Large Dies cut from our Gingham Pastels Paper pack. With this design I love that I was able to utilize almost every last inch of my 6x6 Paper because I was able to use the edges for my half circles that bleed off the edges, cutting the pieces for all 4 cards from a single sheet. 

Just make sure to use some washi tape to keep your die in position to keep your die from slipping since this is pretty precise. If you cut your first two strips just a hair wider than 2-1/4", then your 3/4" strips will need to be just a hair smaller to account for this, but it totally works and I found I actually still needed to trim a bit off each of my half circles that bled off the top and bottom of my white card panel.

Sunny Studio Stamps Meow & Furever Valentine's Day Card Circle Pattern Diagram

Card No. 4:  For my next card, I utilized the 1-7/8" circles from our Stitched Circle Small Dies, pairing them with a thin scalloped border from our Scalloped Circle Mat 1 Dies. This is the exact same scalloped circle die used in my first card with just a 1/8" larger stitched circle for a little bit different look.

I cut two pennants from our cloud print paper using our Summer Splash Paper pack and our new Slimline Pennant Dies. As you will see, I found myself using these for so many uses outside of slimline cards. I used the skinny pennant die to cut stitched strips for my greetings, cutting off the "v" on the end by die-cutting it a second time with the larger die so that it would be the perfect width to layer over the top of my banner and have stitching on all four sides.

I stamped my sentiments using VersaFine Onyx Black Ink and added a few small red hearts as accents cut from our Basic Mini Shape II Dies
Sunny Studio Blog: I Love You Furever Punny Kitty Cat Valentine's Day Card (using Meow & Furever Stamps, Slimline Pennant Dies, Scalloped Circle Mat 1 Dies, Stitched Circle Small Dies & Dies & Spring Fling Cloud Paper)

Card No. 5: For my last cat card of the day I created a simple, punny anniversary card. I started by cutting 1" strips from our red heart print paper from our Very Merry Paper pack which I mounted to the top and bottom of my card base.

I then cut a panel from pink cardstock that was 5-1/2" x 2-3/4", die-cutting the edges with a new stitched scalloped border included with our Slimline Pennant Dies. This border mimics the edge of our Fancy Frame Dies, but it's the first time we've ever had a 5.5" wide version to span the length of a card and I'm very excited to have that new border die sneaked in there.  To frame my stamped kitty images I mounted them onto the scalloped circle from our new Scalloped Circle Mat 3 Dies.
Sunny Studio Blog: Red & Pink Kitty Cat Punny Anniversary Card (using Meow & Furever Stamps, Slimline Pennant Dies, Scalloped Circle Mat 3 Dies & Very Merry Paper)

Card No. 6: Switching gears, the second new stamp set I'm sharing today is our new Lovable Llama 2x3 Stamps. Can I just gush how much I love this set?! It has so many design possibilities for a mini set! It comes with the Llama, a stack of presents, a bow to wrap the llama up like a gift, some confetti, plus a little hello greeting. I used almost all of the images layered together to create this fun birthday card. 

Red is my signature color so I couldn't resist a fun red and white color scheme for this card, taking inspiration from his polka-dot gift. To perfectly space my over-sized polka-dots, I used a clear grid ruler to draw light diagonal pencil lines spaced 3/8" apart going both directions and then I adhered my stitched circles accordingly, using the smallest circle found in the Scalloped Circle Mat 1 dies. 

To frame my little guy, I layered our new Scalloped Circle Mat 2 Dies, adding a solid red scalloped mat beneath from the same Scalloped Circle Mat 1 Dies I used for my background. By doing this it kept my frame looking cleaner and wasn't as visually distracting as it was when I could see my background peeking through on some holes, but not others. I finished my card by stamping the banner from our Banner Basics Stamps in red ink using a sentiment from our new Inside Greeting Birthday Stamps which I will be sharing more of on Friday.
Sunny Studio Stamps: Red & White Polka-dot Birthday Card (using Lovable Llama, Banner Basics, Inside Greetings Birthday, Scalloped Circle Mat 2 Dies & Stitched Circle Dies)

Card No. 7:  I think when wrapped up like a present, our Lovable Llama Stamps look so sweet for baby cards. I created both a boy and girl version with him and I think he looks darling for both genders. To create these cards, I used our Kinsley Alphabet Stamps to spell out the words "baby" with a simple heart from our Meow & Furever Stamps onto a mini clear block. Then using my same clear grid ruler with light pencil lines spaced 3/8" apart, I repeatedly stamped my background. This may sound time consuming, but I was able to make these two custom backgrounds in about 20 minutes and I love the results!

Since the background had a lot going on, I kept the rest of my card design fairly simple, using our Stitched Circle Small Dies and Scalloped Circle Mat 1 Dies to frame my little guy. I added a matching stitched scallop edge to the bottom of my cards using our Slimline Basic Border Dies and stacked a few of our "Congrats" word die-cuts from our Slimline Scalloped Frame Dies to look like white chipboard.
Sunny Studio Stamps: Pink & Blue Congrats Baby Boy & Girl Cards (using Lovable Llama, Kinsley Alphabet, Scalloped Circle Mat 1 Dies, Stitched Circle Small Dies & Slimline Scalloped Frame Dies)

Card No. 8: For my last card today, I stamped my Lovable Llama multiple times to create a whole party of Llamas. We have a new scene set being fully unveiled on Wednesday called Country Scenes, but here's a little sneak peek of it colored in cool, subtle colors for a wintry feel. I added a set of balloons colored to match the gifts and party hats using our Floating By Stamps which I fussy cut with scissors and taped sewing thread to the back of to form my balloon strings. For my sentiment, I used another phrase from our Inside Greetings Birthday Stamps being share more on Friday.
Sunny Studio Stamps: Celebrate Your Day Llamas in the Mountains Winter Card (using Lovable Llama, Country Scenes, Floating By & Inside Greetings Birthday Stamps)

That wraps up today's sneak peeks. I'm so happy you spent a part of your day with me today. I read all your comments and they mean so much!  I'd love to give a $50 gift code to one lucky winner using the rafflecopter below.  Make sure to keep checking back all this week for more peeks & prizes. The contests run through Saturday, January 9th at Midnight PST with winners announced here on Sunday, January 10th. :)

a Rafflecopter giveaway
Here's a closer look at the our new Meow & Furever Stamps & Dies, Lovable Llama Stamps & Dies and the circle mat dies used today (available for purchase on January 8th). 

Sunny Studio Meow & Furever Punny Puns Love Themed Kitty Cat Valentine's Day 4x6 Clear Photopolymer Stamp SetSunny Studio Meow & Furever Punny Puns Love Themed Kitty Cat Valentine's Day Metal Cutting Dies

Sunny Studio Lovable Llama Alpaca Birthday Mini 2x3 Clear Photopolymer Stamp SetSunny Studio Lovable Llama Alpaca Metal Cutting Dies

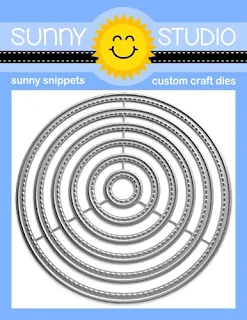
I offset our stitched circle dies so that for the most part they may fill in some gaps in sizes to die sets you may already own, while still including a few good basic sizes. 

The Stitched Circle Small Dies are sized: 5/8", 1-1/4", 1-7/8", 2-1/2" 3-1/8", 3-3/4"
The Stitched Circle Large Dies are sized: 1", 1-5/8", 2-1/4", 2-7/8", 3-1/2" 4-1/8"

Sunny Studio Stamps: Stitched Circle Small Nesting Nested Metal Cutting DiesSunny Studio Stamps: Stitched Circle Large Nesting Nested Metal Cutting Dies

The Scalloped Circle Mat 1 Dies are sized: 1/2" 1-1/4", 2", 2-7/8", 3-1/2"
The Scalloped Circle Mat 2 Dies are sized: 3/4", 1-3/4", 2-5/8", 3-1/2"
The Scalloped Circle Mat 3 Dies are sized: 1", 1-3/4", 2-5/8", 3-1/2"

Sunny Studio Stamps: Scalloped Circle Mat 1 Stitched Scallop Metal Cutting Dies Sunny Studio Stamps: Scalloped Circle Mat 2 Stitched Scallop Metal Cutting Dies

Sunny Studio Stamps: Scalloped Circle Mat 3 Stitched Scallop Metal Cutting Dies 

Other Sunny Studio Supplies Used:

Stitched Heart Dies
Stitched Heart Dies
Shop at:
Sunny Studio
Versafine Onyx Black Ink
Shop at:
Sunny Studio
Polka-dot Parade 6x6 Paper
Shop at:
Sunny Studio
Gingham Pastels 6x6 Paper
Shop at:
Sunny Studio

Very Merry 6x6 Paper
Shop at:
Sunny Studio
Scalloped Tags-Square
Shop at:
Sunny Studio
Banner Basics Stamps
Shop at:
Sunny Studio
Banner Basics Dies
Banner Basics Dies
Shop at:
Sunny Studio
Floating By Stamps
Floating By Stamps
Shop at:
Sunny Studio
Floating By Dies
Floating By Dies
Shop at:
Sunny Studio
Kinsley Alphabet Stamps
Shop at:
Sunny Studio
Spring Fling Paper
Spring Fling Paper
Shop at:
Sunny Studio
Slimline Basic Borders
Shop at:
Sunny Studio
Slimline Scalloped Frame
Shop at:
Sunny Studio
Country Scenes Stamps
Shop at:
Sunny Studio
Country Scenes Dies
Country Scenes Dies
Shop at:
Sunny Studio
Inside Greetings Birthday
Shop at:
Sunny Studio
Slimline Pennant Dies
Shop at:
Sunny Studio
Hero Arts White Detail
Shop at:
Sunny Studio
VersaMark Watermark Ink
Shop at:
Sunny Studio

Staggered Circles Die
Shop at:
Sunny Studio
Mini Basic Shape Dies II
Shop at:
Sunny Studio