My slimline card base measures 3.5" wide by 8.5" tall. I added a separate ink blended background panel to the card front. This panel is trimmed smaller than the card base to allow about a quarter inch white border to show. I used Spun Sugar Distress Oxide ink and a blending brush to create the ombre' effect. I picked out three mice images and some accessories for this card. I Copic colored the images and used the coordinating Merry Mice dies to cut them out.
I used the Scalloped Tags Circle & Square dies to create little frames for the mice.
I masked off the scalloped edges and blended Pine Needles Oxide Ink onto
the center of the tags. I then splattered with thinned white acrylic
paint. I added the mice to the tags and then adhered the tags to the
background with dimensional foam squares. I left enough space in between
the tags to stamp the greeting which is included in the Merry Mice set.
I wanted to embellish the card
with some pine sprigs and berry images from the Season's Greetings stamp set. They are the perfect accent in the
corners and at the sides of the center tag. I tied bows with some baker's twine
to the tags and that completed my card.
-------------------------------------------------
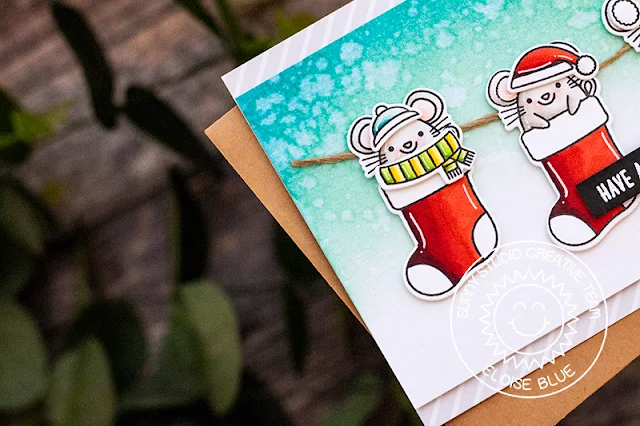
Hi everyone, Eloise here and today I have a card using the new Merry Mice Stamp Set. This set is so super cute, and I love all the different mice and the dress up elements, too. I decided to use the mice in the stocking for my card today.
-------------------------------------------------
Hi everyone, Eloise here and today I have a card using the new Merry Mice Stamp Set. This set is so super cute, and I love all the different mice and the dress up elements, too. I decided to use the mice in the stocking for my card today.
I
started off with stamping out my images from Merry
Mice, plus a couple of scarfs and hats too. I coloured them in with
Copic Markers and then cut
them out. Once they were cut, I added white gel pen details onto the
images.
(Copic Markers: R14, R24, R27, R89 / W00, W0, W1, W3 / R000, R00, R30 / BV01, BV02, BV04, BV08 / BG10, BG11, BG13, BG49 / BV01, BV02, BV04, BV08 / YG01, YG03, YG23, YG17 / Y11, Y13, Y15, Y19)
(Copic Markers: R14, R24, R27, R89 / W00, W0, W1, W3 / R000, R00, R30 / BV01, BV02, BV04, BV08 / BG10, BG11, BG13, BG49 / BV01, BV02, BV04, BV08 / YG01, YG03, YG23, YG17 / Y11, Y13, Y15, Y19)
For
my background, I used some Peacock Feathers and Cracked Pistachio Distress Inks
and ink blended on the top half of a watercolour panel. I faded it off to white
and then flicked on some water droplets. I then dried the entire panel with a
heat tool.
I
added string onto the backs of the mice so they would all be connected, added
foam tape onto the back and adhered it onto the background. I added on their
accessories, too. For my sentiment, I used the ‘Have A Mice Christmas’ from the
same set
and white heat embossed it onto a thin strip of black cardstock.
Lastly, I adhered the sentiment into place and adhered my entire panel onto a piece of white and grey striped patterned paper from the Subtle Grey Tones 6x6.
Thanks so much for stopping by today and I’ll see you next week.
Lastly, I adhered the sentiment into place and adhered my entire panel onto a piece of white and grey striped patterned paper from the Subtle Grey Tones 6x6.
Thanks so much for stopping by today and I’ll see you next week.
Sunny Studio Supplies Used:
 Subtle Grey Tones Paper Shop at: Sunny Studio |
 Season's Greetings Stamps Shop at: Sunny Studio |
 Season's Greetings Dies Shop at: Sunny Studio |
 Merry Mice Stamps Shop at: Sunny Studio |
 Merry Mice Dies Shop at: Sunny Studio |
 Scalloped Tags-Circle Shop at: Sunny Studio |
 Scalloped Tags-Square Shop at: Sunny Studio |


