Thank you for your business this weekend! We know you had lots of really good places to spend your hard earned money this past week so it means so much to us that you chose to shop with us...
With your help we were able to donate $1500 today to Convoy of Hope to help feed the world's hungry. You're the best!
Tuesday, November 27, 2018
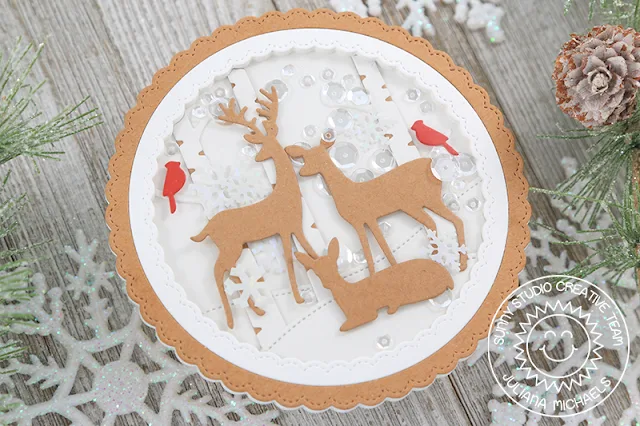
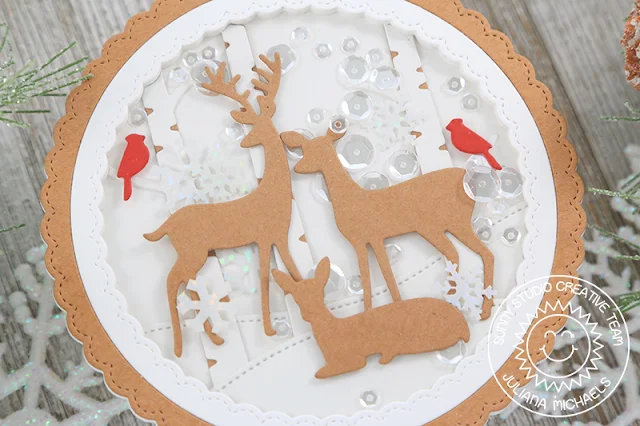
Rustic Winter Shaped Winter Shaker Card with Juliana
Happy
Holidays friends! It's Juliana Michaels and today I'm here to share a Rustic
Winter shaker card created using the new Rustic Winter dies combined with the
Fancy Frames Circle dies.
To get started use the large Fancy Frames Circle dies to make
the top of the shaker. Die cut the outside frame from kraft cardstock and the
inside frame from white cardstock. Next, cut a piece of acetate using a circle
die (I used one from my stash) and adhere it to the backside of the frame.
The next step is to create the shaker box frame. Die cut the large Fancy Frame Circle dies 5 times from white cardstock and glue them all together. Using the same circle die you used to cut the acetate, cut another circle from white cardstock. This is the back of the shaker. Set these pieces to the side for now.
Next, take the Rustic Winter dies and cut the top layer of the trees from white cardstock and the bottom layer from kraft cardstock. Die cut some snowy hills from white cardstock using the Woodland Border dies. Grab the Rustic Winter dies again and cut some birds from red cardstock and the deer from kraft cardstock. Once you have all of the pieces cut out, layer them together to create the scene. Adhere them all to the back piece of the shaker and trimmed off anything that hang over the edge. Use double sided foam tape to adhere the deer and to add some depth and dimension to the scene.
Once the scene is complete, adhere the shaker frame pieces to the back piece. Now it's time to add the fun stuff. Pour in a mix of sequins and beads to add some sparkle and shine to the shaker card. Once the shaker is filled, glue on the top to complete the card front.
For the final step, you will create a circle shaped card base. To do this, fold a piece of cardstock in half and place the same circle die you've already used so that a little edge of it hangs over the fold. Run this through your die cutting machine and you will have created your own shaped card base. Now, just adhere the shaker to the front of the card base and your card is complete!
I hope you enjoyed this Rustic Winter shaker card I shared with you today. Thanks so much for joining me today! Until next time, happy holiday crafting!
Sunny Studio Supplies Used:
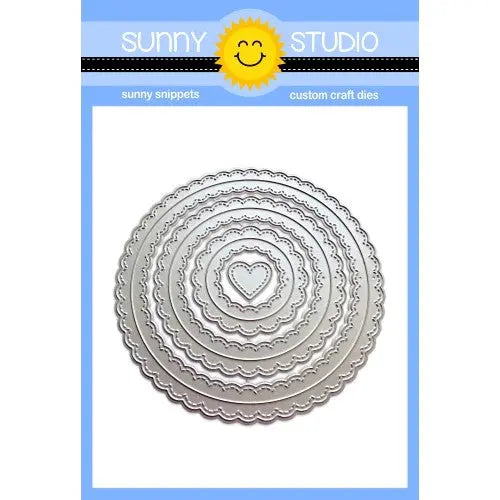 Fancy Frames-Circle Dies Shop at: Sunny Studio |
 Woodland Borders Dies Shop at: Sunny Studio |
 Rustic Winter Dies Shop at: Sunny Studio |
Monday, November 26, 2018
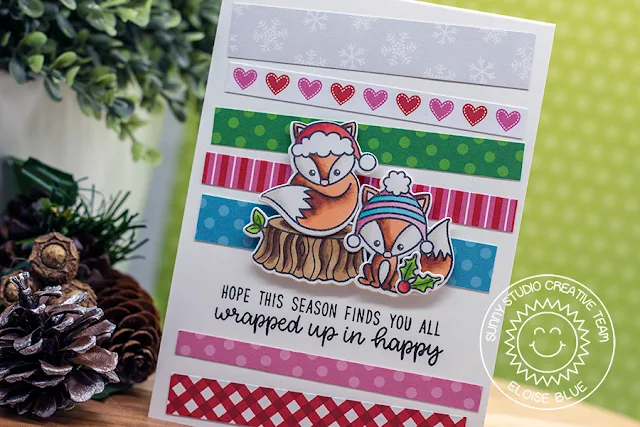
Foxy Christmas Colorful Winter Themed Holiday Card with Eloise
Hi friends, Eloise here and today I'll be using the Foxy Christmas stamp set along with the Holiday Cheer Paper Pad to create this colourful winter card.
To start off I stamped and coloured my images from the Foxy Christmas stamp set. Once they were coloured I cut them out using the coordinating dies.
(Copic Markers Used: R14, R24, R27 / BG02, BG05, BG23 / YG03, YG23, YG67 / R81, R83, R85 / C00 / W00, W1 / R30 / E95, E97, E99, E07 / E55, E57, E59)
Next I cut up strips of patterned paper from the Holiday Cheer paper pad and adhered them onto my card base leaving room for the sentiment. I then added foam tape onto the backs of my images and adhered them into place.
Lastly I stamped the sentiment from the Foxy Christmas stamp set with black ink underneath the images.
Thanks so much for stopping by today, I hope you enjoyed. See you next week!
Sunny Studio Supplies Used:
 Holiday Cheer 6x6 Paper Shop at: Sunny Studio |
 Foxy Christmas Stamps Shop at: Sunny Studio |
 Foxy Christmas Dies Shop at: Sunny Studio |
Saturday, November 24, 2018
25 Days of Christmas Tags featuring Build-A-Tag Dies
Hello there! We're so excited to be hopping with Tracey McNeely's 25 Days of Christmas Tags (which you can learn more about at her blog In My Creative Opinion). I have created lots of tag featuring our two newest mix and match Build-A-Tag dies.
Tag Set #1: For my first set of tags I paired our Holiday Cheer 6x6 Paper with our Build-a-tag #1 dies and the cute images from our Holiday Alpaca stamps which I colored with Copic Markers. For my "to" and "from" I heated embossed the words from our Christmas Icons stamps.
Tag Set #2: Up next is another set of tags using our Foxy Christmas stamps together with our Build-A-Tag #2 dies. I love that these holiday products can expand to also work beyond Christmas for some cute Valentine's Day themed tags! :)
Tag Set #3: For my third tag set I paired the round tag from our Build-A-Tag #1 dies with the scalloped circle from our Fancy Frames Circle dies. Since the opening of the fancy frames is the same size as the circular tag, I sandwiched a piece of printer paper in the middle that was punched just slightly larger to hold everything together, adding patterned paper to both sides. For my decoration, I used the mini holly die from our mini basic shape die set together with the stitched heart from our Warm & Cozy dies.
Tag Set #4: For my last set of tags today, I die-cut my tags using the other tag from our Build-A-Tag #2 dies layered together with two of the scalloped topper available. I paired them with some holly and berries from our Christmas Trimmings stamps and the "to" and "from" in a different font from the same Christmas Icons Stamps.
Thank you for joining me today! :)
Here's a list of all the companies participating with a new company featured each day with lots of prizes up for grabs. Make sure to stop by Tracey's blog to see more tags today using our products and for details on how you can win a $25 gift code to our store. :)
Also, before you go, just a reminder that we are automatically offering free shipping on all orders over $25 when shipped within the USA, a free word die with each order and we are donating 15% off all retail sales to Convoy of Hope through November 26th at 11:59 pm PST (cannot be combined with other promo codes). :)
Sunny Studio Supplies Used:
Christmas Icons Stamps Shop at: Sunny Studio |
 Fancy Frames-Circle Dies Shop at: Sunny Studio |
 Mini Basic Shape Dies Shop at: Sunny Studio |
 Holiday Cheer 6x6 Paper Shop at: Sunny Studio |
 Christmas Trimmings Stamps Shop at: Sunny Studio |
 Christmas Trimmings Dies Shop at: Sunny Studio |
 Alpaca Holiday Stamps Shop at: Sunny Studio |
 Alpaca Holiday Dies Shop at: Sunny Studio |
 Foxy Christmas Stamps Shop at: Sunny Studio | |
 Foxy Christmas Dies Shop at: Sunny Studio |
 Build-A-Tag #1 Dies Shop at: Sunny Studio |
 Build-A-Tag #2 Dies Shop at: Sunny Studio |
Friday, November 23, 2018
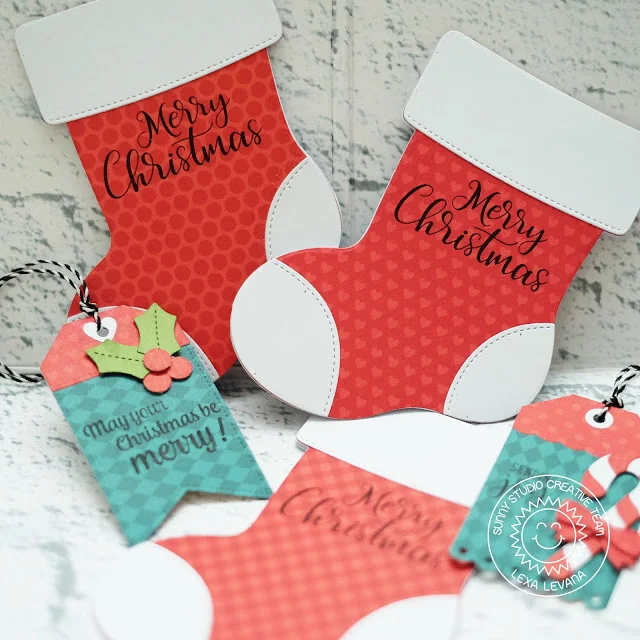
Santa's Stocking Christmas Tags and Shaped Cards with Lexa
Hi
everyone! Lexa here today with super fun shaped cards and gift tags for this
Christmas. Highlighting the Santa's
Stocking Dies with so many possibilities to get ready for the seasons.
I
used white cardstock and various red patterned papers from Sunny Studio to
create the Santa's
Stockings. They look more fun with the patterns rather than
plain red stockings. I stamped "Merry Christmas" from Petite Poinsettias on every stocking. You can many of this fun
shaped cards in such a little time, all you need is the dies and papers. Since
I had scrap papers left over, I decided to create some gift tags as well. Using the
brand new tag dies called Build-A-Tag #2 Dies, I use a classic
Christmas color combination in green and red.
The ornaments from Santa's
Stocking Dies are super adorable, you know that you need
them for your Christmas' projects. I mean...come on, who can resist the
cuteness?? Here's the closer look of the gift tags... I also tied black and
white twines.
I adhered some pieces with foam tapes to create dimension. I made lots of use of the pretty
patterned papers. This simple greeting cards will make anyone's holiday even
merrier. The sentiment on the right tag is from an older set called Merry Sentiment Stamps.
That's
all for today, thank you so much for stopping by. I hope you enjoy today's
projects as much as I do.
Don't forget that through Monday night all US orders will receive FREE SHIPPING on orders over $25. Plus all orders regardless of size will receive a FREE WORD DIE (just make sure to indicate in the order comments if you prefer a sunshine, color or sew word).
Plus we are donating 15% off all retail sales to Convoy of Hope through Monday night. :)
Have a wonderful day!
Sunny Studio Supplies Used:
 Merry Sentiments Stamps Shop at: Sunny Studio |
 Petite Poinsettias Stamps Shop at: Sunny Studio |
 Build-A-Tag #2 Dies Shop at: Sunny Studio |
 Santa's Stocking Dies Shop at: Sunny Studio |
Subscribe to:
Comments (Atom)


