Today I have two new stamp sets, a set of coordinating dies and two word dies to showcase with oodles of cards. Let's jump in!
Card No. 1: Up first is a new layering set focusing on more of the fall and late summer fruits in a stamp set called Fruit Cocktail. For this card I layered the pear (ink colors listed below) and added smiley faces from our Fresh & Fruity stamps. There are a number of fun mix and match sentiments in this set that can be rearranged to create over 10 unique greetings.
For my background I used the pear from that same Fresh & Fruity set to repeatedly stamp the pear using a dark brown ink. I then colored all the images using Copic markers, stamped and cut a few pears from masking material and took turns moving them as I inked up my background with a jumbo dauber using Peacock Feathers distress ink. I then took a white sharpie and added a trio of dots for a little extra interest. As a final finishing touch I mounted my pears on a simple white frame using our Fancy Frames Circle Dies.
Card No. 2: Up next is a card with a similar layout, created using the peach image. My husband is Japanese and they love their white peaches so my ink colors were chosen with him in mind. ;)
Using my MISTI tool I repeatedly stamped the peaches assembly line style and then fussy cut them out. As I learned the hard way, if you want to use the coordinating dies, it really helps to start by die-cutting your cardstock and then using a negative piece of the cardstock with your stamp positioner for perfect stamping each time. Because I didn't do this my leaves didn't line up correctly with the dies and I had no option but to cut them out by hand. ;)
For my background I sponged on some Spun Sugar distress Ink, added a band of gingham paper using our new Gingham Jewel Tones paper being shared tomorrow and a stitched label that comes with a die set that will be showcased on Friday. ;) I just love how these colors look together!
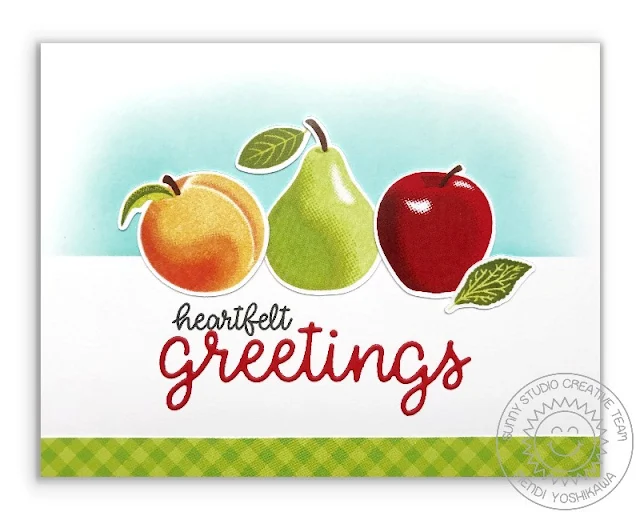
Card No. 3: For my third card with the set, I went with more traditional ink colors for my peach, pairing it with the pear and apple from the set. I inked up my background using the edge of a post-it note with some Tumbled Glass distress ink to give the appearance they are sitting on a table. I finished off the card with a little scrap of patterned paper left from another project and our new Greetings Word die.
Card No. 4: For this card I was inspired by back to school colors, using a red dot paper from our Polka-dot Parade 6x6 paper pack which I paired with a black and white stripe created with our Background Basics stamps. I lined up my apples and sprinkled in some Sparkling Clear Crystals to give the look of water droplets. I added a little interest to my card edge using our Ric Rac Border dies and finished off my card with a sentiment heat embossed onto the pennant from our Fancy Frames Rectangle Dies.
Card No. 5: Up next is a card using a fun punny sentiment from the set perfect for a wedding or anniversary card. I created my background by stamping the polka-dot pattern using those same Background Basics stamps with clear embossing powder on black cardstock--Such a cool look! I then cut down the panel and mounted it on our largest scalloped rectangle from the Fancy Frames Rectangle dies to form my card base.
I used the paper stamp from our School Time Set to form a border to frame my apple couple. I borrowed the bow from our Bundled Up Set to turn them into Mr. and Mrs. and stamped faces using a stamp from our Fresh & Fruity Set.
I used the paper stamp from our School Time Set to form a border to frame my apple couple. I borrowed the bow from our Bundled Up Set to turn them into Mr. and Mrs. and stamped faces using a stamp from our Fresh & Fruity Set.
Card No. 6: I switched gears for my next card showcasing our new Happy Thoughts Stamps and large over-sized coordinating Happy Word Die. I repeatedly stamped the word "happy" from the stamp set on a piece of white cardstock for my background on the diagonal using bright rainbow ink colors.
When I was done, I felt the background was too overpowering and nearly threw it away. To save this card from the trash, the next morning I cut a frame from black cardstock which I backed with a piece of vellum and popped up with foam tape to blur the words a bit. I still felt like it was missing something when I had the idea to pull out some leftover balloons I had stamped using our Birthday Balloons set. It was just what this card needed and now I love it! Just goes to show that it never pays to give up and sometimes all you need to do is walk away & come back with fresh eyes. ;)
I completed the card with some Studio Katia Crystal Clear Mini Sequins. These are new to our store and they are amazing! Love the way they catch the light!
Card No. 7: This was take two on the diagonal stamped background and this too was nearly thrown away. I initially had the idea to stamp each line in the same way that I had on the last one using a different color of embossing powder for each row, but the further along I got the messier it became and I ended up with one big boo boo mixed with quite a rainbow of stray dots that were bothering me. In the end I covered the biggest mistake with my circle frame and disguised the stray dots by masking off the rows to ink up the background to match my embossing for a tone-on-tone look. Once again I was happy to find a way to salvage this after all the time invested. ;)
I decided to set my sentiment on the diagonal for this one since the sentiment was a bit too wide to fully fit on a vertical card and then used our Fancy Frames Circle dies for my scalloped circle. I finished off my card with a cupcake colored with Copics from our Birthday Smiles set and some Studio Katia Satin Rainbow Confetti.
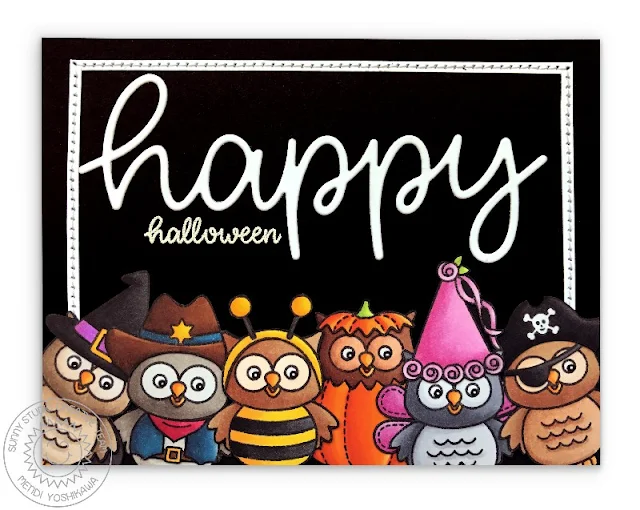
Card No. 8: Up next is a card featuring one of the many holiday sentiments available in the new Happy Thoughts stamp set. I paired the greeting with the owls from our Happy Owl-o-ween Stamps and a simple frame created with my paper trimmer which I stitched over with my sewing machine after it was adhered.
Card No. 9: For my last card of the day I created a Thanksgiving card using the critters from our Harvest Happiness set paired with the oversized Happy word stamp and thanksgiving word from our new Happy Thoughts stamps. For my paper I used a new 6x6 patterned paper called Amazing Argyle which will be shared more tomorrow and die-cut the edge using our Stitched Scallop Dies.
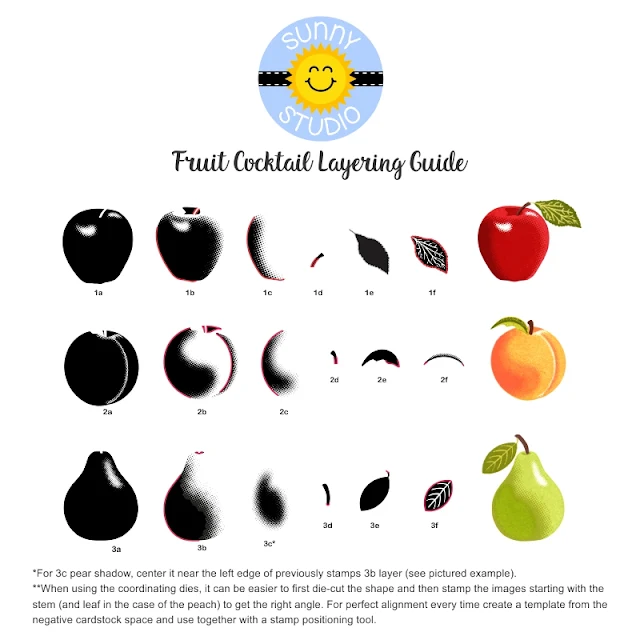
To help you line up our Fruit Cocktail stamps like a pro I've created a special layering guide (you can click on the photo below to view it larger). For all the fruits I started by stamping them with the lightest ink color, working towards the darkest. The red outline indicates where that layer touches the previously stamped layer. :)
I frequently am asked which ink colors I used for my layered images. While I think there are so many great options out there that can provide good results, these are the colors I used today for my stamped images (in the ordered shared from lightest to darkest)...
Yellow Pear
Colorbox Lemonade
Hero Arts Lemon Yellow
Colorbox Dandelion
Green Pear & Green Apple
Colorbox Kiwi
Colorbox Tree Frog
VersaFine Clair Verdant
Pink Peach
Colorbox Pink Capri
Stampin' Up Blushing Bride
Papertrey Ink Pale Peony
"Peach" Peach
Ranger Buttered Popcorn
Stampin' Up Blushing Bride
Papertrey Ink Pale Peony
Dark Red Apple
Colorbox Strawberry
Colorbox Candy Red
Colorbox Cranberry
Red Apple
Hero Arts Pale Tomato
Colorbox Strawberry
Colorbox Candy Red
Leaves
Colorbox Kiwi
Colorbox Artichoke or
Colorbox Grasshopper
I'm so excited you've joined me for today's sneak peek and I'd love to give a $25 gift code to one lucky winner. Make sure to keep checking back all this week for more peeks & prizes for up to five chances to win. The contests run through Saturday at Midnight PST with winners announced here on Sunday, July 15th. :)
a Rafflecopter giveaway Here's a sneak peek at the new stamps & coordinating dies (which will be available for purchase on Friday, July 13th).
Other Sunny Studio Supplies Used:

I frequently am asked which ink colors I used for my layered images. While I think there are so many great options out there that can provide good results, these are the colors I used today for my stamped images (in the ordered shared from lightest to darkest)...
Yellow Pear
Colorbox Lemonade
Hero Arts Lemon Yellow
Colorbox Dandelion
Green Pear & Green Apple
Colorbox Kiwi
Colorbox Tree Frog
VersaFine Clair Verdant
Pink Peach
Colorbox Pink Capri
Stampin' Up Blushing Bride
Papertrey Ink Pale Peony
"Peach" Peach
Ranger Buttered Popcorn
Stampin' Up Blushing Bride
Papertrey Ink Pale Peony
Dark Red Apple
Colorbox Strawberry
Colorbox Candy Red
Colorbox Cranberry
Red Apple
Hero Arts Pale Tomato
Colorbox Strawberry
Colorbox Candy Red
Leaves
Colorbox Kiwi
Colorbox Artichoke or
Colorbox Grasshopper
I'm so excited you've joined me for today's sneak peek and I'd love to give a $25 gift code to one lucky winner. Make sure to keep checking back all this week for more peeks & prizes for up to five chances to win. The contests run through Saturday at Midnight PST with winners announced here on Sunday, July 15th. :)
a Rafflecopter giveaway Here's a sneak peek at the new stamps & coordinating dies (which will be available for purchase on Friday, July 13th).
 Birthday Smiles Stamps Shop at: Sunny Studio |
 Fresh & Fruity Stamps Shop at: Sunny Studio |
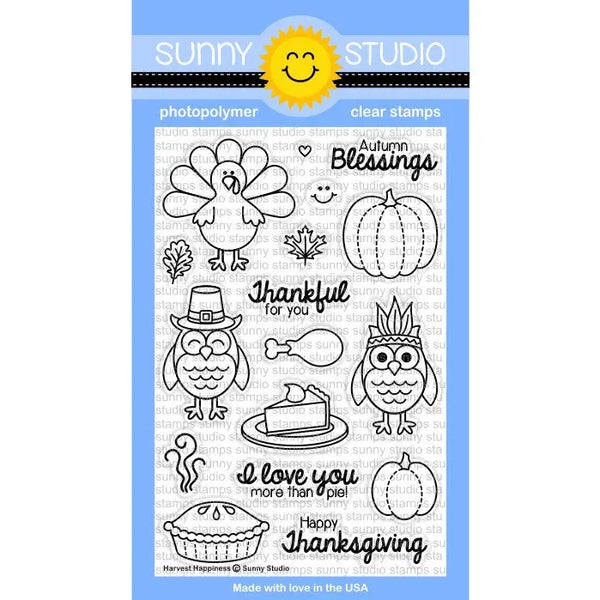 Harvest Happiness Stamps Shop at: Sunny Studio |
 School Time Stamps Shop at: Sunny Studio |
 Tsukineko Jumbo Dauber Shop at: Sunny Studio |
 Happy Owl-o-ween Stamps Shop at: Sunny Studio |
 Birthday Balloon Stamps Shop at: Sunny Studio |
 Birthday Balloon Die Shop at: Sunny Studio |
 Ric Rac Border Dies Shop at: Sunny Studio |
 Fancy Frames-Circle Dies Shop at: Sunny Studio |
 Fancy Frames- Rectangles Shop at: Sunny Studio |
 Background Basics Stamps Shop at: Sunny Studio |
 Classic Gingham 6x6 Paper Shop at: Sunny Studio |
 Crystal Clear Mini Sequins Shop at: Sunny Studio |
 Satin Rainbow Confetti Shop at: Sunny Studio |
 Sparkling Clear Crystals Shop at: Sunny Studio |
 VersaMark Watermark Ink Shop at: Sunny Studio |
 Stitched Scallop Dies Shop at: Sunny Studio |


