Hi there! Thank you for joining me for our second day of sneak peeks as we count down to our fall release coming out on Friday. :)
Today I have two fun new sets to share that play nicely together called Quilted Hexagons and Cute As A Button. A while back a sweet customer emailed me asking me to create a quilt-themed set and it sparked something in me so I totally ran with it. ;)
First up, I have a card using both sets with a happy rainbow color scheme, along with our previously released Color Me Happy Stamps and Color Word die. The Quilted Hexagons come with a row of stitched hexagons and a second row of hexagons that allow you to build on the first row. You can then fill in the spaces with the different patterned hexagons in all your favorite colors and patterns. 
I love that the backgrounds don't have to be perfect to still be beautiful. For both my first card and my next card, I stamped all of these freehand with no stamp positioning tool. The patterns are busy enough that no one is going to notice if you don't have them stamped perfectly centered and it adds to the homespun feel. :)
For my second card I incorporated a row of buttons using the Cute As A Button stamps which come with 7 sentiments that play on the word "sew", along with two layering buttons, a layered needle and a stitched heart. I have to say my heart skipped a beat the first time I saw the buttons layered together--They truly look 3-D without any of the bulk, making them perfect for putting through the mail!

For my third card, I was inspired by THIS quilt. I found for this particular card it was easiest to line things up by using my MISTI (using the instructions outlined below) and the coordinating dies for this set. This pattern utilizes a stamp that has three of the six sections of the hexagon and then you turn your paper a half turn and stamp again with a lighter color. The image has a fine outline in the center to help you line up your second layer.
I found once I got them lined up in my MISTI, I was able to stamp out all my colors rather quickly. I then was able to add the die-cut hexagons to my card with a glue pen in a fun, random pattern. I just drew some light vertical pencil lines to help me keep my rows straight which I was able to erase after my background was assembled.
For my sentiment, I heat embossed my words with black glitter embossing powder on vellum, pairing them with the Sew Word die cut from black cardstock. To hide my adhesive, I added a simple scalloped edge and sewed around the border to tack down the open side.

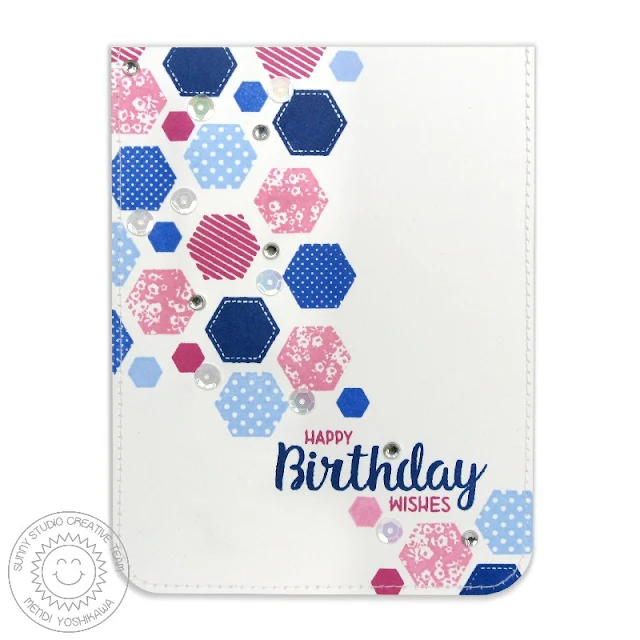
My next card uses the stamps in a more modern, free-form look. To creat this card I started by stamping my sentiment in the bottom, right portion of my card and then stamped the larger hexagons, working out towards the far corners. When I was done, I went back with the smaller hexagon from the set to fill in some of the spaces. I finished off my card with some pearlescent sequins and clear jewels for a bit of sparkle.
My next card uses more of the buttons to create a layered border that honestly would be quite bulky and difficult to achieve with regular buttons. For the bottom half of my card, I blended on Worn Lipstick, Carved Pumpkin, Mustard Seed, Twisted Citron and Peacock Feathers distress ink, before going back over in the same colors and stamping a stitched border using the trail from our Backyard Bugs stamps.
For this card I created an overall pattern using the stamped and die-cut buttons. It looks pretty cool here, but I honestly think it looks even better in person. It begs to be pet with the optical illusion created. I had one friend who kept feeling it, certain they were more dimensional than they really are. ;)
When stamping my buttons (and the hexagons on my third card) I found it easiest to first die-cut them from cardstock and then to create a template to slip them into so I could stamp them assembly line style using a stamp positioning tool like the Mini MISTI. I then stamped the darkest layer first, going color by color and then followed with all my lighter colors. Because circles are round, they obviously can rotate around in the template, but I found if I just did my best to line them up perpendicular that they generally lined up pretty well.
For the Quilted Hexagon set, you really are only limited by your imagination. For these patterns, they both started with a simple stitched background and were built into the two patterns shown here using the diamond and triangle stitched inserts.
To help get your creative juices flowing, I have pinned some patterns and ideas of real hexagon quilts HERE.
Here's a full look at the new 4x6 Quilted Hexagon and 3x4 Cute As A Button clear stamps and coordinating dies available for purchase on Friday morning. I made sure to also add the word "So" the regular way to expand the versatility of the set for everyday use. :)
I frequently am asked what ink colors I've used. While I have used a variety of brands in my samples, there's a good chance you can achieve similar results with inks you probably already have in you stash. I highly recommend stamping your inks out and creating a swatch book to aid you in choosing two inks that compliment each other. These are the ones I happened to use here today from lightest to darkest:
Hot Pink
Colorbox Candy
Colorbox Pinkolicious
Colorbox Very Berry
Ranger Pink Gumball
Colorbox Guava
Red
Colorbox Strawberry
Colorbox Cranberry
Orange
Simon Says Stamp Orange Slush
Colorbox Tangerine
My Favorite Things Orange Zest
Yellow
Colorbox Lemonade
Colorbox Banana
Simon Says Stamp Orange Slush
Green
Colorbox Kiwi
Colorbox Tree Frog
Aqua
Colorbox Seaglass
Colorbox Ocean
Pale Blue
Colorbox Sky
Simon Says Stamp Blue Jay
Medium Blue
Colorbox Poolside
Colorbox Wave
Royal Blue
Colorbox Moody Blue
Colorbox Atlantic Blue
Purple
Colorbox Grape Slushy
Colorbox Grape
Colorbox Imperial
I hope you've enjoyed today's sneak peek. Would you like to win a $25 gift code to our online store to spend on some of the new sets? Use the rafflecopter below to enter to win. We will be giving away a new gift code each day for a total of five chances to win! Contest closes on July 22nd at Midnight PST. Winners will be announced on Sunday, July 23rd. :)
a Rafflecopter giveaway
Make sure to check back tomorrow when I will be sharing another fun new stamp & die set. :)
Other Supplies Used Today:


