Tuesday, March 21, 2017

Timeless Tulips Vellum Wrapped Tulip Bouquet Card with Emily

Hey everyone, it's Emily here. Today's card features the stunning Timeless Tulips stamp set and coordinating dies. These were so easy to stamp and I didn't even use a stamp positioner for these. I stamped them in reverse order using an acrylic block!


Sunny Studio Stamps: Timeless Tulips Vellum Wrapped Tulip Bouquet Card by Emily Leiphart

Sunny Studio Stamps: Timeless Tulips Vellum Wrapped Tulip Bouquet Card by Emily Leiphart

I used Fishtail Banners II dies to create a vellum wrap for the bundle of tulips and died it off with some burlap string and a tag created with the Semi Circles dies and Tag Topper Crescent dies.


Sunny Studio Stamps: Timeless Tulips Vellum Wrapped Tulip Bouquet Card by Emily Leiphart

Thanks so much for stopping by!

Sunny Studio Supplies Used:
        

Monday, March 20, 2017

Color Me Happy Rainbow Window Card with Eloise

Hello everyone! Eloise here and today I have a fun rainbow card to share with you using the Color Me Happy stamp set along with a few other sets also!

Sunny Studio Stamps: Color Me Happy Rainbow Window Card by Eloise Blue

To begin my card today I went ahead and pulled several stamp sets with images I could colour for the whole rainbow. So I pulled Tropical Paradise, Fresh and Fruity, Sunny Sentiments, Froggy Friends, Sweet Shoppe and Stars and Stripes and stamped out one of the images out of each set onto some white cardstock, and used various Copic Markers to colour them in. I then used the coordinating dies to cut them all out. Once my images were ready I would on my window portion. 

I've done this for a previous card before, so I had the template all ready to go, I just lined up the template on another piece of white cardstock, taped it into place and placed the die in the slots to cut them out. For the circles I used the orange slice die from Fresh and Fruity. Once I had cut all six circles, I could work on the background. 

Sunny Studio Stamps: Color Me Happy Rainbow Window Card by Eloise Blue

I masked off the circles behind the window panel and used various colours of Distress Inks to ink blend the background. I did each circle a colour of the rainbow in order. I then used foam adhesive to adhere down the window frame on top of the coloured background piece. I used tape adhesive and glued down my images into their coordinating coloured circle. Once my images were adhered I moved into my sentiment.

I used the 'You Fill My Days with Rainbows' sentiment from the Color Me Happy stamp set and white heat embossed that onto some black cardstock with white embossing powder. I cut down the strip and foam mounted it to the panel. For my card base I added a pink piece of cardstock to the card base and then adhered my panel on top. For a very last finishing touch I used some sequins to add into the circles in coordinating colours.

Thanks for stopping by today, I hope you enjoyed and make sure you check back on the blog for more inspiration this week!

Sunny Studio Supplies Used:


Saturday, March 18, 2017

Guest Designer Spotlight: Cards with Juliana Michaels

I'm so excited to welcome Juliana Michaels to the blog today as our special guest. She has some gorgeous cards that you are going to just love! 

Hello Sunny Studio Fans and Happy Saturday! It's Juliana and I'm thrilled to be guesting again here on the Sunny Studio blog. Today I'm sharing a trio of cards I created using stamps and dies from the recent Spring release.

With my blog being named 17Turtles, I of course have a thing for turtles and I couldn't resist playing with the Turtley Awesome stamp set. Those little turtles are just adorable!

Sunny Studio Stamps: Turtley Awesome and Daffodil Dreams Cards by Juliana Michaels

The turtles and heart were stamped using Versafine Ink and then colored with Prismacolor Colored Pencils. I blended the pencils using a stump blender dipped in Gamsol. Next, I die cut the colored images and added some Glossy Accents to give them a little shine.

Sunny Studio Stamps: Turtley Awesome and Daffodil Dreams Cards by Juliana Michaels

Using my Fuse Tool I created a shaker card pocket and filled it with gold hearts and little irridescent pink hearts. I placed this behind the die cut heart panel and then attached everything to my card base.

Sunny Studio Stamps: Turtley Awesome and Daffodil Dreams Cards by Juliana Michaels

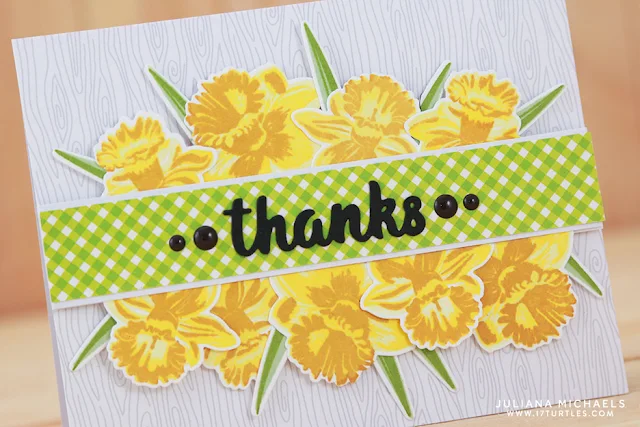
For my second card I used the beautiful Daffodil Dreams set. I really enjoyed working with this layered stamp set to create these realistic looking images.

I stamped the daffodils using 3 different colors of yellow ink and the leaves using 2 different colors of green ink. Next, I die cut all of the flowers and leaves and arranged them to create 2 border pieces. I used washi tape to help hold them together until I was happy with the design and then adhered them to the card using double sided foam tape to give them some added dimension.

Sunny Studio Stamps: Turtley Awesome and Daffodil Dreams Cards by Juliana Michaels

The sentiment is die cut from black cardstock using one of the dies from the Vintage Jar Dies set. I placed this on a strip of patterned paper layered onto a piece of cardstock to create a banner across the card front. The finishing touch was the addition of some black enamel dots.

Sunny Studio Stamps: Turtley Awesome and Daffodil Dreams Cards by Juliana Michaels

I again used the Daffodil Dreams Stamp set and combined it with the Vintage Jar Stamps to create this third card. For the daffodils and leaves, I used the same stamping technique as I did for the first card. I then stamped the jar onto vellum with a light gray ink. Using a foam blending tool, I applied Distress Ink in Tumbled Glass to the backside of the vellum to give the appearance that the flowers were in water.

Sunny Studio Stamps: Turtley Awesome and Daffodil Dreams Cards by Juliana Michaels

After die cutting all of the images, I arranged them on the card front. I used double sided foam tape to adhere some of the daffodils for an added touch of dimension. For the sentiment, I die cut a banner from kraft cardstock and stamped the “thanks” using brown ink. I then tied a bit of twine around the mouth of the jar and attached the banner.

I hope you enjoyed what I shared with you today. For another bit of inspiration, head on over to my blog HERE to check out a fun technique for using the backside of your stamps using the Turtley Awesome stamp set

Sunny Studio Supplies Used:


Friday, March 17, 2017

That Sucks Puppy Girl Vacuum Card with Lexa

Hello crafty friends! Lexa here today with a card starring That Sucks Stamp and it's coordinating dies. I've been thinking about the idea to pair the vacuum with one of Sunny Studio standing critters, so I try all the possibilities and came up with this girl puppy from Sockhop Stamp. They look pretty well together with the punny sentiment. A perfect card for someone you can't live without. For me, it's my mom.

Sunny Studio Stamps: That Sucks Puppy Girl Vacuum Punny Card by Lexa Levana

I usually make a lot of cards with scenes, but this time I try to play with layouts. I must say it's out of my comfort zone. I start with a 4.25"x5.5" piece of white cardstock and blend some blue inks with a grid stencil on the left side. Salty Ocean and Tumbled Glass Distress Inks are perfect for the blue hues I try to achieve. I stamped my images with Versafine black ink and watercolor all of them with Distress Markers. I fussy cut the puppy's hands with craft knife so I can tuck the vacuum handle between them. 

Sunny Studio Stamps: That Sucks Puppy Girl Vacuum Punny Card by Lexa Levana

A few things that I love about That Suck Coordinating Dies are that it has the "suck" with bolder font than the stamp, and you also can use the tiny heart dies without the stamp too (just like I did with my card). One more thing - coordinating dies really make your life easier. Hehe. 

Thank you so much for stopping by today, I hope you all have an awesome day!

Sunny Studio Supplies Used:
      

Thursday, March 16, 2017

Easter Wishes Spring Birthday Card with Vanessa

Hi everyone! Vanessa here with a spring birthday card using Easter Wishes. This set is so adorable and versatile, I am sure I'll be using it all year long!

Sunny Studio Stamps: Easter Wishes Spring Birthday Card by Vanessa Menhorn

I first created a sky on the front of my card base, using the cloud from the Little Angels Dies and an ink blending tool. Now I trimmed a green panel to fit the card and die-cut a circle from the top left corner. After I had adhered the panel, I stamped the sentiment (a mix of Froggy Friends and Sweet Shoppe). 

Sunny Studio Stamps: Easter Wishes Spring Birthday Card by Vanessa Menhorn

Now I stamped all the images onto white cardstock, colored them with Copics and die-cut them with the matching dies. Finally, I adhered the images to the card, using foam tape to pop some up for more dimension.

Happy Spring everybody! And thanks for stopping by today!

Sunny Studio Supplies Used: