Friday, March 10, 2017

Daffodil Dreams Birthday Bouquet Card with Lexa

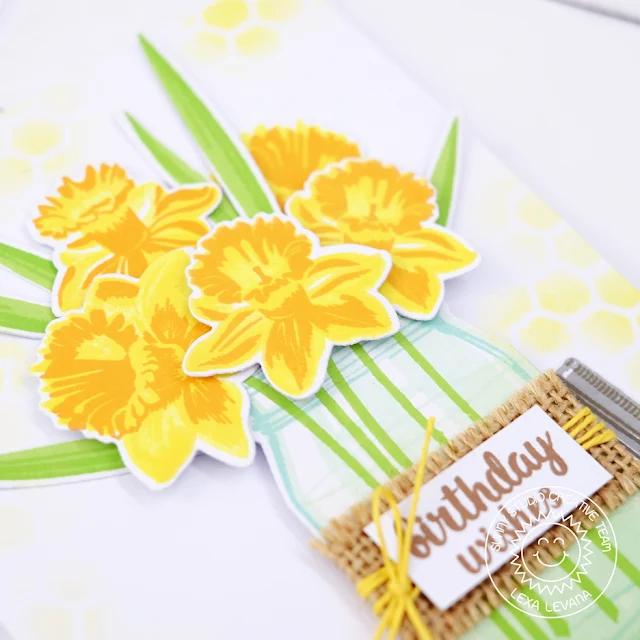
Hello everyone! Lexa here with a flowery card starring Daffodil Dreams stamp and coordinating dies. Layering stamp is so much fun, effortless and create a super beautiful result in the end. Sunny Studio's layered stamps are probably one of the easiest to work on with.

Sunny Studio Stamps: Daffodil Dreams Birthday Bouquet Card by Lexa Levana

I stamped my daffodils with yellow and orange dye inks, also two shades of green for the leaves and die cut all of them with the coordinating dies. The Vintage Jar looks so real and pretty, I use mint ink for the base color and aqua as the outline. I also use some real burlap and some yellow twines tied around the jar. With the lid on the side, I try to tell a story as if someone just opened the jar and put a bouquet of fresh daffodils in. To create a ground for my main star, I blended Frayed Burlap Distress Ink with a simple line masking. The same yellow dye ink for the daffodils also used for the background, I blended it with a bee hive masking. I try to keep it light so I just blend it only on the edges.

Sunny Studio Stamps: Daffodil Dreams Birthday Bouquet Card by Lexa Levana

I'm not really good at arranging flowers, but I must say that this daffodils are pretty easy to work with. I just need some foam tapes to add some dimensions and here it is. So effortless. If I can do this, everyone can. Here's a closer look of my card.

Thank you so much for stopping by today. I really hope you like this and give it a try to do some stamp layering. Have a wonderful day!

Sunny Studio Supplies Used:
      

Thursday, March 9, 2017

Turtley Awesome Turtle Parade Happy Birthday Card with Vanessa

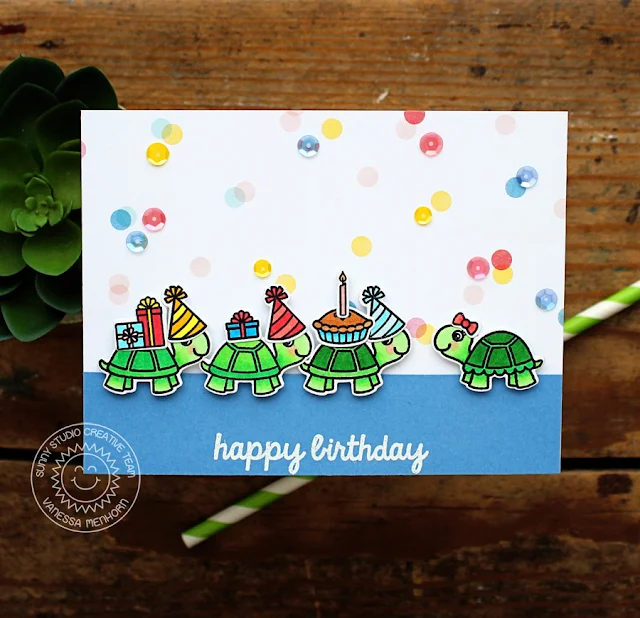
Hi everybody! Vanessa here with a colorful birthday card using Turtley Awesome. These cute turtles always make me smile and it is fun to play with them and add accessories from other sets to dress them up!

Sunny Studio Stamps: Turtley Awesome Happy Turtle Birthday Card by Vanessa Menhorn

I stamped all the images onto white cardstock, colored them with Copics and die-cut them with the matching dies. The hats and the bow are from Froggy Friends, the pie is from Woodsy Creatures, the candle from Little Angels and the presents from Gleeful Reindeer

Sunny Studio Stamps: Turtley Awesome Happy Turtle Birthday Card by Vanessa Menhorn

Now I made a card from patterned paper and trimmed a strip of blue cardstock to fit the bottom third of the card. I stamped and heat-embossed the sentiment from Comfy Creatures and adhered the strip to the card. Now I adhered the images with foam tape and finished the card off with matching sequins.


I hope you like all the fun party guests! Thank you for stopping by today!

Sunny Studio Supplies Used:


Wednesday, March 8, 2017

Easter Wishes Tri-Fold Easter Card with Amy

Hello friends! Amy here. Today I'm sharing a card I made using the Easter Wishes stamp set along with the coordinating Easter Wishes dies. This a great stamp set that allows you to make beautiful, clean and simple Easter cards or create really fun scenes with adorable critters and pretty flowers. I combined two styles together into a tri-fold card.

Sunny Studio Stamps: Easter Wishes Tri-Fold Easter Cross Card by Amy Yang

The paper is trimmed to 12"x 5½", and I scored the lines at 4"and 8". I used the cross die to cut directly onto the front of the card and stamped the gorgeous sentiment with Versamark ink. I heat-embossed the sentiment using black embossing powder. Next, I folded the card at the scored lines and stamped the cross inside the die-cut opening so that it would line up correctly when the card was closed. 

Sunny Studio Stamps: Easter Wishes Tri-Fold Spring Bunnies & Chicks with Cross Card by Amy Yang

After, I used masking paper to cover the cross and colored the background of the the second layer of the card with the distress inks Citrus Citron and Peacock Feathers. I also lightly applied Mustard Seed distress ink to the front of the card just around the cross to add more interest. I love to add texture to my cards so I spritzed the backgrounds with water and picked up some of the colors with paper towel. 

Sunny Studio Stamps: Easter Wishes Tri-Fold Spring Bunnies & Chicks with Cross Card by Amy Yang

I stamped all the images I used on this card and colored them with copic markers. I then cut them with coordinating dies. Finally, I created my scene by adhering the images onto the second layer of the card.

I hope you enjoyed today's card. Thank you for stopping by!

Sunny Studio Supplies Used:


Tuesday, March 7, 2017

Easter Wishes and A Good Egg Easter Card Duo with Emily

Hey everyone, it's Emily here. I'm showcasing a duo of cards using Easter Wishes and A Good Egg. Two of the best things about Sunny Studio Stamps are the sheer volume of images included in every stamp set and their versatility. 

Sunny Studio Stamps: Easter Wishes and A Good Egg Easter Card by Emily Leiphart

This could not be more true for the Easter Wishes stamp set, as well as last year's Easter set, A Good Egg. The sentiment and all of the images, except the basket, on these two cards are from Easter Wishes. The basket full of eggs is from A Good Egg

Sunny Studio Stamps: Easter Wishes and A Good Egg Easter Card by Emily Leiphart

I love that those two sets go together! I almost threw in the humanized bunny from Sending My Love to over-see the scene. How funny would that have been? LOL.

Sunny Studio Stamps: Easter Wishes and A Good Egg Easter Card by Emily Leiphart

Thanks so much for stopping by!

Sunny Studio Supplies Used:
      

Monday, March 6, 2017

Friends & Family Coloured Heart Background Card with Eloise

Hi everyone! Eloise here and today I have a card featuring the new Friends & Family stamps, along with the Friends & Family Word diesI also have a background technique featuring some die embossing with the Stitched Hearts dies as well as masking to create a fun coloured background too.

Sunny Studio Stamps: Friends & Family Colored Heart Background Card by Eloise Blue

To begin my card today I pulled a piece of watercolour cardstock and four different pink to red Distress Inks. I then used the Stitched Heart die set and taped the trio of larger hearts together. To do the die embossing onto my cardstock I use an embossing mat - they're inexpensive and super handy to have. I opened my Big Shot tab, I laid down a cutting plate, then the embossing mat, the piece of cardstock, then the dies into place, the cutting plate on top and ran it through and I continued this until the background was covered. This gets a little tricky as the dies are quite large and they can't run through as easy as they're too wide, but if you play with them a bit, you can get them through no problem. Once my background was coloured, I kept my dies taped together and ran them through with some masking paper, but this time I removed the tan mat, put my Big Shot back to normal cutting sandwich and ran it through a couple of times to get all the pieces I needed to mask. Once I had all my pieces I was ready to blend.

I first masked off the outside of the large heart, so the background and then the middle of the trio of hearts. Which revealed the 1st heart and the 3rd heart. I used Picked Raspberry, Abandoned Coral and Festive Berries in an ombre style to ink blend over the two exposed hearts. I then repeated this step for all four heart clusters. I then reversed the masks and covered the 1st heart and 3rd heart and ink blended the rest with the Spun Sugar - I was going to originally leave it white, but I had a few boo-boos, so I had to cover it up somehow. Once everything was blended I flicked a little water over top to create that fun Distress water splotch look.

Sunny Studio Stamps: Friends & Family Colored Heart Background Card by Eloise Blue

For my sentiment I first die cut the 'family' word die from the Friends & Family Word die set out of some white fun foam and white cardstock, adhered them together and then onto my card panel. I then stamped the 'The love of' and 'it's everything' from the Friends & Family stamp set with some black ink above and below my adhered die cut. So the sentiment reads 'The love of family, it's everything'. I really love this stamp and die set, it's super sweet. To finish my card up completely I added some Wink of Stella in the clear onto the Family die cut word and that was it.

I hope you enjoyed my card today - I really love the background, it's so fun to do and with all that extra embossing, just makes it even more wonderful. You could even die cut it and inlay it instead if you would prefer, that makes it have the same effect, you just have to adhere it together - but if you don't have the embossing mat, this would work great!

Make sure you stop by the blog the rest of the week for more inspiration!

Sunny Studio Supplies Used: