Friday, December 9, 2016

Little Baker Angels Card with Lexa

Hi everyone!

It's Lexa here with these cute little angels as bakers for today. I love how versatile Sunny Studio Stamps are, you can mix all of them to make cards for all year around just like I have done here today. I combined Blissful Baking and Little Angels stamps, and they look so good together.

Sunny Studio Stamps: Little Angels & Blissful Baking Card by Lexa Levana (using Sunny Semi Circle dies for the arched window)

I started the card with a piece of 4.25" x 5.5" white cardstock and created a window using the second largest arc from Sunny Semi Circles dies and cut the rest with craft knife following the end points on both sides. I stamped all my images with Versafine black ink and watercolored them with Distress Markers. After I finished with the coloring, I die cut all the images with the coordinating dies

I created a dreamy background with dye inks from various brands. Building up the scene is the most fun part when making a card. I also add some clear sequins for extra sparkle. Here's a closer look at my card..

Sunny Studio Stamps: Little Angels & Blissful Baking Card by Lexa Levana (using Sunny Semi Circle dies for the arched window)

Thank you so much for stopping by. I hope you like today's card and have a wonderful day!

Sunny Studio Supplies Used:


Thursday, December 8, 2016

Gleeful Reindeer Card with Vanessa

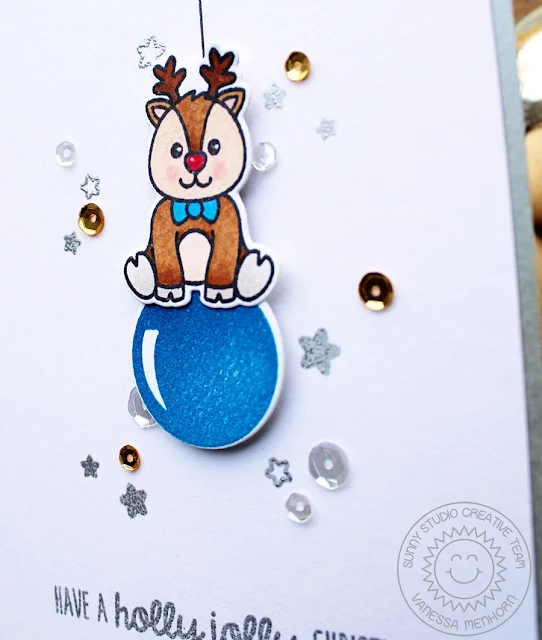
Hi everybody! Vanessa here with a new card using Gleeful Reindeer and Holiday Style. How about a reindeer swinging on a Christmas bulb?


Sunny Studio Stamps: Gleeful Reindeer & Holiday Style Christmas Card by Vanessa Menhorn.

I trimmed a piece of cardstock slightly smaller than my silver card base. Then I stamped and heat-embossed the sentiment and the stars and adhered the panel to the card. I stamped the Christmas bulb, die-cut it with the matching die and adhered it to the card with foam tape. Now I stamped the reindeer , colored it with Copics and die-cut it with the matching die. I drew a string for the bulb and adhered the reindeer with foam tape. Finally I added gold and silver sequins.


Sunny Studio Stamps: Gleeful Reindeer & Holiday Style Christmas Card by Vanessa Menhorn.

The cute Christmas sets are so fun to combine! I hope you like today's card! Thanks for stopping by!

Vanessa

Sunny Studio Supplies Used:
      

Wednesday, December 7, 2016

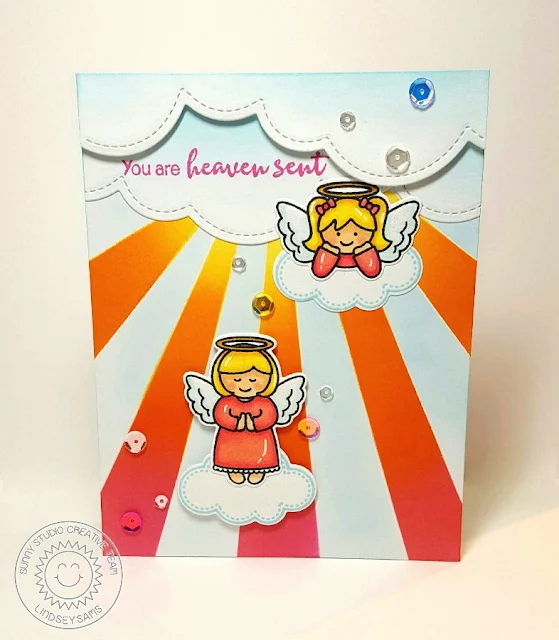
Little Angels Heaven Sent Sunburst Card with Lindsey

Hi, Lindsey here today sharing a card using Little Angels and Angelic Sentiments. The little angels are just so cute and coordinates perfectly with Angelic Sentiments. This set is great for the holidays and also works great for everyday cards. Let's get started on how I created this card.


Sunny Studio Stamps: Little Angels & Angelic Sentiments You Are Heaven Sent Card by Lindsey Sams.

I began with an A2 piece of white card stock. To create my background, I used distress inks. I simply masked off the area I wanted to ink up using some scrap paper. I would blend the ink in that area and then move the mask to the next area. 

Once I had the background finished, I cut some strips of white card stock using a cloud border. I stamped my sentiment on the back cloud and attached the clouds to the top of the background piece. I stamped two little angels and two clouds on some white card stock and colored the angels using Copic markers. I attached the angles to the clouds and then to the card using regular adhesive and foam tape. To finish the card, I added some Wink of Stella to the clouds and angel wings, and I attached a scattering of sequins.


Sunny Studio Stamps: Little Angels & Angelic Sentiments You Are Heaven Sent Card by Lindsey Sams.

That's it for me today. I hope you enjoyed my card and will give this adorable set a  try. I can't wait to see what you guys create. Thanks for reading and have a great day!

Sunny Studio Supplies Used:
    

Tuesday, December 6, 2016

Santa' s Helpers Christmas Card with Emily

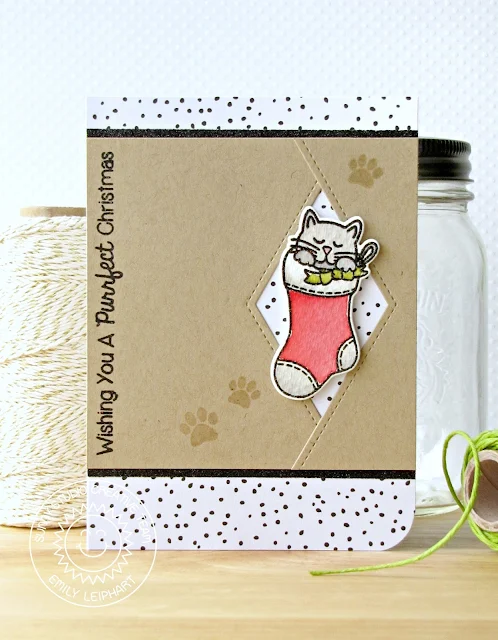
Sunny Studio Stamps: Santa's Helpers Cat In Stocking Christmas Card by Emily Leiphart.

Doesn't the kitty look snug in that stocking? Santa's Helpers is one of my favourite holiday animal holiday sets! I love colouring them and they are so cute. I coloured all of the images at once so I could make a whole batch of cards. They'll be going to all the friends who have pets or are getting new pets this Christmas.


Sunny Studio Stamps: Santa's Helpers Cat In Stocking Christmas Card by Emily Leiphart.

I heat embossed both the image and the sentiment with sparkle embossing powder so the black outline is super sparkly! It's perfect for holiday cards. I created a diamond-shaped focal point by connecting two banners made with the Fishtail Banners Dies.


Thanks so much for stopping by!

Sunny Studio Supplies Used:
    

Monday, December 5, 2016

Merry Sentiments Rainbow Lights Card with Eloise

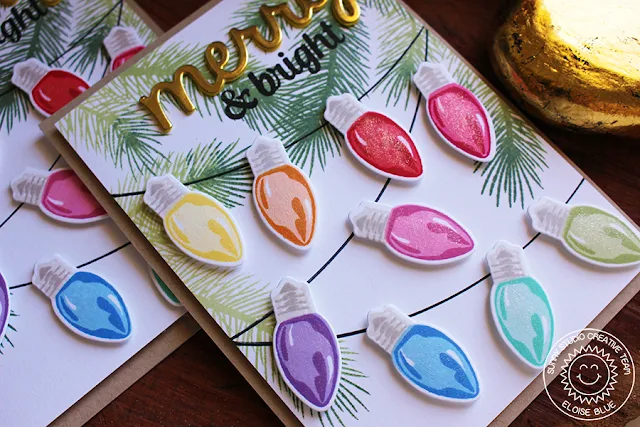
Hey everyone! Eloise here and today I'm making a rainbow string of lights card using the Merry Sentiments stamp set. My original idea for this card was to just have the three strings across a card, similar to how the card turned out this time and to just have a popped up sentiment over top, but when I did that.. I wasn't sure I liked it. It was too clean and simple and needed more colour and if you know me, I never have clean and simple cards. So I came up with this card.

Sunny Studio Stamps: Merry Sentiments and Holiday Style Rainbow Lights Card by Eloise Blue.

To begin my card I cut down a piece of white cardstock and stamped down some branches from the Holiday Style stamp set in various green inks. Just around the top of the card. I then took a plate and traced around the edge of it to create the lines for the lights to sit on. I then used various colours of rainbow coloured inks and stamped down the bulbs. I stamped down two of each in case I made a mistake, but these bulbs are so easy to line up! Once everything was stamped, I could die cut them out.

Now, since this die is solid, there was a little bit of an issue. So I used a trick I learnt from Michelle Short quite a while back. All you do first is die cut the die out of some plain cardstock. Then you use the negative piece and place it over your stamped image in the spot where it's equal on all sides. Then adhere it down with washi tape. Then place the die over top and it should just fall into place, then adhere that down and you're ready to run it through your big shot. When you run it through and take it out, your image should be perfectly centred! I love this trick, so handy.

Sunny Studio Stamps: Merry Sentiments and Holiday Style Rainbow Lights Card by Eloise Blue.

Anyway, once all my pieces were die cut I adhered down all my bulbs with foam tape, in my rainbow order. I always like to start with yellow first, I don't know why. But anyway, once they were all adhered I then stamped out the '& bright' portion of the sentiment at the top of the card in black ink. I then used the Merry die and die cut that out of gold cardstock and adhered it down above the '& bright' portion of the sentiment. To finish up my card I adhered down the panel with fun foam on a kraft card base and added some wink of stella all over the lights.

Hope you enjoyed my card today. Definitely wasn't what I was planning at all, But I love all the green  stamping at the top. I always love green on my cards! Thanks for stopping by today and check back the rest of the week for more inspiration.

- Eloise

Sunny Studio Supplies Used: