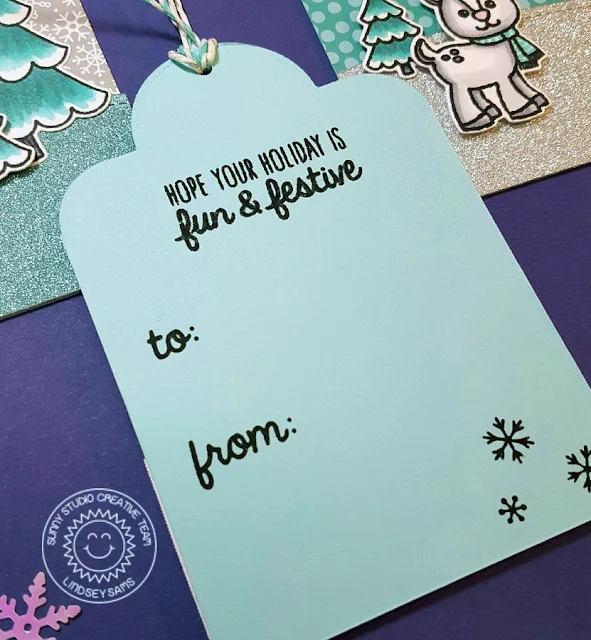
Hi Lindsey here today sharing some cute holiday tags using the brand-new Crescent Tag Toppers, Christmas Icons, and Gleeful Reindeer. I just love how all the new sets and dies can be mixed and matched to create some really fun designs. Let's get started!
To begin, I cut some 3" by 4 1/2" rectangles from both patterned paper and some solid cardstock. The patterned paper would hold the stamps on the front of the tag and the solid paper would be the back of the tag where you would address it. Once those were cut, then I used the Crescent Tag Topper to create a tag. It was super easy to do. In order to have a place for the reindeer to stand, I cut some hills from glitter paper to place at the bottom of each tag. Next, I stamped all my images and colored them with Copic markers and cut them out using the coordinating dies. Then it was time to build the scenes. I used regular adhesive as well as some foam adhesive to keep my images in place. I added a few sparkle dots to a couple of the tags just to add a little interest.
Now that the fronts of the tags were finished, I needed to work on the backs. I stamped the "to" and "from" from the Christmas Icons stamp set and a sentiment and snowflakes from the Gleeful Reindeer stamp set. Adding the sentiment and snowflakes helped the back of the tag not look so plain. To finish, I added some silver sparkle twine and turquoise twine to tie the tag to a package. That's it!
This was a fun project to make. I love making cards but sometimes it's nice to switch it up a bit. Tags are a fun way to dress up a package especially at the holidays. I hope you'll try your own. Keep checking back to the blog for more fun projects and inspiration using all the fun new products! Have a great day!
Sunny Studio Supplies Used:
Wednesday, October 12, 2016
Tuesday, October 11, 2016
Little Angels Sing Card with Emily
Today's card features the Little Angels stamp set. Coordinating dies are also available and would be fabulous for creating dimension. I did a lot of masking to keep my card flat for holiday mailing. After stamping the images, I curved two of the sentiments to go along with the scene.
Then I watercoloured all the images using distress inks. After the panel dried, I added shimmer to the halos and wings, which you can see in the angled photo above.
Thanks so much for stopping by!
Supplies Used:
Monday, October 10, 2016
Night Time Gleeful Reindeer Scene with Eloise
Hello everyone! Eloise here and I'm back with my card for this week. I was inspired by a card I did a few months ago for a previous Sunny Studio release, but I switched it up a little and came up with this super cute reindeer card! This is the new Gleeful Reindeer stamp set that has just been released along with the Merry word die as well. I love these word dies, they're so versatile and fun!
To begin my card today I first started off with die cutting 6 squares to use on my card. You don't have to use dies if you don't want too, since they're square - you can just use your trimmer! I just used dies because they were convient for me. I then pulled the stamps I wanted to use from the Gleeful Reindeer stamp set and stamped each of the images I wanted down in the squares. I did have to use some masks since I wanted things to appear in front and behind and I wanted these pieces to be completely flat. Once all the stamping was done I used my Copic Markers and coloured in all the images.
Once all the colouring was done I wanted to colour in the backgrounds of each of the squares, so I stamped my images once again on masking paper and covered them up. I then used a couple of Distress Inks and ink blended over the images and created the night sky look. While the masks were still colouring the images, I also used my favourite water splotch technique and splatted a litter water over each square also.
Now that all the colouring was done I could start bringing my card together. I first pulled some red and white striped patterned paper from my stash and adhered that down to my white 4" x 5 1/2" cardbase. I then pulled another piece of white cardstock and used an embossing folder to give that plain white piece some texture and interest and I stuck that on top of my patterned paper piece with some fun foam. I then used some foam adhesive to adhere down my squares onto that white piece. I made sure they were basically all even on there too - I used a t-square ruler to help with that.
Now my card was basically done I needed a sentiment. I was dying to use the Merry die so I die cut that out of some fun foam and gold mirror cardstock and adhered the two together and then on my card. For the word christmas, I masked off one of the sentiments in the set and white heat embossed it on some black cardstock. Then I adhered it down flat to my card. For a last finishing touch I used some Wink of Stella and added a little clear shimmer onto some of the images. You have to have a little sparkle on Christmas cards, right?
Thanks for stopping by today, I hope you enjoyed and got inspired. Make sure you stop by the blog for the rest of week to see the other ladies projects for the week, they're going to be amazing!
- Eloise
Sunny Studio Supplies Used:
Sunday, October 9, 2016
Sunny Studio Winter Release Giveaway Winners!
Thank you everyone who joined our Winter Release festivities this week! It was such a joy having you help me celebrate. Without further ado, the winners of our five $20 gift codes are...
Monday, Oct 3
Heidi Hurley
Tuesday, Oct 4
Karen Linkogle
Wednesday, Oct 5
Gilda (McStamper)
Thursday, Oct 6
Jo Williams
Friday, Oct 7
Sue Martin
Ladies, I have emailed you. For everyone else, there's still two days left to take advantage of our free shipping offer. Please note that with Columbus Day on Monday, any orders placed in the next two days will go out on Tuesday. :)
Don't forget you can also combine the free shipping offer with our SAVE5 promo code on orders over $49.
Hope you have a wonderful and relaxing Sunday. :)
Saturday, October 8, 2016
Sunny Saturday Share: Customer Fall & Winter Cards
Hello Peeps! I just wanted to thank you for your overwhelming support this past week. Your sweet comments truly made my week extra special. I think our paper crafts industry is filled with some of the sweetest souls around.
I thought I would take this Saturday to share a handful of gorgeous customer cards that caught my eye over the past couple of weeks.
Bundled Up Penguin Shaker Card by Andreea Raghina
Autumn Splendor Fall Leaves Card by Cassie Tezak
Snow Kissed Skiing Penguin Card by Nicky
Gleeful Reindeer Card by my friend Lorna. :)
Thank you so much for sharing your beautiful cards with us. Please keep 'em coming. Tag me with the hashtag #sunnystudiostamps on Instagram, our facebook page or in our flickr group for your chance to be featured here in our next Sunny Saturday Share feature. :)
Also, mark your calendars. Two weeks from today I will kick off a fall themed challenge. ;)
Sunny Studio Supplies Used:
Subscribe to:
Comments (Atom)


