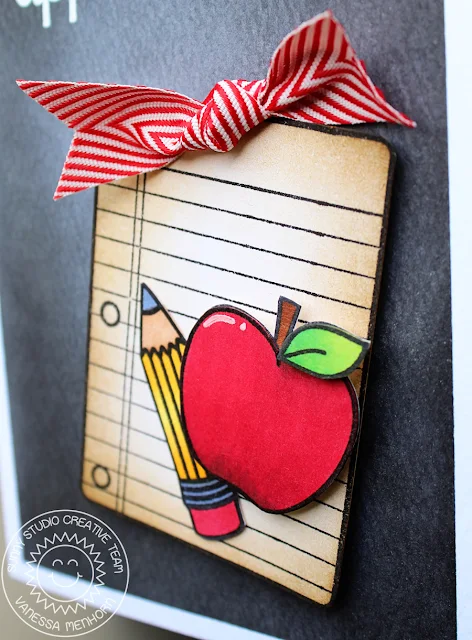
Hello everyone! Vanessa here with a card using School Time. Here in the south of Germany, we are only halfway through school vacation, so I am still enjoying time with my girl. But it will be over too soon and then I'll have this card to give to her:
I started with a panel of watercolor paper, masked off the edges and applied black dye ink with an ink blending tool. This way I created a background that looks like a chalk board. Now I stamped and heat-embossed the sentiment with white embossing powder and adhered the panel to my card base. I stamped the apple, the pencil and the notebook page onto white cardstock, colored them with Copics and fussy-cut them. On the apple, I stamped a second leaf and adhered it to the apple with foam tape. Then I adhered the images to the card. Finally, I trimmed and tied a piece of chevron ribbon and adhered it to the top of the notebook page.
I hope you liked today's card! I am off to enjoy more time without school :) Hope to see you back next week!
Vanessa
Supplies Used:
Thursday, August 25, 2016
Wednesday, August 24, 2016
School Time You Rule Teacher Card with Lindsey
Hi! Lindsey here today! I've got a fun card using a previously released stamp set called School Time. This set has lots of great school images perfect for making cards for all those hardworking teachers! You could also use this set to make little notes for your kiddos. Let's get started!
I started with an A2 sized rectangle cut from some patterned paper. Then I cut a slightly smaller rectangle out of some patterned paper that looked like notebook paper. The notebook paper is where I decided to stamp my sentiment. Next I cut another rectangle the same size as the notebook paper from white cardstock. This is what I did my stamping on. I stamped several rulers from School Time in a row along the bottom of the rectangle.
Then I stamped the owl from Woo Hoo on top of one of the rulers. I had to do a bit of masking on the owl's feet before stamping the ruler under him. I colored all my images with Copic markers. I then fussy cut the rulers and owl along the top of the stamping. I then attached the stamped panel to the front of the notebook paper rectangle and popped that rectangle up on the A2 sized patterned paper with some foam tape. I just loved how this card turned out. The bold rainbow colors are just too fun!
That's it for me today. I hope you'll check out this stamp set and the blog for more fun inspiration! Thanks for reading and have a great day!
Supplies Used:
Tuesday, August 23, 2016
School Time: You're A Good Apple with Anni
Hey stampers, Anni! Today I have a card for you that uses just a few supplies: the stamp set School Time, some inks, cardstock and some Copics to color with. It is easy to make and perfect for mass production.
As I said the card is easy to make but as easy it is I used four (yes, four!) different ink pads on this simple card. For the apple I used an Copic friendly ink (Memento Tuxedo Black Ink).
For the sentiment I chose Versafine ink because it is perfect for detailed images and letters.
For the lined page I needed an ink that is more subtle so I decided to go with a warm grey.
And finally for the background I wanted something that wasn't too dominant. I love the effect of white pigment ink on kraft cardstock so that was the way to go.
In the end I thought the card needed something so I added some Glossy Accents to the apple.
Thanks for stopping by and have a sunny week!
Anni
Monday, August 22, 2016
School Time Melted Crayon Inspired Card with Eloise
Hi there! Eloise here again today and I'm here to show you a card I used featuring the School Time stamp set and dies. I love seeing that melted crayon art that you see and I wanted to create a card like that today using watercolours.
To begin my card I stamped and embossed lots of crayons from the School Time stamp set on some watercolour paper. I then used my Peerless Watercolours to watercolour them in. Once they were dry I die cut them out using the coordinating dies. I then took a piece of watercolour cardstock once again and used the a stitched rectangle die to die cut it out. I then used the same Peerless Watercolour colours to watercolour the background in rainbow order. I did a super messy watercolour to try and replicate the look of the watercolour dripping down. I then dried it off with a heat tool to dry it completely. I then used foam adhesive to adhere down my crayons onto the top of the die cut rectangle.
For my sentiment I cut a thin strip of black cardstock and stamped down the 'thank you' sentiment from the same set and white heat embossed it. I foam mounted that onto the panel and then went onto adhering my card together. I was going to just adhere it onto the white card base but I wanted to break it up a little so I cut a scalloped rectangle out of some kraft cardstock and adhered that flat onto the card. I then used some fun foam on the back of the watercoloured panel and adhered that down too. To finish it off I used some Wink of Stella on the crayons to give it a little sparkle.
That's it for today, I hope you enjoyed and got inspired to use this School Time stamp set. Make sure you check out the blog this week for more inspiration using this set!
- Eloise
Sunny Studio Products Used:
Saturday, August 20, 2016
Guest Designer Spotlight: Fall Cards with Marion Vagg
Hello there. It's Marion Vagg here and I am super honoured to be making an appearance again on the Sunny Studio blog. Congratulations Mendi on a wonderful first year of business and I can't believe Sunny Studios has turned 1 already! I hope this next year exceeds all your expectations!
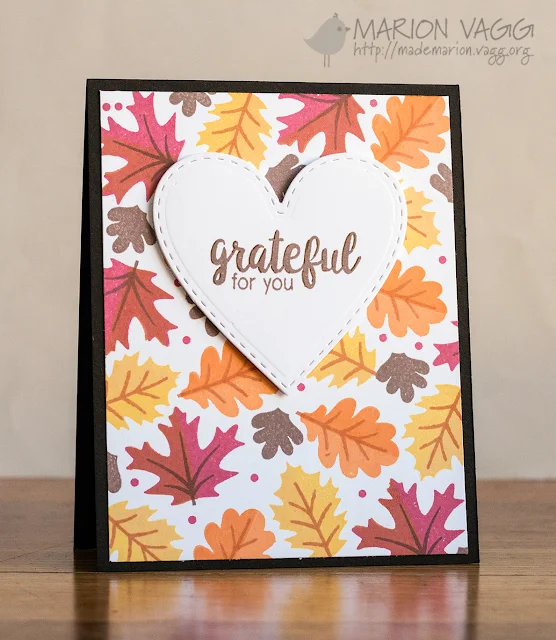
Today I have made two cards using some of the August 2016 Release stamp sets. Talk about classy and cute! First up I have used the Autumn Splendor stamp set and created my own leafy background. It was fun mixing and matching the colours on the leaves. The sentiments in this set are really lovely and I just adore the font. I die cut a heart from the Stitched Heart dies set and then stamped the sentiment on it. To add a little more interest, I used a distress marker and added some shading to the sentiment.
My second card uses the adorable Woodsy Creatures stamp set. Talk about CUTE! I stamped and masked all those cute animal faces to create a polaroid photo scene. They are all coloured with Copic markers.
I hope I have inspired you in some small way today. Thank you Mendi for having me back on the blog. I have had a blast.
Until next time,
Marion
Subscribe to:
Comments (Atom)


