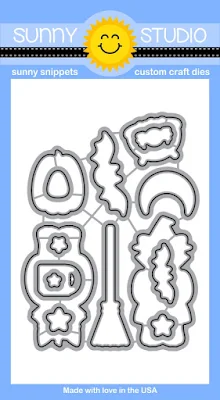
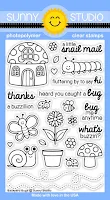
I'm so excited that our little company is turning one this month and we're celebrating with three new Fall stamps & their coordinating dies coming out on Friday. Today I'm sharing several ideas for a new stamp set called Halloween Cuties! This set comes with two costumed Critters and includes all sorts of supporting images from jack-o-lanterns, to bats and spiders (I promise they're more cute than creepy). ;)
Up first is a little scene using a number of images from the set (along with an extra pumpkin from our Harvest Happiness set) which I colored with Copic Markers.
For my next card I focused on the bats, moon and stars from the set (and the banner from our Sunny Borders set). After coloring my images with Copics, I finished my card by adding a bit of bling to the moon & stars using the new Spectrum Noir Clear Sparkle Pens.
For my last card I used that the same little witch, pairing her with the broomstick and cauldron that come with the set.
Curious how I created the bokeh backgrounds for my three cards? I've put together a little step-by-step picture tutorial for you (click on the image below to view it larger).
It's a twist on an idea that the amazing Sandy Allnock inspired me with HERE. She used magnets & a Copic airbrush for her idea and for mine I used die-cut vinyl circles, Distress ink & my favorite jumbo dauber by Tsukineko. :)
I actually love this technique so much that I also used it on some cards shared earlier HERE and HERE.
Here's a full look at the new Halloween Cutie stamps and coordinating dies.
I'd love to hear what you think. Make sure to keep checking back throughout the week. I will be sharing more fun ideas, including more for this set on Friday when we will have 10 special guests helping us celebrate with a birthday blog hop and lots of prizes along the way!
Tuesday, August 9, 2016
Monday, August 8, 2016
Birthday Smiles Ice Cream & Balloon Cards with Mendi
Hello there! It's Mendi here today and I'm so excited to be taking over the blog for the week. Today I have a couple of bright and happy birthday cards to share using a versatile set from our original release called Birthday Smiles. This set has so many options packed in it and I've been dying to find some time to finally play with the coordinating dies we released in the Spring!
Up first is a card taking advantage of the dies by using them to cut the shapes from felt. I'm weird, but I actually find fussy cutting relaxing so I don't always use the coordinating dies, but I think this die set is one that works so well as a stand-alone set too with all the cupcakes, ice cream and banner images.
I started by stamping my sentiment on the bottom of my card panel using our Sweet Shoppe set (I decided I would hate to mess that up after all the stitching that follows). I then adhered the cones to my card with a little liquid adhesive and stitched them on my sewing machine, starting by stitching the outside edge and then using it a a guide to stitch the diagonal rows. When I was done, I pulled the threads to the back of my panel and taped them down all at once. From there I added my ice cream and stitched again around the edge (taking the corners slow). I considered stitching on the toppings as well, but it was getting pretty bulky so I decided to poke holes in the top of each with a paper piercer and add some decorative brads instead. I finished off my card by adhering some pink felt to white cardstock for stability and then die-cut it using our Sweet Word die. I love the look!
For my next card I used the Birthday Smiles set to stamp the solid balloon image (it comes with both an outline and a solid version for more techniques and flexibility). I love how the balloons look when overlapped with each other! Using my ink swatch book I was able to find colors that were a really close match to my striped Doodlebug paper--Love Jennifer McGuire's system and how it allows me to shop my inks like I'm at a paint store!
I decided I didn't want any extra bulk for the balloon strings this time so I drew simple lines with my Copic Multiliner pen and a clear ruler. I then just drew some freehand bows. They are far from perfect, but I decided to just go with it and call them whimsical. ;)
I finished off my card by stamping one of the banners from the set, coloring it in with my Copics and using our Sweet Script set to stamp the word "party". I finished off my card with a little twine and bows to match. This card was super easy to create and I love how bright and happy it turned out!
Thanks so much for hanging with me today. I hope you will stop back by tomorrow when I will be revealing the first of three new stamp sets we have for Fall. :)
Sunny Studio Supply List:
Saturday, August 6, 2016
Sunny Saturday Share: Projects by Our Wonderful Customers
Hello everyone! How have you been? I hope you all had a great week! I'm so excited for next week when I will be sharing ideas for our new Fall release. On Friday we have some BIG things lined up to celebrate our first birthday including a blog hop with some of my favorite talents in the industry, a special sale and $20 gift certificate prizes at every stop!!!
In the meantime I thought I would pop in and share a handful of fabulous cards that caught my eye over the past couple of weeks...
Backyard Bugs Card by Eloise Blue (with video tutorial on her YouTube Channel)
Tropical Paradise Card by Rachel Bergfeld (@rbergfeldcarddesigns on instagram)
Backyard Bugs Card by Tracy Crafty (@inkyfingersandribbon on instagram)
Tropical Paradise Card by Vanessa (@vanessa.amann on instagram)
Sweet Shoppe Card by GSacht (on flickr)
Thank you everyone for sharing your talents & beautiful projects with us!
Don't forget to tag us with the hashtag #sunnystudiostamps and share your beautiful projects with us on Instagram, our facebook page or in our flickr group!
Friday, August 5, 2016
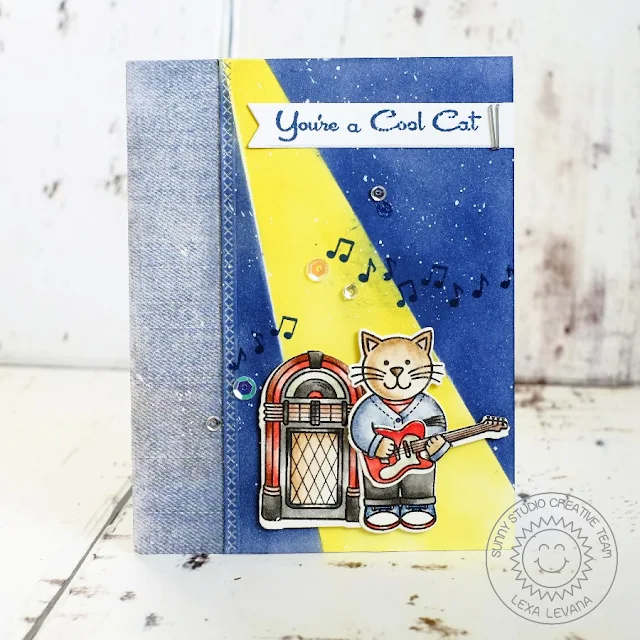
Sock Hop Cool Cat Card with Lexa
Hi everyone. Lexa here today to share a manly card (oh, I hope it's manly enough) using Sock Hop stamp and coordinating dies. The idea is to put these cat in the spotlight, I think it would be really cool. He's jamming along with the music that came from the jukebox.
I start with a panel of Neenah Solar White cardstock, and blend some Distress Inks for the background. I put unsticky tape for masking the spotlight. I blend some Chipped Saphire and as for the spotlight I blend Squeezed Lemonade and a little bit of Mustard Seed on the top part of the card. After finished with the blending, I splatter some white paint randomly.
I stamped all the images with Versafine Onyx Black on a piece of watercolor paper and colored them with Distress Markers. I did a little bit of trick on his left hand, I cut it with craft knife and turn it upside down as if it did a chord. For this card, I choose few shades of color just to make sure everything match together. The denim patterned paper looks so cool in this card, I thought it goes together really really well. Don't you think so?
I hope you enjoy my card, and wish you a wonderful Friday! :)
Thursday, August 4, 2016
Sock Hop 1950's Retro Jukebox Card with Vanessa
Hi sweet Sunny Studio friends! Vanessa here with a card using Sock Hop. This set is so fun and I haven't seen anything like it before. I love the adorable jukebox, so I used it for my card:
I applied orange dye ink to the middle part of the cardstock panel and stamped my sentiment. Then I stamped and heat-embossed the notes to the inked part and adhered the panel to my card with foam tape. I stamped the jukebox, colored it with Copics, die-cut it with matching dies and adhered it with foam tape. Finally I added matching sequins around the notes.
I hope you liked today's project! Thank you so much for stopping by!
Subscribe to:
Posts (Atom)