Friday, February 12, 2016

May Your Day Be Filled With Sunshine Card by Francine + A Sale

Hi everyone, Francine here!  

Today, I’m featuring the newest Sunny Sentiments stamp set and here is my card:

Sunny Studio: May Your Day Be Filled With Sunshine Card by Francine Vuillème (using Sunny Sentiments stamp set)
I went for a clean and simple design! The font is so BEAUTIFUL, that it doesn’t need more!!! So I focused on that. To make the sentiment pop, I decided to create a sunny background with Distress inks. I first sponged my panel with Squeezed Lemonade. I then made a self-made mask with triangles that I sponged with Wild Honey and Mustard Seed. I removed the mask and I sponged the whole background with Mustard Seed again. I kept the top of the card lighter.

Sunny Studio: May Your Day Be Filled With Sunshine Card by Francine Vuillème (using Sunny Sentiments stamp set)

Next, I stamped the “May your day be filled with” text with black ink to the background. I then embossed the “Sunshine” with white embossing powder on black cardstock and fussy cut it. I adhered it below the stamped sentiment with foam pads. To finish off my card, I die cut a cloudy border from white cardstock that I also fixed with foam pads for more dimension and I added 3 golden sequins.

Check out the Sunny Sentiments stamp set! There are many other stamps in it, which makes this set super versatile!  

I hope you like what you’ve seen! Thanks for joining me today and happy crafting!

Francine

P.S.  In case you haven't heard there's a 20% sale going on over at the online store today through Monday 2/15/16 using the code "SunnyValentine".  :)


Thursday, February 11, 2016

Sunny Sentiments Hello Sunshine Card with Elise

Hello! It's Elise to share a sunshiny card that features Sunny Studio Stamp's "Sunny Sentiments" stamp and die! I wanted to create a card that was sunny and bright, so here is what I created:


Sunny Studio: Hello Sunshine card by Elise Constable (using Rain or Shine, Stitched Hearts & Sunny Sentiments stamps and Sunshine word die)

This card also features the Sunshine word die, which goes perfectly with this stamp set! I stamped the clouds onto some blue card stock, and stamped the sun onto some yellow patterned paper, then die cut them with the coordinating dies. I attached the sun and clouds with different amounts of foam tape to get a bunch of dimension. The sentiment is cut from blue glitter paper to add some sparkle!


Sunny Studio: Hello Sunshine card by Elise Constable (using Rain or Shine, Stitched Hearts & Sunny Sentiments stamps and Sunshine word die)

I finished the card by adding a few hearts die cut from pink patterned paper with the Stitched Heart die and hearts from the Rain or Shine dies

Thanks for stopping by and I hope that you like this card! Stop by again tomorrow for some more inspiration! :)

Wednesday, February 10, 2016

Sunny Sentiments You are My Sunshine card by Marion

Hello. It's Marion here with another bright and sunshine-y card using the Sunny Sentiments stamp set. I also used the Sunny Sentiments dies that coordinate with the stamp set.
My card was very much inspired by this recent Cas(E) this Sketch! #157.

Sunny Studio: Sunny Sentiments You are My Sunshine card by Marion Vagg
 
Using a sunshine mask, I inked up the rays with Mustard Seed and Spiced Marmalade Distress Ink. I then stamped and die cut the sun and the clouds and coloured them with Copic markers. The sun has a nice thick layer of clear Wink of Stella glitter brush pen for lots of subtle sparkle.  I adhered a yellow piece of card stock to the bottom of the card before stamping the sentiments.

Sunny Studio: Sunny Sentiments You are My Sunshine card by Marion Vagg

Sunny Studio products used:
Thanks for visiting today. I hope the sun is shining bright where you are today,

Marion 

Tuesday, February 9, 2016

Sunny Sentiments Encouragement CAS Card with Heidi

Hello everybody! Heidi here!  This week we are introducing the "Sunny Sentiments" stamp set so I created this encouragement card, using a very clean and simple approach. I also use the "Sunshine word" die.  I hope you'll enjoy today's card.


Sunny Studio: Create Your Own Sunshine Sunburst Card by Heidi Criswell (using Sunny Sentiments stamps and Sunshine Word die).

For this card, I masked a portion of the front panel, then I placed a sun rays stencil and inked the stencil using distress inks. I picked this fabulous encouragement sentiment from the "Sunny Sentiments" stamp set and stamped on the center of the stenciled portion of the card. I cut the "Sunshine word" die using yellow and black card stock and placed them on an offset to create the illusion of a drop shadow on the word die. I adhered the die-cut panel to the card and lastly I added some sequins as a finishing touch.   


Sunny Studio: Create Your Own Sunshine Sunburst Card by Heidi Criswell (using Sunny Sentiments stamps and Sunshine Word die).

CAS (Clean and Simple) cards are one of my favorite cards, and with the adorable "Sunny Sentiments" stamp set you can create CAS cards or combine it with other sets to create happy and lovely cards. Visit the Sunny Studio Stamps shop to purchase the products feature on this post. 

I hope you enjoy this card.  Thanks so much for stopping by.  Have a lovely day!

Monday, February 8, 2016

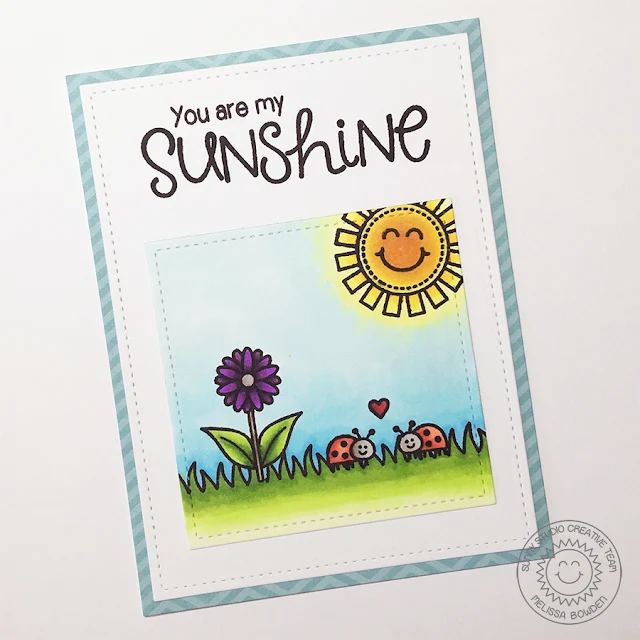
Sunny Sentiments You Are My Sunshine Card with Melissa

Hello everyone, Melissa here! Today I have a card to share using Sunny Sentiments!  I paired it with the Backyard Bugs stamp set to create a cute mini scene. 

Sunny Studio: You Are My Sunshine card by Melissa Bowden (using Sunny Sentiments & Backyard Bugs stamp sets)

To create this card I first die cut a small square out of white paper. I stamped all the images where I wanted them, masking off the lady bugs and flower to add the grass. After they were all stamped I colored the whole scene with Copic markers. I adhered the scene to a piece of white paper with a patterned paper border and added the sentiment from Sunny Sentiments. 

Sunny Studio: You Are My Sunshine card by Melissa Bowden (using Sunny Sentiments & Backyard Bugs stamp sets)

That completes the card!  I hope you enjoyed it.  Thanks for stopping by!