Thursday, November 26, 2015

Merry & Bright Holiday Christmas Card with Elise

Hello there! It's Elise again to share a fun Christmas card with you today that features the Santa's Helpers coordinating dies!

I really wanted to focus on using some of the extra dies that are included in the die set, such as the merry & bright sentiment, as well as the holly leaves and berries!


I die cut the sentiment from gold glittery paper as well as black card stock. I offset the black die cut to give the sentiment a shadowy look to help it stand out against the white background. Here is a close up on the sentiment:


Next, I die cut the holly leaves and berries from green and red striped patterned paper, and arranged them around the sentiment. I finished the card by adding some gold enamel dots, red patterned paper for some more color, and a large green bow on the side!

Thanks for stopping by today! Have a great Thanksgiving!  :)

Wednesday, November 25, 2015

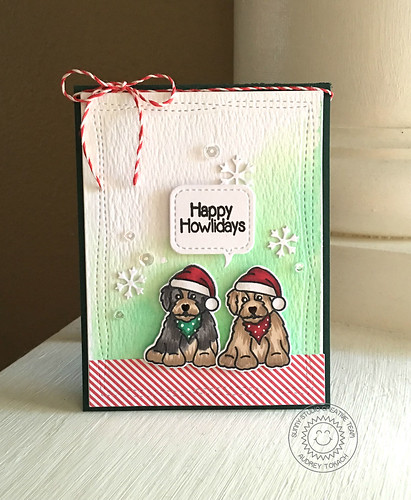
Santa's Helpers: Happy Howlidays Christmas Card with Audrey


Hello there! Audrey here with a card featuring the Santa's Helper's stamp set.  It was difficult trying to decide which images to use for my project today, but then as I was coloring them, I had a lightbulb moment.  At first when looking at this image I didn't see a cocker spaniel, but then I decided to color the patch of hair under their chin like a bandanna and suddenly I thought they started looking like my babies!  I'm so excited to finally have a stamp that looks like them!

I started off by watercoloring a piece of Tim Holtz watercolor paper with my Artist's Loft watercolor set from Michaels.  When it was dry, I ran it through my die-cut machine to give it a stitched edge. I wanted to bring in a bit of red to coordinate with the Santa's hats so I pulled out a piece of red and white striped patterned paper from my stash.  I popped the dogs up using foam tape after die-cutting them with their coordinating dies.  I stamped a sentiment from the set on a speech bubble die-cut and then added some diecut snowflakes which are also included in the Santa's Helpers die set.  To add a bit of sparkle around the snowflakes, I added some sparkling clear sequins, and then mounted the panel on a dark green card base using foam tape.  Finally, I added a bow with my favorite red and white bakers twine.

Santa's Helpers

That's all for me today!  I hope you like my card!  Be sure to stop back by tomorrow with more inspiration from the design team!  Happy Thanksgiving to you!!

Tuesday, November 24, 2015

Santa's Helpers Purrfect Kitty Cat Christmas Card with Heidi

Hello everybody, welcome back to the Sunny Studio Stamp blog!  This week we are introducing the Santa's Helpers stamps and coordinated die set. This stamp set is perfect for all you cat and dog lovers out there. Here is my card that I created to share with you today.  I hope you'll enjoy it!


For this card I stamped and colored the images using Copic Markers.   I then created a brick background on a piece of red cardstock using a stencil.  I added a scalloped glittery green border and hung the stockings with the kittens on top using some festive colored bakers twine. 


I stamped the sentiment directly onto the card base along with a little paw print from the set. I also added some detail with a white gel pen on the stockings. 

The "Santa's helpers" stamp and die set are available at the Sunny Studio Stamp shop.  We can't wait to see what you create with them!   Have a lovely day!

A Santa's Helpers Kitty Card with Free Fireplace Cutting File

I just wanted to pop in and share a peek of a card using our Santa's Helpers stamps that's being featured over on the CardMaker​ blog today.  


I hope you will visit for a closer look and to get a free download of the fireplace shaped card cutting file.  ;)

Monday, November 23, 2015

Santa' s Helpers Cat Tangled In Christmas Lights Card by Melissa

Hello everyone, Melissa here. Today I have a card to share with you using the Santa’s Helpers stamp set. I love all the cute critters in the set but my favorite has to be this little kitty dressed up as a Christmas tree. He is too cute! 


To create this card I first stamped the cat image onto a piece of blank cardstock and then masked him off with masking paper. I then die cut a hill border with masking paper and placed that over the bottom portion of the card, this would become the snowy hill. I then worked on inking up the sky. This time I used Simon Says Stamp inks and they worked perfectly! I added a light yellow around the cat to make him look like he was glowing and worked my way out to the edges of the card using darker blues. 

To finish off the sky I stamped a Santa and reindeer flying over head and added some dots of white gel pen for the stars. I then removed the masks from the cat and the hill. I colored the cat with Copic markers and added some shadow to the snowy hill. To finish off the card I embossed the greeting with red embossing powder and mounted the card on top of some white and red papers. 


I hope you enjoyed the card for today!   Don't forget that the Sunny Studio Online Store is having a 20% off sale that ends tonight at Midnight (using the code: SCTMagazine).

Thanks for stopping by!