Thursday, November 19, 2015

Harvest Happiness Happy Thanksgiving Card with Elise

Hi everyone! It's Elise here to share a cute Thanksgiving card with you that features the Harvest Happiness stamps and dies!

I stamped and die cut all of the images from white card stock, and colored them with Prismacolor pencils. The images are all attached with foam tape to help them stand out against the background. I finished the card off by adding a few clear sequins around the images. 


Here is a close up on the images that are included on this card. That turkey looks like he has his eye on that pumpkin pie!!


Thanks for stopping by to see this card featuring the Harvest Happiness stamp set!  Don't forget to stop by again tomorrow for some more inspiration! :)

Wednesday, November 18, 2015

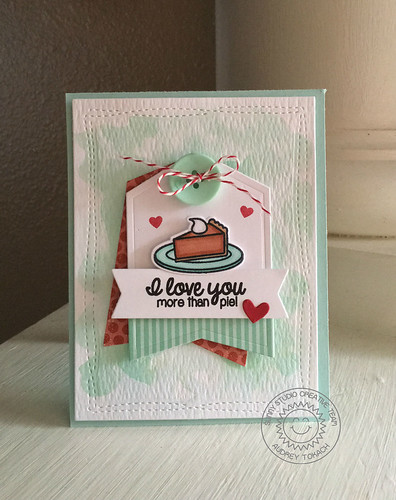
Harvest Happiness I Love You More the Pie Card by Audrey

Hello there! Audrey here! Today I have a fun pie themed card using the Harvest Happiness stamp set!  Just because this stamp set is full of fall and Thanksgiving images, you can do so much more with it!  I love this image and sentiment.

I started by watercoloring a very subtle background using Cracked Pistachio distress ink.  Then I die-cut a stitched frame around the edge of the watercolor piece when it was dry.  I love using tag dies for the base of my focal point on cards.  I die-cut this tag three different times from cardstock, and patterned papers.  I then adhered the striped paper to the bottom of the white tag and popped that tag up on the polka-dot tag behind it with foam tape.  I tilted the top tag slightly to show a little snippet of the polka-dot patterned paper.  

I stamped, colored and die cut the pie slice image from the Harvest Happiness stamp set, using the coordinating dies, and then stamped a sentiment from the same set on a banner die-cut to put below it. I stamped a few hearts from the Happy Home stamp set on the tag, and added a bigger die-cut heart to the banner to create a visual triangle.  After I adhered to the watercolor piece, I threaded an aqua button with some bakers twine to cover up the tag hole, and then adhered the whole panel to an aqua care base with foam tape.

I love you more than pie

Here is a closer shot of the focal point:


That's all for me today!  Be sure to stop back by tomorrow for  more inspiration from the design team!  Have a great day! :)

Tuesday, November 17, 2015

Harvest Happiness Thanksgiving Fall Card with Heidi

Hello everybody! Heidi here.  Today I am sharing more inspiration using the "Harvest Happiness" stamp set.  With the Thanksgiving celebrations approaching, this stamp and coordinated die set are a must have for all your card and projects.  I hope you'll enjoy the card that I created to share with you today.


I stamped and colored the cute little owls and the pumpkin pie with Copic markers and I die cut them using the coordinated dies. Then I die cut some frames using some dies that I have on hand to set the scene for my images and sentiment.


I used distress inks to blend a subtle background, and place all of the images using foam adhesive.

The Harvest happiness stamp and coordinated dies are available at the Sunny Studio Stamps shop.   We love to see your creations using Sunny Studio Stamps so don't forget to tag your work using the #SunnyStudioStamps

Have a lovely day! 

Monday, November 16, 2015

Harvest Happiness Thanksgiving Owl Card by Melissa + Winners

Hello everyone, Melissa here. Today I have a card to share with you using the Harvest Happiness stamp set! I decided to make a fairly simple card today to really make these two cute little owls stand out. 


To make this card I first die cut a circle out of a white square of cardstock. On another piece of square cardstock I marked out where the circle was when I placed it behind the die cut panel. This would be the area that would be peeking through. 

I stamped the owls where I wanted them and masked them off. I then masked off the area of the grass and colored the rest with distress inks - this would be the sky. I did the same again by masking off the sky and applying ink to the grassy hill. I then unpeeled all the masks and colored the owls with Copic Markers. I then stuck the colored panel to the back of the white piece with the die cut circle and adhered both of those to a card base with a piece of patterned paper. 

To finish off the card I made a little banner by die cutting the ends of a strip of card stock with the Fishtail Banners die. I then stamped the sentiment and heat embossed that. I added some green and yellow distress inks to the banner and adhered it to the card. 


That completes the card for today, but before I go we have two winners to announce from our blog hop last week!   Congratulations Nathalie Paquette and Denise WardWe've emailed you.  ;)  Thank you to everyone who stopped by and for all the sweet comments left.    

Be sure to check back this week to see what the other talented design team members created!  Thanks for stopping by.

Saturday, November 14, 2015

Sunny Saturday Share: School Time & Birthday Smiles Cards by Yainea


Hello there!  Today for our Sunny Saturday Share we have a special guest designer which I'm sure many of you know well.  Cristina "Yainea" Nunez is joining us!!!  I am such a huge fan so I was delighted when she agreed to squeeze us into her busy schedule and create some cute cards with a couple of our stamp sets.  :)


Her first card uses our School Time stamps.  I just adore the fun chalkboard treatment she gave her background and how realistic her apple looks with her beautiful shading!


Up next is a card using our Birthday smiles stamps.  For this card, Yainea started by stamping the images in white pigment ink and then when it was fully dry she stamped over the images again in bright colors of dye ink.


I love how the colors pop against the kraft paper with this fun technique!  :)


Thank you Yainea for sharing your talents with us.  You're the best!  :)