Monday, September 7, 2015

Introducing Snow Kissed: Penguins Meet Winter Sports!

Guess what?!  We are on our final sneak peek before our big grand opening tomorrow!  Today's set called Snow Kissed coordinates perfectly with the Bundled Up stamp set shared yesterday.

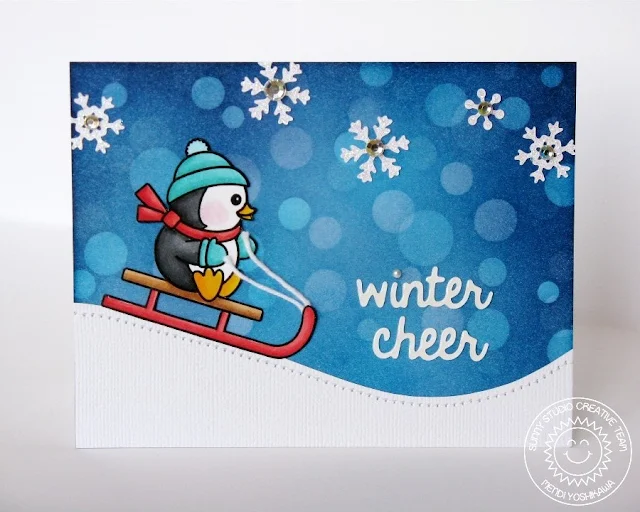
For my first card I used a super cool Bokeh technique inspired by the amazing Sandy Allnock featured HERE on her blog.  She used an airbrush and magnets for her technique, but since I didn't have those handy I chose to create a similar look using vinyl circles I cut out on my Silhouette Cameo and sponging on different layers of Peacock FeathersMermaid LagoonSalty Ocean and Chipped Sapphire distress inks. It was seriously so much fun and I love the results!


I finished off my card by creating a little sledding scene using the penguin stamp and some of the snowflakes and phrase dies found in the coordinating Snow Kissed Sunny Snippets die set.  I love how the white pops against the background!


For my next card I chose to go soft and sweet using Tumbled Glass and Spun Sugar distress inks.  I used a heat gun to make sure the pink background was good and dry before stamping it with VersaMark ink and heat embossing the snow pattern in the background with white embossing powder.


To carry out the soft feel of my card I tied a bow around the bottom using swiss dot organza ribbon.  I used more of the coordinating dies to cut some snowflakes, coating them with a bit of Stardust Stickles glitter glue.  I love the shimmer and sparkle it gave my card!


Here's a closer look at the full Snow Kissed stamp set used for both of today's cards (available for purchase tomorrow morning):


Thanks so much for visiting!  I hope you will check back tomorrow for all of the grand opening festivities--I'm seriously feeling like a kid the day before Christmas!  :)

Friday, September 4, 2015

Introducing Bundled Up: Dress-a-Penguin Winter Stamps

Hello there!  I'm excited to be sharing a closer look at another favorite of mine called Bundled Up.  Yes, I know... It seems they're all my favorites.  What can I say?  They're all my babies.  ;)

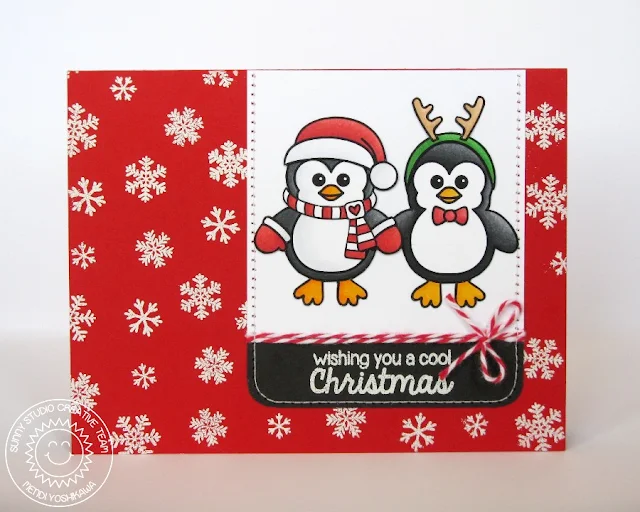
Bundled up features a little baby penguin which you can dress up in endless winter clothing options depending on the fun ways you chose to color them.  For my first card I chose to go with the look of Santa and his reindeer.  I've always been drawn to red and white snowflake patterns so I created my own by heat embossing the various snowflake images found on both this set and the coordinating Snow Kissed stamp set.


I tied in the black of the penguins by heat embossing my sentiment on black cardstock and adhering it to the bottom of the little panel they are sitting on.


For my next card I went with more of an everyday look, combining the Bundled Up penguin and sentiment with the balloons from the Birthday Smiles set.


For my background I painted some freehand watercolor clouds using the Zig Clean Color Real Brush Markers on Tim Holtz watercolor paper which I spritzed and lightened by dabbing with a paper towel.

For my balloons, I taped twine to the back of each one and glued them down before pulling the twine tight and tying the "streamers" together using some plain sewing thread.  I tried to knot them in one big knot, but it was way too bulky.  I decided it was easy to hide my thread under my girl penguin's flipper when popping her up with foam tape.


Here's a closer look at the full Bundled Up stamp set used for both of today's cards (available for purchase on Tuesday morning):


Thanks for visiting!  I hope you have a fabulous weekend!  :)

Thursday, September 3, 2015

Introducing Santa's Helpers: Holiday Themed Pet Cards

Hi there!  Today I have another pet inspired stamp set to share with a holiday spin called Santa's Helpers.

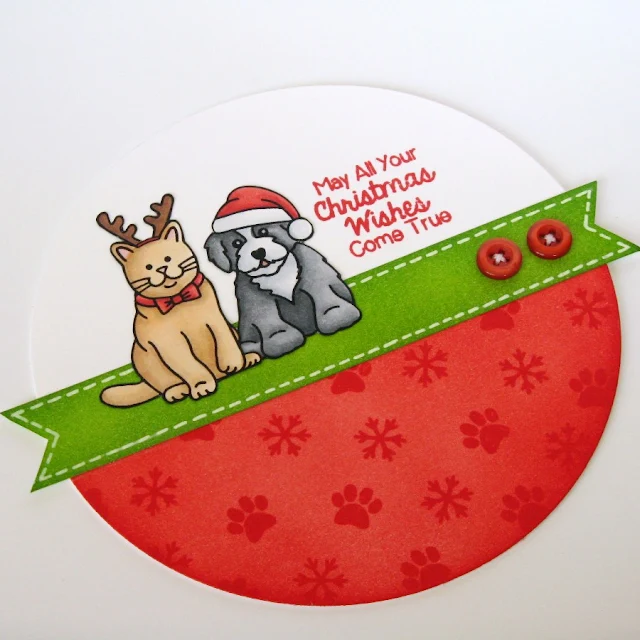
For my first card I created my card base using a 5-inch circle die from Lifestyle Crafts Nesting Circle set.  I simply cut two of them, scored one along the top and adhered it with some good strong adhesive to the back side of the front circle.  To help it stay upright I cut a little sliver off the bottom of the back circle as well.


My images were colored once again with Copics and fussy cut, although they too will have a die set available to spare you the hassle if you prefer.  The dies are actually really cool because they come with loads of extra stand alone dies like words and shapes such as holly and snowflakes!

For my colors I inked up my pieces using barn door and mowed lawn distress ink.  I love how cute the kitty and puppy look paired together!


For my next card I lined up several kitties in stockings.  I love making them look like they are all hanging in a row.  I added some small gold brads to the little stocking loops as an extra detail.


The sentiment was the perfect size to fill the space I had leftover along the bottom of my card, but you could also cut it apart to fit onto two lines to extend your options.


Here's a look at the full Santa's Helpers stamp set used for both of today's cards (available for purchase on September 8th):


I hope you've been enjoying these little peeks so far.  I can't wait for you to see all the amazing projects the gals are putting together for our grand opening blog hop on Tuesday!  :)

Wednesday, September 2, 2015

Introducing Furever Friends: Kitty Cat Cards

Hello there!   Today I am excited to share some ideas using the first set I created called Furever Friends.  I love that you can completely change the look of these kitties just by the way you choose to color them!

For my first card I thought I would try one of my favorite color schemes:  Black, grey and pink!  I started by coloring in my images with copic markers and then fussy cut them out.  For those who dislike cutting things out by hand there will also some cool matching dies available.  ;)


I inked up my background using Spun Sugar and Worn Lipstick distress inks and then adhered my images and stamped my sentiment with VersaFine Black Onyx ink.  When I had those placed just the way I wanted them I set to work stamping the open hearts from the set (and a tiny one borrowed from the Harvest Happiness set) to frame them.


For my next card I chose to go with another favorite color combo of mine using soft blue and brown together.  I couldn't decide which color to go with for my kitty so I decided to stamp three of them so I wouldn't have to choose.  For the middle kitty I colored a random calico pattern with my Copic Markers and then used my .3 mm Copic Multiliner pen to trace the edges of my pattern.


My background was inked up using Tumbled Glass distress ink and a Tsukineko Jumbo Dauber.  The sentiment was stamped with Hero Arts Cup O' Joe Shadow Ink.

This particular image is extra special to me because I quickly sketched it of my own kitty as he sat hogging my desk space while I worked.  He was laying in this exact pose next to my warm keyboard and I was so giddy I was able to capture his personality on my first attempt.  In moments like these, I swear God was literally guiding my hand as I drew.  ;)


Here's a look at the full Furever Friends stamp set used for both of today's cards (available for purchase on September 8th):


Thanks for hanging with me today.  :)

Tuesday, September 1, 2015

Introducing Harvest Happiness: Autumn Blessings Card

Today I would like to formally introduce the new Harvest Happiness stamp set.

For my card I created a little scene using the pumpkin and leaf images from the set which I colored with Copic Markers and fussy cut.  I will admit cutting out these little leaves made my eyes cross and were largely responsible for inspiring me to release a line of dies with my debut (that and the skinny little Turkey and Owl legs).  ;)


My background was a created through lots of trial and error.  I really wanted to create a multi-colored background picking up all the colors of the leaves, but it just wasn't coming together the way I imagined.  I actually was close to pulling my hair out with how bad it was looking.

To try a miraculous rescue I ended up spritzing the whole piece like crazy with water, soaking up some of the darker mucky colors with a paper towel, hitting it with my heat gun and sponging on some more Ripe Persimmon and Spice Marmalade distress ink over the top.  In the end I actually love the layered, modeled look of it all and how it compliments the pumpkins.  I thought I would share my experience in case you're ever feeling like your project is also a hot mess.  With a little perseverance & experimenting you can frequently turn things around.  ;)


Here's a look at the full Harvest Happiness stamp set used for today's card (available for purchase on September 8th):


I hope you've enjoyed the sneak peeks so far.  I will be back tomorrow with some more fun reveals.  :)