Saturday, January 30, 2016
Sunny Saturday Share: Love Themed Cards for Valentine' s Day
Hello there! I hope you're all have a nice Saturday in your neck of the woods! Today I'm popping in with a couple of darling customer cards that I spotted on the web this week.
AJ Bodine has created the most wonderful card using our Happy Home stamp set. I absolutely love all the fun details she has poured into this card, from the sweet way she colored her house with the brick exterior to the fun fluffy clouds in her background. I think her color choices are amazing too! :)
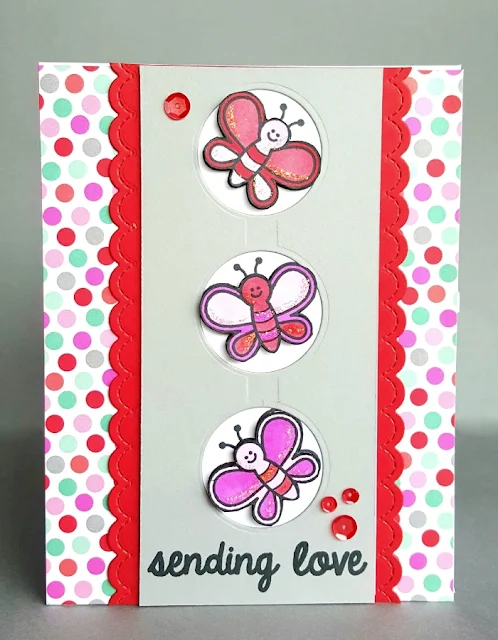
Up next is another super cute card by Lenae at Sugargems. I am smitten with her Valentine spin on the butterflies from Backyard Bugs. What a fun way to stretch your stamps! :)
Don't be shy... We'd love to see what you've been creating with our stamps too! As always you share your creations with us on our Facebook page, in our Flickr group or by tagging us with the hashtag #SunnyStudioStamps on instagram.
I hope the rest of your weekend is happy! :)
Friday, January 29, 2016
Guest Designer Spotlight: Spring Cards with Suzy Plantamura
I'm so happy to be welcoming a new friend to the blog that I have admired and looked up to since my early days in scrapbooking. Please welcome the wildly talented Suzy Plantamura!!!
Take it away Suzy...
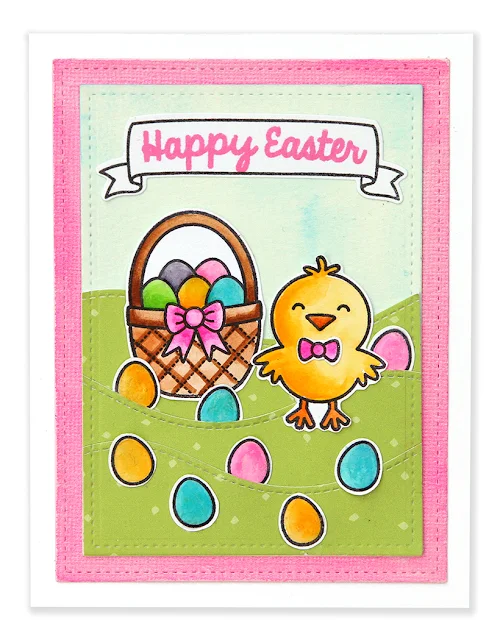
Happy Easter Card using A Good Egg Stamp set
I painted all the stamped images with watercolors. I added glossy accents to the eggs in the basket and all the eggs in the grass. I added grass borders in three layers so I could tuck some of the eggs under the layers to make them appear as if the little chick was going on an Easter egg hunt. I stamped the Happy Easter in bright pink ink on a stamped banner for the salutation.
Fluttering By Card using Backyard Bugs Stamp set
To make the background, I painted coral stripes with watercolor. I then stamped the dotted line wavy border on the non-painted stripes to match the stripes, but add a subtle design that added to the theme of the card. I added glimmer to the butterfly and flower with a Wink of Stella pen. All of the stamped images are painted with watercolor. I used pop dots behind the larger mushroom.
You can find Suzy on social media at the following links:
Thank you Suzy for joining us today. It means the world to me! :)
Thursday, January 28, 2016
A Flower Card with Custom Sentiment by Elise
Hello! It's Elise again to share a card with you this morning that features the Sweet Script stamp set from Sunny Studio Stamps! This set is great for helping to create custom sentiments on your cards and projects! Here is the card that I created:
The flower and pots are also adhered with foam tape. I added some blue paper to my card base, added some twine, and adhered the white panel to the front of the card!
Thanks for stopping by today! I hope that you enjoyed the card! :)
Wednesday, January 27, 2016
Sweet Script I Love You Heart Card with Marion
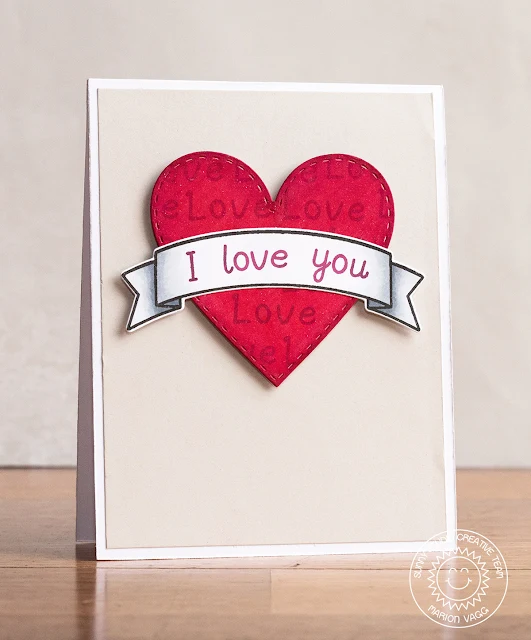
Hello. It's Marion here with a sweet Valentine's Day card that uses the Sweet Script stamp set and also the Sunny Borders stamp set and coordinating dies. I've also been itching to use the newly released Stitched Heart dies - and they are wonderful!
I started by die cutting a heart from white card stock and then I sponged on some Festive Berries Distress ink. Once dry, I mounted the letters 'Love' (from the Sweet Script stamp set) onto an acrylic block and then stamped it repeatedly in Hero Arts Raspberry Jam ink. I also darkened the edges of the heart with the same ink. I mounted the heart onto the card with some mounting foam. The banner was stamped and die cut and I generated my own "I Love You" sentiment from the Sweet Script stamp set. I added a little bit of shading onto the banner with Copic markers.
The heart is covered in a layer of clear Wink of Stella glitter brush pen. I love the subtle shimmer.
Sunny Studio products used:
Thanks for topping by today,
Marion
Tuesday, January 26, 2016
Sweet Script "You Have My Heart" Card with Heidi
Hello everybody, Heidi here! Today I am sharing a very fun Valentine's card featuring custom made sentiment using the Sweet Script stamp set, images from the adorable Sending My Love stamp set, and the Stitched Hearts die set.
I think it's so important to have alphabet stamp sets to customize not only sentiments but also to personalize gifts and cards. The "Sweet Script" stamp set is very easy to use and has both upper and lowercase letters, a real must have.
I think it's so important to have alphabet stamp sets to customize not only sentiments but also to personalize gifts and cards. The "Sweet Script" stamp set is very easy to use and has both upper and lowercase letters, a real must have.
For this card I stamped and colored the little puppy from the Sending My Love stamp set, then I inked a piece of 5.50 by 4.25 inch cardstock using "distress inks" and them I spritzed them with some water to create some splatters. I cut a white front panel and used the medium size heart from the Stitched Hearts die set to cut a window to set the little puppy.
I heat embossed the sentiment on a piece of velum using gold embossing powder and I also cut some hearts from inked paper and embossed paper using the heart dies from the "Sending my love" stamp set.
The stamps and dies are available for purchase at the Sunny Studio Shop. I hope you enjoyed this card. Thanks so much for stopping by. Have a lovely day!
Monday, January 25, 2016
A Good Egg Easter Chick Card with Melissa
Hello everyone, Melissa here! Today I have a card to share using three of the newly released stamp sets. Sweet Script, A Good Egg and Sunny Borders.
To make this card I first die-cut a stitched rectangle out of white cardstock and used a light brown ink to lightly blend the outside edge. I laid the chick, eggs and paint bucket from A Good Egg out on the rectangle where I wanted them and stamped and masked them, starting with the chick in the foreground until the scene was complete. I then colored them in using Copic Markers.
For the sentiment I used the “Happy” from A Good Egg and made the word “Easter” using the Sweet Script stamp set. I stamped those inside of the banner from Sunny Borders onto patterned paper and fussy cut them out. I then stuck that onto the top on the card above the little scene. To finish the card I mounted it onto a scalloped rectangle border.
I hope you enjoyed the card for today! Thanks for stopping by!
Saturday, January 23, 2016
Sunny Saturday Share: Customer Cards Using Our Newest Stamps
Hello there! Today I'm popping in with some Valentine's Day cards created by our customers using our new Sending My Love stamp set and coordinating dies.
Up first is a darling pop-up card by Lenae (you can follow her on instagram at: sugargems). I adore the happy little scene she created with the mail box and letters and the little ladybug from Backyard Bugs! Such a bright and happy card, right? :)
Our next card is a super fun and sunny card by Lori U'ren (you can follow her on instagram at LoriUren) combining the snail from Backyard Bugs with all of the fun images and phrase from Sunny Sentiments and the Sunshine Word die.
I Love the the blue band she created behind the word "sunshine". She reminded me that I don't always have to stamp in black ink too. :)
Our last card is a sweet card by Jamie Peters from Not 2 Shabby. Love her blue and brown color scheme and the cute little freckles she added to the kitty! :)
I hope you will join them and share your own creations with us on our Facebook page, in our Flickr group or by tagging us with the hashtag #SunnyStudioStamps on instagram.
Thanks for stopping by. Hope you have a wonderful weekend! :)
Friday, January 22, 2016
Backyard Bugs What's Buzzin? Bumblebee Card with Francine
Hi everyone! This is Francine.
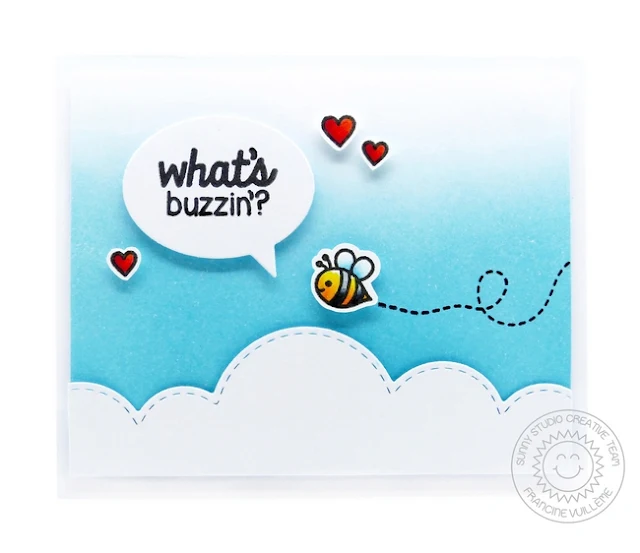
Today, I’m featuring the Backyard Bugs stamps. What an amazing set! Here is the card I made:
OMG…. this cute little bee… It was love at first sight! I decided to focus on that image and this is why I created a scene for my bee. I first sponged the background with Distress inks (Tumbled Glass and Broken China). Next, I stamped the bee and the hearts in black ink. I colored and fussy cut them. I also die-cut a cloudy border from white cardstock.
To finish off my card, I stamped the fun “What’s buzzin’?” sentiment on a speech bubble and I adhered everything together with foam dots.
I hope you enjoyed this post! Thanks for stopping by and have a fabulous day!
♥ Francine
Thursday, January 21, 2016
Backyard Bugs Fluttering By To Say Hi Butterfly Card with Elise
Hi everyone! It's Elise here to share a card with you that features the Backyard Bugs stamps and dies from Sunny Studio Stamp! If you can't tell, the butterfly stamp is my favorite, so I created a card to showcase how cute it is!
I stamped the butterfly onto some patterned paper and die cut two butterflies from each paper. I attached one of the butterflies to the card base and the top butterfly is only attached in the middle so that I could fold the wing to make it more three dimensional. Here is a close up to show you the two layers:
I stamped the sentiment inside of the banner from Sunny Borders stamp and die cut it with the coordinating die.
Thanks for stopping by today! Stop by again tomorrow from some more inspiration featuring the Backyard Bugs set! :)
Wednesday, January 20, 2016
Backyard Bugs Hello Toadstool House with Marion
Hello! It's Marion here sharing two cards with you today. They are the same card, but I stepped up the second card and made it into a shaker card. Both cards use the newly released Backyard Bugs stamp set. The sentiment is from the Sunny Sentiments stamp set (also a new stamp set).
To start with, I partially diecut a circle (leaving the bottom section uncut). Next, I stamped the house and the flowers. I then took my pointy scissors and cut around the house and flowers, leaving the window. The images were coloured with Copic Markers and the grass was coloured with Prismacolor pencils and Gamsol. I sponged on some Salty Ocean distress ink onto the card base, and then popped up the front panel onto the card base with mounting foam.
Now to be honest, these cards were a labour of love! It took me about 5 tries to get it right, but I am glad that I persisted.
The second card uses exactly the same process as the first, except I adhered a piece acetate to the back of the front panel and created a well with the mounting foam to house the sequins.
Sunny Studio products used:
Which card is your favourite? Thanks for stopping by today,
Marion
Tuesday, January 19, 2016
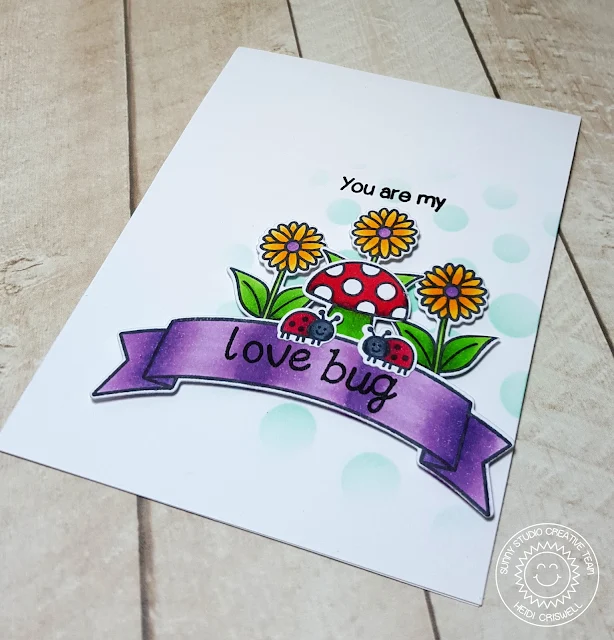
Backyard Bugs Lovebug Card with Heidi
Hello everybody! It's Heidi here and I'm so happy to be back at the Sunny Studio Stamps blog! We have an amazing new release. Today I am sharing a card featuring the new Backyard Bugs Stamp and coordinated die set. There are so many cute images to combine for creating adorable cards for Spring time and all year 'round occasions.
For this card I used a circle stencil for the background, which I inked with a soft bluish green ink. I stamped, colored and die cut the flowers, the mushroom and the lady bugs. I also used the banner from the "Sunny Borders" stamp set, which I colored using purple Copic Markers.
I stamped the "you are my" sentiment from the Sunny Sentiments stamp set and then stamped the words "love bug" using the Sweet Script stamp set. This is a very easy to use alphabet set. I really like the font--it's a must have for customized sentiments.
Thanks so much for stopping by. We would love to see what you create using our stamps and dies! Have a lovely day!
Monday, January 18, 2016
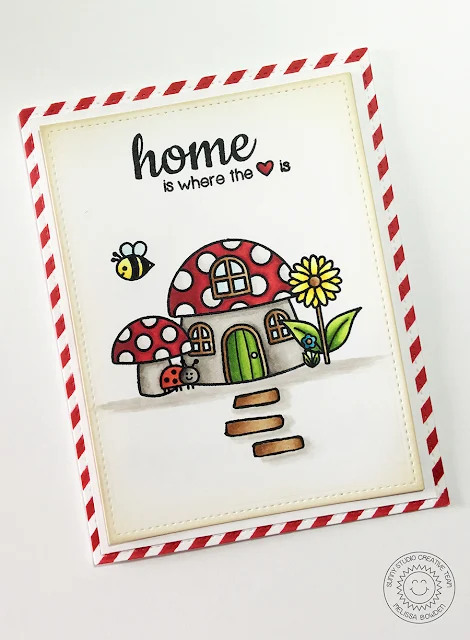
Backyard Bugs Home Is Where The Heart Is Card by Melissa
Hello everyone, Melissa here! Today I have a card to share using another one of the newly released stamp sets, Backyard Bugs. This set has a bunch of cute little bugs to make the sweetest outdoor springtime scenes . I absolutely LOVE it!
To make this card I first die cut a stitched rectangle out of white card and used a light brown ink to lightly blend the outside edge. After that I stamped the sentiment which is from the Happy Home stamp set. I wanted to do this first so I knew exactly how much room I had to fit my scene.
I then stamped and masked off the flowers, mushroom and lady bug before stamping the mushroom house. I also free-handed a little path leading up to the house with a Copic multi-liner. I then removed all of the masks and colored the images with Copic markers. To create the striped paper for the card base I used a stencil and some red distress ink.
I hope you enjoyed the card for today and that you love this stamp set as much as I do! Don’t forget to check back for more inspiration!
Sunday, January 17, 2016
Sunny Sunday Share: Bundled Up Winter Penguin Cards
Hello there! I'm a day late, but I wanted to pop in with some darling projects that caught my eye on instagram over the past week or two using our Bundled Up stamp set and coordinating dies.
Up first is a super cute card by Anita Madden (at amadden725). I am in love with her mad coloring skills and her artful use of patterned paper! Loving her touches with the complimentary orange color too! :)
Next up we have some really cute paperclips toppers using more of the penguins from Bundled Up set by Monique (at vampyr1764). Aren't these a darling idea for planners?! Love how she paper-pieced the earmuffs and scarf from patterned paper!
I hope you will join these ladies by sharing your darling creations with us on our Facebook page, in our Flickr group or by tagging us with the hashtag #SunnyStudioStamps oninstagram.
Friday, January 15, 2016
Guest Designer Spotlight: Sending My Love Card with Laura Bassen
Every other Friday we will be spotlighting a different guest designer on the blog. I'm very excited by all the wonderful and talented ladies we have lined up for the coming months and the wonderful Laura Bassen is kicking things off with a darling card using our Sending My Love stamp set.
I just adore the darling way she colored her kitty and her clean and simple style! The little window with the kitty peeking out is too cute and I love the way she cut the heart with hands out as a separate piece to pop them up and make them stand out!
Thank you Laura for sharing your talents with us! :)
Thursday, January 14, 2016
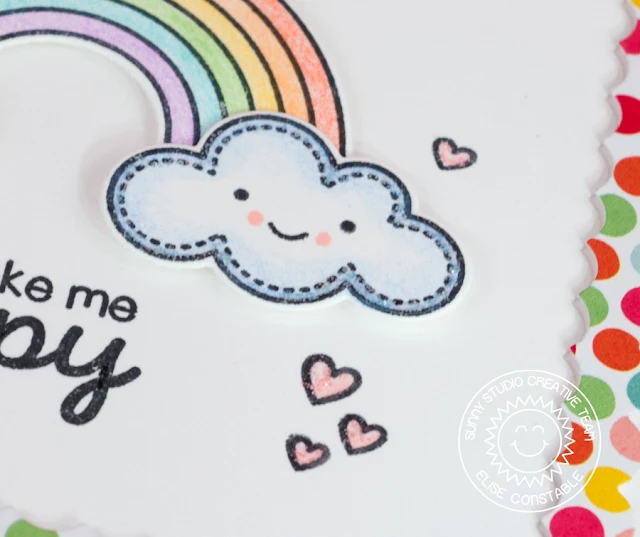
Rain or Shine: You Make Me Happy Card with Elise
Good morning! It's Elise again to share a colorful card with you that features the Rain or Shine stamp set and dies!
I was so excited about the rainbow and cloud stamps in this set, and I knew they would be perfect for a cheery, colorful card!
The images are all colored with Prismacolor pencils and attached with foam tape. I used a smiley face stamp from another set that I had in my stash, but the face could easily be drawn on the cloud with a black marker. I also added some stickles to the edge of the clouds and the hearts for some extra detail. Here is a close up on those adorable clouds!
This set is so cute and its perfect for making sunny, spring cards! I can't wait to send this card to a friend to brighten their day!
Thanks for stopping by and stop by again tomorrow for some more inspiration! :)
Wednesday, January 13, 2016
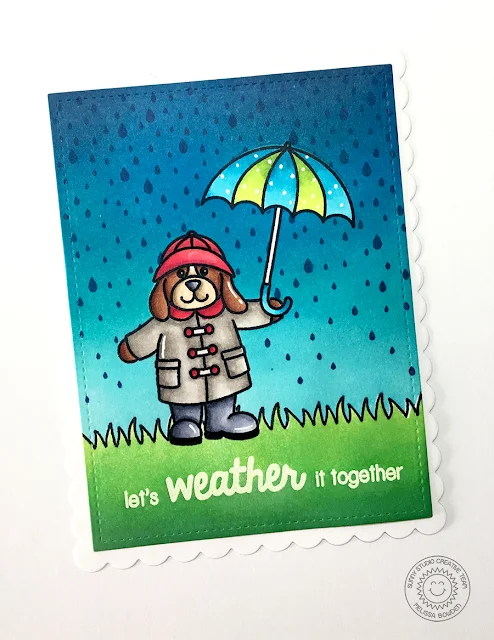
Rain or Shine: Let's Weather It Together Card by Marion
Hi there. It's Marion here with another card using the Rain or Shine stamp set. Isn't this puppy just the sweetest thing?
I created the background with my new Kuretake water colour paints onto some Tim Holtz water colour paper. I thought it created the perfect background for the cute doggy image from the set which I coloured with Copic markers. I popped up the images with some foam dimensionals.
Sunny Studio Products used:
Thanks for stopping by today,
Marion
Tuesday, January 12, 2016
Rain or Shine Sending Sunshine Rainbow Card by Mendi
Hello there! Today the team is showcasing ways to use the Rain or Shine stamp set and I have a fun Rainbow card that I created pairing sentiments from the complimentary Sunny Sentiments stamp set.
I colored my image in with Copic markers. I used a pale B0000 to color in shade the bottom of my clouds and then popped them up with foam tape to add some interest. I then added a little clear glossy accents over my hearts to give them some shine.
For my sentiment I gently bent the stamp on my block to have it follow the curve of my rainbow. Love how clear stamps can be shaped like this! :)
I hope I've managed to spread a little sunshine your way today. Make sure to check back to see all the darling ideas the team has up their sleeve this week! :)
Monday, January 11, 2016
Rain or Shine Let's Weather It Together Card with Melissa
Hello everyone, Melissa here! I am super excited to share a card with you today featuring the newly released stamp set Rain or Shine! This set is so much fun!
Like a lot of my cards, this is one layer so required quite a bit of masking. I first stamped the dog holding his umbrella, then masked them off and stamped the grassy border from Sunny Sentiments. Once that was done I masked off the grass area with masking paper and inked up the sky using a variety of blue inks. I then used a darker blue to stamp the raindrops. I then removed the mask from the grass and stamped the sentiment on the bottom of the card and heat embossed it using white embossing powder.
To add the color to the grass I masked off the sky and inked it up using several green inks. Next I colored both the dog and his umbrella using distress inks. To finish the card I stuck the scene onto a scalloped card base.
I hope you enjoyed it! Thanks for stopping by!
Subscribe to:
Comments (Atom)


