Friday, June 30, 2017

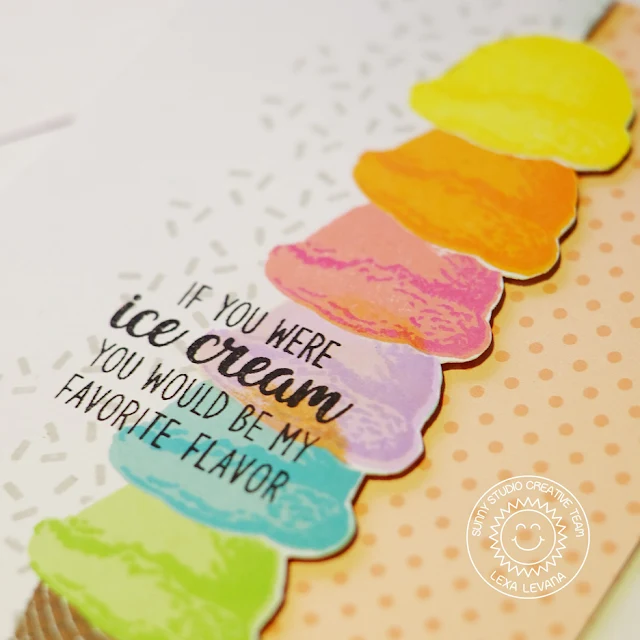
Two Scoops Six Scoop Ice Cream Card with Lexa

Hello everyone! Lexa here with a card featuring the popular Two Scoops stamp set and it's coordinating dies. Since it's a long holiday for all the students here in Indonesia, I find it hard to do crafty things lately. Both of my children are keep me busy all day. This layering stamps from Sunny Studio really works well for creating time saver cards.

Sunny Studio Stamps: Two Scoops Six Scoop Ice Cream Card by Lexa Levana

​I stamped rainbow colored ice cream scoops on a piece of white cardstock, masking off each piece before stamping the next so it layered perfectly. These colorful ice creams really make me happy! I also stamped some sprinkles with grey ink, as I didn't want it to overpower the star - which is the six scoops of ice cream. Once I was happy with them, I fussy cut around the entire thing so that it looked like a border. I adhered it on a piece of polka dotted patterned paper with some foam tape. 

Sunny Studio Stamps: Two Scoops Six Scoop Ice Cream Card by Lexa Levana

It's a simple and time saver card, but I hope you guys like it. Thank you so much for stopping by today. I hope you all have a wonderful day!​

Sunny Studio Supplies Used:

Two Scoop Dies
Two Scoop Dies
Shop at:
Sunny Studio
Two Scoop Stamps
Two Scoop Stamps
Shop at:
Sunny Studio

Thursday, June 29, 2017

A Bird's Life Birdhouse Village Card with Vanessa

Hello! Vanessa here with a new card using the cute set A Bird's LifeI thought it would be fun to create a little birdhouse village with the striped version.

Sunny Studio Stamps: A Bird's Life Striped Birdhouse Village Card by Vanessa Menhorn

First, I trimmed a piece of white cardstock slightly smaller than my card base. Now I used a cloud mask to ink the background with an ink blending tool. I matted the panel with turquoise cardstock and adhered it to the card. Then I stamped the birdhouses and the posts, colored everything with Copics, die-cut the images with the matching dies and adhered them to the card.

Sunny Studio Stamps: A Bird's Life Striped Birdhouse Village Card by Vanessa Menhorn

Now I stamped the sentiment onto a strip of red cardstock, heat-embossed it with white embossing powder and adhered it to the card with foam tape. To finish the card off, I added a tiny bow made from baker's twine to the right house.

This set is so adorable, don't you think? Thank you for stopping by today!

Sunny Studio Supplies Used:
  

Wednesday, June 28, 2017

Oceans Of Joy & Magical Mermaids Pop-Up Box Card with Amy

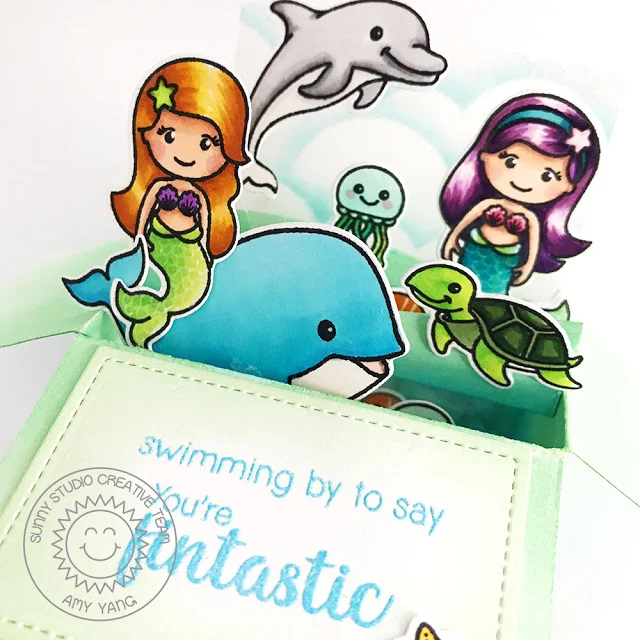
Hello everybody! Amy here today to share a pop-up box card featuring the Oceans Of Joy and Magical Mermaids stamp sets. I love how these two sets can be used together to create a scene that is fun and whimsical.

Sunny Studio Stamps: Oceans Of Joy & Magical Mermaids Pop-Up Box Card by Amy Yang

For this card, I used a box card die. However, you can find lots of great tutorials online to make your own. To begin, I cut out all the pieces for the box card, I used a rectangle die to create a window for the front bottom of the card. With the die-cut rectangle, I added the sentiment "Just Swimming By to Say You're Fintastic" from Magical Mermaids. I heat embossed it with blue embossing powder. I also trimmed acetates to cover the window, and to the two panels that went inside the box to hold the images. This allowed me to create a fun 3D underwater scene.

Sunny Studio Stamps: Oceans Of Joy & Magical Mermaids Pop-Up Box Card by Amy Yang

Before assembling the box, I distressed it with Distress Inks in Faded Jeans, Peacock Feathers, and Cracked Pistachios in most areas. I splattered the panels with droplets of water using a brush to add texture, and created clouds with a stencil on the back panel. Once it dried, I put together the box card with double sided tape.

Sunny Studio Stamps: Oceans Of Joy & Magical Mermaids Pop-Up Box Card by Amy Yang

I stamped the images from Oceans Of Joy and Magical Mermaids and colored them with Copic markers. Then, I cut them out with their coordinating dies. To finish, I adhered the sentiment rectangle to the front flap and the images to the card.

Thank you so much for stopping by today! I hope you enjoyed this post and I have inspired you to try creating your own ocean scenes with the two adorable stamp sets.

Sunny Studio Supplies Used:
      

Tuesday, June 27, 2017

Stars & Stripes Patriotic Red, White, and Blue Card with Nancy

Let’s hear it for the red, white and blue! Nancy here today with a patriotic card using the Stars & Stripes stamp set. I love that this set has so many fun sentiments and icons. These are perfect for all those last minute Fourth of July BBQ invitations! Who doesn’t love to get a handmade invite.

Sunny Studio Stamps: Stars & Stripes Patriotic Red, White, and Blue Card by Nancy Damiano

I started the card by randomly stamping images on the right side of a white 4-1/2”x5-1/4” card. To create this look, begin with the largest images then fill in the whit spots with the tiny and medium stars.

All of the images were colored with Copic markers. A strip of red cardstock was used to ground the sentiment. The “Happy 4th of July” was created by using white embossing powder and a heat gun. This really makes that sentiment stand out!

Sunny Studio Stamps: Stars & Stripes Patriotic Red, White, and Blue Card by Nancy Damiano

A few scattered sequins and a stars completes this bright and patriotic card. Don’t forget to pick up the Stars & Stripes stamp set in the store!

Sunny Studio Supplies Used:

Monday, June 26, 2017

Pirate Pals Boy Themed Birthday Card with Eloise

Hi everyone, Eloise here and today I have another birthday card to share with you using the Pirate Pals stamp set. I'm loving making boy themed cards with this set - it's so nice to have a few in my stash!

Sunny Studio Stamps: Pirate Pals Boy Themed Birthday Card by Eloise Blue

To begin my card today I went ahead and first did the background piece. I took a piece of watercolour cardstock and tore all four dies to create that distressed look. I then used Antique Linen, Ground Espresso and Gathered Twigs Distress Ink to colour it. Once it was coloured I flicked on some water and dried it all with a heat tool. 

Next up I stamped out my images from Pirate Pals and coloured them in with Copic Markers. I only used a few colours and just repeated using them to create a simple colour scheme. Once they were all coloured in I die cut them out using the coordinating dies.

Sunny Studio Stamps: Pirate Pals Boy Themed Birthday Card by Eloise Blue

I then added fun foam behind my panel piece and adhered it down to a grey striped piece of patterned paper that I adhered onto a card base. I then adhered all my images using foam adhesive too. 

For my sentiment I white heat embossed it onto some green cardstock, cut the end off at an angle and also added a bow with some hemp cord to the other side and adhered it down onto my card also. 

That finished up the card for today, I hope you enjoyed and I'll be back next week! Thanks so much for stopping by. 

Sunny Studio Supplies Used: