Saturday, November 13, 2021

Guest Designer Spotlight: Tags & Cards with Anni Lerche

Hey stampers, Anni Lerche here! I am so happy and proud to be a guest designer for Sunny Studio! I got to play with the two new sets Lazy Christmas and Bear Hugs – so so cute. I had so much fun.

Sunny Studio Stamps: Bear Hugs Slimline Dies Thank You Word Dies Tags by Anni Lerche

I made three tags using the set Bear Hugs because I couldn’t decide for an image. They are all so adorable. And I love to make tags. They make every gift more special and – if needed – you can quickly turn them into a card.

Sunny Studio Stamps: Bear Hugs Slimline Dies Tags by Anni Lerche

I started by stamping the bears with a waterproof ink and coloured them with Distress Reinkers. To darken up the shadows I used some coloured pencils. This is my favourite way of colouring.

For the backgrounds I added ink blending with Distress Oxides. The grounds I created by die cutting the Slimline Nature Borders from cardstock.

Sunny Studio Stamps: Bear Hugs Slimline Dies Thank You Word Dies Tags by Anni Lerche

For the starry background I also sprinkled water and watered down white gesso on the cardstock. The sentiment is the Thank You Word die.

Sunny Studio Stamps: Bear Hugs Slimline Dies Tags by Anni Lerche

For this autumn tag I stamped a few leaves I could find in my stash and cut them out. I coloured them loosely with the Distress reinkers and added them randomly to the birch trees.

Sunny Studio Stamps: Lazy Christmas Merry Word Die Holiday Card by Anni Lerche

And I also created this Christmas card with the super cute sloth set. I chose some untraditional colours for the card. The images I coloured the same way as the bears. For the sentiment I used an older die called Merry Word. I love to stack up word die cuts for more dimension.

Sunny Studio Stamps: Lazy Christmas Merry Word Die Holiday Card by Anni Lerche

On the bottom I used the gifts from the sets. I turned them in different directions. This way it seems as if I am using a few stamps.

Thank you so much for stopping by and have a crafty day.

Sunny Studio Supplies Used:

Merry Word Die
Merry Word Die
Shop at:
Sunny Studio
Bear Hugs Stamps
Bear Hugs Stamps
Shop at:
Sunny Studio
Bear Hugs Dies
Bear Hugs Dies
Shop at:
Sunny Studio
Lazy Christmas Stamps
Shop at:
Sunny Studio
Lazy Christmas Dies
Lazy Christmas Dies
Shop at:
Sunny Studio
Thank You Words Die
Thank You Words Die
Shop at:
Sunny Studio
Slimline Nature Borders
Shop at:
Sunny Studio

Friday, November 12, 2021

Gingerbread House Die Focused Tag & Card with Tammy and Audrey

Hello friends! Tammy here with this sweet gift tag, that can also be repurposed as an ornament, featuring the adorable Gingerbread House Dies.

Sunny Studio Stamps: Gingerbread House Dies Icing Border Dies Christmas Cookies Holiday Tag by Tammy Stark

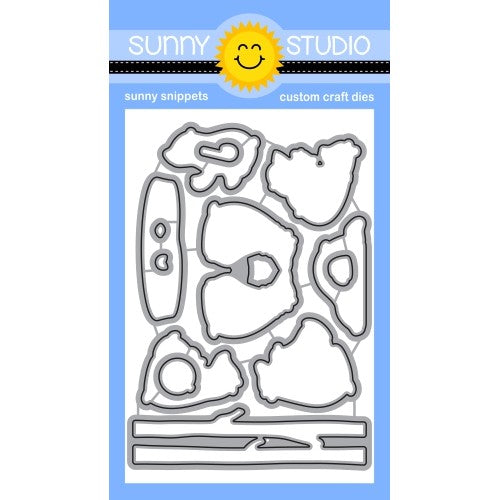
To begin, I die cut kraft cardstock using the Gingerbread House Dies, then ink blended the edges with Vintage Photo Distress Oxide ink to darken the edges. Next, I die cut the other elements using various colors of cardstock. I added glitter to the white scalloped pieces and the candies to give the look of sugared candy.

Next, I stamped the images from Christmas Cookies, colored with Copic markers, and die cut with the Christmas Cookies Dies. Copic Colors Used: Gingerbread: E37, E55, E31, E51, E50; Red: R39, R37, R35, R05; Green: YG17, YG03, YG01; Pink: R22, R20, RV10; White: N2, C1, C00

Sunny Studio Stamps: Gingerbread House Dies Icing Border Dies Christmas Cookies Holiday Tag by Tammy Stark

I cut a white base using the larger Gingerbread House shadow, placed my decorated gingerbread house on top and lightly traced it, then cut it. This gives the back a nice, clean look and makes the tag super sturdy. Next, I stamped the sentiment onto a white cardstock strip, punched a hole and attached it to a piece of red and white bakers twine. I covered the back of the house with heavy duty tape adhesive, then attached the two pieces, sandwiching the twine between them to create a little loop...perfect for adding to a gift or the Christmas tree!

Thanks so much for stopping by! I hope you are inspired to create your own tags or ornaments for gifting! Happy Crafting!

---------------------------------------------

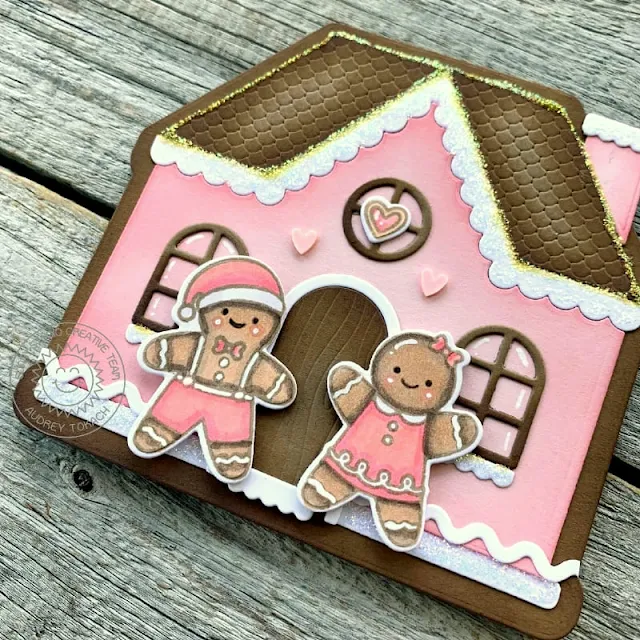
Hello friends! Audrey here with some sweet holiday wishes! I used the new Gingerbread House die to make a shaped card!  This die is a large size and nearly fills an A2 card front. It's perfect for creating shaped cards. 

Sunny Studio Stamps: Gingerbread House Dies Icing Border Dies Christmas Cookies Holiday Card by Audrey Tokach

I started off by die cutting two of the largest house dies from medium  brown cardstock, along with all of the windows, the door, and the roof. I used Vintage Photo Distress Oxide to ink the edges of each piece for more contrast. Then, I cut the window, door and roof trim from white cardstock, and the body of the house from light pink cardstock. If you have followed me for any length of time a pink gingerbread house should not surprise you at all! ;) 

The edges of the main part of the house were inked with Worn Lipstick Distress Oxide. Then, I die cut one of the Icing Borders from white cardstock glued that near the bottom of the house. I adhered all of the other pieces with liquid glue, and added Diamond Stickles to nearly everything. LOL!  I forgot that ink will make the Stickles change color slightly, and that is why my roof looks a bit gold. I think it is a fun contrast to the white. 

Sunny Studio Stamps: Gingerbread House Dies Icing Border Dies Christmas Cookies Holiday Card by Audrey Tokach

Next, I stamped the two gingerbread from the Christmas Cookies stamp set in brown ink and colored them with Copic markers. They were die cut with the coordinating Christmas Cookies dies. The brown ink makes they look a but like I did no-line coloring. I added their little faces back ink with a brown pen, and enhanced their icing stripes with a white gel pen, then popped them up with foam tape. I adhered the front of the house to a second house die cut that I scored about 1/2" front the top so the card would open properly. Finally, I added white gel pen accents to the rest of the card, and a few tiny clay hearts to finish off my card.

Sunny Studio Supplies Used:

Christmas Cookies Stamps
Shop at:
Sunny Studio
Christmas Cookies Dies
Shop at:
Sunny Studio
Gingerbread House Dies
Shop at:
Sunny Studio
Icing Border DIes
Icing Border DIes
Shop at:
Sunny Studio

Thursday, November 11, 2021

Lazy Christmas Cards with Marine and Anja

Hey crafty friends, Marine here, I'm so happy to share with you this new holiday shaker card showcasing the lovely Lazy Christmas stamp set that features two super cute sloths. I stamped those cuties as well as two branches on white cardstock using an alcohol marker friendly black ink, cut them using the coordinating dies and then used my alcohol markers to color them.

Sunny Studio Stamps: Lazy Christmas Botanical Backdrop Dies Christmas Card by Marine Simon

After the coloring I moved on to the background and started by creating a turquoise panel. I cut a 5,5 x 4,25" Strathmore bristol panel and applied salvaged patina oxide ink all over the panel and then peacock feathers oxide ink on the edges to bring more contrast.

As always I added lots of splatters on the panel to make it less flat and more interesting: water, peacock feathers + water, liquid stardust + water and copic opaque white ink + water.

To frame the card, and give the sloths a habitat, I cut a Botanical Backdrop out of a dark green cardstock, and added a little bit of white splatters on those leaves as well. And to make this jungle card even more festive, I cut another Botanical backdrop out of a silver glitter cardstock. I attached the dark green botanical frame on top of the silver glitter frame, but turned the dark green frame so that the leaves don't match.

Sunny Studio Stamps: Lazy Christmas Botanical Backdrop Dies Christmas Card by Marine Simon

I cut a 5,5 x 4,25" heat resistant acetate panel that I placed in my misti tool, placed some stamps right in the middle of the acetate to create my sentiment and picked them up with the door of the misti tool. I applied powder all over the acetate panel using my powder bag to make it antistatic, and then I stamped my sentiment using clear embossing ink. I sprinkled white embossing powder on the ink and used my heat gun to melt the powder.

I attached the acetate panel at the back of the botanical frame using liquid glue at the back of the frame on the four edges and foam squares at the back of some leaves to bring some dimension.

Sunny Studio Stamps: Lazy Christmas Botanical Backdrop Dies Christmas Card by Marine Simon

Stuck two layers of foam strips at the back of the frame on the four edges, and used my powder brush tool to apply a generous amount of powder all along the foam strips. This will keep the sequins away from the foam strips. I cleaned the acetate using a microfiber cloth, and poured a mix of sequins directly on the acetate, I carefully peeled the backing papers off the foam strips, and then I stuck my oxide panel on the foam strips to totally close the my shaker panel.

Next I attached the two little sloths and the branches. I used glue dots to stick the branches and foam squares to stick the sloths. And finally I added highlights and details on the images using a white gel pen.

Sunny Studio Stamps: Lazy Christmas Botanical Backdrop Dies Christmas Card by Marine Simon

And that's it, we have a super fun and festive shaker card that features the cutest little sloths, and I hope that you like it. Feel welcome to check the process video (click on the photo above), and I will see you next week with a new card!

----------------------------------------------------

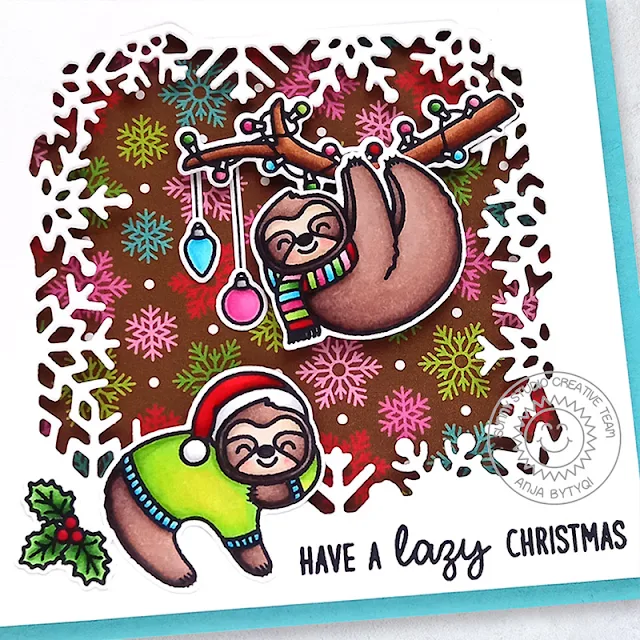
Hi everyone, Anja here and today I'm back with another holiday card showcasing the Lazy Christmas Stamps. These sloths are just the cutest!

Sunny Studio Stamps: Lazy Christmas Layered Snowflake Frame Dies Christmas Card by Anja Bytyqi

First, I started off with a 4 3/8" x 4 3/8" card base and trimmed down a piece of white cardstock to 4" x 4". I ran it through my die cutting machine with one of the Layered Snowflake Frame Dies. The patterned paper that went behind the opening is from the All Is Bright 6x6 Paper pack. The sentiment was stamped in VersaFine Onyx Black Ink. To create a bit of dimension, I adhered the snowflake frame with foam tape.

Sunny Studio Stamps: Lazy Christmas Layered Snowflake Frame Dies Christmas Card by Anja Bytyqi

Next, I stamped the images in Memento Tuxedo Black Ink and colored them with Copic Markers. I cut everything out with the coordinating dies. I used foam tape again to pop up my images. Only the Christmas baubles and the holly & berries were adhered flat with liquid glue.

Thank you so much for stopping by! Have a wonderful day!

Sunny Studio Supplies Used:

Lazy Christmas Stamps
Shop at:
Sunny Studio
Lazy Christmas Dies
Lazy Christmas Dies
Shop at:
Sunny Studio
Botanical Backdrop Die
Shop at:
Sunny Studio
Layered Snowflake Frame
Shop at:
Sunny Studio
All Is Bright Paper
All Is Bright Paper
Shop at:
Sunny Studio

Wednesday, November 10, 2021

Bear Hugs Tags & Card with Franci and Julia

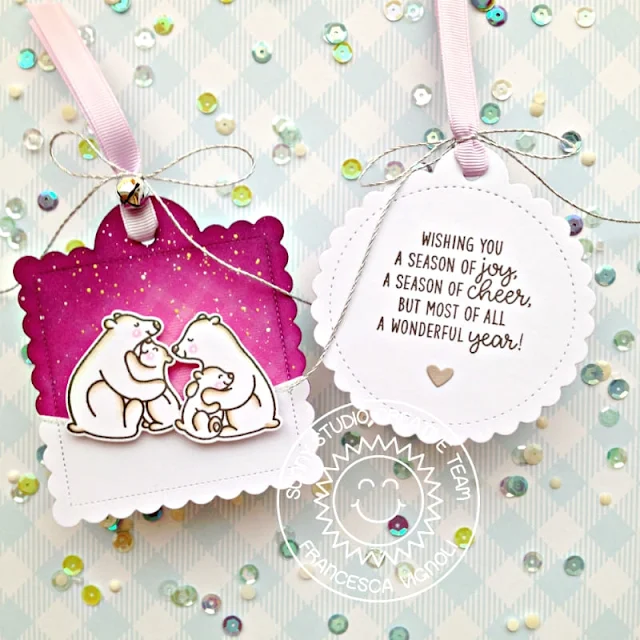
Hi there! It's Franci here with you today, showcasing the adorable Bear Hugs set. Aww I love these cute bears soo much! 

Sunny Studio Stamps: Bear Hugs Scalloped Tag Dies Inside Greetings Winter Themed Christmas Tags by Franci Vignoli

First of all I die cut all my tags multiple times out of white cardstock and patterned paper from the All Is Bright set using the Scalloped Tag Square and Scalloped Tag Circle dies sets.

I stamped my sentiments from the Inside Greetings Holiday stamp onto 2 of the white ones and created snowy hills with the others by die cutting them with the Slimline Nature Borders dies. Then I stamped my bears, colored them with Copics and die cut them out with their coordinated dies.

Sunny Studio Stamps: Bear Hugs Scalloped Tag Dies Inside Greetings Winter Themed Christmas Tags by Franci Vignoli

I inked my patterned paper tags with some Distress inks and added some gold and sparkle splatters. I let everything dry completely and assembled my tags with liquid glue and foam adhesive. Finally I added some twine, ribbon and a little bell to embellish them. 

I'm so happy about how these turned out: I love them! Hope you are now inspired to create for the Holidays and thanks a lot for stopping by today!

------------------------------------------------

Hello! It’s Julia here and I have this cute wintery scene card to share with you today!

Sunny Studio Stamps: Bear Hugs Slimline Dies Winter Themed Christmas Card by Julia Englich

I stamped the images from Bear Hugs onto Bristol Smooth cardstock and colored them using Zig Clean Color Real Brush Markers.

I ink blended the background with Milled Lavender, Seedless Preserves, and Black Soot. I also added a treeline using the Forest Tree Stencils and Cracked Pistachio and Evergreen Bough Distress Oxide. I die-cut two hills with the Slimline Nature Borders and added a little bit of Shading with Salvaged Patina to the edges.

Sunny Studio Stamps: Bear Hugs Slimline Dies Winter Themed Christmas Card by Julia Englich

I adhered an A2-sized piece of teal plaid paper from the All Is Bright paper pad to a card base. Then, I cut down the background to be slightly smaller to show the edge of the paper. I cut the hills down to the same width and adhered both to the card base. For my sentiment, I heat embossed "Have a beary merry Christmas" onto a strip of black cardstock. Finally, I added my cute little polar bears to the scene!

I can't get enough of these sweet wintery scene cards and I hope you like this one. I will be back soon with more holiday card inspiration! Wintery hugs.

Sunny Studio Supplies Used:

Bear Hugs Stamps
Bear Hugs Stamps
Shop at:
Sunny Studio
Bear Hugs Dies
Bear Hugs Dies
Shop at:
Sunny Studio
Scalloped Tags-Circle
Shop at:
Sunny Studio
Scalloped Tags-Square
Shop at:
Sunny Studio
Slimline Nature Borders
Shop at:
Sunny Studio
Inside Greetings-Holidays
Shop at:
Sunny Studio
All Is Bright Paper
All Is Bright Paper
Shop at:
Sunny Studio

Tuesday, November 9, 2021

Icing Border Die Focused Cards with Isha and Kavya

Hello everyone! Isha here, sharing a CAS shaker card with you. I am featuring the Icing Border Dies by using one of the dies to create a border for the card panel.

Sunny Studio Stamps: Icing Border Dies Christmas Critters Stitched Rectangle Dies Christmas Card by Isha Gupta

To start, I die-cut the scallops from the Icing Border Dies using various colors. Adhere to a white layer and die-cut this piece using the Stitched Rectangle die. Mat this layer with a coral card and adhere to a white card base.

Stamp the wreath from the Christmas Critters, color using Copic markers and die-cut using coordinating dies. Adhere acetate behind this piece. Now-die-cut the wreath 5 more times and stack behind the stamped wreath. This gives us a well to fill in gold dust by Studio Katia. Close this well by adhering a white circle. Now we have a shaker element ready.

Sunny Studio Stamps: Icing Border Dies Christmas Critters Stitched Rectangle Dies Christmas Card by Isha Gupta

Stamp the sentiment from the Holiday Express stamp and adhere the shaker element. Hope you enjoyed the interactive shaker element. Thank you for dropping by.

-----------------------------------------------------

Hi folks, Kavya here. I am back on the blog with another fun holiday card! The adorable icing border dies from the new release are just versatile and can be used all year long. I stretched these dies to create a fun scalloped roof and chimney, complete with a Santa peeking out! 

Sunny Studio Stamps: Icing Border Dies Santa Claus Lane North Pole Christmas Card by Kavya

I first started off creating a card base. I matted an ink blended (Chipped Sapphire, Mermaid Lagoon and Cracked Pistachio Distress Oxide inks) cardstock on top of A2 sized red and white stripped pattern paper from All is Bright paper pack. For the roof, I ink blended the edges of red cardstock using Vintage Photo and Black Soot Distress Oxide inks and splattered some red and brown paint. I added some brown die cut borders from Icing Borders to make it look like the roof has scalloped shingles. For the chimney, I did the same thing but out of brown cardstock and added the lines using a white gel pen to make it look like a brick! Finally, I hand drew and cut some ’snow’ on the roof and chimney using white glitter cardstock and added a hanging light string from Scenic Route stamp set on the roof. 

Sunny Studio Stamps: Icing Border Dies Santa Claus Lane North Pole Christmas Card by Kavya

Later, I stamped and colored a bunch of images from Santa Claus Lane and North Pole stamp set to finish off my card :) I decided not to add a sentiment because I thought my card already looked busy and the theme of the card was just so obvious! 

I hope this inspires you to use the icing border dies in your projects soon! Happy Crafting!

Sunny Studio Supplies Used:

Stitched Rectangle Dies
Shop at:
Sunny Studio
Christmas Critters Stamps
Shop at:
Sunny Studio
Christmas Critters DIes
Shop at:
Sunny Studio
Holiday Express Stamps
Shop at:
Sunny Studio
Icing Border DIes
Icing Border DIes
Shop at:
Sunny Studio
Santa Claus Lane Stamps
Shop at:
Sunny Studio
Santa Claus Lane Dies
Shop at:
Sunny Studio
Scenic Route Stamps
Scenic Route Stamps
Shop at:
Sunny Studio
Scenic Route Dies
Scenic Route Dies
Shop at:
Sunny Studio
North Pole Stamps
North Pole Stamps
Shop at:
Sunny Studio
North Pole Dies
North Pole Dies
Shop at:
Sunny Studio
All Is Bright Paper
All Is Bright Paper
Shop at:
Sunny Studio