Monday, July 5, 2021

Cupcake Shape Die Cards by Mayra and Ashley

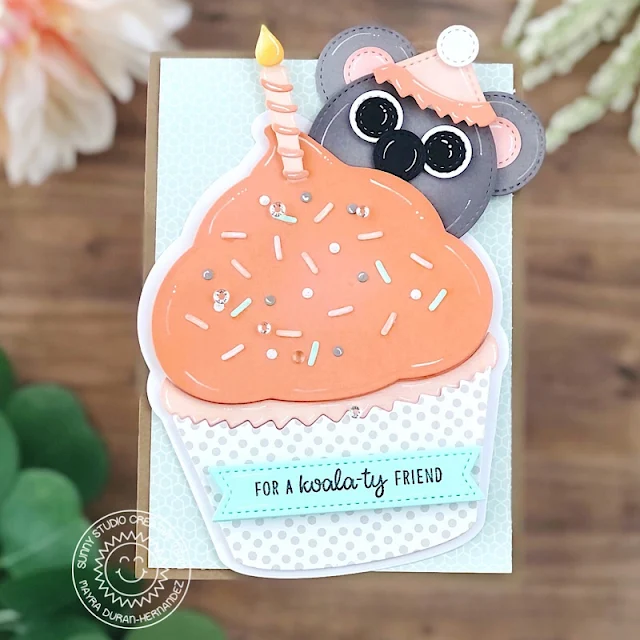
Hello everyone!! Happy July! Mayra here with you today. I am so happy to share this super sweet and fun card using the awesome Cupcake Shape dies

Sunny Studio Stamps: Cupcake Shaped Dies Stitched Circle Dies Stitched Rectangle Dies Birthday Card by Mayra Duran-Hernandez

I started by die cutting all of the layers to create the cupcake. I also created a die cut koala using the Stitched Circle Large dies and the Stitched Circle Small dies. I used different sized circles to create the face, ears, eyes and nose. I used the smallest of the rectangles from the Stitched Rectangles die set to create the birthday hat, along with the edge of one of the layers from the Cupcake Shape dies to create the trim. 

Sunny Studio Stamps: Cupcake Shaped Dies Stitched Circle Dies Stitched Rectangle Dies Birthday Card by Mayra Duran-Hernandez

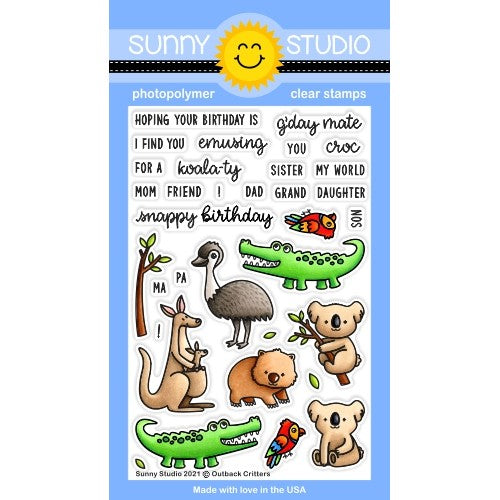
I then added a bit of color to each of the layers using ink in similar tones to the cardstock that I used. Next, I stamped the sentiment from the Outback Critters stamp set onto one of the die cut banners from the Stitched Rectangles die set. 

I hope you enjoy this fun koala-themed birthday card. Thank you so much for taking the time to stop by. I hope you each have a wonderful and super blessed day. 

-----------------------------------------------

Hi friends! It's Ashley today with a fun shaped shaker card featuring the new Cupcake Die set! I don't usually make shaped cards, but this die is so cute and so easy to paper piece together!

Sunny Studio Stamps: Cupcake Shaped Dies Stitched Rectangle Dies Birthday Card by Ashley Ebben

I started by cutting the Cupcake Die pieces from white cardstock. I used the big outside edge of the cupcake to make a base for my shaker and also to make a shaped card base. I colored the frosting piece a nice light pink with some dye inks, then added a few shadows with Copic markers for more detail. I added that to the shaker base, then surrounded it with foam tape. I used a mix of Girly Sprinkles and Rainbow Dot Confetti inside the shaker piece, then covered it with some acetate and the thin white cupcake frame.

Sunny Studio Stamps: Cupcake Shaped Dies Stitched Rectangle Dies Birthday Card by Ashley Ebben

I colored the cake piece of the cupcake with Antique Linen Distress Oxide and added it to the card. For the wrapper, I used a piece of paper from the Spring Fling paper pack in a fun rainbow pattern. I stamped a sentiment from Blissful Baking in VersaMark ink on black cardstock and embossed with white. I used the banner die from Fancy Frames Rectangles to cut it out, then glued it to the front of my card at a slight angle to look like a tag. I cut the stitched heart from Cupcake Die out of a different piece of patterned paper from Spring Fling and added it to the card with foam tape. I finished with a sweet little bow that I made from some pink and white twine.

Thank you so much for stopping by! Have a wonderful day!

Sunny Studio Supplies Used:

Blissful Baking Stamps
Shop at:
Sunny Studio
Outback Critters Stamps
Shop at:
Sunny Studio
Cupcake Shape Dies
Cupcake Shape Dies
Shop at:
Sunny Studio
Stitched Rectangle Dies
Shop at:
Sunny Studio
Fancy Frames- Rectangles
Shop at:
Sunny Studio
Spring Fling Paper
Spring Fling Paper
Shop at:
Sunny Studio
Stitched Circle Small Dies
Shop at:
Sunny Studio
Stitched Circle Large Dies
Shop at:
Sunny Studio

Saturday, July 3, 2021

Cupcake Shape & Gift Card Pocket Dies Project with Leanne

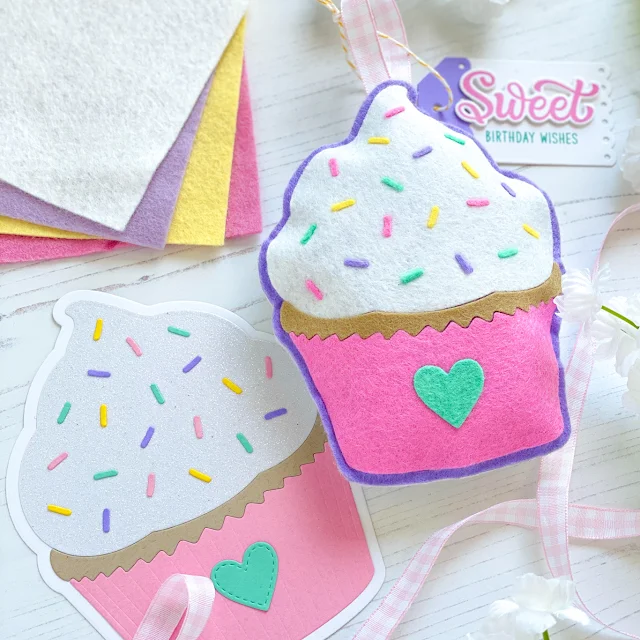
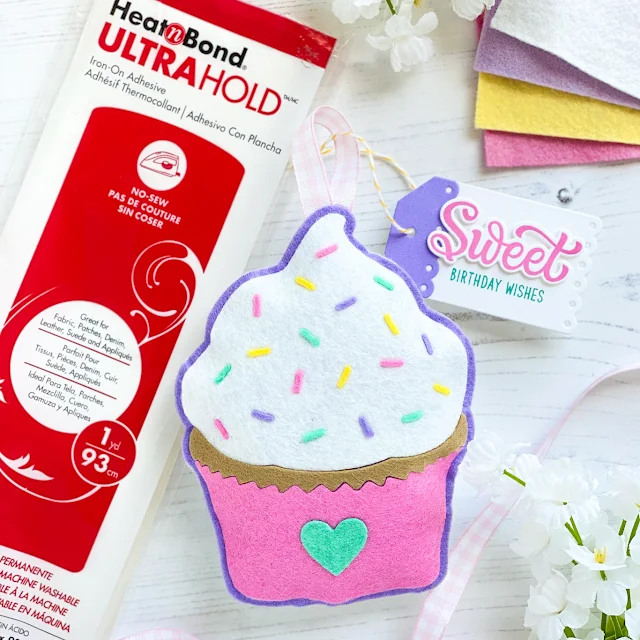
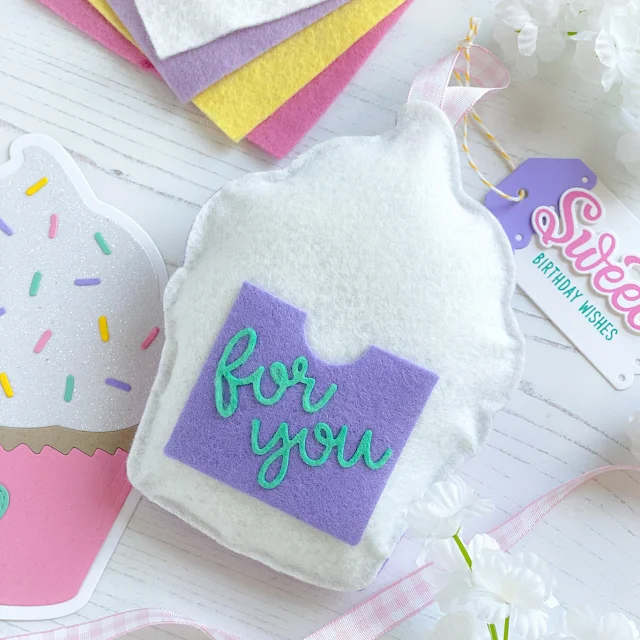
Hello crafty friends, Leanne here! I have a super fun project to share with you all today. It's a no sew cupcake plushie that doubles as a gift card holder. I have used the Cupcake Shapes dies to create this cute cupcake plushie. I have always found that any metal die that can cut card stock, can cut felt. Any kind of felt will work for this project. This project is also an excellent opportunity to use up any felt scraps you might have.

Sunny Studio Stamps: Cupcake Shape Dies Gift Card Pocket Dies Build-A-Tag Dies Candy Shoppe Felt Cupcake Plushie by Leanne West

Besides felt, you'll also need some type of adhesive.  I used an iron on adhesive called Heat'n'Bond. It's as simple to use as it sounds. Heat'n'Bond is a double sided adhesive. To start, simply iron on the adhesive to the back side of the felt.  After applying the Heat'n'Bond to the back of all my felt scraps, I then started die cutting the cupcake pieces. The metal dies easily cut through the felt even with the adhesive on the the back. It's important to note, you won't need to apply the Heat'n'Bond to the back side of the large solid cupcake shapes (you'll need a front and a back). These pieces will just require adhesive around the outer edge when it's time to stuff the cupcake.  

Sunny Studio Stamps: Cupcake Shape Dies Gift Card Pocket Dies Build-A-Tag Dies Candy Shoppe Felt Cupcake Plushie by Leanne West

To assemble, I placed all the parts of the cupcake (frosting, sprinkles, cake, wrapper, and heart) onto one of the solid cupcake shapes. Since all the separate cupcake pieces had Heat'n'Bond on the back, I simply ironed them in place. There's one last step before stuffing the cupcake if you want to make this into a gift card holder. You can add a pocket to the back piece. I used the Gift Card Pocket Die to create a felt pocket. Again I used the Heat'n'Bond. I used the iron on adhesive to apply the words "for you" onto the pocket. Then I just used little strips of Heat'n'Bond to adhere the pocket flaps down onto the back cupcake piece. As long as you keep the center free of adhesive, you'll have a functional little pocket to slide a gift card into.  

Sunny Studio Stamps: Cupcake Shape Dies Gift Card Pocket Dies Build-A-Tag Dies Candy Shoppe Felt Cupcake Plushie by Leanne West

Once I had the front and back pieces complete, I adhered the edges together and stuffed with poly fiber fill. I used my hot glue gun to apply a thin line of adhesive all along the outer edges.  At the top of the cupcake, I added a ribbon hanger while gluing. I left a small opening at the bottom to add the stuffing. After stuffing, I glued the opening shut. To customize the cupcake for any occasion, you can add a paper tag. I made a birthday tag to add to mine. I used Build-a-Tag 2 dies to make a cute little scalloped edge tag. The sentimenFelt stamps come from the Candy Shoppe stamp set.  

I hope this project gives you lots of inspiration for making your own felt plushies using the Cupcake Shapes dies. As you can see from the photos, the felt plushie is much more dimensional than the card stock version. It will definitely add some extra sweetness to the recipient's special day.  

Sunny Studio Supplies Used:

Candy Shoppe Stamps
Candy Shoppe Stamps
Shop at:
Sunny Studio
Cupcake Shape Dies
Cupcake Shape Dies
Shop at:
Sunny Studio
Gift Card Pocket
Gift Card Pocket
Shop at:
Sunny Studio
Build-A-Tag #2 Dies
Build-A-Tag #2 Dies
Shop at:
Sunny Studio

Friday, July 2, 2021

Beach Buddies Cards with Candice and Tammy

It's Candice with you this fabulous Friday with a fun summery card using the adorable Beach Buddies stamp set!

Sunny Studio Stamps: Beach Buddies Sealiously Sweet Stitched Circle Dies Summer Card by Candice Fisher

I used these Sunny Studio products for my design:

I began my card with a 6 1/2 x 5 card base. For the background, I trimmed some thick white cardstock to fit a little smaller than my card base and added 3 rows of the coral, yellow, and blue striped stitched circles to the front.

Sunny Studio Stamps: Beach Buddies Sealiously Sweet Stitched Circle Dies Summer Card by Candice Fisher

Next, I stamped all of my images from Beach Buddies & Sealiously Sweet stamp sets, colored them with Copic markers, and used the coordinating dies to cut them out. I added the images to the circles using foam tape. I heat embossed the sentiments in white on black banners and the 'Sunshine' in yellow and trimmed it out with scissors. I finished by adding them with foam tape and sprinkled the water drops all around!

Thank you for stopping by!

---------------------------------------------

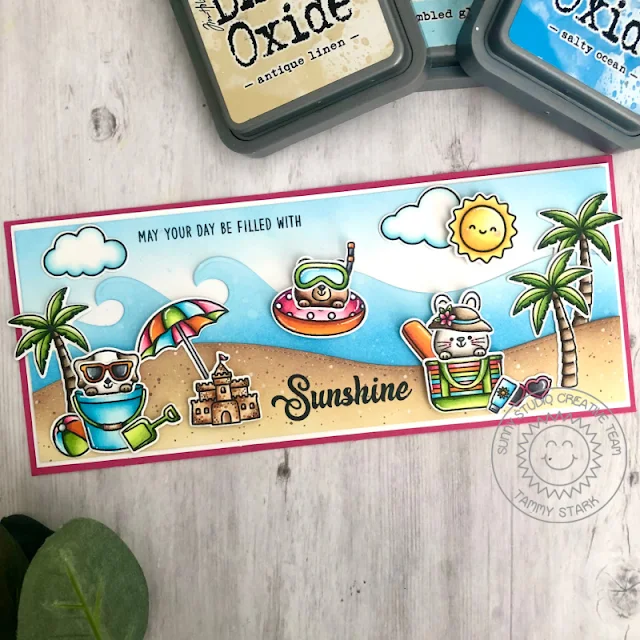
Hi friends! Tammy here with this fun, summer themed slimline card, featuring the adorable stamp set, Beach Buddies. These cuties are enjoying a day at the beach, and with the blazing temps here in Vegas, I must say I'm jealous, lol!

Sunny Studio Stamps: Beach Buddies Beach Babies Tropical Scenes Summer Card by Tammy Stark

To begin, I cut Bristol cardstock to 3 1/4 X 8 1/4" and lightly ink blended the sky with Tumbled Glass Distress Oxide ink. I cut the ocean and sandy borders using the Slimline Nature Borders Dies and ink blended them with Salty Ocean, Antique Linen, and Vintage Photo Distress Oxide inks and attached to the background.

I stamped, colored with Copic markers, and die cut images from the following sets:
Beach BuddiesCoordinating Dies
Beach BabiesCoordinating Dies
Tropical ScenesCoordinating Dies
Balloon RidesCoordinating Dies

Sunny Studio Stamps: Beach Buddies Beach Babies Tropical Scenes Summer Card by Tammy Stark

Next, I arranged the stamped images onto my card and attached them, using foam tape on some for dimension. I then stamped the sentiment from Beach Buddies in black ink onto my card. Lastly, I attached the card front to white cardstock, then onto a bright pink 3 1/2 X 8 1/2" card base to complete my card.

Thanks so much for stopping by today! Have a wonderful weekend!

Sunny Studio Supplies Used:

Beach Buddies Stamps
Shop at:
Sunny Studio
Beach Buddies Dies
Beach Buddies Dies
Shop at:
Sunny Studio
Beach Babies Stamps
Beach Babies Stamps
Shop at:
Sunny Studio
Beach Babies Dies
Beach Babies Dies
Shop at:
Sunny Studio
Dots & Stripes Pastels 6x6 Paper
Shop at:
Sunny Studio
Sealiously Sweet Stamps
Shop at:
Sunny Studio
Sealiously Sweet Dies
Shop at:
Sunny Studio
Tropical Scenes Stamps
Shop at:
Sunny Studio
Tropical Scenes Dies
Shop at:
Sunny Studio
Slimline Nature Borders
Shop at:
Sunny Studio
Balloon Rides Stamps
Shop at:
Sunny Studio
Balloon Rides Dies
Balloon Rides Dies
Shop at:
Sunny Studio
Stitched Circle Large Dies
Shop at:
Sunny Studio

Thursday, July 1, 2021

Poppy Fields Cards with Vanessa and Anja

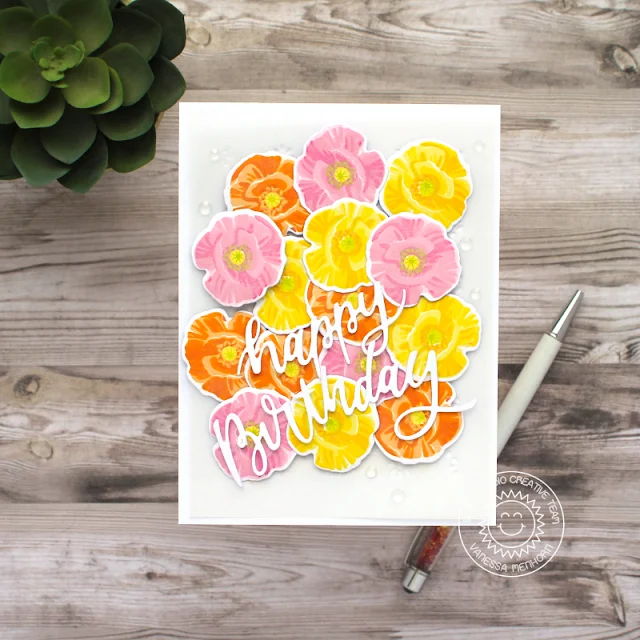
Hello to you! Vanessa here with a pastel birthday card using the beautiful Poppy Fields set. Although I love the classic red poppies, I decided to go with iceland poppies for my card:

Sunny Studio Stamps: Poppy Fields Frilly Frame Dies Blooming Frame Dies Floral Card by Vanessa Menhorn

First, I trimmed a panel of vellum slightly smaller than my white card base and die-cut the Frilly Frames Eyelet Lace from it. After I had adhered it to the card, I stamped all the poppies, die-cut them with the matching dies and adhered them to the card with foam tape.

These sets were used for today's card:
Poppy Fields stamps + dies
Frilly Frames Eyelet Lace Dies
Blooming Frame Die
Crystal Clear Jewels

Sunny Studio Stamps: Poppy Fields Frilly Frame Dies Blooming Frame Dies Floral Card by Vanessa Menhorn

I used the following inks for my flowers:
Pink: Distress Ink Spun Sugar + Kitsch Flamingo + Picked Raspberry, MFT Cotton Candy
Yellow: Hero Arts Soft Yellow + Butter Bar, MFT Sunshine, Distress Ink Squeezed Lemonade
Orange: Hero Arts Soft Yellow + Soft Apricot, Distress Ink Dried Marigold, Memento Morocco

Now I die-cut the happy birthday from white cardstock and adhered it before finishing the card off with clear jewels.

Thank you for visiting today! 

-------------------------------------------------

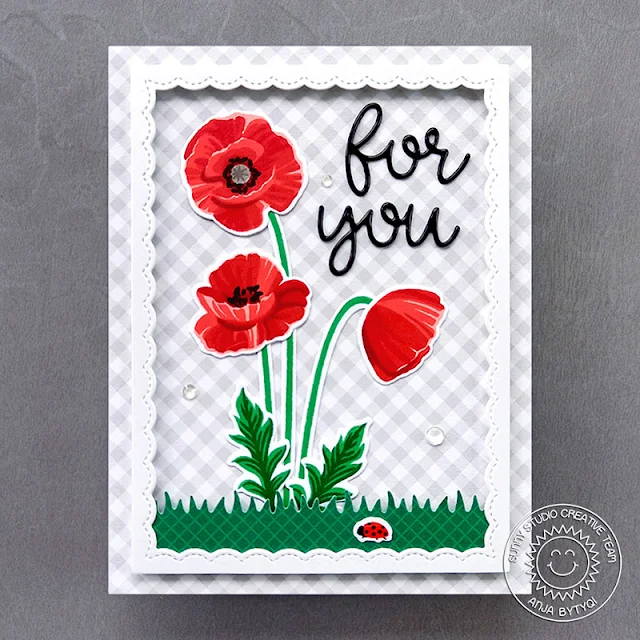
Hi everyone, Anja here. Poppies are some of my favorite flowers, so I was excited to create a card with the Poppy Fields Stamps.

Sunny Studio Stamps: Poppy Fields Fancy Frame Dies Picket Fence Border Dies Floral Card by Anja Bytyqi

I started with an A2 card base and trimmed the gingham patterned paper from the Subtle Grey Tones 6x6 Paper pack to the same size. I then cut one of the Fancy Frames Rectangle Dies from white cardstock and adhered it with foam strips.

Next, I stamped the layered poppies, leaves as well as the tiny ladybug from the Layered Basket set using dye inks (you can find the ink colors below). I used the coordinating dies to cut all the pieces out and arranged them on my card. I added a grass border (Picket Fence Die) at the bottom which I die cut from green grid paper (Gingham Jewel Tones Paper).

Dye Inks used:
Poppies: Altenew Pink Pearl, Coral Bliss, Crimson, Vineyard Berry, Grapevine; Simon Says Stamp Stone, Cobblestone; Leaves: Altenew Just Green, Hunter Green; Stems: Altenew Just Green; Ladybug: Altenew Heart Beat

Black details: VersaFine Onyx Black Ink

Sunny Studio Stamps: Poppy Fields Fancy Frame Dies Picket Fence Border Dies Floral Card by Anja Bytyqi

I die cut the words 'for you' included in the Gift Card Pocked Die set from black cardstock and double heat embossed them with clear embossing powder for a glossy look. To finish off my card, I adhered three Crystal Clear Jewels.

Thank you so much for stopping by! See you soon!

Sunny Studio Supplies Used:

Gift Card Pocket
Gift Card Pocket
Shop at:
Sunny Studio
Picket Fence Border Dies
Shop at:
Sunny Studio
Poppy Fields Stamps
Poppy Fields Stamps
Shop at:
Sunny Studio
Poppy Fields Dies
Poppy Fields Dies
Shop at:
Sunny Studio
Fancy Frames- Rectangles
Shop at:
Sunny Studio
Gingham Jewel Tones 6x6 Paper
Shop at:
Sunny Studio
Subtle Grey Tones Paper
Shop at:
Sunny Studio
Blooming Frame Die
Blooming Frame Die
Shop at:
Sunny Studio
Frilly Frames-Eyelet Lace
Shop at:
Sunny Studio
Layered Basket Stamps
Shop at:
Sunny Studio
Layered Basket Dies
Layered Basket Dies
Shop at:
Sunny Studio