Thursday, October 28, 2021

Gingerbread House Die Focused Cards with Marine and Anja

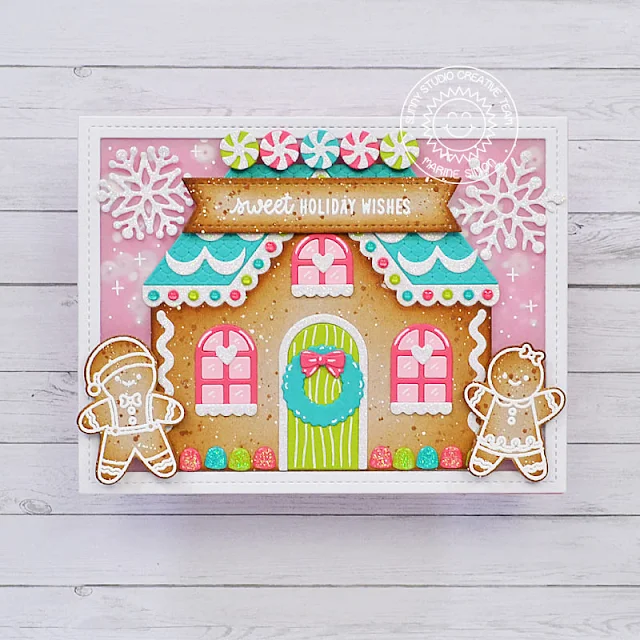
Hello crafty friends, Marine here, I'm back today with a cute and colorful shaker card showcasing the Gingerbread House Dies. Most of the elements I used to build this sweet little house come from that set, but I also used the wreath and bow dies from the Sweet Treat House Add-On die set and two Icing Border dies to help me decorate the house.

Sunny Studio Stamps: Gingerbread House Dies Sweet Treats House Add-On Dies Christmas Cookies Christmas Card by Marine Simon

I cut all the bits and pieces using a pink + green + blue combination, some were cut using sparkling white cardstock to create the icing, and I picked a kraft paper to create the gingerbread cookie.

To emphasize the gingerbread cookie effect, I applied vintage photo distress ink on the house edges. And then to add a cookie texture, I smooshed my vintage photo ink pad onto my glass surface, added a bit of water to the ink and then used a small brush to splatter small droplets on the house. And for a bit of contrast, I mixed some Copic opaque white ink with a drop of water to create more splatters on the house.

Once the house was dry, I glued it on a piece of cardstock, and then I assembled all the other elements: roof, windows, icing pieces, candy, etc. using liquid glue. For the smallest pieces, I used my twizzlers to keep my fingers away from the glue, and used my quick stick tool to pick up the tiniest things, such as the small circles.

Next I moved on to the shaker panel and cut a 5,5 x 4,25" panel out of a pink pattern paper from the Very Merry 6x6 paper pack. I also cut a frame out of white cardstock, and glued that frame on vellum. The vellum will mute the shaker background so it won't steal the gingerbread house thunder but we will still be able to see the shaker material.

Sunny Studio Stamps: Gingerbread House Dies Sweet Treats House Add-On Dies Christmas Cookies Christmas Card by Marine Simon

I trimmed the vellum around the frame, and applied foam strips at the back of that frame, on the four edges. And to keep the shaker material away from those foam strips, I applied powder all along the foam edges. This way the sequins and beads won't stick to the foam.

I cleaned the vellum window using a microfiber cloth, and then added the shaker material into the window: white beads, clear sequins, and a bunch of small pink jewels. I peeled the backing paper off the foam strips, and placed my pink panel directly on those foam strips to close the shaker panel.

Next I stuck the gingerbread house in the middle of the vellum panel using liquid glue, and also added more decorative pieces at the top of the house using foam squares.

For the last final details, I cut two sparkling white Lacy Snowflakes, cut a kraft banner using a die from Stitched Rectangle and white heat embossed my sentiment from Christmas Cookies on top of it. I also white heat embossed two gingerbread cuties from Christmas Cookies on kraft cardstock, and I created the same texture on those elements as the one on the house.

I attached those gingerbread cuties on both sides of the house using foam squares, stuck the banner on the roof, and then the snowflakes on both sides of the roof.

And finally, I added some details around the house, directly on the vellum, using a white gel pen, and brought more shine and sparkles by adding a dot of glossy accents on each little circle below the roof, and glitter on the candy at the bottom of the house.

Sunny Studio Stamps: Gingerbread House Dies Sweet Treats House Add-On Dies Christmas Cookies Christmas Card by Marine Simon

And that's it, I hope that you like this very cute, bright and shiny and colorful gingerbread house. Feel more than welcome to check the process video above (click on the photo), maybe it will inspire you to create your own gingerbread house! Thanks for stopping by and see you next week! 

--------------------------------------------

Hi everyone, Anja here and today's shaped card was made with the sweet Gingerbread House Dies.

Sunny Studio Stamps: Gingerbread House Dies Sweet Treats House Add-On Dies Christmas Cookies Christmas Card by Anja Bytyqi

First, I die cut the house shadow base from cream cardstock. Next, I die cut all the elements from colored cardstock. The scalloped trims for the roof and windows as well as the bottom piece were cut from glitter cardstock. I sponged the edges of the kraft gingerbread house die-cut with brown ink and added some splatters with a paint brush. To decorate the top window, I picked the cute little bow from the Sweet Treat House Add-on Dies set.

Now comes the fun part of putting the gingerbread house together by adhering all the die-cuts. I covered the gumdrops with Crystal Stickles to match the glitter cardstock. To make the pink part of the peppermint candy shiny, I applied a coat of Glossy Accents. I also turned it into a lollipop by putting it on a stick.

Sunny Studio Stamps: Gingerbread House Dies Sweet Treats House Add-On Dies Christmas Cookies Christmas Card by Anja Bytyqi

Of course I had to decorate the house with one of the adorable Christmas Cookies. I stamped the gingerbread girl and heart cookie in Memento Tuxedo Black Ink and colored them with Copic Markers. I used the coordinating dies to cut out the images and adhered them with foam tape.

Finally, I stamped the 'Merry Christmas' sentiment from the Bear Hugs set in VersaMark Ink onto a dark brown cardstock strip and heat embossed it with white embossing powder.

Thank you so much for stopping by! Have an awesome day!

Sunny Studio Supplies Used:

Stitched Rectangle Dies
Shop at:
Sunny Studio
Bear Hugs Stamps
Bear Hugs Stamps
Shop at:
Sunny Studio
Christmas Cookies Stamps
Shop at:
Sunny Studio
Christmas Cookies Dies
Shop at:
Sunny Studio
Gingerbread House Dies
Shop at:
Sunny Studio
Icing Border DIes
Icing Border DIes
Shop at:
Sunny Studio
Lacy Snowflakes Die
Lacy Snowflakes Die
Shop at:
Sunny Studio
Very Merry 6x6 Paper
Shop at:
Sunny Studio
Sweet Treats House Add-on
Shop at:
Sunny Studio

Wednesday, October 27, 2021

Lacy Snowflake Die Focused Cards with Franci and Julia

Hi there! It's Franci here, with a cute card showcasing the new Lacy Snowflakes set.

Sunny Studio Stamps: Lacy Snowflake Die Bear Hugs Christmas Critters Merry Mice Slimline Die Winter Christmas Card by Franci Vignoli

First of all I die cut all the snowflakes out of white cardstock and shaded them with a light blue marker. Then I stamped the adorable bear couple from the Bear Hugs set, colored it with my Copics and die cut it with its coordinated dies.

Sunny Studio Stamps: Lacy Snowflake Die Bear Hugs Christmas Critters Merry Mice Slimline Die Winter Christmas Card by Franci Vignoli

I created a card base out of white cardstock, inked the front center with light blue Distress Inks and glued down all the snowflakes and the cute bear couple into this fun design. I added a little confetti heart, stamped my sentiment and this card is ready to wish a loved one Merry Christmas!

Hope you're now inspired to create fun designs with these new products, happy crafting!

---------------------------------------------

Hello crafty friends! It’s Julia here and for today's card, I had to bring out the adorable little mice again!

Sunny Studio Stamps: Lacy Snowflake Die Christmas Critters Merry Mice Slimline Die Winter Christmas Card by Julia Englich


I stamped the images from
Christmas Critters, Harvest Mice, and Merry Mice and colored them in using Zig Clean Color Real Brush Markers.

I die-cut two snowy hills with the Slimline Nature Borders as well as the Comic Strip Everyday frame out of white cardstock. I snipped off the inside pieces, so I could just use the stitched frame. I ink blended the background with Tumbled Glass, Faded Jeans, Prize Ribbon, Blueprint Sketch, Chipped Sapphire, and Black Soot. I also added a few black splatters and lots of snowy splatters to the background for more interest.

Sunny Studio Stamps: Lacy Snowflake Die Christmas Critters Merry Mice Slimline Die Winter Christmas Card by Julia Englich


I stamped the sentiment from
Merry Mice onto the lowest hill and I adhered the background and the hills to an A2-sized card base. Then, I die-cut lots of the Lacy Snowflakes out of white glitter cardstock and adhered them to the background. I layered the white frame over top. Finally, it was time to add all my cute little mice and of course the Snowmouse!

I had such a blast creating this one and I really hope you like it! Have an amazing day and a merry Christmouse!!

Sunny Studio Supplies Used:

Bear Hugs Stamps
Bear Hugs Stamps
Shop at:
Sunny Studio
Bear Hugs Dies
Bear Hugs Dies
Shop at:
Sunny Studio
Christmas Critters Stamps
Shop at:
Sunny Studio
Christmas Critters DIes
Shop at:
Sunny Studio
Lacy Snowflakes Die
Lacy Snowflakes Die
Shop at:
Sunny Studio
Comic Strip Everyday Dies
Shop at:
Sunny Studio
Merry Mice Stamps
Merry Mice Stamps
Shop at:
Sunny Studio
Merry Mice Dies
Merry Mice Dies
Shop at:
Sunny Studio
Slimline Nature Borders
Shop at:
Sunny Studio
Harvest Mice Stamps
Harvest Mice Stamps
Shop at:
Sunny Studio
Harvest Mice Dies
Harvest Mice Dies
Shop at:
Sunny Studio

Tuesday, October 26, 2021

Bear Hugs Cards with Isha and Kavya

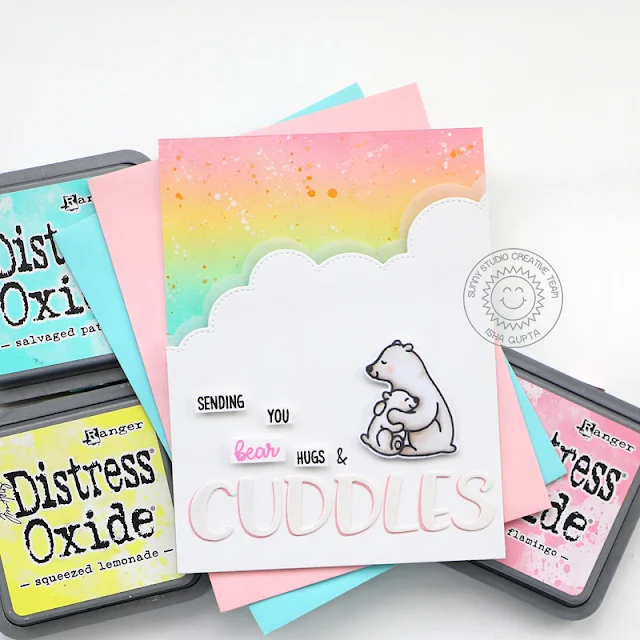
Hello everyone, Isha here! Today, I have a fun, clean and simple card featuring our Bear Hugs stamps and dies. I love the fact that we can mix and match various products to personalize the card as per our liking. So, I made this card for my younger daughter, who literally would hug and cuddle me all the time, even though she is 17 :) And I enjoy it to the fullest.

Sunny Studio Stamps: Bear Hugs Slimline Dies Chloe Alphabet Dies Polar Bear Themed Hugs Card by Isha Gupta

I used a pastel palette as she loves soft colors. I started by sponging kitsch flamingo, squeezed lemonade and salvaged patina onto a white layer to create the sky. I then flicked some silver and gold paint to it.

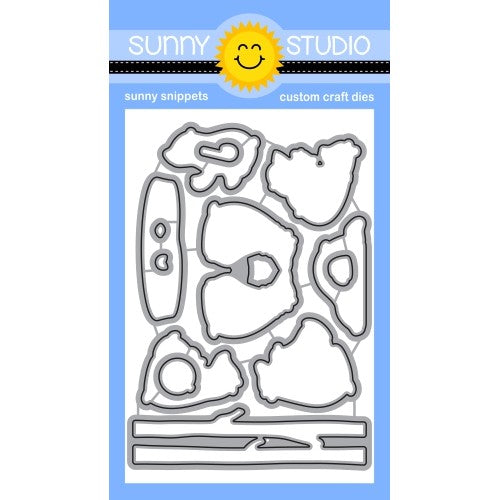
Next, I die-cut the clouds using the Slimline Nature Border dies. I die-cut them once using white cardstock and also once in vellum. Adhere the vellum behind the white clouds. Adhere to the card diagonally using 3D foam. Stamp the bear image from the Bear Hugs stamp. Color using Copic markers. Die-cut the image using the coordinating dies. Stamp the sentiment and cut thin strips using scissors.

Sunny Studio Stamps: Bear Hugs Slimline Dies Chloe Alphabet Dies Polar Bear Themed Hugs Card by Isha Gupta

I wanted to add the word "CUDDLES" so, die-cut it using the Chloe Alphabet dies. I cut them once using white cardstock and once again using pink cardstock. Back the white letters by pink to create a shadow effect. Adhere to the card and apply spectrum noir clear sparkle pen. Adhere all the images using 3d foam.

Thank you for stopping by and have a lovely day!

-------------------------------------------------------

Hi folks, Kavya here. I am back with another fun card! I love making galaxy cards but I never tried recreating northern lights before… seeing it in person is definitely at the top of my wish list! These ‘fake’ northern lights didn’t turn exactly how I envisioned but it’s still gorgeous to look at :) 

Sunny Studio Stamps: Bear Hugs Scalloped Oval Mat Dies Winter Scenes Polar Bear Themed Hugs Card by Kavya

I first started out by creating my background by ink blending streaks of Cracked Pistachio and Seedless Preserves. I highly recommend using mini blending brushes for the lights. On my card, I made ’straight’ streaks but I think curved ones would look a bit more realistic. I am going to try more organic streaks next time :) Then, I filled the gaps using Blueprint Sketch, Chipped Sapphire and Black Soot around the edges. As always, I splattered some white paint to make some stars. I also went back and added some larger sparkly stars using a white gel pen! 

Sunny Studio Stamps: Bear Hugs Scalloped Oval Mat Dies Winter Scenes Polar Bear Themed Hugs Card by Kavya

Then, I stamped and colored images from Bear Hugs and Winter Scenes. I ink blended the edges of the tree border from Winter Scenes using Speckled Egg distress oxide ink and splattered some more white paint to make it look like snow! Finally, I added a sentiment from Bear Hugs and added a die-cut ‘Hugs’ from Scalloped Oval Mat 3 dies from white glitter cardstock to finish off the card!

Isn’t this adorable? I absolutely love the how cute these bears are! Can’t wait to use them more in the future! Happy Crafting!

Sunny Studio Supplies Used:

Chloe Alphabet Dies
Chloe Alphabet Dies
Shop at:
Sunny Studio
Bear Hugs Stamps
Bear Hugs Stamps
Shop at:
Sunny Studio
Bear Hugs Dies
Bear Hugs Dies
Shop at:
Sunny Studio
Slimline Nature Borders
Shop at:
Sunny Studio
Winter Scenes Stamps
Shop at:
Sunny Studio
Winter Scenes Dies
Winter Scenes Dies
Shop at:
Sunny Studio
Scalloped Oval Mat 3 Dies
Shop at:
Sunny Studio

Monday, October 25, 2021

Icing Border Die Focused Cards with Ashley and Mayra

Hi friends! It’s Ashley with a card featuring the new Icing Border dies! These dies go perfectly with the Sunny Studio gingerbread products, but they are super versatile and can be used for so many other cards too! When I saw them, I thought they would make cool waves for one of my favorite critters - the otters!

Sunny Studio Stamps: Icing Border Dies Stitched Rectangles My Otter Half Card by Ashley Ebben

I started by blending Distress Oxide inks in Peacock Feathers, Faded Jeans, and Chipped Sapphire onto light aqua cardstock. I used one of the Icing Border dies several times to make some ombré waves. I glued the waves to white cardstock then cut the whole piece with the largest Stitched Rectangle die to add some detail to the edges. I added this to a dark blue card base to enhance the watery feel.

Sunny Studio Stamps: Icing Border Dies Stitched Rectangles My Otter Half Card by Ashley Ebben

I cut a small oval using the Stitched Oval 2 dies from more light aqua cardstock and blended the same Distress Oxides onto it as before to make a nice backdrop for my otters. I added the oval to the card with foam tape for dimension. I stamped the otters from My Otter Half with Lawn Fawn Jet Black ink and colored with Copics before cutting them out with the matching dies and adding them to the card. I die cut the "hugs" sentiment from Scalloped Oval Mat 3 three times from the same dark blue cardstock as my base and layered them up for a dimensional sentiment. I finished the card with a few clear jewels for some sparkle.

Thank you so much for stopping by! Have a wonderful day!

-----------------------------------------

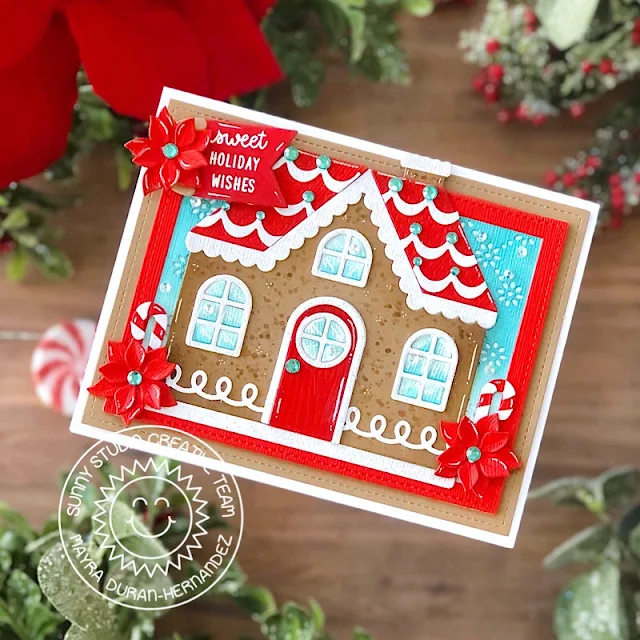
Hello everyone, Mayra here. Happy Monday. I am sharing this card with you today using the super cute Icing Border dies set. 

Sunny Studio Stamps: Icing Border Dies Stitched Rectangles Gingerbread House Dies Christmas Card by Mayra Duran-Hernandez

I began by die-cutting the layers for the gingerbread house using the Gingerbread House die set. Next, I used the largest of the rectangles from the Stitched Rectangles die set to die-cut the base panel. I then used the Frilly Frames Eyelet Lace die to die-cut the design into the base panel. I then used the larger and medium sized dies from the Stitched Rectangles set to create the red frame. 

Sunny Studio Stamps: Icing Border Dies Stitched Rectangles Gingerbread House Dies Christmas Card by Mayra Duran-Hernandez

Next, I used the poinsettia from the Window Quad Circle die set to die-cut the poinsettias for the card. I then used the tag from the Window Quad Square die set to die-cut the tag for the sentiment. The sentiment is from the adorable Christmas Cookies stamp set. 

I hope you enjoy the card I created to share with you today. Thank you very much for stopping by. I hope you each have a wonderful and blessed day. 

Sunny Studio Supplies Used:

Stitched Rectangle Dies
Shop at:
Sunny Studio
Christmas Cookies Stamps
Shop at:
Sunny Studio
Gingerbread House Dies
Shop at:
Sunny Studio
Icing Border DIes
Icing Border DIes
Shop at:
Sunny Studio
Frilly Frames-Eyelet Lace
Shop at:
Sunny Studio
Window Quad Circle Die
Shop at:
Sunny Studio
Window Quad Square Die
Shop at:
Sunny Studio
My Otter Half Stamps
Shop at:
Sunny Studio
My Otter Half Dies
My Otter Half Dies
Shop at:
Sunny Studio
Scalloped Oval Mat 3 Dies
Shop at:
Sunny Studio
Stitched Oval 2 Dies
Shop at:
Sunny Studio