Thursday, August 12, 2021

Picket Fence Die Focused Cards with Vanessa and Anja

Hello to you! Vanessa here with a fall card using the Picket Fence Die.

Sunny Studio Stamps: Picket Fence Dies Farm Fresh Harvest Mice Slimline Dies Fall Card by Vanessa Menhorn

I first inked the front of the white card base with Tumbled Glass Distress Oxide ink. Now I die-cut the cloud border from white cardstock, inked it with Spiced Marmalade and Carved Pumpkin Distress Oxide inks, added ink droplets and adhered it to the card to create bushes. Then I die-cut the fence from thin wood veneer and added it to the card. I inked a piece of white cardstock with Crushed Olive Distress Oxide ink, added ink droplets, die-cut the grass border and adhered it to the card.

Today, I used these sets:
Picket Fence Die (fence, grass border)
Farm Fresh stamps + dies (chicken)
Harvest Mice stamps dies (pumpkins)
Happy Harvest stamps dies (pumpkins + sentiment)
Slimline Nature Borders Dies (cloud border)

Sunny Studio Stamps: Picket Fence Dies Farm Fresh Harvest Mice Slimline Dies Fall Card by Vanessa Menhorn

I stamped all the images onto white cardstock, colored them with Copic markers, die-cut the pieces with the matching dies and adhered the elements to the card.

Have a wonderful day and thank you for visiting!

-----------------------------------------

Hi everyone, Anja here and today I'm back with a sweet night scene featuring the Picket Fence Dies which I combined with the Missing Ewe Stamps.

Sunny Studio Stamps: Picket Fence Dies Slimline Dies Missing Ewe Missing You Card by Anjy Bytyqi

First, I started off with ink blending the night sky background using Distress Oxide Inks (Faded Jeans, Chipped Sapphire and Black Soot). For the stars, I splattered on some Finetec Moon Gold paint. Next, I blended together Mowed Lawn and Rustic Wilderness for the grass. I used the straight Picket Fence grassy border die as well as the curved one from the Slimline Nature Borders Dies set. The fence and woodgrain embossed boards were cut from  Kraft cardstock.

I stamped the sheep in Memento Tuxedo Black Ink and colored them with Copic Markers. I used the coordinating dies to cut them out. The word 'ewe' is included in the same die set and I cut it from gold glitter cardstock. To complete my punny phrase, I stamped the sentiment from the Plane Awesome set in VersaMark Ink onto red cardstock strip and white heat embossed it.

Sunny Studio Stamps: Picket Fence Dies Slimline Dies Missing Ewe Missing You Card by Anjy Bytyqi

Finally, I assembled my card by adhering all pieces with liquid glue as well as some foam tape for the sheep and bottom grass border. I added two red die-cut hearts as a finishing touch.

Thank you so much for stopping by! Have an amazing day!

Sunny Studio Supplies Used:

Picket Fence Border Dies
Shop at:
Sunny Studio
Missing Ewe Dies
Missing Ewe Dies
Shop at:
Sunny Studio
Missing Ewe Stamps
Missing Ewe Stamps
Shop at:
Sunny Studio
Happy Harvest Stamps
Shop at:
Sunny Studio
Happy Harvest Dies
Happy Harvest Dies
Shop at:
Sunny Studio
Plane Awesome Stamps
Shop at:
Sunny Studio
Slimline Nature Borders
Shop at:
Sunny Studio
Farm Fresh Stamps
Farm Fresh Stamps
Shop at:
Sunny Studio
Farm Fresh Dies
Farm Fresh Dies
Shop at:
Sunny Studio
Harvest Mice Stamps
Harvest Mice Stamps
Shop at:
Sunny Studio
Harvest Mice Dies
Harvest Mice Dies
Shop at:
Sunny Studio

Wednesday, August 11, 2021

Looking Sharp Cards with Franci and Julia

Happy Wednesday friends! Franci here with you today, with a fun birthday card featuring the Looking Sharp set. Aww these little plants are soo cute, I love them so much!

Sunny Studio Stamps: Looking Sharp Stitched Rectangle Dies Alpaca Holiday Balloon Rides Birthday Punny Cards by Franci Vignoli

First of all I die cut 2 Stitched Rectangles out of white cardstock and patterned paper from the Gingham Jewel Tones set and created a coordinated card base out of white cardstock.

I stamped, colored with Copics and die cut my little plants and added some details with a white gel pen and some sparkle with my Wink Of Stella clear brush. I stamped my sentiment onto my white panel, masked it and inked the top with Distress ink.

Sunny Studio Stamps: Looking Sharp Stitched Rectangle Dies Alpaca Holiday Balloon Rides Birthday Punny Cards by Franci Vignoli

Then I removed the mask and glued down my cuties with foam adhesive. I glued my decorated panel to the front of my card base I previously covered in patterned paper and added some white embellishments and little hearts from the Happy Hamster set. 

Have a lovely day!

--------------------------------------------

Hello crafty friends! It’s Julia here with a fun birthday card!

Sunny Studio Stamps: Looking Sharp Alpaca Holiday Balloon Rides Birthday Punny Card by Julia Englich


First, I stamped all my images from
Looking Sharp, Alpaca Holiday, and Balloon Rides onto Bristol Smooth paper and I colored them in using Zig Clean Color Real Brush Markers.

I used the Stitched Rectangle dies to cut out two white panels. One panel I used for the background and the other to cut my hills out of so that I would have the beautiful stitching going all the way around! For the hills, I used the Slimline Nature Borders. I ink blended the background and the hills with Distress Oxide inks.

Inks used: Antique Linen, Tea Dye, Vintage Photo, Squeezed Lemonade, Spiced Marmelade, Seedless Preserves Distress Oxides. 
Zig Markers used: 999; 41, 40, 44,; 42, 33; 82; 64, 65, 73; 50, 51, 52.


Sunny Studio Stamps: Looking Sharp Alpaca Holiday Balloon Rides Birthday Punny Card by Julia Englich

I stamped my sentiment from Looking Sharp on the lowest hill in black ink. Then, I adhered my ink blended panel to a white card base, leaving a white border, and adhered the hills on top of that using liquid glue. Finally, I added all my adorable little images with foam squares and liquid glue.


I had such a good time making this and I really hope you like it! Thank you so much for spending time with me today! Have an amazing day!


Sunny Studio Supplies Used:

Happy Hamsters Stamps
Shop at:
Sunny Studio
Happy Hamsters Dies
Happy Hamsters Dies
Shop at:
Sunny Studio
Looking Sharp Stamps
Shop at:
Sunny Studio
Looking Sharp Dies
Looking Sharp Dies
Shop at:
Sunny Studio
Stitched Rectangle Dies
Shop at:
Sunny Studio
Gingham Jewel Tones 6x6 Paper
Shop at:
Sunny Studio
Alpaca Holiday Stamps
Shop at:
Sunny Studio
Alpaca Holiday Dies
Alpaca Holiday Dies
Shop at:
Sunny Studio
Slimline Nature Borders
Shop at:
Sunny Studio
Balloon Rides Stamps
Shop at:
Sunny Studio
Balloon Rides Dies
Balloon Rides Dies
Shop at:
Sunny Studio

Tuesday, August 10, 2021

Teacher Appreciation Cards with Isha and Kavya

Hello everyone! Isha here with a rainbow colored card featuring the Teacher Appreciation stamp set. This stamp set is simply perfect for one of the most important people of our lives, "Teachers".

Sunny Studio Stamps: Teacher Appreciation Stitched Rectangles Chloe Alphabet Dies Teacher Card by Isha Gupta

Rainbow colors are my way of showing the variety of ways a teacher touches our lives. So, I started by applying distress inks (salty ocean, picked raspberry, shabby shutters, squeezed lemonade, dried marigold) mixed with water onto watercolor paper. Let this dry and then add white splatters. Adhere this layer to a white card base.

Next, I made a white frame by using two of the Stitched Rectangle dies. Die-cut some alphabets and numbers from the Chloe Alphabet and the Loopy Letters dies. Adhere the frame to the card and then adhere the alphabets and numbers inside it.

Sunny Studio Stamps: Teacher Appreciation Stitched Rectangles Chloe Alphabet Dies Teacher Card by Isha Gupta

Stamp the sentiment from the Teacher Appreciation stamp set onto vellum. Cut a white cardstock slightly bigger than the sentiment stripe. Sponge some ink to one side. Adhere the vellum sentiment to it. Adhere this to the card using 3d foam. To finish, I added a small paperclip.

Thank you for dropping by! Have a nice day.

-------------------------------------------------

Hi folks, Kavya here. I am back with another fun card that uses some products from the previous releases along with the new release! I love it when Mendi designs products that pair well with supplies that you might already have in your stash. 

Sunny Studio Stamps: Teacher Appreciation School Time Teacher Card by Kavya

I first started off by stamping and coloring a bunch of images from School Time stamp set. I stamped a sentiment inside the ruled paper using the new Teacher Appreciation stamp set. I then created a faux blackboard using just cardstock and dye ink! I first ink blended the edges of a basil colored green cardstock using matching dye ink. I then gently swiped a white dye ink pad on top and added some paint splatters to create a faux chalk look. 

Sunny Studio Stamps: Teacher Appreciation School Time Teacher Card by Kavya

I then did the same with Kraft cardstock to create a faux wood look.. but instead of swiping a white ink pad, I used a brown ink pad! Layer them on top of one another and you are done! 

That’s it! I hope you liked this fun card… and maybe decide to recreate this! 

Sunny Studio Supplies Used: 


School Time Dies
School Time Dies
Shop at:
Sunny Studio
School Time Stamps
School Time Stamps
Shop at:
Sunny Studio
Teacher Appreciation Stamps
Shop at:
Sunny Studio
Chloe Alphabet Dies
Chloe Alphabet Dies
Shop at:
Sunny Studio
Stitched Rectangle Dies
Shop at:
Sunny Studio
Loopy Letters Dies
Loopy Letters Dies
Shop at:
Sunny Studio

Monday, August 9, 2021

Gift Card Pocket Die Focused Cards with Ashley and Mayra

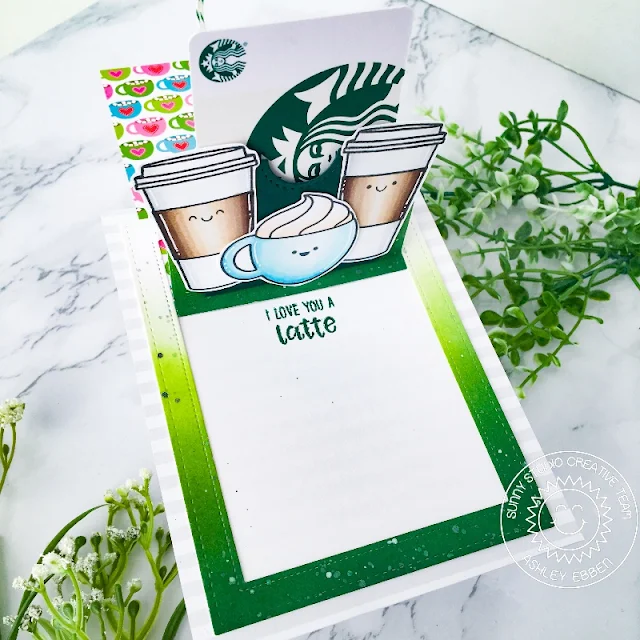
Hi friends! It's Ashley with a fun sliding window card that also incorporates the Gift Card Pocket die! By combining the Sliding Window and Gift Card Pocket dies, you can make the gift card pop up when the slider is pulled! I had a Starbucks gift card on hand, so I decided to use that as my inspiration for the rest of the card.

Sunny Studio Stamps: Gift Card Pocket Dies Sliding Window Dies Mug Hugs Card by Ashley Ebben

I started by blending several Pinkfresh Studio green inks onto white cardstock to create an ombre effect. I splattered some white and black watercolor onto it, then die cut it with the largest Stitched Rectangle die before using it for my slider. I created my slider piece with the Sliding Window die and my ink blended piece, white cardstock, and a piece of mug patterned paper from the Holiday Cheer paper pack. I followed these instructions, making a few modifications as necessary to fit the size of the stitched rectangle I cut out. Make sure to use strong adhesive - I like Scor Tape! Once my slider was assembled, I added it to a piece of striped paper from the Subtle Grey Tones pack to make my base.

Sunny Studio Stamps: Gift Card Pocket Dies Sliding Window Dies Mug Hugs Card by Ashley Ebben

I stamped the coffee images from Mug Hugs and added a few smiley faces to them with the Looking Sharp set. After coloring with Copics, I fussy cut the images but you could also use the matching dies. I die cut the Gift Card Pocket from dark green cardstock and added it right to the edge of the slider where it folds up. I arranged my coffee images on top the pocket, then tied a bit of sparkly green twine to the pull tab. I finished by stamping an image from Breakfast Puns on the inside in dark green ink, making sure to save room to write a personalized message later.

Thank you so much for stopping by! Have a wonderful day!

----------------------------------------------

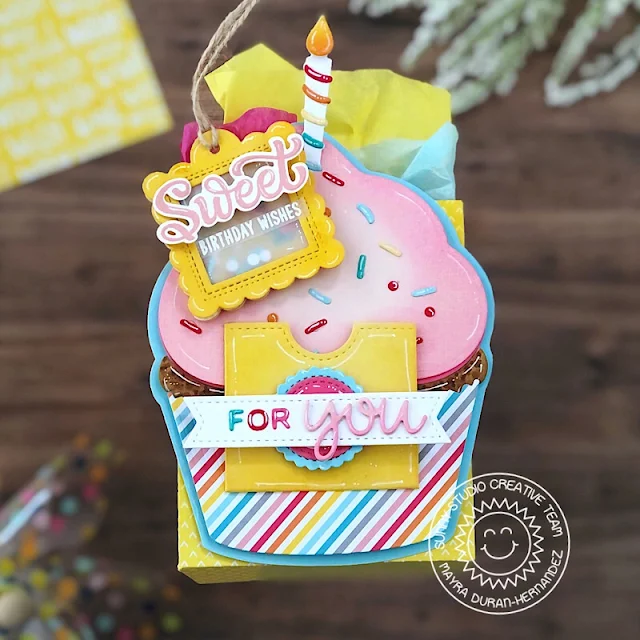
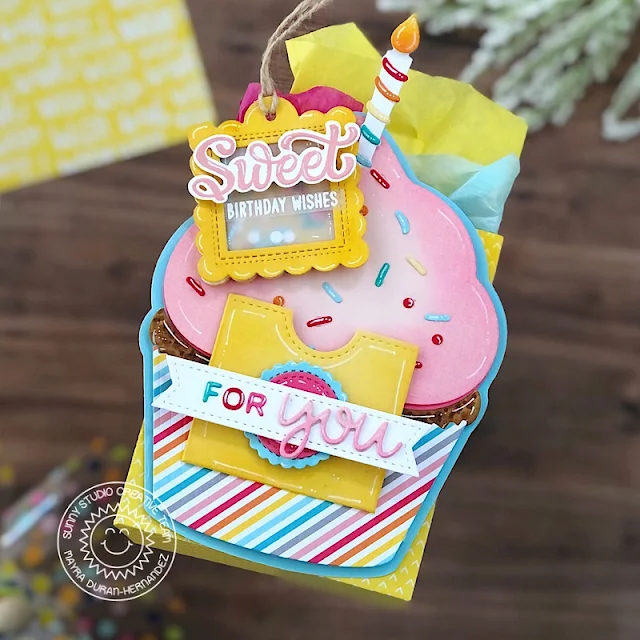
Hello everyone, happy Monday. Mayra here with you today sharing this sweet treat bag with a gift cardholder. I used the super fun Gift Card Pocket die.

Sunny Studio Stamps: Gift Card Pocket Dies Scalloped Tag Dies Cupcake Shaped Dies Card by Mayra Duran-Hernandez

I began by die-cutting the layers to create the cupcake and bag using the Cupcake Shape dies set, and the Sweet Treats Bag die. I also die-cut a couple of extra sprinkle pieces from the Cupcake Shape die set to use for the mini shaker tag. To create the mini shaker tag, I used the smaller of the tags from the Scalloped Tag Square dies set. I then die-cut a smaller square into the center area to create the shaker window. I also used some of the Small White Crystals to the shaker tag.  

Sunny Studio Stamps: Gift Card Pocket Dies Scalloped Tag Dies Cupcake Shaped Dies Card by Mayra Duran-Hernandez

Next, I added the pocket die to the front of the cupcake shape. The sentiment is from the Candy Shoppe stamp set. The banner is from the Stitched Rectangles die set. 

I hope you enjoy the fun treat bag I created to share with you today. Thank you so much for stopping by. I hope you each have a wonderful and blessed day. 

Sunny Studio Supplies Used:

Mug Hugs Dies
Mug Hugs Dies
Shop at:
Sunny Studio
Mug Hugs Stamps
Mug Hugs Stamps
Shop at:
Sunny Studio
Candy Shoppe Stamps
Candy Shoppe Stamps
Shop at:
Sunny Studio
Looking Sharp Stamps
Shop at:
Sunny Studio
Cupcake Shape Dies
Cupcake Shape Dies
Shop at:
Sunny Studio
Gift Card Pocket
Gift Card Pocket
Shop at:
Sunny Studio
Stitched Rectangle Dies
Shop at:
Sunny Studio
Breakfast Puns Stamps
Shop at:
Sunny Studio
Sliding Window Dies
Sliding Window Dies
Shop at:
Sunny Studio
Holiday Cheer 6x6 Paper
Shop at:
Sunny Studio
Subtle Grey Tones Paper
Shop at:
Sunny Studio
Scalloped Tags-Square
Shop at:
Sunny Studio
Sweet Treats Gift Bag
Shop at:
Sunny Studio