Friday, November 22, 2019

Scenic Route Cards with Candice and Rachel

It's Candice with you today and I hope you are all getting ready for a fabulous weekend of crafting and I have some inspiration for you using the versatile Scenic Route stamp setHow many of you just had to get the adorable superheroes this summer and just haven't gotten to use them as much as you would like?! I decided to tie them into the holiday season, a perfect card for the comic lover in your family!

Sunny Studio Stamps: Scenic Route Super Duper Woodland Borders Christmas Garland Frame Dies Winter Super Hero Themed Christmas Card by Candice Fisher

The Sunny Studio Stamps products I used are:
I first die cut the frame, using the negative to frame my scene. I filled the scene first with the night sky pattern paper and added the copic colored and glittered hills under the moon.  Next, I colored the houses and used the coordinating dies to cut out and pop dotted along the hillside.

Sunny Studio Stamps: Scenic Route Super Duper Woodland Borders Christmas Garland Frame Dies Winter Super Hero Themed Christmas Card by Candice Fisher

I then die cut the stitched snowhills, layering along the bottom of the card and pop dotted the frame on top of the scene. For the sentiments, I first heat embossed the you're my favorite super hero on two separate navy banners and then die cut multiples of the christmas, the top one out of red glitter. I then die cut the comic bubble out of the same navy and heat embossed the ho, ho, ho in white and pop dotted it next to the Christmas superhero. I added a few green pearls to tie in the green around the sentiment.

I hope you are inspired to use some of your summer sets for Christmas in different ways!

---------------------------------------------------------

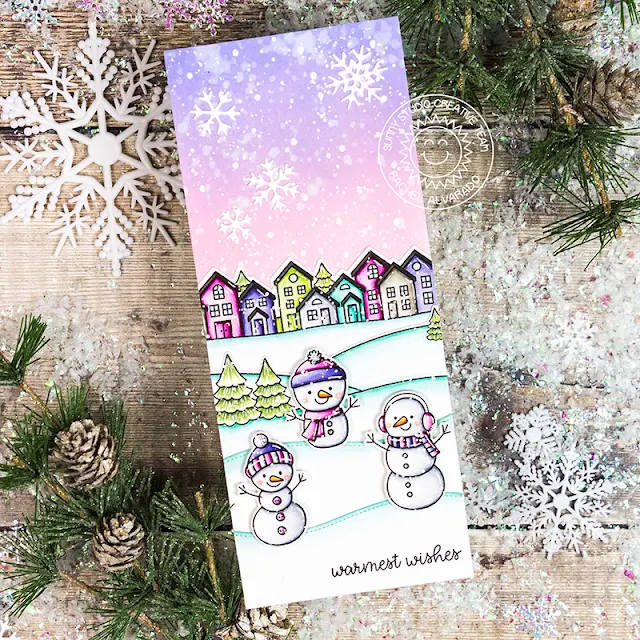
Hello everyone! It's Rachel here and I have a card to share with you today that focuses on the new Scenic Route Stamp Set. I combined this set with some cute snowmen from the Feeling Frosty Set to create a fun winter scene.

Sunny Studio Stamps: Scenic Route Feeling Frosty Circle Woodland Borders Snowflake Frame Dies Winter Themed Card by Rachel Alvarado

To start, I first trimmed a piece of Neenah Solar White 110lb Card Stock to 8.5" x 3.5". I then blended the top portion of it with Spun Sugar and Shaded Lilac Distress Oxide Inks. I splattered this blend with both water and diluted Opaque White Paint to resemble snow. I also added a few white die cut snowflakes using the snowflake dies from the Snowflake Circle Frame Die Set.

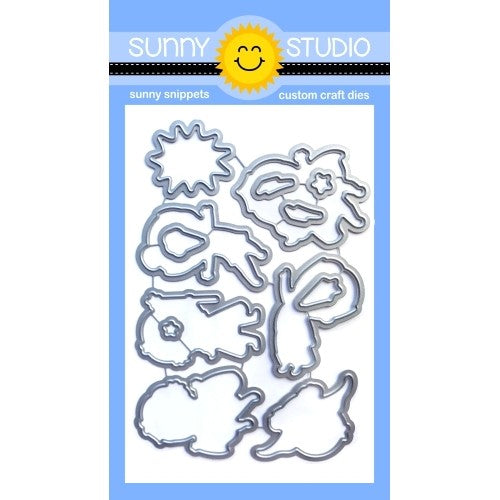
I stamped my images with Memento Tuxedo Black Ink onto another sheet of Neenah Solar White 110lb Card Stock and colored them with Copics. I used the coordinating Scenic Route and Feeling Frosty die sets to cut them out once colored.

Copic Colors Used:
  • Pinks: RV000, RV00, RV52, RV55, RV66, RV69
  • Purples: BV000, BV02, BV13, BV17, BV08
  • Whites: 0, C00, C0, C2, C4
  • Greens: G20, G24, YG25, YG63
  • Dark Gray: W5, W8
  • Light Gray: W1, W3, W5
  • Snow Drifts: BG0000, BG11, BG53
Sunny Studio Stamps: Scenic Route Feeling Frosty Circle Woodland Borders Snowflake Frame Dies Winter Themed Card by Rachel Alvarado

Once I had all of my scenery and images cut out, I adhered them carefully onto the front of my card where I wanted them to be aligned. I then used a paper trimmer to trim off any excess. I used the Woodland Border Dies to add a few extra stitched snow drifts. I stamped my sentiment onto the lower right corner of my lowest snow drift and lastly, adhered my snowmen with some 3D Foam Adhesive Squares for added dimension.

I hope you've enjoyed my card today! Thanks so much for dropping by! Wishing you all the most wonderful weekend!

Sunny Studio Supplies Used:

Woodland Borders Dies
Shop at:
Sunny Studio
Super Duper Stamps
Super Duper Stamps
Shop at:
Sunny Studio
Super Duper Dies
Super Duper Dies
Shop at:
Sunny Studio
Comic Strip Speech Bubble Dies
Shop at:
Sunny Studio
Very Merry 6x6 Paper
Shop at:
Sunny Studio
Santa Claus Lane Stamps
Shop at:
Sunny Studio
Feeling Frosty Stamps
Shop at:
Sunny Studio
Feeling Frosty Dies
Feeling Frosty Dies
Shop at:
Sunny Studio
Scenic Route Stamps
Scenic Route Stamps
Shop at:
Sunny Studio
Scenic Route Dies
Scenic Route Dies
Shop at:
Sunny Studio
Snowflake Circle Frame
Shop at:
Sunny Studio
Christmas Garland Frame
Shop at:
Sunny Studio

Thursday, November 21, 2019

Christmas Garland Frame Focused Cards with Vanessa and Anja

Hello to you! Vanessa here today with a new Christmas card using the Christmas Garland Frame Die. This frame adds the special something to a card!

Sunny Studio Stamps: Christmas Garland Frame Dies Feeling Frosty Rustic Winter Dies Woodland Border Dies Winter Themed Holiday Card by Vanessa Menhorn

I first inked the front of a white card base with Distress Oxide Inks. Now I die-cut the trees from Rustic Winter Dies, the snowdrifts from the Woodland Borders Die and the Christmas Garland Frame Die from white cardstock and adhered everything to the card. I die-cut a frame from red cardstock and adhered it. 

Sunny Studio Stamps: Christmas Garland Frame Dies Feeling Frosty Rustic Winter Dies Woodland Border Dies Winter Themed Holiday Card by Vanessa Menhorn

I stamped the snowman from Feeling Frosty and the ornament from Happy Owlidays onto cardstock, colored them with Copics, die-cut them with the matching dies and adhered everything, adding a string to the ornament with a black marker. Finally, I stamped and heat-embossed the sentiment onto a strip of black cardstock, trimmed it and adhered it to the card.

Thanks for visiting today!

------------------------------------------------

Hi everyone, Anja here and today's card was made using die-cuts only. I combined the Christmas Garland Frame Die with the deer and birds from the Rustic Winter Dies set to create a winter scene.

Sunny Studio Stamps: Christmas Garland Frame Dies Fishtail Banner Dies Rustic Winter Dies Woodland Border Dies Winter Themed Holiday Card by Anja Bytyqi

First, I started with an A2 Bristol cardstock panel and blended on Distress Oxide Inks (Victorian Velvet, Worn Lipstick and Tattered Rose from the top; Tumbled Glass from the bottom). I let it dry completely and added random white paint splatters with a brush.

Sunny Studio Stamps: Christmas Garland Frame Dies Fishtail Banner Dies Rustic Winter Dies Woodland Border Dies Winter Themed Holiday Card by Anja Bytyqi

Next, I die cut the intricate tree bough frame from emerald cardstock using an additional metal shim in my die-cutting machine. I also die cut the deers and birds from dark brown and red carstock. I stacked the sentiments from the Merry Mice set and stamped them in VersaMark Ink onto a piece of vellum. Then I did some heat embossing with red embossing powder. To create a little banner, I used the Fishtail Banner Dies.

Thank you so much for stopping by! Have a wonderful day!

Sunny Studio Supplies Used:

Fishtail Banner Dies
Shop at:
Sunny Studio
Woodland Borders Dies
Shop at:
Sunny Studio
Happy Owlidays Stamps
Shop at:
Sunny Studio
Happy Owlidays Dies
Happy Owlidays Dies
Shop at:
Sunny Studio
Rustic Winter Dies
Rustic Winter Dies
Shop at:
Sunny Studio
Feeling Frosty Stamps
Shop at:
Sunny Studio
Feeling Frosty Dies
Feeling Frosty Dies
Shop at:
Sunny Studio
Merry Mice Stamps
Merry Mice Stamps
Shop at:
Sunny Studio
Christmas Garland Frame
Shop at:
Sunny Studio

Wednesday, November 20, 2019

Feeling Frosty Cards with Franci and Ana

Happy Wednesday friends! Franci here with you today with a couple of clean and simple festive cards.

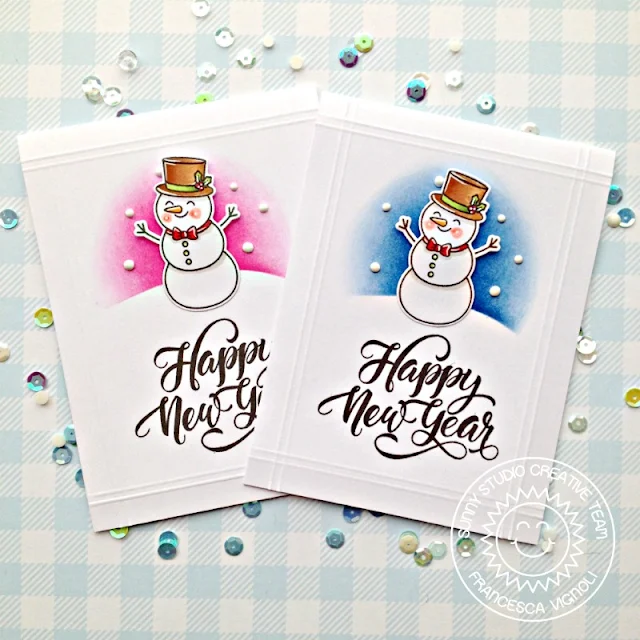
Sunny Studio Stamps: Feeling Frosty Season's Greetings New Year's Card by Franci Vignoli

This is one of my favorite design when it comes to clean and simple cards, I'm sure you have seen so many projects like these all made by me, but I always want to create more! I started by making a couple of card bases out of white cardstock and added some dry embossed details with my scoring board.

Sunny Studio Stamps: Feeling Frosty Season's Greetings New Year's Card by Franci Vignoli

Then I stamped my sentiment from the Season's Greetings set at the bottoms and created a little snowy hill out of masking paper to ink the tops with Distress Inks.

I chose Picked Raspberry and Salty Ocean as background colors here but you could also go crazy with colors and use some yellows and greens! I stamped my fave snowman from the Feeling Frosty set twice, colored them and die cut them with it's coordinated die.

Sunny Studio Stamps: Feeling Frosty Season's Greetings New Year's Card by Franci Vignoli

I glued them down with liquid glue and foam adhesive and then added some Tonic Nuvo Drops on the background to mimic snow. Finally I added some sparkle with my Wink of Stella clear brush and some details with a white gel pen.

Hope you like these clean and simple, easy to mail (and also easy to make a ton of if you need a lots for Christmas!) cards and thanks a lot for stopping by!

-----------------------------------------------------

Hello friends! It’s Ana here today with a super cute card featuring Feeling Frosty stamps and coordinating dies!

Sunny Studio Stamps: Feeling Frosty Frilly Frame Dies Woodland Border Dies Winter Themed Card by Ana Anderson

As always, I started with stamping the images with alcohol marker friendly ink, coloring them with Copic markers and cutting them out with coordinating dies. For the background I choose patterned paper from Very Merry 6x6 paper pack, and cut it slightly smaller than A2 size card base.

Next, I die cut a piece of vellum with a stitched rectangle outline die from Frilly Frames Retro Petals die set, then using VersaMark ink, stamped the sentiment and the snowflakes (from Feeling Frosty stamp set) and white heat embossed them.

Sunny Studio Stamps: Feeling Frosty Frilly Frame Dies Woodland Border Dies Winter Themed Card by Ana Anderson

To create the snowy hills, I used Woodland Borders Die set. I arranged the images and hills to the vellum, adhered them with liquid glue, added highlights with white gel pen and my card was finished!

Thank you so much for stopping by today, I’ll see you next week and until then I wish you Happy Crafting!

Sunny Studio Supplies Used:

Woodland Borders Dies
Shop at:
Sunny Studio
Frilly Frames Retro Petals Dies
Shop at:
Sunny Studio
Very Merry 6x6 Paper
Shop at:
Sunny Studio
Season's Greetings Stamps
Shop at:
Sunny Studio
Feeling Frosty Stamps
Shop at:
Sunny Studio
Feeling Frosty Dies
Feeling Frosty Dies
Shop at:
Sunny Studio

Tuesday, November 19, 2019

Season's Greetings Cards with Juliana and Angelica

Hello Sunny Studio Friends! It's Juliana here and today I've created a Christmas card to share with you using the Season's Greetings Stamp Set.

Sunny Studio Stamps: Season's Greetings Scenic Route Christmas Cards by Juliana Michaels

To create the wreath shape with stamps, I cut a piece of white cardstock to 4x4 inches. I placed the paper into my stamping platform and placed one of the twig sprays in the center but towards the top of the paper. I then inked it with green ink and stamped the image. To continue with creating the wreath, I rotated the paper 90 degrees and stamped the image. I repeated this a total of four times with the same image and ink color. I then placed another twig spray stamp to continue with the wreath design and repeated the same inking and rotating process. Over all, I used four shades of green ink and stamped the various twig sprays five times, stamping until I was pleased with the fullness of the image.

Sunny Studio Stamps: Season's Greetings Scenic Route Christmas Cards by Juliana Michaels

Once the wreath was completed, I stamped the sentiment in the center of the wreath and heat embossed it with gold embossing powder. I then added the berries that I die cut using the coordinating dies. For the card base, I created two layers using papers from the Holiday Cheer 6x6 Paper Pad.

Thanks so much for stopping by today! I hope you enjoyed this bit of inspiration using the Season's Greetings Stamp Set.

----------------------------------------------------

Hello Friends! Angelica here, with a clean and simple holiday card, showcasing the Season's Greetings stamp set.

Sunny Studio Stamps: Season's Greetings Scenic Route Christmas Card by Angelica Conrad

I stamped the beautiful sentiment onto white card stock, then stamped the Christmas lights from Scenic Route stamp set. I colored the lights with Copic Markers, adding a shadow behind each bulb with a W3 Copic marker. I trimmed the panel down, and attached it to a Holiday Cheer Pattern Paper panel. 

Sunny Studio Stamps: Season's Greetings Scenic Route Christmas Card by Angelica Conrad

I adhered the panel to a card base, and glued a thin strip of dark gray card stock above and below the white card stock. I finished the card by adding shimmer and Crystal Glaze to each bulb for extra shine.

That's all that I have for today. Thank you so much for stopping by!

Sunny Studio Supplies Used:

Holiday Cheer 6x6 Paper
Shop at:
Sunny Studio
Season's Greetings Stamps
Shop at:
Sunny Studio
Scenic Route Stamps
Scenic Route Stamps
Shop at:
Sunny Studio

Monday, November 18, 2019

Santa Claus Lane Cards with Eloise and Leanne

Hi friends, Eloise here and today I’m using the Santa Claus Lane Stamp Set to create a Christmas Card.

Sunny Studio Stamps: Santa Claus Lane Holly Jolly Christmas Card by Eloise Blue

I started off with stamping out the images from Santa Claus Lane and coloured them in with Copic Markers. Once they were coloured, I added white gel pen details and I also cut them out.

(Copic Markers Used: R14, R17, R24, R27 / E000, E00, E21, E02 / E41, E42, E43, E44 / W00, W0, W1 / W1, W3, W5, W7 / 0 / YG01, YG03, YG23, YG17 / R000, R00 / Y11, Y13, Y15, Y19 / BG10, BG11, BG13, BG49)

Sunny Studio Stamps: Santa Claus Lane Holly Jolly Christmas Card by Eloise Blue

For my background, I taped off a couple of sections using some tape and ink blended some Tumbled Glass and Broken China Distress Inks over the top for some sky. I then adhered my images into place on each section.

For the sentiment I white heat embossed the ‘Wishing You A Holly Jolly Christmas’ onto some black cardstock and adhered it into the centre of my card.

Thanks so much for stopping by today and I’ll see you all next time.

------------------------------------------------

Hello everyone, Leanne here! I've been playing with the Sliding Window die again. I had an idea for creating a rooftop scene that would open up to a peek at Santa leaving presents around the Christmas tree. 

Sunny Studio Stamps: Santa Claus Lane Sliding Window Dies Comic Strip Speech Bubble Dies Holly Jolly Christmas Card by Leanne West

I die cut the sliding window panel and then inked it up with a combo of Chipped Sapphire and Black Soot Distress ink. I masked off the bottom inch before applying the ink. I splattered the sky with thinned white paint. To create the look of a rooftop, I used dies from the Sweet Treat House Add-on.

Sunny Studio Stamps: Santa Claus Lane Sliding Window Dies Comic Strip Speech Bubble Dies Holly Jolly Christmas Card by Leanne West

With the sliding window panel closed, I began building the roof top scene. I alternated adhering the black and dark grey roof pieces. I added some white glitter to the top edge of the roof. I then added images from the Santa Claus Lane stamp set. I die cut a speech bubble and stamped a greeting which is also from Santa Claus Lane. 

Sunny Studio Stamps: Santa Claus Lane Sliding Window Dies Comic Strip Speech Bubble Dies Holly Jolly Christmas Card by Leanne West

For the inside, I applied Spun Sugar Distress Ink onto the background. I again used images from Santa Claus Lane to create a traditional Christmas scene complete with the stockings hung and presents around the tree. I tucked Santa into the right corner to complete the scene. 

Sunny Studio Supplies Used:

Sliding Window Dies
Sliding Window Dies
Shop at:
Sunny Studio
Comic Strip Speech Bubble Dies
Shop at:
Sunny Studio
Santa Claus Lane Stamps
Shop at:
Sunny Studio
Santa Claus Lane Dies
Shop at:
Sunny Studio
Sweet Treats House Add-on
Shop at:
Sunny Studio

Sunday, November 17, 2019

Guest Designer Spotlight: Feeling Frosty Card with Wanda Guess

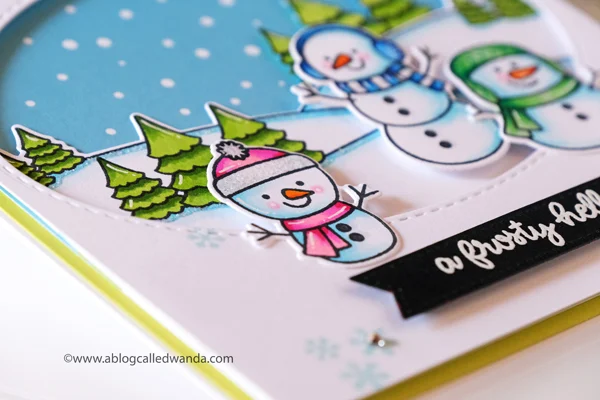
Hi everyone! Wanda Guess here! I'm always happy and excited to be the guest designer on the Sunny Studio Blog! I'm delighted to work with the beautiful and fun stamps and dies from Sunny Studio! The newest release is holiday fabulousness! I am obsessed with the Feeling Frosty snowmen and those Scenic Route Stamps!! I had so much fun creating a card to share with you all today. Please visit me on my blog sometime! You can find me at A Blog Called Wanda! Or find me on Instagram. Let's get started and take a look at my project. I'm sending you a frosty hello!

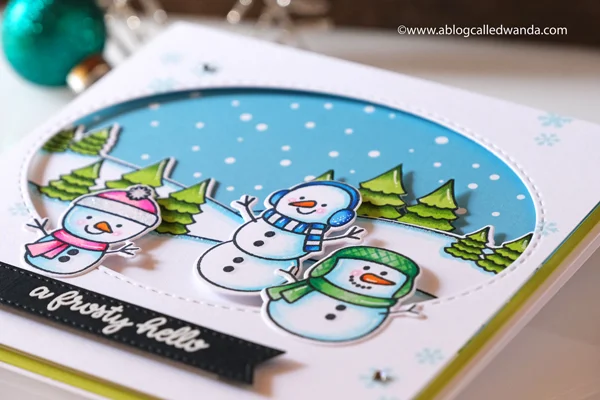
Sunny Studio Stamps: Feeling Frosty Scenic Route Stitched Oval Dies Winter Themed Snowman Card by Wanda Guess

This card is BIG! It's a 5.25 inch square card. I wanted lots of room to build my snowy scene, so I made my card base into a square from Neenah Cardstock. I used the amazing Very Merry Paper Pack too add that snowy sky to the scene. My layers are: white square card base, lime green cardstock, Snowy Sky patterned paper (from the Very Merry paper pack), Scenic Route die, Stitched Oval. (Yes, I love layers!). 

Sunny Studio Stamps: Feeling Frosty Scenic Route Stitched Oval Dies Winter Themed Snowman Card by Wanda Guess

I stamped and die cut out the three snowmen and the snowy hills/trees. I stamped a second snowy hill/trees and fussy cut out another grouping of trees. I had fun coloring everything with Copic Markers in vivid shades. For accents I added bits of white gel pen and Diamond Stickles. I also stamped some snowflakes onto the top most white layer.

Sunny Studio Stamps: Feeling Frosty Scenic Route Stitched Oval Dies Winter Themed Snowman Card by Wanda Guess

The sentiment was heat embossed with white embossing powder onto black cardstock. I love that look! Very graphic and clean. To assemble the card I used foam tape and a tape runner. The snowmen are popped off the card with foam tape. A few sparkly clear gems completed the card. 

Sunny Studio Stamps: Feeling Frosty Scenic Route Stitched Oval Dies Winter Themed Snowman Card by Wanda Guess

How adorable are those snowmen?? I love them! I want to stamp a million of them. Ha! Sunny Studio stamps make me smile. The stamp sets are all perfectly sized and scaled to mix and match, and that makes it so much fun to create with all your stamp sets. I think I might make this card a second time and use tones of red and grey for a more farmhouse look! The possibilities are endless. 

Big thanks to Mendi for having me as a guest! I'm very blessed that she always invites me back! Merry Christmas Season! 

Sunny Studio Supplies Used:

Stitched Oval Dies
Stitched Oval Dies
Shop at:
Sunny Studio
Very Merry 6x6 Paper
Shop at:
Sunny Studio
Feeling Frosty Stamps
Shop at:
Sunny Studio
Feeling Frosty Dies
Feeling Frosty Dies
Shop at:
Sunny Studio
Scenic Route Stamps
Scenic Route Stamps
Shop at:
Sunny Studio
Scenic Route Dies
Scenic Route Dies
Shop at:
Sunny Studio