Showing posts with label Background Basics. Show all posts

Tuesday, December 29, 2020

Snail Mail Cards with Leanne and Isha

Hello everyone, Leanne here! I have a bright and cheerful card to share that features images from a cute new set called Snail Mail. I think this is a must have little set for any card maker.

Sunny Studio Stamps: Snail Mail Background Basics Easter Wishes Slimline Dies Friendship Cards by Leanne West

I have combined the images from Snail Mail with elements from some older stamp sets so this card is a true mix and match design. First I stamped gingham borders on a panel of white card stock that's cut slightly smaller than A2 size. This gingham stamp comes from the Background Basics set. Next, I masked off the gingham to ink blend the background for the scene. I Copic colored all the images to make a spring scene. The mailbox, snail, and hearts are from Snail Mail. The tulips are from Easter Wishes.  

Sunny Studio Stamps: Snail Mail Background Basics Easter Wishes Slimline Dies Friendship Cards by Leanne West

I pulled sentiments from two stamp sets to create the very appropriate greeting. The first part, a little snail mail, is from Backyard Bugs. The second part, for you, is from Over the Rainbow. Lastly I added skinny strips of dark grey card stock to frame in the scene and then adhered the finished panel to an A2 white card base.  

-----------------------------------------------

Hello everyone, Isha here with a CAS card using masking technique. Today, I am featuring the Snail Mail stamp and dies.

Sunny Studio Stamps: Snail Mail Slimline Dies Friendship Card by Isha Gupta

I started by die-cutting a circle onto a masking paper. Adhere it to a white layer. Die-cut the clouds and grass onto white card using the Slimline Nature Border dies. Sponge distress ink using these die-cut stencils. Remove the mask.

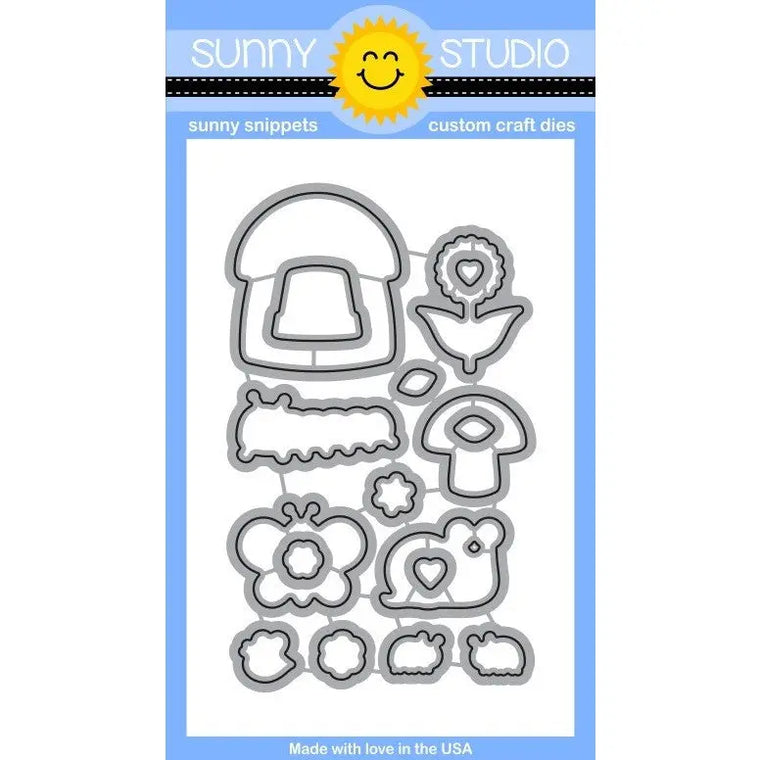
Stamp the images from the Snail Mail stamps using alcohol friendly ink and color using Copic markers. Die-cut using the coordinating dies. Die-cut a heart using the dies in the die set.

Sunny Studio Stamps: Snail Mail Slimline Dies Friendship Card by Isha Gupta

Adhere the images using 3d foam and liquid glue for various dimensions. Stamp the sentiment and adhere the heart. To finish, I applied spectrum noir clear sparkle to the letters.

Wishing you a happy new year and a wonderful year ahead. Thanks for stopping by!

Sunny Studio Supplies Used:

Backyard Bugs Stamps
Shop at:
Sunny Studio
Easter Wishes Dies
Easter Wishes Dies
Shop at:
Sunny Studio
Easter Wishes Stamps
Shop at:
Sunny Studio
Background Basics Stamps
Shop at:
Sunny Studio
Over The Rainbow Stamps
Shop at:
Sunny Studio
Slimline Nature Borders
Shop at:
Sunny Studio
Snail Mail Stamps
Snail Mail Stamps
Shop at:
Sunny Studio
Snail Mail Dies
Snail Mail Dies
Shop at:
Sunny Studio

Sunday, November 29, 2020

Christmas Cookies Gingerbread Men Cards with Mendi

Hi there!  I hope you have been enjoying a wonderful holiday weekend. I couldn't let the week pass without joining in the fun and sharing a couple cards of my own using the Christmas Cookies mini stamps and dies that you can receive free with purchase through tomorrow. 

For my first card I pulled out our Background Basics Stamps to create my red gingham borders. To add a little trim to my edge, I added the gumdrop borders, stamping them twice for both the top and bottom using our Jolly Gingerbread Stamps. I then used that same set to stamp my house with my tree cookies, inking up behind them with some Evergreen Bough distress ink using my favorite Jumbo Dauber. 

I finished my card by adding some white highlights with a Sharpie White Extra Fine Paint Pen and stamping my sentiment with VersaMark ink before heat embossing it with Hero Arts detail white embossing powder (linked below).

Sunny Studio Stamps: Jolly Gingerbread, Christmas Cookies & Background Basics Gingham House Handmade Card by Mendi Yoshikawa

For my next card using the Christmas Cookies Stamps. I wanted to make my card base mimic the feel of a gingerbread cookie with white scalloped icing so I cut my background from some kraft cardstock which I die-cut using our Window Quad Circle Dies. To create scalloped decorative edge I used three separate dies from our Slimline Basic Border Dies set. I backed my gingerbread men with a piece of pink snowflake print paper from our Holiday Cheer Paper pack, once again adding white highlights with my Sharpie white paint pen.

Sunny Studio Stamps: Christmas Cookies, Window Quad Circle Dies, Slimline Basic Border Dies & Holiday Cheer Paper Gingerbread Men Handmade Card by Mendi Yoshikawa

Thank you so much for all your sweet support of our company this holiday season. I truly hope I was able to inspire you in your holiday cardmaking endeavors today.  :)

-----------------------------------------------

The gingerbread stamps I used today are not available for purchase this holiday season, but rather will be automatically included with all retail orders of $40 or more from our online store through tomorrow, November 30th at Midnight PDT. Here's all the details:

Receive free shipping on U.S. orders of $25+

+ Receive exclusive mini "Christmas Cookies" stamp set with $40+ purchase.

+ Receive coordinating "Christmas Cookies" dies with $75+ purchase.

+ 10% of all retail sales will be donated to Convoy of Hope's Covid-19 Crisis Relief Fund.

*Please note: No promo codes needed. All offers will be applied automatically and cannot be combined with additional discounts at checkout. Purchases based on order subtotal, prior to shipping & tax.

Sunny Studio Stamps 2020 Black Friday Promotions with Free Shipping on $25+ order, Free exclusive Mini Stamp on $40+ order and Free Coordinating Dies on $75+ orders & 10% donated to Convoy of Hope's Covid-19 Crisis Relief Fund

Sunny Studio Supplies Used:

Tsukineko Jumbo Dauber
Shop at:
Sunny Studio
Versafine Onyx Black Ink
Shop at:
Sunny Studio
Jolly Gingerbread Stamps
Shop at:
Sunny Studio
Jolly Gingerbread Dies
Shop at:
Sunny Studio

Holiday Cheer 6x6 Paper
Shop at:
Sunny Studio
Slimline Basic Borders
Shop at:
Sunny Studio
Window Quad Circle Die
Shop at:
Sunny Studio
Hero Arts White Detail
Shop at:
Sunny Studio

Background Basics Stamps
Shop at:
Sunny Studio
VersaMark Watermark Ink
Shop at:
Sunny Studio

Tuesday, April 28, 2020

Tea-riffic Cards with Leanne and Ana

Hello crafters, Leanne here! I'm excited to start sharing what I've been working on using the newest release. For today's project, I've made a Mother's Day card featuring the sweet images from Tea-riffic

Sunny Studio Stamps: Tea-riffic Background Basics Frilly Frame Dies Stitched Oval Dies Mother's Day Card by Leanne West

I started by stamping out and Copic coloring the tea cup and tea pot from Tea-riffic. I also stamped out several tiny flowers and leaves which can be found in the Backyard Bugs stamp set.  

Copic colors used for the tea cup and pot are BV01, BV02, BV04. Colors used for the flowers and leaves are RV52, RV55, YG11, YG17.

Next I applied some Spun Sugar Distress Oxide ink with a blending brush to the center of an A2 sized card. I stamped a strip of white card stock with the gingham stamp from Background Basics using some bright green ink. This gingham piece will serve as a table cloth. I positioned the gingham strip towards the bottom half of the card front. I arranged the colored images as if they were sitting on the table. Once I had my images in place, I could stamp the greeting right above them. The word stamps to build this greeting come from the Tea-riffic set.  

Sunny Studio Stamps: Tea-riffic Background Basics Frilly Frame Dies Stitched Oval Dies Mother's Day Card by Leanne West

To complete the card I created a custom frame. I covered a panel of white card stock with Spun Sugar Distress Oxide ink. I spattered the inked panel with water and thinned pink paint. To give the panel a scalloped edge, I used a die from the Frilly Frames Hexagon set. To make the opening, I used the second largest die from the Stitched Oval set. Lastly, I adhered the frame onto the card front with adhesive foam tape. 

-----------------------------------------------------

Hi crafty friends! Ana here today with a sweet Mother’s Day card showcasing brand new Tea-riffic stamps and dies. As soon as I saw this beautiful stamp set, it made me think of England and I wanted nothing more than to create a beautiful card that has a feel of English afternoon tea time, with fine china and delicate lace.

Sunny Studio Stamps: Tea-riffic Background Basics Frilly Frame Dies Heartstring Border Dies Mother's Day Card by Ana Anderson

I stamped the images from Tea-riffic set with very light blue ink for no line Copic coloring. I used BV04, BV13, BV02, BV31 markers to color both images, then free-handed a floral pattern on both teapot and cup and die cut with coordinating dies.

I created the floral pattern for the bottom part of my card by stamping a little flower (from Chickie Baby stamp set) in same light blue ink and coloring each flower with BV markers. I added dots in three different sizes to fill in the space between the flowers.
I used Heartstring Border dies to die cut heart borders, colored the pierced one with markers, then layered white border and hearts on top.

Sunny Studio Stamps: Tea-riffic Background Basics Frilly Frame Dies Heartstring Border Dies Mother's Day Card by Ana Anderson

For my background scalloped mat, I used Frilly Frames Eyelet Lace die and colored it with the same BV markers. I stamped the sentiment (from Tea-riffic set) with dark gray ink, trimmed it into a strip and assembled my card popping the teapot, cut and the sentiment with foam tape.

I just love how this card turned out and I really hope you like it too and that you got inspired. Thank you so much for spending some time with us today – I hope you have a wonderful rest of your week!

Sunny Studio Supplies Used:

Backyard Bugs Dies
Backyard Bugs Dies
Shop at:
Sunny Studio
Backyard Bugs Stamps
Shop at:
Sunny Studio
Background Basics Stamps
Shop at:
Sunny Studio
Stitched Oval Dies
Stitched Oval Dies
Shop at:
Sunny Studio
Frilly Frames Hexagon Dies
Shop at:
Sunny Studio
Chickie Baby Stamps
Chickie Baby Stamps
Shop at:
Sunny Studio
Frilly Frames-Eyelet Lace
Shop at:
Sunny Studio
Heartstrings Border Dies
Shop at:
Sunny Studio
Tea-riffic Stamps
Tea-riffic Stamps
Shop at:
Sunny Studio
Tea-riffic Dies
Tea-riffic Dies
Shop at:
Sunny Studio

Monday, December 9, 2019

Layered Poinsettia Cards with Eloise and Leanne

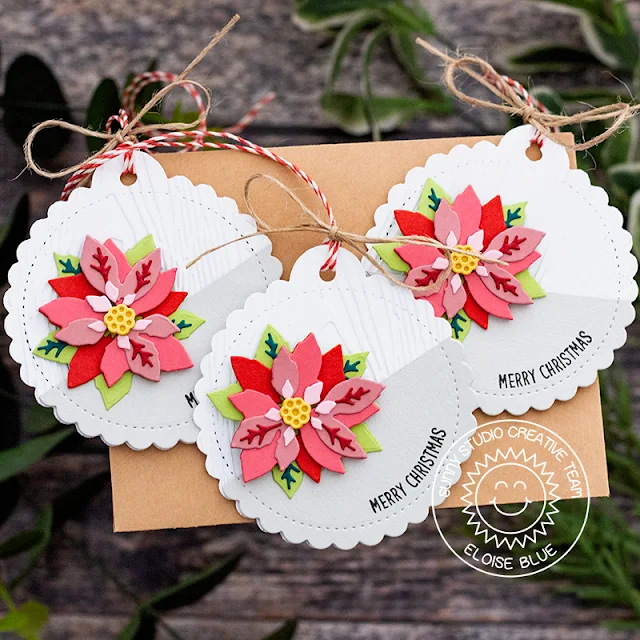
Hi friends, Eloise here and today I’m using the Layered Poinsettia’s Die Set to create some Christmas Tags. I used the Scalloped Tag Circle Dies for the base and also used the Woodgrain Embossing Folder for some added texture and the Merry Mice Stamp Set for the sentiment.

Sunny Studio Stamps: Layered Poinsettia Dies Scalloped Tag Circle Dies Merry Christmas Tags by Eloise Blue

I started off with die cutting out all my layers of the poinsettia die from different shades of cardstock. I then layered them together and adhered them. While I was die cutting, I also cut out three Scalloped Circle Tags from white cardstock and also grey cardstock and then ran the white ones through with the Woodgrain Embossing Folder.

Sunny Studio Stamps: Layered Poinsettia Dies Scalloped Tag Circle Dies Merry Christmas Tags by Eloise Blue

Next I cut down the grey pieces a little to create a diagonal look, added foam tape onto the bottom and adhered them onto my white tags at the bottom. I then adhered the poinsettia’s with foam tape too. For the sentiment I used the Merry Mice Stamp Set, curved the ‘Merry Christmas’ in my MISTI and stamped it with black ink onto the bases of the tags. Lastly, I tied two types of twine through the tops of each of the tags.

Thanks so much for stopping by today, I hope you enjoyed these tags and I’ll see you next week.

--------------------------------------------------

Hi crafty friends, Leanne here! I have another card to share that features the Layered Poinsettia. If you recall, my card from last week combined the poinsettia and buffalo plaid. I really loved that look so I have used that combination again for this week. I've used a very traditional color palette with some glittery accents for a more elegant design.

Sunny Studio Stamps: Layered Poinsettia Dies Christmas Trimmings Merry Christmas Card by Leanne West

I started with an A2 sized card base. I cut a panel of white card stock about a quarter inch smaller than A2 dimensions. I added some black paint splatters then layered it on top of some black glitter card stock with foam tape. I created a red and black plaid strip using a stamp from the Background Basics set. I adhered this strip towards the left side. I stamped out some pine boughs from the Christmas Trimmings set. I created the Layered Poinsettia using dark green card stock for the bottom layer and white for all the petals. I used a light green ink pad with a sponge dubber to add shading to the larger petal edges and completely color the tiny petals. 

Sunny Studio Stamps: Layered Poinsettia Dies Christmas Trimmings Merry Christmas Card by Leanne West

Before adhering the pine boughs and poinsettia, I heat embossed the greeting in silver. The Merry Christmas greeting also comes from the Christmas Trimming set. To finish off the card, I frosted the poinsettia petals with Nuvo White Blizzard Glitter Drops and scattered a few dots of Nuvo Sliver Crystals Glitter Drops. 

Sunny Studio Supplies Used:

Background Basics Stamps
Shop at:
Sunny Studio
Christmas Trimmings Stamps
Shop at:
Sunny Studio
Christmas Trimmings Dies
Shop at:
Sunny Studio
Woodgrain Embossing
Woodgrain Embossing
Shop at:
Sunny Studio
Merry Mice Stamps
Merry Mice Stamps
Shop at:
Sunny Studio
Layered Poinsettia Dies
Shop at:
Sunny Studio
Scalloped Tags-Circle
Shop at:
Sunny Studio

Monday, November 4, 2019

Season's Greetings Cards with Eloise and Leanne

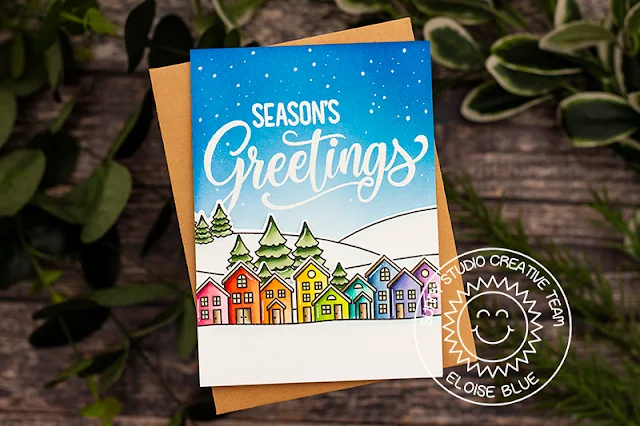
Hi everyone, Eloise here and today I’m using the Season’s Greetings Stamp Set along with Scenic Route to create a Christmas card.

Sunny Studio Stamps: Season's Greetings Scenic Route Winter Holiday Card by Eloise Blu

I started off with ink blending some blue Distress Inks onto a white piece of cardstock. I then white heat embossed the large ‘Season’s Greetings’ from the stamp set onto the piece also.

(Copic Markers Used: BV01, BV02, BV04, BV08 / V01, V12, V15, V17 / BG10, BG11, BG13, BG49 / RV10, RV13, RV25, RV19 / R12, R14, R17, R27 / YR00, YR02, YR14, YR18 / Y11, Y13, Y15, Y19 / YG01, YG03, YG23, YG17 / B91, B93, B95, B97 / YG61, YG63, YG67, G28 / B000, B000, 0 / Y00 / E41, E42, E43, E44)

Sunny Studio Stamps: Season's Greetings Scenic Route Winter Holiday Card by Eloise Blu

Next I stamped out a couple of the images from Scenic Route Stamp Set and coloured them in with Copic Markers. Once they were coloured, I cut them out. I then added foam tape onto the backs and adhered them down onto the bottom of the panel. Lastly, I added white gel pen details onto the images and added snow into the sky.

Thanks so much for stopping by today and I’ll see you next week.

----------------------------------------------

Hello everyone and happy November! Leanne here, and I have a mix and match card design to share today. I've mixed old and new stamps to create a little holiday scene with a bold greeting.

Sunny Studio Stamps: Season's Greetings Gleeful Reindeer Santa Claus Lane Christmas Card by Leanne West

I started with an A2 size card base. I used Chipped Sapphire Distress Oxide ink to color the top half of the card front. I generously splattered the sky with thinned white paint. I then white heat embossed Merry Christmas from the Season's Greetings stamp set. I also added a few heat embossed snow flakes to the sky. I stamped the additional greeting ... "have a magical holiday" which is from the Santa Claus Lane set. 

Sunny Studio Stamps: Season's Greetings Gleeful Reindeer Santa Claus Lane Christmas Card by Leanne West

I Copic colored images from Santa Claus Lane and Gleeful Reindeer to build my little holiday scene. I created two layers of snowy hills from glitter card stock using the Woodland Border dies. Instead of having the hills go all the way down to the bottom of the card, I decided to add a decorative border. I used a stamp from the Background Basics set to create the diagonal red and white stripes and that completed my card.  

Sunny Studio Supplies Used:

Gleeful Reindeer Dies
Shop at:
Sunny Studio
Gleeful Reindeer Stamps
Shop at:
Sunny Studio
Background Basics Stamps
Shop at:
Sunny Studio
Season's Greetings Stamps
Shop at:
Sunny Studio
Season's Greetings Dies
Shop at:
Sunny Studio
Santa Claus Lane Stamps
Shop at:
Sunny Studio
Santa Claus Lane Dies
Shop at:
Sunny Studio
Scenic Route Stamps
Scenic Route Stamps
Shop at:
Sunny Studio
Scenic Route Dies
Scenic Route Dies
Shop at:
Sunny Studio