Friday, November 19, 2021

Pristine Poinsettias & Winter Greenery Cards with Audrey and Vanessa

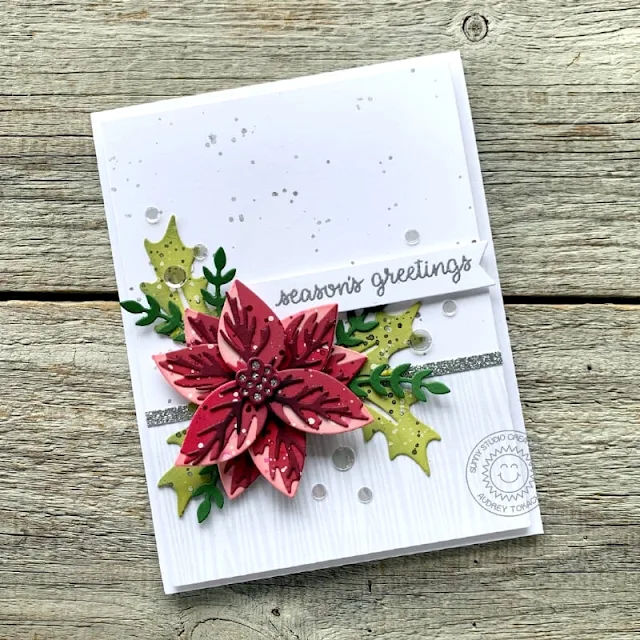
Hello friends! Audrey here to share a project with you today using the Pristine Poinsettia dies and the Wintery Greenery dies!  

Sunny Studio Stamps: Pristine Poinsettias Dies Winter Greenery Dies Christmas Card by Audrey Tokach

To create my card, I started off with a piece of white cardstock cut to 4" x 5.25". I splattered on some Brushed Pewter Distress Mica Spray from Tim Holtz. At the bottom of the panel, I added a strip of wood grain paper from the Subtle Grey Tones 6x6 paper pad, and bordered that with a skinny strip of silver glitter paper to bring out the shine in the mica spray splatters. 

To construct my Pristine Poinsettia, I cut the layers from light pink, medium red and burgundy cardstock and inked the edges of each in either Worn Lipstick, Festive Berries or Aged Mahogany Distress Oxide inks. Then, I splattered on some of the same inks, and some watered down white acrylic paint. I glued each of the petal layers together with a glue pen, and added foam tape between each layer of petals for some dimension. 

Sunny Studio Stamps: Pristine Poinsettias Dies Winter Greenery Dies Christmas Card by Audrey Tokach

For the leaves, I cut the bigger holly leaves from the Wintery Greenery die set from light green cardstock, and inked the edges with Peeled Paint Distress Oxide. I splattered on some Rustic Wilderness Oxide and white acrylic paint. The smaller leaves were die cut from darker green cardstock and inked with Rustic Wilderness Oxide. I glued the poinsettia down just in the center, tucked the leaves behind it and glued them down with a glue pen once I was happy with the arrangements. 

I stamped a sentiment from the Holiday Express stamp set on a white banner, and heat embossed it with silver embossing powder. To finish off the card, I added a scattering of clear sequins before popping the panel up on an A2 white card base.

--------------------------------------

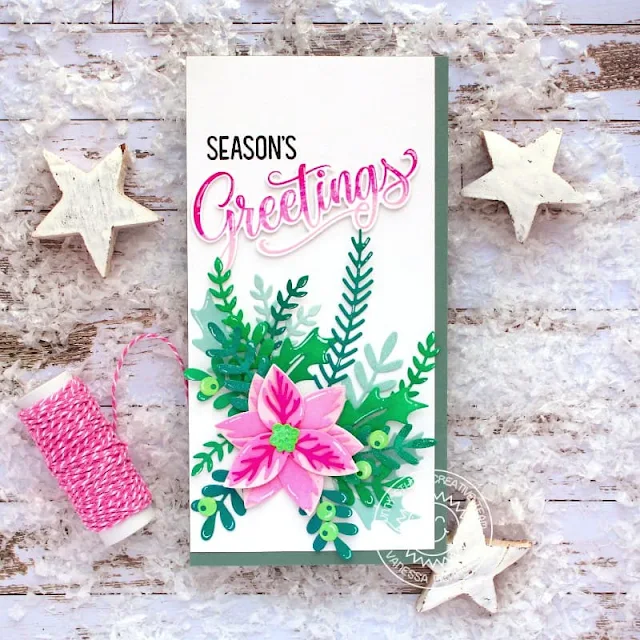
Hello to you! Vanessa here with a Christmas card using the beautiful Pristine Poinsettia and Winter Greenery Dies.

Sunny Studio Stamps: Pristine Poinsettias Dies Winter Greenery Dies Season's Greetings Christmas Card by Vanessa Menhorn

I die-cut the pieces from white cardstock and inked every element with Distress Oxide inks. Then I assembled the poinsettia and arranged it together with the greenery on my white cardstock panel. After stamping the "Season's", I adhered the panel to the green card base. Now I stamped the "Greetings" onto white cardstock, die-cut it with the matching die and adhered it to the card.

These dies are such fun to create with! The possibilities are endless.

Sunny Studio Stamps: Pristine Poinsettias Dies Winter Greenery Dies Season's Greetings Christmas Card by Vanessa Menhorn

Supplies used:
Pristine Poinsettia
Winter Greenery Dies
Season's Greetings stamps + dies

Distress Oxides used: Spun Sugar, Kitsch Flamingo, Picked Raspberry (Poinsettia + Greeting); Cracked Pistacchio, Lucky Clover, Pine Needles, Speckled Egg (Greenery)

Have a wonderful weekend everybody! Thanks for stopping by!

Sunny Studio Supplies Used:

Holiday Express Stamps
Shop at:
Sunny Studio
Subtle Grey Tones Paper
Shop at:
Sunny Studio
Season's Greetings Stamps
Shop at:
Sunny Studio
Season's Greetings Word Dies
Shop at:
Sunny Studio
Pristine Poinsettia Dies
Shop at:
Sunny Studio
Winter Greenery DIes
Shop at:
Sunny Studio

Thursday, November 18, 2021

Deck The Halls Cards with Anja and Marine

Hello everyone, Anja here and today I'm featuring the Deck The Halls stamp set that comes with playful holiday ornaments that will make you smile.

Sunny Studio Stamps: Deck The Halls Inside Greetings Christmas Card by Anja Bytyqi

I started off with a card base that is slightly bigger in size than a standard A2. The final card measures 4 3/8" x 5 5/8". I picked the knitted pattern paper from the All Is Bright 6x6 Paper pack as my background and trimmed it down. At the bottom, I stamped the sentiments (Retro Ornaments and Inside Greetings Holiday) in VersaMark Ink and heat embossed them with white embossing powder. Then I attached the panel directly to the card front.

Next, I created a frame using the peppermint stripes paper. For more sturdiness, I adhered it to a piece of white cardstock before cutting out a 3 3/4" x 5" rectangle. I stamped the ornaments in Memento Tuxedo Black Ink and colored them with Copic Markers. I cut them out with the coordinating dies and pulled some silver string through the holes at the top which I secured with thin micropore tape at the back. I also added a little red pom pom to be the reindeer's nose.

Sunny Studio Stamps: Deck The Halls Inside Greetings Christmas Card by Anja Bytyqi

To create some sprigs for my ornaments to hang on, I used the largest sprig from the Winter Greenery Dies set. I chose two shades of green cardstock and die cut several sprigs which I adhered with liquid glue. I spread them alternately across the top of my card by letting them overlap each other.

I attached the ornaments to the center of the card and tucked the string ends underneath the sprigs. Finally, I popped up the striped frame with foam strips.

Thank you so much for stopping by! Enjoy your day!

------------------------------------------

Hello crafty friends, Marine here, today I'm sharing with you a new joyful and fun interactive card featuring Deck The Halls, and I'm going to show you how I made the Santa ornaments wiggle.

Sunny Studio Stamps: Deck The Halls Christmas Card by Marine Simon

I started by stamping four peppermint ornaments, as well as Santa's head and body, I cut them using the coordinating dies and then colored them using my alcohol markers.

Once all my cute ornaments were colored, I moved on to the background. I wanted to create a Christmas tree background and give the illusion that the ornaments are hanging on the branches. So I started by covering a 5,5 x 4,25" bristol panel with mowed lawn distress ink to get a nice and even base. And from that green base, I created the tree texture using a grass stencil. I started at the top of the panel, I placed the stencil upside down and added rustic wilderness distress ink along the grass stencil and used my mowed lawn blending tool to mix the colors. And then I repeated this process to cover the whole panel with tree texture.

Sunny Studio Stamps: Deck The Halls Christmas Card by Marine Simon

Next I created the interactive element. I cut two small pieces of cardstock: one measuring 2,5 x 1cm and one measuring 2 x 1cm. Those pieces will be hidden so the color of cardstock doesn't matter. And from now on I invite you to watch the video below (click on the image below) to see the entire interactive process because it's always easier to understand with images.

Sunny Studio Stamps: Deck The Halls Christmas Card by Marine Simon

So once I was done with the wiggle mechanism, I attached the four peppermint ornaments and to hang them in the tree I just traced a vertical line from the top of each ornament to the top edge of the panel. And I stamped my sentiment from Holiday Express at the bottom of the panel, right in the center. Next I stuck my panel on a green card base. I added white highlights and details on the images and glued a bunch of Iridescent clear jewels to make the tree all sparkling.

And that's it! Now let's put on 'Rockin around the Christmas tree' and see how Santa wiggles and dances to the sound of the music! I leave you with the process video and I'll see you next week with a new card!

Sunny Studio Supplies Used:

Deck The Halls Stamps
Shop at:
Sunny Studio
Deck The Halls Dies
Deck The Halls Dies
Shop at:
Sunny Studio
Holiday Express Stamps
Shop at:
Sunny Studio
Inside Greetings-Holidays
Shop at:
Sunny Studio
Retro Ornaments Stamps
Shop at:
Sunny Studio
All Is Bright Paper
All Is Bright Paper
Shop at:
Sunny Studio

Wednesday, November 17, 2021

Chloe Number Die Focused Card and Tags with Julia and Franci

Hello crafty friends! It’s Julia here with this quick and easy holiday card!

Sunny Studio Stamps: Chloe Number Dies Bear Hugs Winter Christmas Card by Julia Englich

Often we just don't have enough time to make holiday cards, so quick and easy cards are always welcome. This is made especially easy with the amazing Very Merry paper pad! It comes with two amazing holiday background designs as well as lots of fun patterned papers and it makes quick work of holiday backgrounds!

I stamped my little polar bear from Bear Hugs and his balloon onto bristol smooth paper and colored him in with Zig Clean Color Real Brush Markers. I added the patterned paper onto an A2-sized card base. I die-cut the Chloe Number dies out of red and black cardstock to spell "2022". Then, I added glossy accents to the red numbers and sprinkled iridescent glitter on them. I set them aside to dry completely.

Sunny Studio Stamps: Chloe Number Dies Bear Hugs Winter Christmas Card by Julia Englich

I heat embossed the sentiment in white onto black cardstock. To create my custom sentiment, I used the stamp sets Bear Hugs for the "wishing you a merry Christmas, Beach Buddies for the "&", Words of Gratitude for the "a", and finally Inside Greetings Birthday for the word "happy. I added it over the moon in the background. I layered my, now dry, red numbers with the black numbers and adhered them below the sentiment strip.

Finally, I just added my sweet little polar bear, and this card was already done!! I had lots of fun with this holiday / new years card and I hope you like it! Have an amazing week!

----------------------------------------------

Happy Wednesday, crafty friends! It's Franci here with you with some festive gift tags, made with the new Chloe Number Dies. They're so pretty! 

Sunny Studio Stamps: Chloe Number Dies Scalloped Tag Dies Chloe Alphabet Dies Christmas Tags by Franci Vignoli

First of all I die cut all the tag panels out of white and kraft cardstock using the Scalloped Tag Circle Dies and the Stitched Circle Small Dies.

Then I die cut all the decorative elements out of patterned paper from the All Is Bright set and the Sweater Weather one using these sets: Chloe Alphabet DiesChloe Number Dies and Winter Greenery Dies. 

Sunny Studio Stamps: Chloe Number Dies Scalloped Tag Dies Chloe Alphabet Dies Christmas Tags by Franci Vignoli

I assembled everything into this cute design, added some ribbon and these are ready to embellish my Christmas gifts! 

I hope you like them as much as I do and you are now inspired to create! Happy crafting! 

Sunny Studio Supplies Used:

Beach Buddies Stamps
Shop at:
Sunny Studio
Chloe Alphabet Dies
Chloe Alphabet Dies
Shop at:
Sunny Studio
Bear Hugs Stamps
Bear Hugs Stamps
Shop at:
Sunny Studio
Bear Hugs Dies
Bear Hugs Dies
Shop at:
Sunny Studio
Words of Gratitude Stamps
Shop at:
Sunny Studio
Chloe Number Dies
Chloe Number Dies
Shop at:
Sunny Studio
Very Merry 6x6 Paper
Shop at:
Sunny Studio
Scalloped Tags-Circle
Shop at:
Sunny Studio
Inside Greetings Birthday
Shop at:
Sunny Studio
Stitched Circle Small Dies
Shop at:
Sunny Studio
Winter Greenery DIes
Shop at:
Sunny Studio
All Is Bright Paper
All Is Bright Paper
Shop at:
Sunny Studio
Sweater Weather Paper
Shop at:
Sunny Studio

Tuesday, November 16, 2021

Christmas Critters Cards with Kavya and Isha

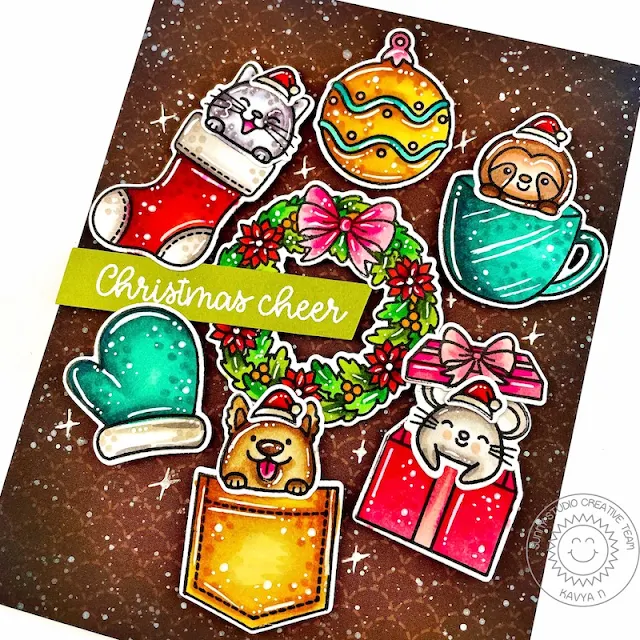
Hi folks, Kavya here. I am back on the blog with another fun project to share with you all! I have been making many Christmas cards this year and I am quite bored of using blues, reds and greens. So, I decided to try out a vintage Christmas palette - Brown, Teal, Yellow, Pink and a bit of red and green. I absolutely love how this turned out. I might try some more unique color combos in the next few weeks! 

Sunny Studio Stamps: Christmas Critters Christmas Card by Kavya

I first started of by ink blending the edges of brown scalloped patterned paper from All is Bright using black and brown dye ink and splattered somewhat paint. I then stamped a bunch of images from Christmas Critters stamp set and colored them using the color combo I mentioned earlier. 

Sunny Studio Stamps: Christmas Critters Christmas Card by Kavya

Then, I added some extra details using a white gel pen including some sparkles! Later, I heat embossed a sentiment from North Pole stamp set to finish off my card!

Wasn’t that simple? I love how this tuned out! Happy Crafting!

---------------------------------------------

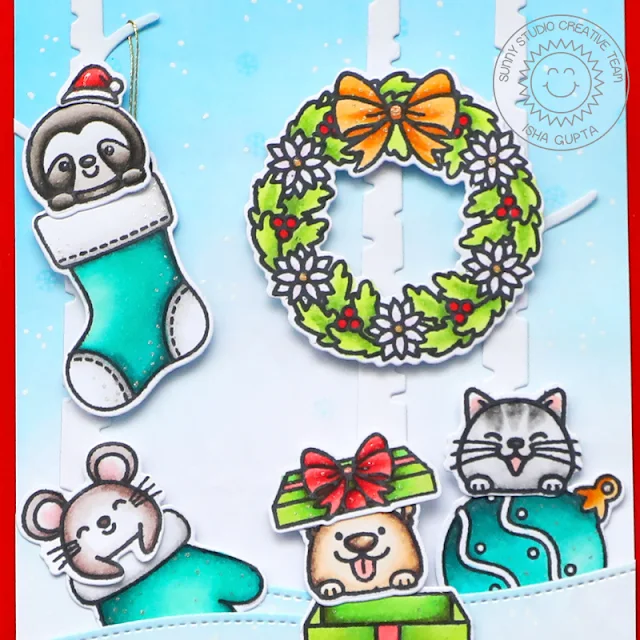
Hello everyone! Isha here with a Christmas card featuring our Christmas Critters stamps and dies. This stamp has so many adorable images, that I wanted to feature them all and hence a scene card.

Sunny Studio Stamps: Christmas Critters Rustic Winter Dies Slimline Dies Christmas Card by Isha Gupta

To start, I sponged tumbled glass and salty ocean distress oxide ink to create the sky to a white layer. I then stamped  the snowflakes from the Christmas Critters stamp set to it. Die-cut the tree trunk from the Rustic Winter dies, adhere to the mat layer. Die-cut snow banks from the Slimline Nature Border dies, sponge tumbled glass ink and adhere to the mat layer. Adhere this to the red card base. 

Sunny Studio Stamps: Christmas Critters Rustic Winter Dies Slimline Dies Christmas Card by Isha Gupta

Stamp the images using memento black ink, color using Copic markers, die-cut using the coordinating dies. Adhere to the card. To finish, add white snow using a gel pen.

Sunny Studio Supplies Used:

Christmas Critters Stamps
Shop at:
Sunny Studio
Christmas Critters DIes
Shop at:
Sunny Studio
Rustic Winter Dies
Rustic Winter Dies
Shop at:
Sunny Studio
Slimline Nature Borders
Shop at:
Sunny Studio
North Pole Stamps
North Pole Stamps
Shop at:
Sunny Studio
North Pole Dies
North Pole Dies
Shop at:
Sunny Studio
All Is Bright Paper
All Is Bright Paper
Shop at:
Sunny Studio

Monday, November 15, 2021

Holiday Express Cards with Mayra and Ashley

Hello and happy Monday everyone!! Mayra here to share this card using the adorable Holiday Express stamp set. I made it into a gingerbread-themed train. 

Sunny Studio Stamps: Holiday Express Christmas Cookies Frilly Frame Dies Christmas Card by Mayra Duran-Hernandez

I started by coloring all of the images using Copic markers. Along with the Holiday Express stamp set, I used the Christmas Cookies, and the lollipop from the Candy Shoppe set. I then die-cut the base panel for the card using the larger rectangle from the Stitched Rectangles dies set.  Next, I used the beautiful Frilly Frames Eyelet Lace die set to add the detail to the base panel and to create a frame for the card. I really love that die set. I then die-cut the candy cane from the Gingerbread House setand a couple of borders using the Icing Borders set. 

Sunny Studio Stamps: Holiday Express Christmas Cookies Frilly Frame Dies Christmas Card by Mayra Duran-Hernandez

Next, I die-cut the poinsettia from the Window Quad Circle dies set to add to the card. I also used my favorite tag from the Window Quad Square dies set. 

I hope you enjoy the card I created to share with you today. Thank you so much for taking the time to stop by. I hope you each have a wonderful and blessed day.

-----------------------------------------------

Hello friends! It's Ashley with a super cute Christmas card to share with you today! The little penguins are getting ready for the holidays and loading a train up with gifts for everyone! 

Sunny Studio Stamps: Holiday Express Frilly Frame Dies Penguin Pals Christmas Card by Ashley Ebben

I started by stamping the trees from Bear Hugs several times in VersaMark ink onto light blue cardstock. I blended a bit of Blueprint Sketch Distress Oxide ink onto the top portion for a bit of contrast. I cut a scalloped oval frame from the center of an A2 sized piece of white cardstock using the Scalloped Oval Mat 1 dies and placed my trees behind it. Then I added the stitched detail to the outside edge with the frame from Frilly Frames - Quatrefoil.

Sunny Studio Stamps: Holiday Express Frilly Frame Dies Penguin Pals Christmas Card by Ashley Ebben

I stamped my images from Holiday Express and Penguin Pals onto Bristol smooth cardstock with waterproof ink and colored with my Zig Clean Color markers. I fussy cut the images out this time, but matching dies are available and super fast! Sometimes you just need a "zone out" activity, you know? I added the images to my card, popping the penguins up with foam tape for dimension. I finished with a sentiment from Penguin Pals stamped in VersaFine Onyx Black and embossed with clear.

Thank you so much for stopping by! Have a wonderful day!

Sunny Studio Supplies Used:

Candy Shoppe Stamps
Candy Shoppe Stamps
Shop at:
Sunny Studio
Candy Shoppe Dies
Candy Shoppe Dies
Shop at:
Sunny Studio
Stitched Rectangle Dies
Shop at:
Sunny Studio
Bear Hugs Stamps
Bear Hugs Stamps
Shop at:
Sunny Studio
Bear Hugs Dies
Bear Hugs Dies
Shop at:
Sunny Studio
Christmas Cookies Stamps
Shop at:
Sunny Studio
Christmas Cookies Dies
Shop at:
Sunny Studio
Holiday Express Stamps
Shop at:
Sunny Studio
Holiday Express DIes
Shop at:
Sunny Studio
Gingerbread House Dies
Shop at:
Sunny Studio
Icing Border DIes
Icing Border DIes
Shop at:
Sunny Studio
Frilly Frames-Eyelet Lace
Shop at:
Sunny Studio
Frilly Frames Quatrefoil
Shop at:
Sunny Studio
Window Quad Circle Die
Shop at:
Sunny Studio
Window Quad Square Die
Shop at:
Sunny Studio
Penguin Pals Stamps
Penguin Pals Stamps
Shop at:
Sunny Studio
Penguin Pals Dies
Penguin Pals Dies
Shop at:
Sunny Studio
Scalloped Oval Mat 1 Dies
Shop at:
Sunny Studio