Wednesday, August 4, 2021

Stitched Rectangle Focused Cards with Julia and Franci

Hello crafty friends! It’s Julia here with a hoppy little card!

Sunny Studio Stamps: Stitched Rectangle Dies Feeling Froggy Spring Scenes Birthday Card by Julia Englich


First, I stamped all my images from Feeling Froggy, Spring Scenes, Country Scenes, Garden Fairy, and Home Sweet Gnome onto Strathmore Bristol Smooth paper and I colored them in using Zig Clean Color Real Brush Markers.

I used the Stitched Rectangle dies to cut out three white panels. One panel I used for the background and the others to cut the scenery elements out of so that I would have the lovely stitching going all the way around my card! For the treetops, I used the cloud border from the Slimline Nature Borders. I also die-cut two hills and a grassy hill using the same die set! I ink blended all the pieces using Distress Oxide inks. I heat embossed the sentiment from Feeling Froggy and Candy Shoppe onto the pond piece in white.

Inks used: Tumbled Glass, Salty Ocean, Blueprint Sketch, Salvaged Patina, Twisted Citron, Cracked Pistachio, Lucky Clover, Pine Needles Distress Oxides. 

Zig Markers used: 999; 21; 41, 48, 33; 64, 65.


Sunny Studio Stamps: Stitched Rectangle Dies Feeling Froggy Spring Scenes Birthday Card by Julia Englich


I adhered my background panel to a white card base and made sure to leave a nice white border.  Then, I added the scenery die-cuts with liquid glue and foam squares. Finally, I added all my cute little images!

I had lots of fun making this hoppy little birthday card and I really hope you like it!! Thank you so much for stopping by today! Have a wonderful day!


----------------------------------------------


Hello there! It's Franci here with you, with a couple of happy cards.


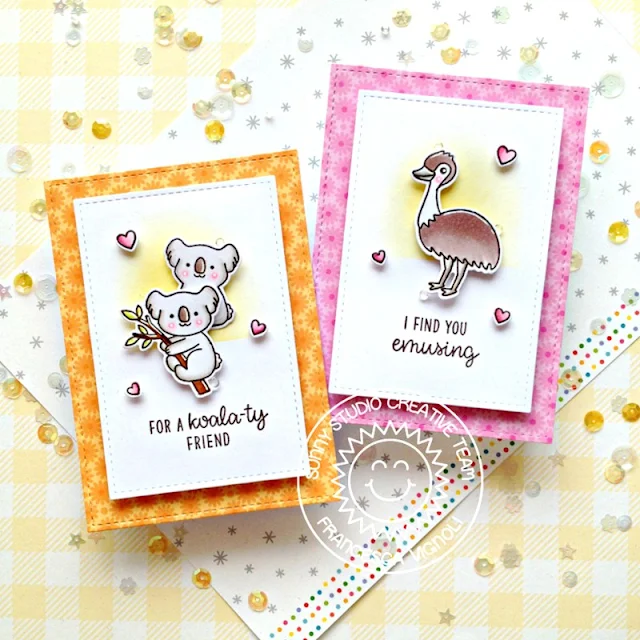
Sunny Studio Stamps: Stitched Rectangle Dies Outback Critter Friend Card by Franci Vignoli


First of all I die cut all my panels out of white cardstock and patterned paper from the 
Spring Fling set using the new Stitched Rectangles Dies.

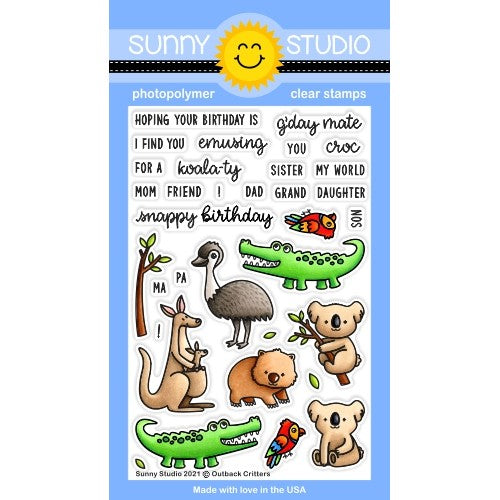
Then I stamped, colored with Copics and die cut all my images from the Outback Critters set and added some details with a white gel pen.

Sunny Studio Stamps: Stitched Rectangle Dies Outback Critter Friend Card by Franci Vignoli

I created some card bases out of white cardstock and covered the front with my patterned paper panels. Then I stamped my sentiments onto the white ones and inked them just a bit in the center with Distress Ink.

I glued down all my images and the panels with foam adhesive and added some little hearts from the Happy Hamster set too. 

Sunny Studio Stamps: Stitched Rectangle Dies Outback Critter Friend Card by Franci Vignoli

I love making mini cards and these turned out so super cute! Hope you like them as much as I do and thanks a lot for stopping by!

Sunny Studio Supplies Used:

Candy Shoppe Stamps
Candy Shoppe Stamps
Shop at:
Sunny Studio
Happy Hamsters Stamps
Shop at:
Sunny Studio
Happy Hamsters Dies
Happy Hamsters Dies
Shop at:
Sunny Studio
Outback Critters Stamps
Shop at:
Sunny Studio
Outback Critters Dies
Shop at:
Sunny Studio
Stitched Rectangle Dies
Shop at:
Sunny Studio
Home Sweet Gnome Stamps
Shop at:
Sunny Studio
Home Sweet Gnome Dies
Shop at:
Sunny Studio
Spring Scenes Stamps
Shop at:
Sunny Studio
Spring Scenes Dies
Spring Scenes Dies
Shop at:
Sunny Studio
Spring Fling Paper
Spring Fling Paper
Shop at:
Sunny Studio
Slimline Nature Borders
Shop at:
Sunny Studio
Country Scenes Stamps
Shop at:
Sunny Studio
Country Scenes Dies
Country Scenes Dies
Shop at:
Sunny Studio
Feeling Froggy Stamps
Shop at:
Sunny Studio
Feeling Froggy Dies
Feeling Froggy Dies
Shop at:
Sunny Studio
Garden Fairy Stamps
Garden Fairy Stamps
Shop at:
Sunny Studio
Garden Fairy Dies
Garden Fairy Dies
Shop at:
Sunny Studio

Tuesday, August 3, 2021

Scalloped Fence Focused Cards with Kavya and Isha

Hi folks, Kavya here. I am back with another fun project to share with you all! I love it when dies/stamps are realistic and the new Scalloped Fence die has so many details that make it just perfect to create fun scenes with. I love playing with critters but I never really created a shadow box before until now. The new fence die was the just the perfect size to create a fun farm scene! When putting this together, I felt like I was transported back to middle school where I had to create mini dioramas almost every summer! 

Sunny Studio Stamps: Scalloped Fence Dies Picket Fence Dies Farm Fresh Interactive Card by Kavya

I know that there are dies available to create shadow boxes but they are super easy to create with supplies that you already have. I used my paper trimmer to cut cardstock into the following dimensions:

- Background: 4.25” x 3.5”
- Base - 2 strips: 
8.5” x 1” strip scored at 0.5”, 2.5”, 6” and 8; 3.5” x 1” strip 

Fold the base strips at the score lines and attach the smaller strip using the 0.5” tabs to create a 3.5” x 2” base. I then attached the background cardstock to the back of the base to finish off my base! 

Sunny Studio Stamps: Scalloped Fence Dies Picket Fence Dies Farm Fresh Interactive Card by Kavya

For the grass, I started off by cutting 3 1.25” x 4.5” strips of different green colored cardstock scored at 0.5” and 4”. I used the grass die from Picket Fence to die cut the top of each panel and snipped the edges of the tabs as shown below:

I ink blended the edges of the panel with matching dye ink before adding them to my shadow box. My box is now complete for decoration! I started off by ink blending a white panel slightly smaller than 3.5” x 4.25” using shades of mint to create a ducky sky. I then stamped and colored images from the Farm Fresh stamp set. As only the bottom part of these images were going to be stuck to the grass base, I stacked 2 die cuts for each image to make it sturdier. I then adhered all these images to the shadow box. 

Sunny Studio Stamps: Scalloped Fence Dies Picket Fence Dies Farm Fresh Interactive Card by Kavya

The Scalloped Fence die is just the perfect size to create an outer border for your shadow box card and make the farm scene more realistic! I stacked two die cuts just like my images to make it sturdier… This would add extra weight when mailing your cards though! 

Sunny Studio Stamps: Scalloped Fence Dies Picket Fence Dies Farm Fresh Interactive Card by Kavya

I then finished off by adding a sentiment by using the Chloe Alphabet die set and the word ’there’ from Farm Fresh stamps set.

That’s it! I hope this fun card inspires you to create a fun shadowbox card if you haven’t already. Happy Crafting!

------------------------------------------------

Hello everyone! Isha, here featuring the Scalloped Fence dies. These are such pretty dies with some lovely details. I get the feel of the big cottages and enchanted lands when I see it, so my card had to have a fairy...lol.

Sunny Studio Stamps: Scalloped Fence Dies Garden Fairy Floating By Seasonal Trees Card by Isha Gupta

I started by sponging tumbled glass distress ink to create the sky. Flick some ink splatters and water to it. Die-cut the grass from the Slimline Nature Borders dies two times. Sponge distress inks in shabby shutters and mowed lawn. Flick water and ink. Adhere to the mat layer. Adhere this to a white card base.

Now I die-cut the Scalloped Fence three times, applied glue and over lapped them to create one single fence. I then adhered the other elements of the dies to create some dimension.

Tree and flower - Seasonal Trees stamp and Dies
Sun - Balloon Rides Stamp and Dies
Balloon, sentiment - Floating By stamp and Dies
Fairy, flower, snail - Garden Fairy stamp and Dies
Bird - Outback Critters stamp and Dies

Sunny Studio Stamps: Scalloped Fence Dies Garden Fairy Floating By Seasonal Trees Card by Isha Gupta

Stamp the images, color using Copic markers and die-cut. Adhere to the card to create a scene. To finish, I applied Nuvo glitter drops to the fairy wings and a bit to the sky.  Finally spectrum noir clear sparkle pen to the balloon, fairy and flowers.

Thanks for dropping by! Have a nice day.

Sunny Studio Supplies Used:

Outback Critters Stamps
Shop at:
Sunny Studio
Outback Critters Dies
Shop at:
Sunny Studio
Chloe Alphabet Dies
Chloe Alphabet Dies
Shop at:
Sunny Studio
Picket Fence Border Dies
Shop at:
Sunny Studio
Scalloped Fence Die
Scalloped Fence Die
Shop at:
Sunny Studio
Seasonal Trees Stamps
Shop at:
Sunny Studio
Seaonal Trees Dies
Seaonal Trees Dies
Shop at:
Sunny Studio
Floating By Stamps
Floating By Stamps
Shop at:
Sunny Studio
Floating By Dies
Floating By Dies
Shop at:
Sunny Studio
Slimline Nature Borders
Shop at:
Sunny Studio
Farm Fresh Stamps
Farm Fresh Stamps
Shop at:
Sunny Studio
Farm Fresh Dies
Farm Fresh Dies
Shop at:
Sunny Studio
Balloon Rides Stamps
Shop at:
Sunny Studio
Balloon Rides Dies
Balloon Rides Dies
Shop at:
Sunny Studio
Garden Fairy Stamps
Garden Fairy Stamps
Shop at:
Sunny Studio
Garden Fairy Dies
Garden Fairy Dies
Shop at:
Sunny Studio

Monday, August 2, 2021

Teacher Appreciation Cards with Mayra and Ashley

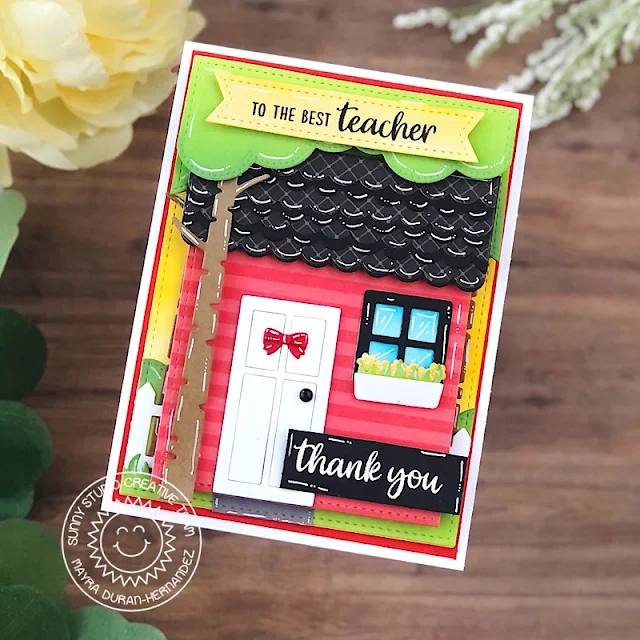
Hello everyone. Happy Monday. Mayra here with you today sharing this teacher thank you-themed card. I used the Sweet Treat House Add-on die to create the schoolhouse, along with the wonderful Teacher Appreciation stamp set. 

Sunny Studio Stamps: Teacher Appreciation Sweet Treat House Add-on Dies Slimline Dies Teacher Card by Mayra Duran-Hernandez

I began by die cutting the layers I needed to create the scene for the schoolhouse, I used Sweet Treat House Add-on die to create the schoolhouse, the Stitched Rectangle dies to create the schoolhouse building, and the base panel. I also used the Picket Fence Borders die, to create the trees, and bushes, I used the cloudy border from the Slimline Nature Border dies, and the tree base from the Rustic Winter dies set. After die-cutting the layers, I added a bit of color to the green layers using Distress Oxide inks. I used Twisted Citron, Mowed Lawn, and Rustic Wilderness. For the base panel and schoolhouse, I used the patterned paper from the Classic Sunburst paper pad and the Sleek Stripes paper pad. 

Sunny Studio Stamps: Teacher Appreciation Sweet Treat House Add-on Dies Slimline Dies Teacher Card by Mayra Duran-Hernandez

Next, I stamped the sentiment from the Teacher Appreciation stamp set onto the banner from the Stitched Rectangles dies set. I hope you enjoy the card I created to share with you today. Thank you very much for taking the time to stop by. I hope you each have a wonderful and blessed day. 

------------------------------------------

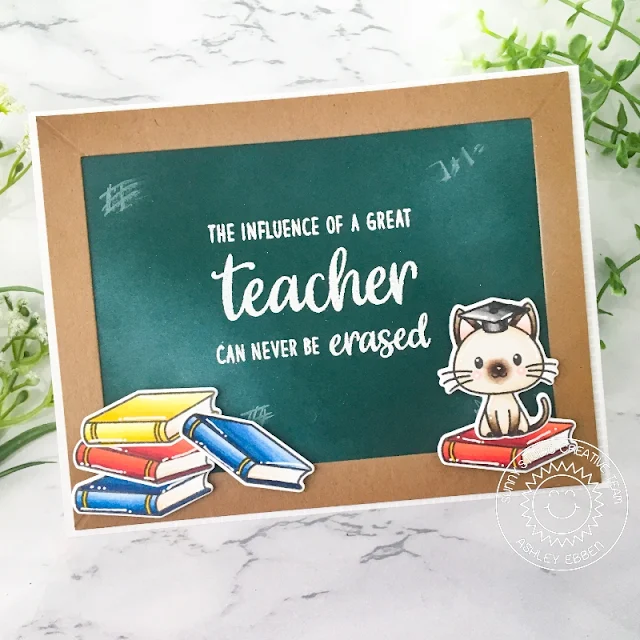
Hello friends! It's Ashley with a fun back to school card for you today! It's hard to believe the school year is already coming up soon! It will be my daughter's first year - she is going to prekindergarten! Time has flown way too fast! I know I'm going to need some cards ready for the teachers she will be spending time with, so why not get started now? I used the Teacher Appreciation stamp set and some other Sunny Studio supplies to create this old school chalkboard look. Yes, I know it's all about white boards and smart boards now, but the chalk is so cute!

Sunny Studio Stamps: Teacher Appreciation Grad Cat Teacher Card by Ashley Ebben

I started by randomly blending white pigment ink in soft patches onto dark green cardstock. l stamped the sentiment from Teacher Appreciation right in the center with VersaMark ink and embossed with white. I then used a white gel pen to make random marks around the outside and rubbed them with a cloth before they dried. This gave me that dirty, erased look like a chalkboard that pairs perfectly with the sentiment.

Sunny Studio Stamps: Teacher Appreciation Grad Cat Teacher Card by Ashley Ebben

I created a frame for the chalkboard with some kraft cardstock and the Stitched Rectangle dies. I scored the corner lines and blended a bit of Gathered Twigs Distress Ink to add depth to the lines. I attached the frame to the chalkboard, then added the whole thing to an A2 sized piece of grid paper from Subtle Grey Tones. I stamped the cat and book from Grad Cat and colored with Copics. I cut them out with the matching dies and finished the card by adding the images with foam tape for dimension.

Thank you so much for stopping by! Have a wonderful day!

Sunny Studio Supplies Used:

Teacher Appreciation Stamps
Shop at:
Sunny Studio
Picket Fence Border Dies
Shop at:
Sunny Studio
Stitched Rectangle Dies
Shop at:
Sunny Studio
Rustic Winter Dies
Rustic Winter Dies
Shop at:
Sunny Studio
Subtle Grey Tones Paper
Shop at:
Sunny Studio
Sweet Treats House Add-on
Shop at:
Sunny Studio
Grad Cat Stamps
Grad Cat Stamps
Shop at:
Sunny Studio
Grad Cat Dies
Grad Cat Dies
Shop at:
Sunny Studio
Slimline Nature Borders
Shop at:
Sunny Studio
Classic Sunburst Paper
Shop at:
Sunny Studio
Sleek Stripes Paper
Sleek Stripes Paper
Shop at:
Sunny Studio