Friday, June 4, 2021

Cupcake Die Focused Cards with Candice and Tammy

Hello! It's Candice back with you today sharing a belated birthday card great for anytime you forget to mail that birthday card in time! I love the candle from the Cupcake Die set and it made for a quick, fun rainbow design!

Sunny Studio Stamps: Cupcake Dies Inside Greetings Slimline Dies Birthday Card by Candice Fisher

I used these Sunny Studio products for my mini slimline design:

I began my mini slimline with a 6 1/2 x 4 card base. For the background, I used the slimline pennant die and used the partial die cut method to create my mini slimline size. The partial die cut method is simple, you run the die through half way, rotate and line up, and run it through again part way!

Sunny Studio Stamps: Cupcake Dies Inside Greetings Slimline Dies Birthday Card by Candice Fisher

Next, I die cut multiple of the candles from alcohol marker friendly paper, colored them with Copic markers in rainbow colors and adhered along the bottom of the stitched rectangle with foam tape. I then trimmed off the bottoms and adhered to the card front. I finished by stamping the awesome belated birthday sentiment in Versafine black ink and added a few jewels!

Thank you for visiting and have a fabulous day!

-------------------------------------------

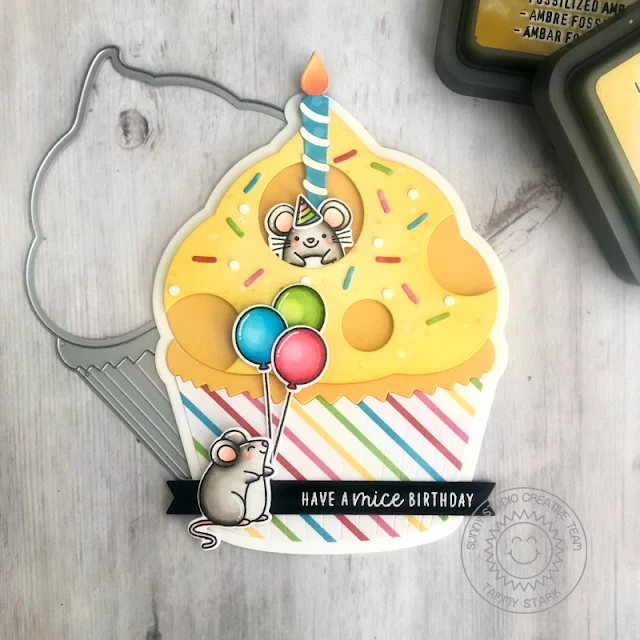
Hello! Tammy here sharing this sweet shaped cupcake card using the Cupcake Shaped Die. 

Sunny Studio Stamps: Cupcake Dies Stitched Circle Dies Harvest Mice Birthday Card by Tammy Stark

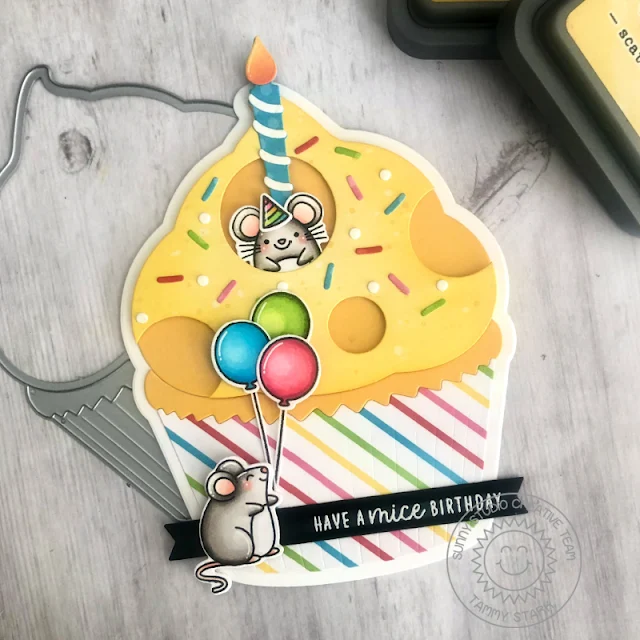
To begin, I cut the cupcake base from 110 lb white cardstock using the Cupcake outline die. Next, I cut the cupcake from Bristol smooth cardstock. I then used the Stitched Circle Large Dies and Stitched Circle Small Dies to cut small circles to resemble cheese. I ink blended it with Scattered Straw and Fossilized Amber Distress Oxide inks then layered it onto a die cut yellow cardstock cupcake, using foam tape for dimension. I cut the striped cupcake liner from the Very Merry 6X6 Paper and the candle and sprinkles from the Polka-Dot Parade 6X6 Paper and assembled the cupcake.

Next, I stamped, colored with Copic markers, and die cut images from the following sets:
Harvest Mice StampsHarvest Mice Dies
Oceans of Joy Stamps (balloons)/ Oceans of Joy Dies
Balloon Rides Stamps (party hat)/ Balloon Rides Dies

Sunny Studio Stamps: Cupcake Dies Stitched Circle Dies Harvest Mice Birthday Card by Tammy Stark

I arranged the stamped images onto the card, attaching with foam tape to add a bit of dimension, and stamped the sentiment from Harvest Mice Stamps onto a black cardstock sentiment banner. Lastly, I attached the cupcake to a white card base die cut using the partial die cutting technique to complete my card.

Thanks so much for stopping by! Have a fantastic day!

Sunny Studio Supplies Used:

Oceans of Joy Dies
Oceans of Joy Dies
Shop at:
Sunny Studio
Oceans of Joy Stamps
Shop at:
Sunny Studio
Cupcake Shape Dies
Cupcake Shape Dies
Shop at:
Sunny Studio
Polka-dot Parade 6x6 Paper
Shop at:
Sunny Studio
Very Merry 6x6 Paper
Shop at:
Sunny Studio
Harvest Mice Stamps
Harvest Mice Stamps
Shop at:
Sunny Studio
Harvest Mice Dies
Harvest Mice Dies
Shop at:
Sunny Studio
Balloon Rides Stamps
Shop at:
Sunny Studio
Balloon Rides Dies
Balloon Rides Dies
Shop at:
Sunny Studio
Inside Greetings Birthday
Shop at:
Sunny Studio
Slimline Pennant Dies
Shop at:
Sunny Studio
Stitched Circle Small Dies
Shop at:
Sunny Studio
Stitched Circle Large Dies
Shop at:
Sunny Studio

Thursday, June 3, 2021

Candy Shoppe Cards with Vanessa and Anja

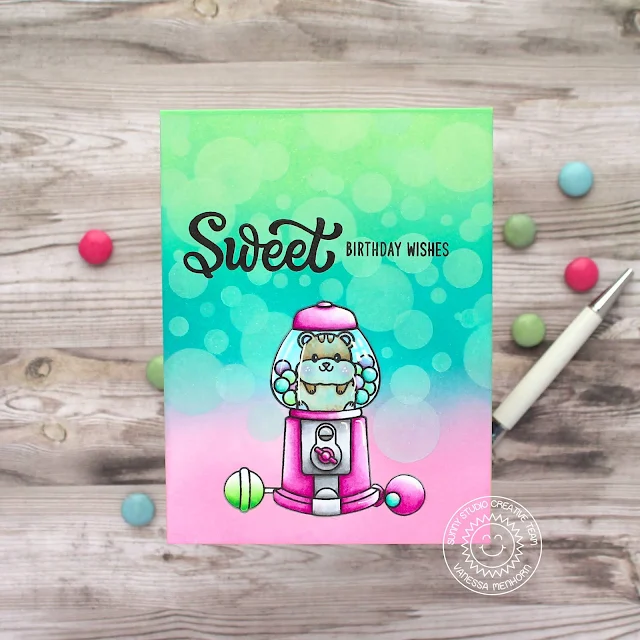
Hello to you! Vanessa here with a sweet birthday card using the yummy Candy Shoppe set.

Sunny Studio Stamps: Candy Shoppe Happy Hamster Candy Themed Birthday Card by Vanessa Menhorn

I first stamped the gumball machine onto a white card base, masking the glass dome. Now I stamped the Happy Hamster, masked it and stamped the inside of the machine. After I had masked the complete image, I stamped the rest of the images and masked these too. 

Sunny Studio Stamps: Candy Shoppe Happy Hamster Candy Themed Birthday Card by Vanessa Menhorn

I applied Distress Oxide inks with an ink blending tool, using these colors from bottom to top: Kitsch Flamingo, Peacock Feathers, Cracked Pistachio. Then I used a dots stencil and applied white pigment ink to create the bokeh effect. After I had removed the masks, I colored everything with Copic markers and stamped the sentiment.

I hope you all have a sweet day! Thank you for stopping by today!

----------------------------------------------

Hi everyone, Anja here and today I have this literally sweet birthday card for you featuring the fun Candy Shoppe Stamps. All these candy themed images inspired me to come up with a little wagon made from die-cuts.

Sunny Studio Stamps: Candy Shoppe Sweet Treats House Add-On Dies Candy Themed Birthday Card by Anja Bytyqi

I used the scalloped dies from the Sweet Treats House Add-On set for the roof and border. I masked off every other scallop and sponged on Kitsch Flamingo Distress Oxide Ink to create the stripes. For the wheels, I cut the half round window die twice from brown cardstock circles. I also added a piece of pink striped paper (Dots & Stripes Pastels Paper) to a white cardstock rectangle for the wagon's bottom part.

Next, I stamped the images in Memento Tuxedo Black Ink and colored them with Copic Markers. I cut everything out with the coordinating dies. Two of the longer striped candy sticks were used to combine the roof and bottom part of the wagon. I adhered the wagon pieces to a light blue card base and arranged all the sweets inside it. For a little bit of sparkle, I applied Crystal Stickles to the right side of the pastel rainbow cotton candy.

Sunny Studio Stamps: Candy Shoppe Sweet Treats House Add-On Dies Candy Themed Birthday Card by Anja Bytyqi

I really like the oversized 'Sweet' word which I stamped in Picked Raspberry Distress Oxide Ink and triple heat embossed with clear embossing powder for a raised and glossy effect. The matching die is awesome, too! The birthday sentiment was stamped in VersaMark Ink onto a thin black cardstock strip and heat embossed in white. I finished off the card by rounding the bottom card corners with a punch and adding three white clay hearts.

Thank you so much for stopping by! Have a sweet day!

Sunny Studio Supplies Used:

Candy Shoppe Stamps
Candy Shoppe Stamps
Shop at:
Sunny Studio
Candy Shoppe Dies
Candy Shoppe Dies
Shop at:
Sunny Studio
Happy Hamsters Stamps
Shop at:
Sunny Studio
Dots & Stripes Pastels 6x6 Paper
Shop at:
Sunny Studio
Sweet Treats House Add-on
Shop at:
Sunny Studio

Wednesday, June 2, 2021

Poppy Fields Cards with Franci and Julia

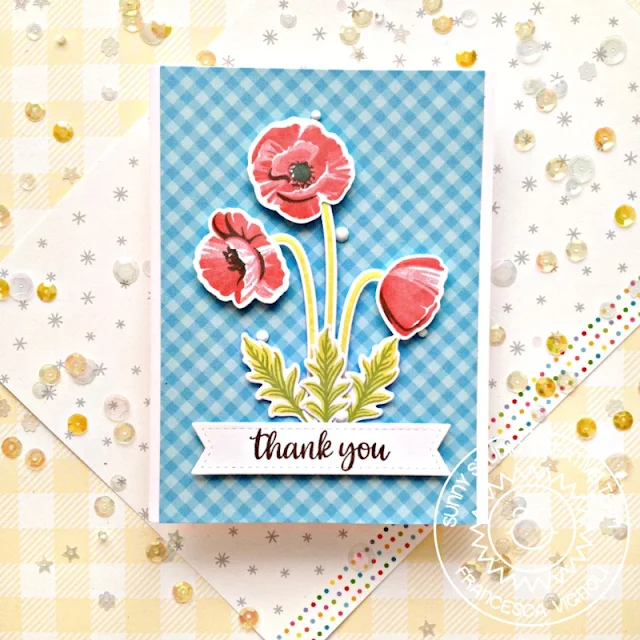
Hi there and happy Wednesday! It's Franci here with you today, with a cute card showcasing the Poppy Fields. Another release, another amazing layering set!

Sunny Studio Stamps: Poppy Fields Teacher Appreciation Thank You Card by Franci Vignoli

First of all I created my card base out of white cardstock and covered the front with some patterned paper from the Gingham Jewel Tones 6x6 paper. Then I stamped all the flowers with a combo of Lawn Fawn and Memento Drop inks and die cut them out with their coordinated dies.

Sunny Studio Stamps: Poppy Fields Teacher Appreciation Thank You Card by Franci Vignoli

Then I die cut the little stitched banner and stamped my sentiment from the Teacher Appreciation set. I glued all the elements down with foam adhesive and added some little white embellishments to finish my design. 

I hope you like this card and thanks a lot for stopping by today. Have a lovely day! 

------------------------------------------------

Hey crafty friends! It’s Julia here with a fun floral card!

Sunny Studio Stamps: Poppy Fields Plane Awesome Slimline Dies Friendship Cards by Julia Englich


For this card, I started by stamping out the beautiful flowers from the layering stamp set Poppy Fields. The large blooms have 5 individual layers and create such amazing dimension!! Then, I stamped the images from Plane Awesome onto Transotype Perfect Coloring Paper and colored them in using Copic Markers.

Sunny Studio Stamps: Poppy Fields Plane Awesome Slimline Dies Friendship Cards by Julia Englich


After that, I ink blended the background using Tumbled Glass Distress Oxide Ink and added some splatters using Salty Ocean. I also die cut a grass border using the Slimline Nature Borders and ink blended that with Shabby Shutters and added splatters with Rustic Wilderness.

Inks used: Floral 6 Crisp Dye Ink Mini Cube Set Copic Markers used: 0; N0, N1, N3, N5, N7; RV10, RV13, RV25, RV19; G40, G43, G46; Y11, Y13, Y15, Y17.

Sunny Studio Stamps: Poppy Fields Plane Awesome Slimline Dies Friendship Cards by Julia Englich


I adhered my background panel to a card base and added all my images and the grassy border on top. Finally, I added shimmer and and crystal glaze to add lots of sparkle! I hope you like it!

Thank you so much for stopping by! Have a wonderful day!

Sunny Studio Supplies Used:

Teacher Appreciation Stamps
Shop at:
Sunny Studio
Poppy Fields Stamps
Poppy Fields Stamps
Shop at:
Sunny Studio
Poppy Fields Dies
Poppy Fields Dies
Shop at:
Sunny Studio
Gingham Jewel Tones 6x6 Paper
Shop at:
Sunny Studio
Plane Awesome Stamps
Shop at:
Sunny Studio
Plane Awesome Dies
Plane Awesome Dies
Shop at:
Sunny Studio
Slimline Nature Borders
Shop at:
Sunny Studio

Tuesday, June 1, 2021

Color My World Cards with Isha and Kavya

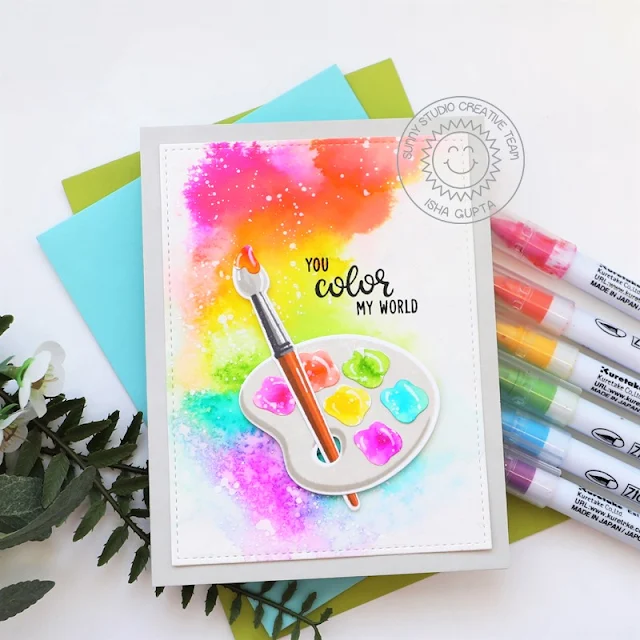
Hello everyone! Isha here today with a colorful watercolor card featuring our GORGEOUS layering stamp Color My World!

Sunny Studio Stamps: Color My World Stitched Rectangle Dies Rainbow Color Themed Card by Isha Gupta

Start by making a rainbow colored mat layer. Scribble bit of ink using ZIG Clean Color real brush markers (purple, yellow, light green, pink, scarlet red, cobalt blue) onto watercolor paper. Spray water to get the desired effect, let dry. Die-cut this piece using the Stitched Rectangle die. Flick white paint onto this layer.

Stamp the color palette from the Color My World stamp using two shades of grey inks. Stamp the brush using various colors, die-cut these using the coordinating dies. These layers make the images look so real.

Sunny Studio Stamps: Color My World Stitched Rectangle Dies Rainbow Color Themed Card by Isha Gupta

Die-cut the color head of the brush and the colors of the palette from watercolor paper. Color using watercolors as the background. Stamp the sentiment onto the mat layer. Adhere the images using 3d foam.  Adhere this layer to a grey card base.

Thank you for dropping by! Have a nice day.

------------------------------------------------

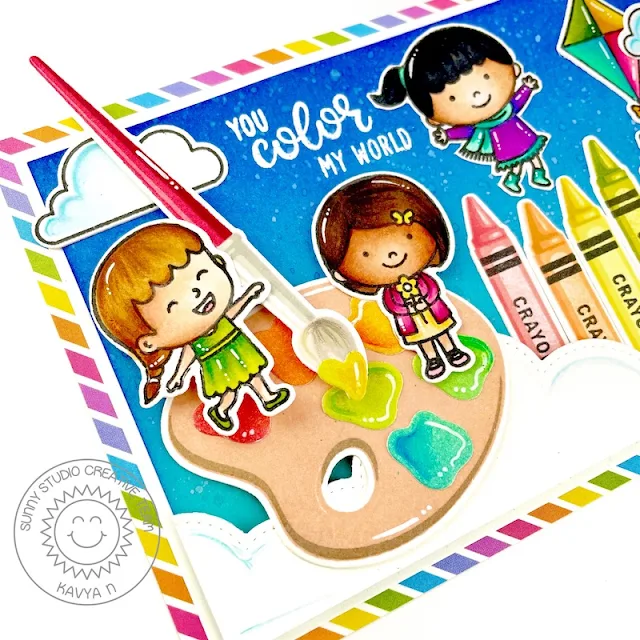
Hi folks, Kavya here. I am back on the blog with another fun using the new Color my World stamps set! By combining it with some critter or kiddo, you can totally expand the possibilities with this set! 

Sunny Studio Stamps: Color My World Fall Kiddos Spring Showers Rainbow Color Themed Cards by Kavya

I first started off by stamping and coloring various images from Fall KiddosSpring Showers and Color My World. For the paint palette, I was inspired by Francesca Vignoli’s card to die cut a rainbow ink blended strip for paint splatters instead of stamping the paint and I totally love how it looks! 

Sunny Studio Stamps: Color My World Fall Kiddos Spring Showers Rainbow Color Themed Cards by Kavya

I prepared my card base by using a 4x6 rainbow striped pattern paper from Spring Sunburst paper pad. I then placed a smaller white A2 card base and blue cardstock on top. For the sky, I ink blended the top of the blue cardstock with blueprint sketch distress ink and splattered some water on top.

Sunny Studio Stamps: Color My World Fall Kiddos Spring Showers Rainbow Color Themed Cards by Kavya

I then die cut a cloud border using the Slimline Nature Border dies and adhered the images on top as shown in the images above and below. Finally, I heat embossed a sentiment from Color My World stamp set using white embossing powder. 

Ta - Da! That’s it! I hope you liked this fun card!! Check back tomorrow for some more inspiration from the DT!

Sunny Studio Supplies Used:

Color My World Stamps
Shop at:
Sunny Studio
Color My World Dies
Color My World Dies
Shop at:
Sunny Studio
Stitched Rectangle Dies
Shop at:
Sunny Studio
Fall Kiddos Stamps
Fall Kiddos Stamps
Shop at:
Sunny Studio
Fall Kiddos Dies
Fall Kiddos Dies
Shop at:
Sunny Studio
Spring Sunburst 6x6 Paper
Shop at:
Sunny Studio
Spring Showers Stamps
Shop at:
Sunny Studio
Spring Showers Dies
Spring Showers Dies
Shop at:
Sunny Studio
Slimline Nature Borders
Shop at:
Sunny Studio