Showing posts with label Pumpkin Patch Dies. Show all posts

Monday, September 26, 2022

Pumpkin Patch Die Focused Cards with Bobbi and Cathy

Hello crafty friends! It’s Bobbi here with a pretty patch of watercolor pumpkins. I love working with watercolors and when I have small pieces left over, I put them in a box to use later. For this card, I used many bits and pieces of my watercolor scraps to make these pretty pumpkins and leaves. I’m using the Pumpkin Patch dies for this 5″ X 7″ card.

Sunny Studio Stamps: Pumpkin Patch Die Focused Cards by Bobbi Lemanski

To create this card, I added a wash of aquas, yellows and oranges on a strip of watercolor paper and adhered it to my white card base, front panel. I like the non-traditional colors of this backdrop. I added 1/8″ strips of white cardstock on the top and bottom of the strip for a clean finish.

For the pumpkins, leaves and vines, I die cut them from various scrap pieces that blended well with the watercolor background I chose. I love the deep orange colors with the soft, light blends. The contrast makes the card more interesting.

Sunny Studio Stamps: Pumpkin Patch Die Focused Cards by Bobbi Lemanski

These pumpkin dies include three layers for each fruit in the set. I glued the two bottom layers together and used a foam tab under the top layer to make the pumpkins dimensional. This also allowed me to tuck a leaf or two in between the layers, too.

I attached all three pumpkins in a row, at the bottom of the watercolor strip to ground them. I attached more falling leaves on the front. Lastly, I stamped the phrase from the holiday stamp set, Cozy Christmas. I think it really fits this card. We love putting pumpkins around our house to decorate for fall. I hope you like it!

Thanks for stopping by today. If you want to see more ideas and inspiration from me, subscribe to my blog, BobbiHartDesign.com. I’ll send you updates on new posts! You can also find me on Instagram as @BobbiHartDesign and on Facebook as BobbiHartDesign. Bobbi Hartmann Lemanski, Bobbi Hart♥ Design, Adding h♥art into every design.

-------------------------------------------------

Hey friends! Cathy here today sharing a card on the simpler side with a soft and peaceful feel using the Pumpkin Patch Dies.


Sunny Studio Stamps: Pumpkin Patch Die Focused Cards by Cathy Chapdelaine (featuring Frilly Frame Dies, Winter Greenery Dies, Autumn Greenery Dies)

 
To start, I die-cut a piece of white cardstock using the frame portion of the Frilly Frames Quatrefoil Dies and the center portion of the Frilly Frames Stripes Dies. I adhered this panel to an ivory A2 card base.


Next, I die-cut the pumpkins from Neenah Classic Crest 80lb solar white cardstock and colored them with Copics. I thought it would be fun to make a few different sizes by die-cutting just 2 layers instead of all 3 to form a taller skinnier pumpkin and a small pumpkin. The blue pumpkin is assembled with all 3 layers. I also used the vine die as a stem on the smaller pumpkins for a whimsical look. I love the versatility of these dies!


Sunny Studio Stamps: Pumpkin Patch Die Focused Cards by Cathy Chapdelaine (featuring Frilly Frame Dies, Winter Greenery Dies, Autumn Greenery Dies)


I die-cut a few leaves to tuck in around the pumpkins from the 
Autumn Greenery Dies and the Winter Greenery Dies from white cardstock. I inked them with Crushed Olive, Tumbled Glass and Old Paper Distress inks and added a few Copic accents to some of the leaves. To finish, I heat embossed a sentiment from the Autumn Greetings Stamps on light gray cardstock and fussy cut around it.


I hope you enjoyed and thanks for stopping by today! For more inspiration, please visit my blog www.inkredibleadventures.com and you can also find me on Instagram as @cathy.chapdelaine.


Sunny Studio Supplies Used:

Autumn Greetings Stamps
Shop at:
Sunny Studio
Frilly Frames Stripes Die
Shop at:
Sunny Studio
Frilly Frames Quatrefoil
Shop at:
Sunny Studio
Winter Greenery DIes
Shop at:
Sunny Studio
Cozy Christmas Stamps
Shop at:
Sunny Studio
Autumn Greenery Dies
Shop at:
Sunny Studio
Pumpkin Patch Dies
Pumpkin Patch Dies
Shop at:
Sunny Studio

Saturday, September 17, 2022

Guest Designer Spotlight: Cards with Gladys Marcelino

Hi friends! Gladys here and I'm so happy to be back on the blog to share projects using awesome new products from the Fall & Winter 2022 release.

Sunny Studio Stamps: Pumpkin Patch Die Fall Card by Gladys Marcelino

For my first project I was very excited to use the Pumpkin Patch dies because I love creating cards using die cuts only. However I can see this set work really well with stamp sets too. I also liked these dies because you can make it dimensional. I cut them out from colored cardstock using some non-traditional autumn colors. I used distress oxide inks to add depth and white paint splatters for more interest.

Sunny Studio Stamps: Pumpkin Patch Die Fall Card by Gladys Marcelino

For the background I used a scalloped slimline die to cut from white cardstock. I blended salvaged patina on the panel then adhered it onto brown plaid paper from the Critter Country paper pack. I stamped a sentiment from Happy Harvest and highlights with white gel pen to complete the card.

Sunny Studio Stamps: Too Cute to Spook Card by Gladys Marcelino

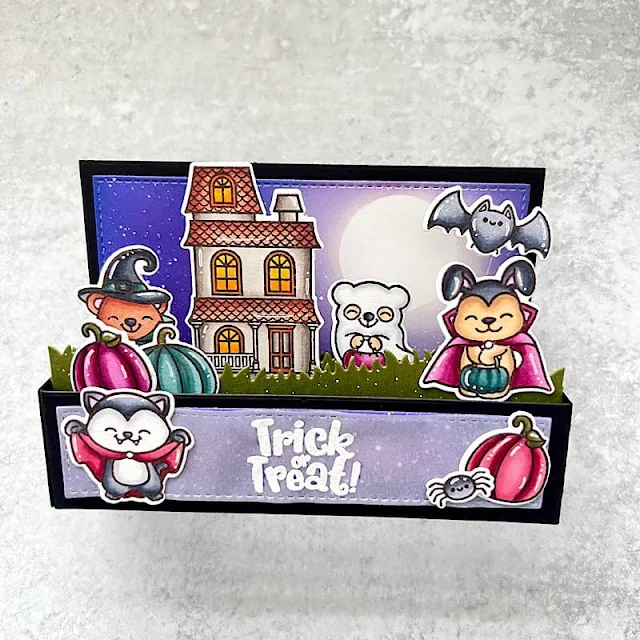
For my second project I used the adorable Too Cute To Spook stamp set to make a Halloween card. This set is full of trick or treaters in their cute little costumes. I stamped a bunch of the images and colored them with alcohol markers. Again, I used non-traditional Halloween colors. I used the coordinating dies to cut them out.

Sunny Studio Stamps: Too Cute to Spook Card by Gladys Marcelino

Next I used the mini slimline outside-the-box dies from My Favorite Things to cut the base panels from black cardstock. I also used the grassy hills dies cut from dark green cardstock. For the background I used a small circle die to cut from masking paper to create the moon. I ink blended the sky on Bristol smooth cardstock using shaded lilac and blueprint sketch distress oxide inks.

Sunny Studio Stamps: Too Cute to Spook Card by Gladys Marcelino

I assembled the box card and adhered the images on the grass and all sides of the box. I also popped the bat on acetate so it's flying in front of the moon. Finally I white heat embossed the sentiment onto vellum.

I hope you liked my projects using the latest release. Thank you so much for joining me and I wish you all a wonderful day!

Sunny Studio Supplies Used:

Happy Harvest Stamps
Shop at:
Sunny Studio
Too Cute To Spook Stamps
Shop at:
Sunny Studio
Too Cute To Spook Dies
Shop at:
Sunny Studio
Pumpkin Patch Dies
Pumpkin Patch Dies
Shop at:
Sunny Studio
Critter Country Paper
Shop at:
Sunny Studio

Friday, September 16, 2022

Pumpkin Patch Die Focused Cards with Vanessa and Tina

Hello to you! Vanessa here with a rocking interactive card using the Pumpkin Patch Dies.

Sunny Studio Stamps: Pumpkin Patch Die Card by Vanessa Menhorn (featuring Too Cute to Spook, Chloe Alphabet Dies, Picket Fence Border Dies)

I started with an orange circle that I scored in the middle to create the card base. I then trimmed two smaller circles from white and black cardstock, created the sky on the white circle with Pumice Stone Distress Oxide ink and a cloud mask and trimmed off half of the black circle with the grass border die. I die-cut the pumpkins from white cardstock and colored them with Copics, then I added yellow cardstock behind. I stacked the images and created the moving part of the card -> find a video tutorial here.

Here comes a list of the used products:
Pumpkin Patch Dies
Too Cute To Spook stamps
Chloe Alphabet Dies
Picket Fence Border Die

Sunny Studio Stamps: Pumpkin Patch Die Card by Vanessa Menhorn (featuring Too Cute to Spook, Chloe Alphabet Dies, Picket Fence Border Dies)

Now I adhered the black half circle to the bottom part, trimmed the black fence with scissors to create a broken appearance and adhered the pieces. I die-cut the letters from orange cardstock, colored the tops with a black marker and spelled BOO. Finally, I stamped the bats to the background.

Wishing you a wonderful weekend, everybody!

------------------------------------------

Hello crafty friends! It’s Tina with a sweet pumpkin card for you today! The new Pumpkin Patch Die set gives you lots of options to create the cutest or spookiest pumpkins! It can also be used as layering dies but I went with the adorable faces that come with this set.

Sunny Studio Stamps: Pumpkin Patch Die Card by Tina (featuring Slimline Dies, Window Quad Dies)

First, I die cut a stitched rectangle panel from some Neenah Solar White Card Stock. I wanted to create a striped border for my sentiment so I used one of the Slimline Basic Border Dies to cut off about an inch at the bottom of the panel. Next, I used a striped stencil and some die inks in yellow, green, and red tones. The same ones that I’ll apply on the pumpkins later.

I thought it would be fun to feature four adorable pumpkin faces so I pulled the Window Quad Square die and run it through my die cute machine using the top part of the white rectangle panel. I adhered both pieces of the rectangle panel to a card base using liquid glue.

Then it was time to create the bases for the pumpkins and decide which ‘faces’ I wanted to use! I cut the pumpkin bases three times for some dimension on my card.

Sunny Studio Stamps: Pumpkin Patch Die Card by Tina (featuring Slimline Dies, Window Quad Dies)

I also die cut the greenery that comes with the set. Next, I added some color to the pumpkins and leaves using the same inks as before for the striped border. Finally, I glued all the pieces together with some liquid glue. For some extra texture, I added little dots to the left side of the pumpkins with some brown copics and a white gel pen. Each finished pumpkin was added to a square using foam tape.

I used a sentiment from the Beautiful Autumn stamp set, stamped it onto a die cut banner and added it to the striped banner piece with foam tape. To embellish the card I sprinkled some Iridescent Jewels on the pumpkins and around the sentiment.

I love all these cute pumpkin faces and I hope you got inspired to create some adorable cards with this new die set too!

Sunny Studio Supplies Used:

Chloe Alphabet Dies
Chloe Alphabet Dies
Shop at:
Sunny Studio
Picket Fence Border Dies
Shop at:
Sunny Studio
Beautiful Autumn Stamps
Shop at:
Sunny Studio
Slimline Basic Borders
Shop at:
Sunny Studio
Window Quad Square Die
Shop at:
Sunny Studio
Too Cute To Spook Stamps
Shop at:
Sunny Studio
Pumpkin Patch Dies
Pumpkin Patch Dies
Shop at:
Sunny Studio

Thursday, September 8, 2022

Pumpkin Patch Die Focused Cards with Waleska and Marine

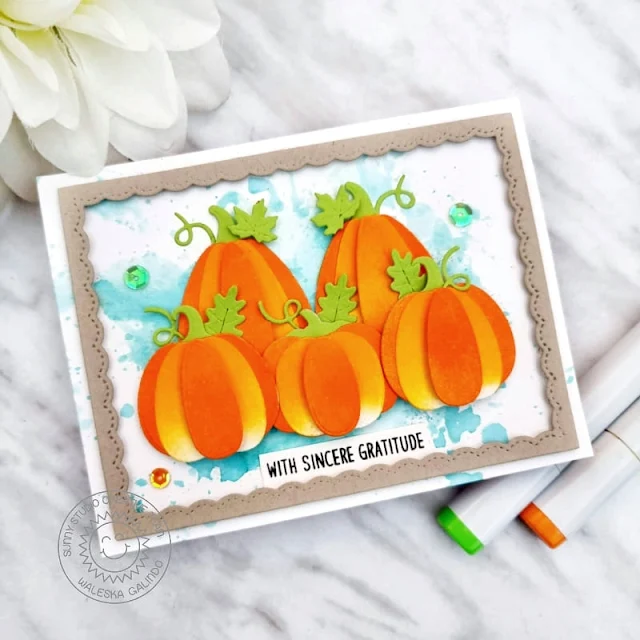
Hi Friends, Waleska here. My card for this week features one of my new favorite pumpkin dies, the Pumpkin Patch Dies, they are so fun and you can make them with or without dimension I just love them!

Sunny Studio Stamps: Pumpkin Patch Die Focused Card by Waleska Galindo (featuring Words of Gratitude, Fancy Frame Dies)

I started die cutting the pieces to create this beautiful pumpkins with white cardstock, I wanted to ink them with Oxide Inks.  For the leaves and stem I used green colored cardstock.  I used Ripe Persimmon and Carved Pumpkin Oxide inks to add color and dimension to the pumpkins. I used 3D Foam tape to elevate some parts too.

Sunny Studio Stamps: Pumpkin Patch Die Focused Card by Waleska Galindo (featuring Words of Gratitude, Fancy Frame Dies)

For the background I used Salvaged Patina Oxide Ink mixed with water with a smooshing technique on Watercolor paper.  I cut the biggest frame from the Fancy Frame Rectangles  with kraft cardstock and adhere it to the front panel.  I assemble the pumpkins in the center of my card and finally I added this panel to an orange card base.

I used the Words of Gratitude stamp set for the sentiment.  Thank you so much for stopping by remember to stay crafty because today is only lived once, do what you love and enjoy it!!!

------------------------------------------

Hey crafty friends, Marine here, thank you so much for stopping by! I'm back today with two cards, both showcasing the brand new Pumpkin Patch die set from the Fall & Winter 2022 collection. I couldn't decide if I wanted to create an autumn card or a Halloween card, so I decided to make both, using die cut pieces only.

Sunny Studio Stamps: Pumpkin Patch Die Focused Card by Marine Simon (featuring Comic Strip Everyday Dies, Picket Fence Border Dies, Tropical Trees Backdrop Dies)

I started by cutting all the pieces I needed to create both cards. And I knew that I wanted to use my alcohol markers to color all those bits and pieces, so I cut everything out of the same paper I always use to color my images. Besides the Pumpkin Patch die set, here are the sets I picked the different dies from:

Comic Strip Everyday: clouds, sun/moon, tree trunks, foliage
Picket Fence Border: grass border & fence
Tropical Trees Backdrop: crows/bats

For the autumn card I went with traditional pumpkins using two shades of orange, I also colored some sunflowers, leaves and swirling stems, a sun and a few clouds, some colorful trees and some birds to be crows.

And for the Halloween card I went with spooky pumpkins using two shades of purple. The sunflowers turned into bright pink flowers, I didn't add any foliage on the trees, the sun turned into the moon and the birds into bats.

Sunny Studio Stamps: Pumpkin Patch Die Focused Card by Marine Simon (featuring Comic Strip Everyday Dies, Picket Fence Border Dies, Tropical Trees Backdrop Dies)

Once everything was colored, I created a background for each card. I cut two 5,5 x 4,25" bristol panels, as well as two grass borders using a die from the Picket Fence Border die set. For the autumn card I went with a turquoise sky using tumbled glass & peacock feathers oxide inks, and a khaki green grass border using shabby shutters & peeled paint oxide inks. And for the Halloween card, I went with dark blue shades for the sky using blueprint sketch, chipped sapphire & black soot oxide inks, and a dark green grass border using mowed lawn & rustic wilderness oxide inks.

Before assembling the cards, I white heat embossed a sentiment at the bottom of each grass border: "Hello autumn" from Fall Kiddos for the autumn card, and "Trick or treat" from Bewitching for the Halloween card. And next I attached the different elements on each panel, starting with the grass borders, and then all the bits and pieces using a combination of foam squares, glue dots & liquid glue.

Sunny Studio Stamps: Pumpkin Patch Die Focused Card by Marine Simon (featuring Comic Strip Everyday Dies, Picket Fence Border Dies, Tropical Trees Backdrop Dies)

And that's it! Love how they both turned out, super cute and bright. I hope you like them too! As always you will find more information and details in the process video, so feel welcome to check it out! Thank you so much for stopping by, and see you next week!

Sunny Studio Supplies Used:

Picket Fence Border Dies
Shop at:
Sunny Studio
Stitched Rectangle Dies
Shop at:
Sunny Studio
Bewitching Stamps
Bewitching Stamps
Shop at:
Sunny Studio
Words of Gratitude Stamps
Shop at:
Sunny Studio
Comic Strip Everyday Dies
Shop at:
Sunny Studio
Fall Kiddos Stamps
Fall Kiddos Stamps
Shop at:
Sunny Studio
Tropical Trees Backdrop
Shop at:
Sunny Studio
Pumpkin Patch Dies
Pumpkin Patch Dies
Shop at:
Sunny Studio

Saturday, September 3, 2022

Guest Designer Spotlight: Cards with Leanne West

Hello and happy September! Leanne here with you today. We are just a few weeks away from the official start of fall and I can't wait! In the mean time, I enjoyed creating a couple of fall cards in anticipation of sweater weather and pumpkin spice lattes.  

Sunny Studio Stamps: Pumpkin Patch Dies and Autumn Tree Dies Focused Fall Themed Cards by Leanne West

I've used two new standalone die sets to help build my scenes - Pumpkin Patch and Autumn Tree. I just love a card with lots of layers and texture. These new die sets made it so easy to achieve that. 

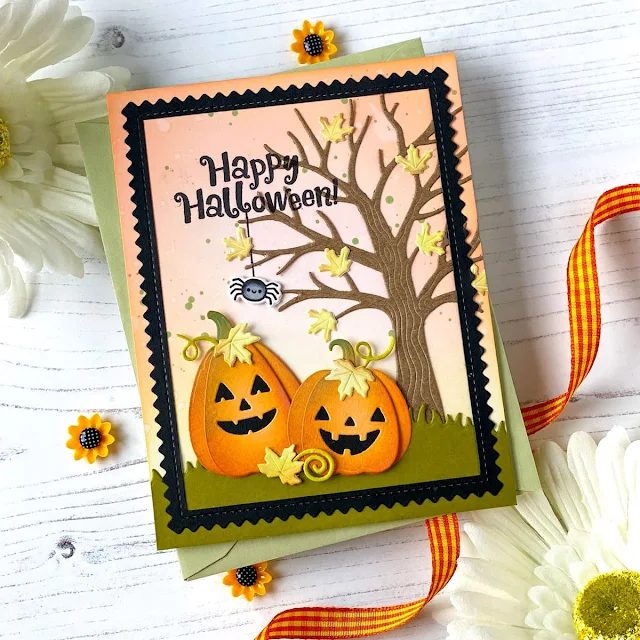
Both of my cards started out with the same ink blended background which is a combination of Tattered Rose and Saltwater Taffy Distress Oxide Inks. I then added a khaki green die cut grassy hill to each.

Sunny Studio Stamps: Pumpkin Patch Dies and Autumn Tree Dies Focused Fall Themed Cards by Leanne West

To make the pumpkins and Jack-o-lanterns, I die cut the pieces from light orange card stock. For shading on each piece, I used Carved Pumping, Vintage Photo, and Peeled Paint Oxide Ink. The shading is important because I feel this really gives the pumpkins more dimension when the pieces are all layered together. For the Jack-o-lanterns, I die cut the faces into the top pumpkin layer and backed it with black card stock. The face pieces are tiny and I felt this was the easiest way to assemble them. 

After I had the pumpkins and tree placed into the scene, I used lots of leaves for embellishment. I die cut the leaves from white card stock. I used a small blending brush with Shabby Shutters, Carved Pumpkin, Vintage Photo, and Peeled Paint Oxide Inks to color them. I scattered the leaves on the tree and pumpkins and even some in the air on the Happy Fall card. The little dashed lines have been stamped. These stamps come from the Backyard Bugs set. They are meant for bug trails but work just as well for blowing leaves. 

Sunny Studio Stamps: Pumpkin Patch Dies and Autumn Tree Dies Focused Fall Themed Cards by Leanne West

For the Halloween card I added the stamped sentiment and tiny spider. These are from a new set called Too Cute To Spook. I hand drew the line the spider is hanging from. For the fall card, I added a part stamped, part die cut greeting. Happy Thoughts and the Chloe Alphabet were the sets I used. Finally to complete my cards, I added some frames. I wanted these frames to be fairly thin so they wouldn't cover up too much of the scenes. I used two different Frilly Frames dies - Chevron & Stripes. With a craft knife and straight edge, I was able to thin the sides of each frame.   

I hope my cards have inspired you to get started on your fall projects. Thanks for stopping by! 

Sunny Studio Supplies Used:

Backyard Bugs Dies
Backyard Bugs Dies
Shop at:
Sunny Studio
Backyard Bugs Stamps
Shop at:
Sunny Studio
Chloe Alphabet Dies
Chloe Alphabet Dies
Shop at:
Sunny Studio
Happy Thoughts Stamps
Shop at:
Sunny Studio
Frilly Frames Chevron Die
Shop at:
Sunny Studio
Frilly Frames Stripes Die
Shop at:
Sunny Studio
Too Cute To Spook Stamps
Shop at:
Sunny Studio
Too Cute To Spook Dies
Shop at:
Sunny Studio
Autumn Tree Die
Autumn Tree Die
Shop at:
Sunny Studio
Pumpkin Patch Dies
Pumpkin Patch Dies
Shop at:
Sunny Studio

Wednesday, August 31, 2022

Pumpkin Patch Die Focused Cards with Alma and Marie

Hi dear ones, it's Alma and I'm so happy to show you the awesome new stamps from the Pumpkin Patch Dies set from the new release on my new card.

Sunny Studio Stamps: Pumpkin Patch Die Focused Card by Alma Störk (featuring Words of Gratitude)

The punches are very versatile, you can use them as Halloween punches or simply as fall pumpkins. I chose the second option and punched the die-cut elements on white paper, glued them together and then coloured them with copics and pencils.

Sunny Studio Stamps: Pumpkin Patch Die Focused Card by Alma Störk (featuring Words of Gratitude)

I then speckled and dotted the background, tied the Doodletwine around the card, and die-cut the text from the Words of Gratitude Stamps Set. Now glue the pumpkins on, colour in a shadow with pencils under the pumpkins and you're done! 

--------------------------------------------

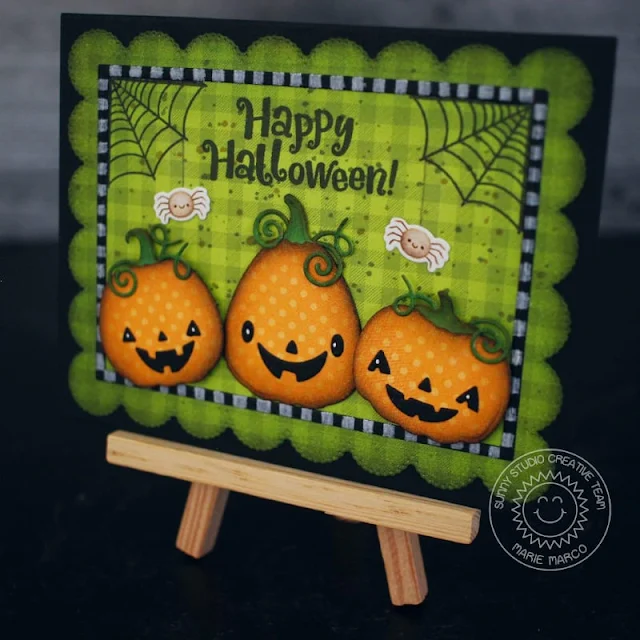
Hello Everyone! I’m Marie! Thank you so much for joining me today for my very first blog post with Sunny Studio Stamps. It’s Spooky season for some people that’s why I am so thrilled to be here to share my simple, fun, and spooktacular Halloween card featuring the new Pumpkin Patch Dies. I also used the New Too Cute To Spook stamp set. There are so many elements in this die set that will help to build all kinds of different pumpkins, from Harvest to the friendly Jack-o’-lantern. These dies are perfect for all fall themed cards.

Sunny Studio Stamps: Pumpkin Patch Die Focused Card by Marie Marco (featuring Frilly Frame Dies, Too Cute To Spook)

To create this card, I first started by die cutting an A2 sized panel from 110 lb black card stock as my card base.  Using the Frilly Frames Eyelet Lace Die, I cut out my green pattern paper from the Critter Country Paper Pack. I then inked the scalloped edges of my pattern paper with Distress Ink in “Black Soot”. Afterwards, I adhered my pattern paper to the black card base. 

Setting my background panel aside, I die cut  my 3 adorable pumpkins  from Orange polka dot paper also from the Critter Country Paper pack. I also die cut another set of pumpkins using 110 lb. Neenah Solar white cardstock. I attach my orange pattern paper pumpkins to the solid white card stock  to create sturdy pumpkins. I die cut the pumpkin stems and vines and used a copic marker in the color G17 Forest Green to color the vines and stem. I then distress the edges of the stems and vines and entire pumpkins using Ground Espresso Distress Oxide Inks. After Inking, I die cut some cute jack-o-lantern faces and glued them to my pumpkins and highlighted their eyes with a white gel pen. 

For some added spookiness, I decided to water color 2 tiny spiders from the Too Cute To Spook stamp set, and die cut them them using their corresponding dies 

Sunny Studio Stamps: Pumpkin Patch Die Focused Card by Marie Marco (featuring Frilly Frame Dies, Too Cute To Spook)

To build my card, I created a frame from black card stock and used a white color pencil to create spooky black and white stripes around the border. I adhered it to my background panel and I stamped out some spider webs  as well as the Happy Halloween Sentiment both from the Too Cute To Spook stamp set. I adhered my happy little pumpkins using foam tape to add dimension to the 2 outer pumpkins and finally  I added my super cute spiders. 

And there you have it! A cute and fun Halloween card! Thank you so much for stop! I can’t wait to create more fun and spooky cards to share with you all during this spooky season! Until Next time, Happy Crafting!

Sunny Studio Supplies Used:

Words of Gratitude Stamps
Shop at:
Sunny Studio
Frilly Frames-Eyelet Lace
Shop at:
Sunny Studio
Too Cute To Spook Stamps
Shop at:
Sunny Studio
Too Cute To Spook Dies
Shop at:
Sunny Studio
Pumpkin Patch Dies
Pumpkin Patch Dies
Shop at:
Sunny Studio
Critter Country Paper
Shop at:
Sunny Studio