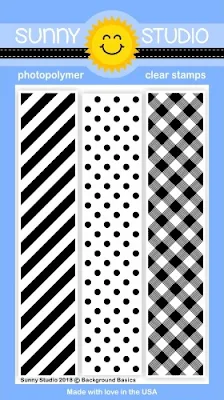
We also have a new background stamp set called Background Basics that I have fallen so madly in love with that it was hard to resist the urge to use it on nearly every card this week. It is perfect for when you just need a little snippet of patterned paper and I love all the different looks I was able to create from this single 4x6 set. I don't think I've made a dent in all the variations you can achieve!
For my first card I wanted to use all the stamps in the Berry Bliss set to create a yummy border. I’m a huge fan of bold black and white prints with pops of color so the striped border stamped in Versafine Black Onyx Ink was the perfect compliment. For my sentiment I paired our new Hello Word die with the word sweetie from the set.

Up next is another clean & simple card using the gingham border from the set. Sadly in this example my ink pad was a bit over-inked so some of the definition disappeared, but I think it's a fun look either way--It sort of reminds me of lattice which goes so well with the fruit theme. ;)
To dress up my panel down the center, I die-cut small zig-zag borders using our Ric Rac Border dies. To help my fruit stand out and add some dimension, I adhered each one to my card using foam tape.

For my next card I took inspiration from Gymboree and one of my many favorite collections of theirs from over a decade ago. My daughter had these sandals way back when (I swear I was obsessed with them) which I based the feel of my card on.

For my card I die-cut the three windows using our Window Trio Square dies. I then backed the background for each, alternating yellow gingham and polka-dot using the Background Basics stamps. For the sentiment I borrow a stamp from our Fresh & Fruity set and die-cut my scalloped edge using our Stitched Scallop dies.
")
For this card highlighting the cherries from the set, I paired them with the cherries from our older Fresh & Fruity set which I heat embossed with VersaMark ink and clear embossing powder on red cardstock. I then took a Copic Marker in a slightly darker shade and added some quick swipes with my pen to give light definition to them.
I was very strategic when stamping my gingham background. While this border doesn't invisibly repeat, you can line them up to form a continuous background--You will just see the seam were the two solid triangles line up to form a diamond. With this in mind I was able to position the layers of my Fancy Frames Oval dies so that you would never know there was a seam or notice the gingham was actually stamped three times across. To perfectly match the scalloped edge of my oval I used the long edge of the Fancy Frames Rectangle Dies for the bottom edge of my card.
")
For my last card of the day I wanted to play with different ink colors for my fruit. I love that you can switch things up and create the look of raspberries, boysenberries and blackberries all with the same set of stamps! I used our newest exclusive Fancy Frames Rectangle dies to form the lacy edge of my card base and then clear heat embossed the polka-dots and stripes from the Background Basics set to form glossy tone-on-tone prints. As a final finishing touch I stamped my sentiment with stamps from our Sweet Shoppe set which has so many phrases that play nicely with these images.
")

Here's a layering guide to help you line up the Berry Bliss stamps (you can click on the photo below to view it larger). For all the fruits, except the blueberry, I stamped them starting with the lightest ink color, working to the darkest. The black outlines indicate where that layer touches the previously stamped layer. :)

I frequently am asked which ink colors I used for my layered images. While I think there are so many great options out there that can provide good results, these are the colors I used today for my stamped images (in the ordered shared from lightest to darkest)...
Blueberries
Colorbox Sky
Colorbox Blueberry
Colorbox Atlantic Blue
True Red Strawberries
Colorbox Bubblegum
Colorbox Candy Red
Colorbox Cranberry
Berry Red Strawberries
Colorbox Bubblegum
Stampin' Up Melon Mambo
Colorbox Red Devil
True Red Cherries
Colorbox Strawberry
Colorbox Candy Red
Colorbox Cranberry
Berry Red Cherries
Stampin' Up Melon Mambo
Colorbox Blossom
Colorbox Red Devil
Red Raspberries
Stampin' Up Melon Mambo
Colorbox Blossom
Colorbox Red Devil
Colorbox Cranberry
Pink Raspberries
Colorbox Candy
Colorbox Pinkolicious
Colorbox Very Berry
Colorbox Dark Cherry
Boysenberries
Colorbox Burgundy
Colorbox Dark Cherry
Colorbox Deep Grape
Versafine Nocture
Olive Green Stems
Colorbox Tree Frog
Colorbox Artichoke
Dark Green Stems
Colorbox Grasshopper
Colorbox Golf Course
I'm so excited you've joined me for today's sneak peek and I'd love to give a $25 gift code to one lucky winner. Make sure to keep checking back all this week for more peeks & prizes for up to five chances to win. The contests run through Saturday at Midnight PST with winners announced here on Sunday, April 8th. :)
a Rafflecopter giveaway
Here's a sneak peek at the new Berry Bliss stamps & coordinating dies and Background Basics Stamps featured today (which will be available for purchase tomorrow).


Before you head off to shop tomorrow morning, don't forget to stop here first for one last sneak peek, a giveaway, and a special offer. ;)
Other Sunny Studio Supplies Used:
 Fresh & Fruity Stamps Shop at: Sunny Studio |
 Stitched Scallop Dies Shop at: Sunny Studio |
 Sweet Shoppe Stamps Shop at: Sunny Studio |
 Ric Rac Border Dies Shop at: Sunny Studio |
 Fancy Frames- Ovals Shop at: Sunny Studio |
 Fancy Frames- Rectangles Shop at: Sunny Studio |
 Window Trio- Square Die Shop at: Sunny Studio |
 Hello Word Die Shop at: Sunny Studio |