Showing posts with label Cupcake Shape. Show all posts

Thursday, July 22, 2021

Cupcake Shaped Die Focused Cards with Anja and Vanessa

Hello everyone, Anja here today sharing a fun shaped birthday card made with the Cupcake Shape Dies. Who wouldn't want to receive a big yummy cupcake like this?!

Sunny Studio Stamps: Cupcake Shape Die Slimline Dies Woodsy Autumn Birthday Card by Anja Bytyqi

These dies are so easy to work with! First, I cut out the base from white cardstock. The cupcake pieces were cut from Bristol smooth cardstock, Kraft cardstock and Gingham patterned paper (Gingham Pastels 6x6 Paper).

I went with some sort of Vanilla frosting and blended on a bit of Antique Linen Distress Oxide Ink. I also added tiny ink splatters with a paint brush. Next, I inked the edges of the cake portion die-cut with Frayed Burlap and splattered on lots of ink to create texture. The die for the wrapper piece creates some fine lines which I enhanced with Copic Markers.

Sunny Studio Stamps: Cupcake Shape Die Slimline Dies Woodsy Autumn Birthday Card by Anja Bytyqi

To decorate the cupcake wrapper, I stamped the adorable baking fox from the Woodsy Autumn set in Memento Tuxedo Black Ink. I masked off the original pie and replaced it with a little cupcake included in the Party Pups set. I colored the image as well as the cherry die-cut with Copics. I fussy cut the fox and applied a thick layer of Glossy Accents to the red part of the cherry to make it look shiny and dimensional.

I die cut the word 'congrats' from the Slimline Scalloped Frame Dies set out of turquoise glitter cardstock and adhered it to the frosting. The birthday sentiment (Sealiously Sweet Stamps) was stamped in VersaMark Ink onto black cardstock strips and I heat embossed it in white. Finally, I popped up the fox with foam tape.

Thank you so much for stopping by! Wishing you a sweet day!

------------------------------------------------

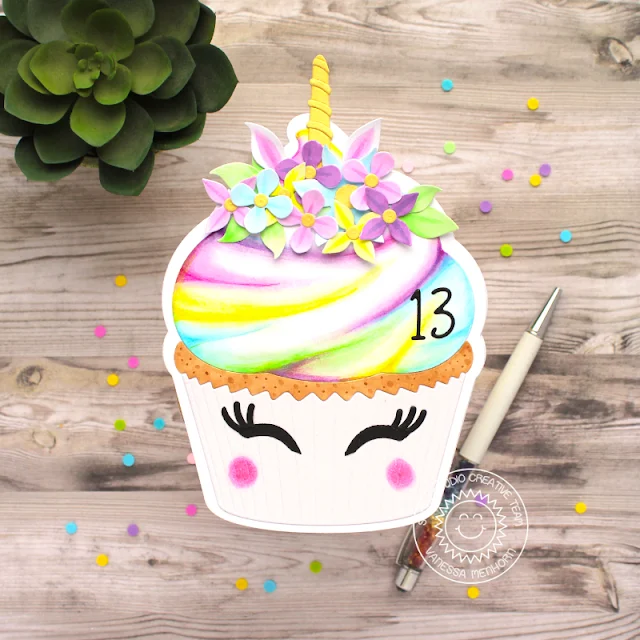
Hello to you! Vanessa here with a cute unicorn card using the Cupcake Shape Dies. I can't tell you how much I love this die! Here I created a card for my girl's birthday, no stamping included this time:

Sunny Studio Stamps: Cupcake Shape Die Loopy Letter Dies Botanical Backdrop Dies Birthday Card by Vanessa Menhorn

First, I created a card base from two large cupcake silhouettes. Now I die-cut the cupcake shapes from white cardstock, colored them with Copic markers and adhered them to the card. I die-cut the candle from gold cardstock, rounded the bottom and adhered it upside down for the horn. Then I die-cut the flowers and leaves from Botanical Backdrop Die from white cardstock, colored them with Copics and adhered the pieces to the cupcake, popping-up some elements with foam tape.

Supplies:
Cupcake Shape Dies
Botanical Backdrop Die
Loopy Letters Dies

Sunny Studio Stamps: Cupcake Shape Die Loopy Letter Dies Botanical Backdrop Dies Birthday Card by Vanessa Menhorn

The ears of my unicorn are made with the leaves dies and simply colored differently. Finally, I die-cut the 13, the eyes (made with the leaves die again) and the lashes (the stripes from the candle) from black cardstock and adhered everything.

I love how this turned out, exactly what I had in mind! I hope this inspires you to take a closer look at your supplies and see what you can make of them :) Thanks for stopping by!

Sunny Studio Supplies Used:

Cupcake Shape Dies
Cupcake Shape Dies
Shop at:
Sunny Studio
Party Pups Stamps
Party Pups Stamps
Shop at:
Sunny Studio
Party Pups Dies
Party Pups Dies
Shop at:
Sunny Studio
Loopy Letters Dies
Loopy Letters Dies
Shop at:
Sunny Studio
Gingham Pastels 6x6 Paper
Shop at:
Sunny Studio
Botanical Backdrop Die
Shop at:
Sunny Studio
Woodsy Autumn Stamps
Shop at:
Sunny Studio
Woodsy Autumn Dies
Woodsy Autumn Dies
Shop at:
Sunny Studio
Sealiously Sweet Stamps
Shop at:
Sunny Studio
Slimline Scalloped Frame
Shop at:
Sunny Studio

Saturday, July 17, 2021

Guest Designer Spotlight: Cards with Wanda Guess

Hi everyone! Wanda Guess here! I'm always happy and excited to be the guest designer on the Sunny Studio Blog! I'm so delighted to work with the beautiful and fun stamps and dies from Sunny Studio! Happy Summer! When I saw this new release I immediately loved everything - but in particular the Tiki Time set! My husband and I love to visit our local Tiki Bar here in Sacramento, California! I knew I had to make a card with a Tiki theme! And a giant cupcake?? And Hamsters?? It's all fantastic. I love this latest release. I had so much fun creating three cards to share with you today. Lots of color and lots of fun! Please visit me on my blog sometime! You can find me over at A Blog Called Wanda, and on Instagram. Let's get started with some cards. 

Sunny Studio Stamps: Tiki Time Tropical Scenes Card by Wanda Guessv

First up is a tropical oasis Tiki Bar out in the jungle! This is a big square card that measures 5.25" x 5.25" made from white cardstock. I layered pretty Sunny Studio patterned paper and then ink blended the top layer with Distress Inks. I think I used 5-6 stamp sets to make this one. I love that about Sunny Studio - all the stamp sets work together so nicely. 

Sunny Studio Stamps: Tiki Time Tropical Scenes Card by Wanda Guess

I featured the Tiki Time stamp set and then added elements like the flamingo and that little crab and some palm trees from other sets. I used the Tropical Scenes stamp set for the top piece. I stamped and die cut out all the pieces first and designed my card layout. Then I colored everything with Copic Markers and added bits of white gel pen accents and a little bit of glitter! I die cut a kraft hillside/ground and ink blended it to look like sand.

Sunny Studio Stamps: Tiki Time Tropical Scenes Card by Wanda Guess

All the elements are attached to the card with foam tape. What a fun card to make! I wish I was inside this card right now having a cocktail with those cute critters! (Our local Tiki Bar is called The Jungle Bird, so that is what inspired me!)

Sunny Studio Stamps: Cupcake Shape Die Frilly Frame Dies Card by Wanda Guess

Next up is a big giant cupcake birthday card. This card base is A2 size made from white cardstock. I layered patterned papers in pink polka dots and used the Frilly Frames Stripes die set to make the pretty layer. I used the Cupcake Shape Die and made the bottom from Kraft cardstock. 

Sunny Studio Stamps: Cupcake Shape Die Frilly Frame Dies Card by Wanda Guess

The cupcake part and the frosting were die cut from white cardstock. I colored the frosting and the wrapper with Copic Markers in pink and brown. I die cut the cherry from gingham paper and used the candle flame as a leaf for the cherry. The sentiment is from the Two Scoops stamp set and I layered it with some scalloped circles.

Sunny Studio Stamps: Cupcake Shape Die Frilly Frame Dies Card by Wanda Guess

Finally I added little hearts and sprinkles with Doodlebug accents. I also splashed on some white paint because I really like that look. It's hard to see in the photo, but I also splashed on some silver paint and white shimmer paint. This would be a great birthday card for someone of any age!

Sunny Studio Stamps: Happy Hamsters Card by Wanda Guess

Lastly today is a fun, clean and simple designed card made with those Happy Hamsters! What an adorable stamp set! This finished card is slightly smaller than A2 because those images are small. I like the scale of a slightly smaller card base for that reason. 

Sunny Studio Stamps: Happy Hamsters Card by Wanda Guess

I stamped and die cut out the hamsters and their wheel. Then I colored everything with Copics. I layered those pretty stripes in teal and then matched my Copic coloring to the Striped Silly patterned paper color. Everything is attached to the card with foam tape. 

Sunny Studio Stamps: Happy Hamsters Card by Wanda Guess

I wrapped a bit of brown twine across the top to just add a little texture. I wheelie love them! Don't you?! Did you have a pet hamster as a kid? I did - and this brought me back to those happy memories.

Big thanks to Mendi for having me as a guest! I'm very blessed that she always invites me back! Take care and happy crafting!

Sunny Studio Supplies Used:
 

Two Scoop Stamps
Two Scoop Stamps
Shop at:
Sunny Studio
Happy Hamsters Stamps
Shop at:
Sunny Studio
Happy Hamsters Dies
Happy Hamsters Dies
Shop at:
Sunny Studio
Tiki Time Stamps
Tiki Time Stamps
Shop at:
Sunny Studio
Tiki Time Dies
Tiki Time Dies
Shop at:
Sunny Studio
Cupcake Shape Dies
Cupcake Shape Dies
Shop at:
Sunny Studio
Frilly Frames Stripes Die
Shop at:
Sunny Studio
Tropical Scenes Stamps
Shop at:
Sunny Studio
Tropical Scenes Dies
Shop at:
Sunny Studio

Monday, July 5, 2021

Cupcake Shape Die Cards by Mayra and Ashley

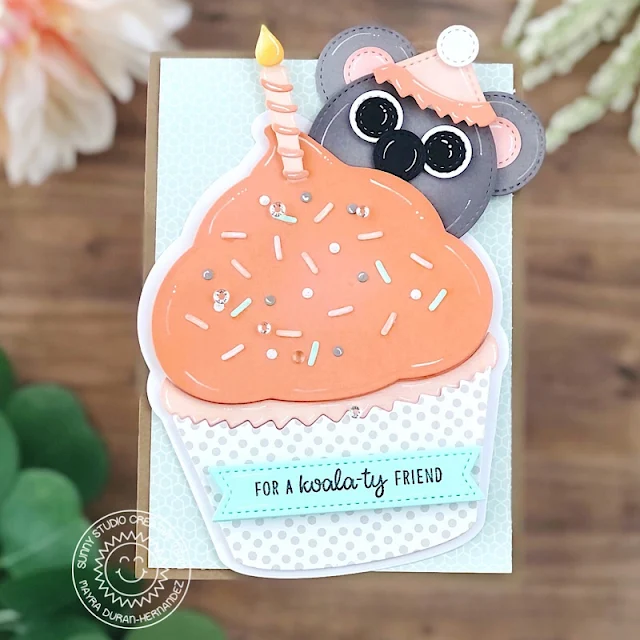
Hello everyone!! Happy July! Mayra here with you today. I am so happy to share this super sweet and fun card using the awesome Cupcake Shape dies

Sunny Studio Stamps: Cupcake Shaped Dies Stitched Circle Dies Stitched Rectangle Dies Birthday Card by Mayra Duran-Hernandez

I started by die cutting all of the layers to create the cupcake. I also created a die cut koala using the Stitched Circle Large dies and the Stitched Circle Small dies. I used different sized circles to create the face, ears, eyes and nose. I used the smallest of the rectangles from the Stitched Rectangles die set to create the birthday hat, along with the edge of one of the layers from the Cupcake Shape dies to create the trim. 

Sunny Studio Stamps: Cupcake Shaped Dies Stitched Circle Dies Stitched Rectangle Dies Birthday Card by Mayra Duran-Hernandez

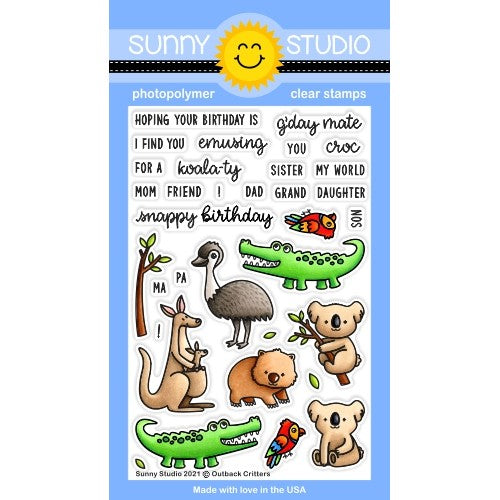
I then added a bit of color to each of the layers using ink in similar tones to the cardstock that I used. Next, I stamped the sentiment from the Outback Critters stamp set onto one of the die cut banners from the Stitched Rectangles die set. 

I hope you enjoy this fun koala-themed birthday card. Thank you so much for taking the time to stop by. I hope you each have a wonderful and super blessed day. 

-----------------------------------------------

Hi friends! It's Ashley today with a fun shaped shaker card featuring the new Cupcake Die set! I don't usually make shaped cards, but this die is so cute and so easy to paper piece together!

Sunny Studio Stamps: Cupcake Shaped Dies Stitched Rectangle Dies Birthday Card by Ashley Ebben

I started by cutting the Cupcake Die pieces from white cardstock. I used the big outside edge of the cupcake to make a base for my shaker and also to make a shaped card base. I colored the frosting piece a nice light pink with some dye inks, then added a few shadows with Copic markers for more detail. I added that to the shaker base, then surrounded it with foam tape. I used a mix of Girly Sprinkles and Rainbow Dot Confetti inside the shaker piece, then covered it with some acetate and the thin white cupcake frame.

Sunny Studio Stamps: Cupcake Shaped Dies Stitched Rectangle Dies Birthday Card by Ashley Ebben

I colored the cake piece of the cupcake with Antique Linen Distress Oxide and added it to the card. For the wrapper, I used a piece of paper from the Spring Fling paper pack in a fun rainbow pattern. I stamped a sentiment from Blissful Baking in VersaMark ink on black cardstock and embossed with white. I used the banner die from Fancy Frames Rectangles to cut it out, then glued it to the front of my card at a slight angle to look like a tag. I cut the stitched heart from Cupcake Die out of a different piece of patterned paper from Spring Fling and added it to the card with foam tape. I finished with a sweet little bow that I made from some pink and white twine.

Thank you so much for stopping by! Have a wonderful day!

Sunny Studio Supplies Used:

Blissful Baking Stamps
Shop at:
Sunny Studio
Outback Critters Stamps
Shop at:
Sunny Studio
Cupcake Shape Dies
Cupcake Shape Dies
Shop at:
Sunny Studio
Stitched Rectangle Dies
Shop at:
Sunny Studio
Fancy Frames- Rectangles
Shop at:
Sunny Studio
Spring Fling Paper
Spring Fling Paper
Shop at:
Sunny Studio
Stitched Circle Small Dies
Shop at:
Sunny Studio
Stitched Circle Large Dies
Shop at:
Sunny Studio

Saturday, July 3, 2021

Cupcake Shape & Gift Card Pocket Dies Project with Leanne

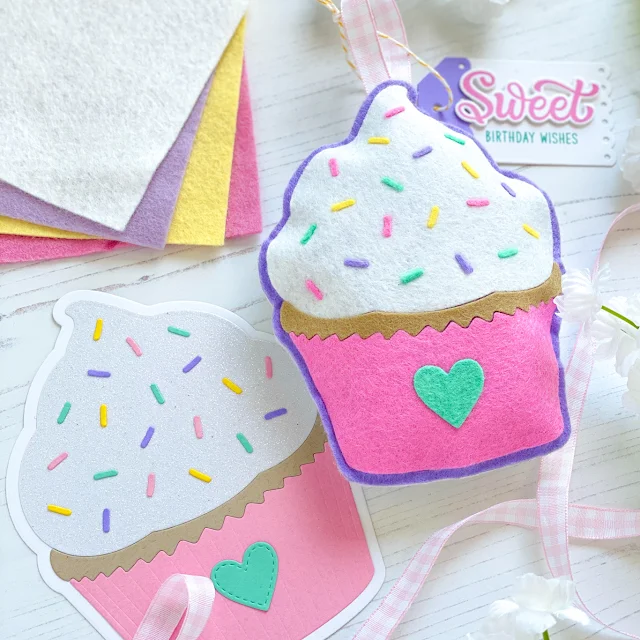
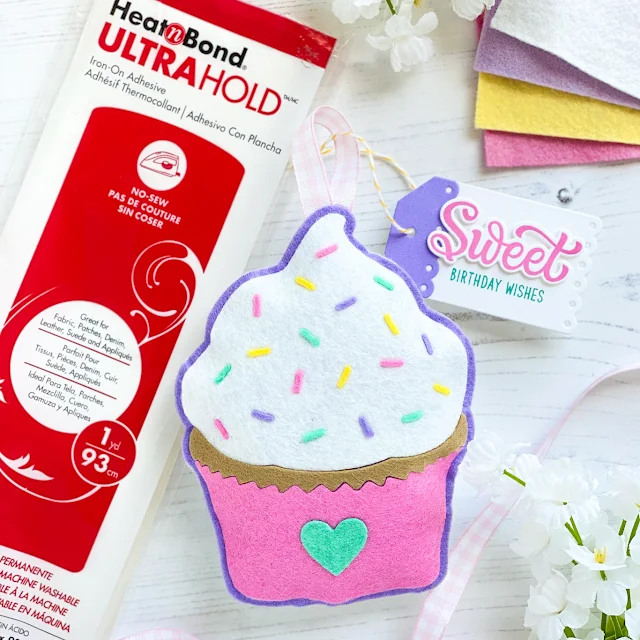
Hello crafty friends, Leanne here! I have a super fun project to share with you all today. It's a no sew cupcake plushie that doubles as a gift card holder. I have used the Cupcake Shapes dies to create this cute cupcake plushie. I have always found that any metal die that can cut card stock, can cut felt. Any kind of felt will work for this project. This project is also an excellent opportunity to use up any felt scraps you might have.

Sunny Studio Stamps: Cupcake Shape Dies Gift Card Pocket Dies Build-A-Tag Dies Candy Shoppe Felt Cupcake Plushie by Leanne West

Besides felt, you'll also need some type of adhesive.  I used an iron on adhesive called Heat'n'Bond. It's as simple to use as it sounds. Heat'n'Bond is a double sided adhesive. To start, simply iron on the adhesive to the back side of the felt.  After applying the Heat'n'Bond to the back of all my felt scraps, I then started die cutting the cupcake pieces. The metal dies easily cut through the felt even with the adhesive on the the back. It's important to note, you won't need to apply the Heat'n'Bond to the back side of the large solid cupcake shapes (you'll need a front and a back). These pieces will just require adhesive around the outer edge when it's time to stuff the cupcake.  

Sunny Studio Stamps: Cupcake Shape Dies Gift Card Pocket Dies Build-A-Tag Dies Candy Shoppe Felt Cupcake Plushie by Leanne West

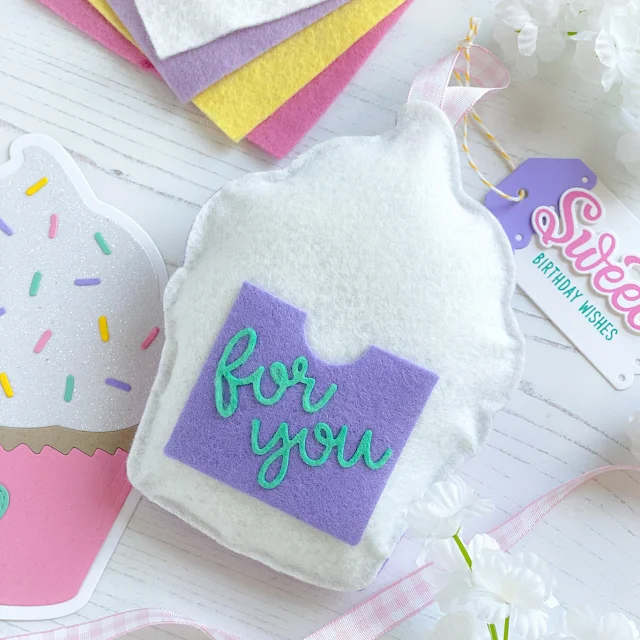
To assemble, I placed all the parts of the cupcake (frosting, sprinkles, cake, wrapper, and heart) onto one of the solid cupcake shapes. Since all the separate cupcake pieces had Heat'n'Bond on the back, I simply ironed them in place. There's one last step before stuffing the cupcake if you want to make this into a gift card holder. You can add a pocket to the back piece. I used the Gift Card Pocket Die to create a felt pocket. Again I used the Heat'n'Bond. I used the iron on adhesive to apply the words "for you" onto the pocket. Then I just used little strips of Heat'n'Bond to adhere the pocket flaps down onto the back cupcake piece. As long as you keep the center free of adhesive, you'll have a functional little pocket to slide a gift card into.  

Sunny Studio Stamps: Cupcake Shape Dies Gift Card Pocket Dies Build-A-Tag Dies Candy Shoppe Felt Cupcake Plushie by Leanne West

Once I had the front and back pieces complete, I adhered the edges together and stuffed with poly fiber fill. I used my hot glue gun to apply a thin line of adhesive all along the outer edges.  At the top of the cupcake, I added a ribbon hanger while gluing. I left a small opening at the bottom to add the stuffing. After stuffing, I glued the opening shut. To customize the cupcake for any occasion, you can add a paper tag. I made a birthday tag to add to mine. I used Build-a-Tag 2 dies to make a cute little scalloped edge tag. The sentimenFelt stamps come from the Candy Shoppe stamp set.  

I hope this project gives you lots of inspiration for making your own felt plushies using the Cupcake Shapes dies. As you can see from the photos, the felt plushie is much more dimensional than the card stock version. It will definitely add some extra sweetness to the recipient's special day.  

Sunny Studio Supplies Used:

Candy Shoppe Stamps
Candy Shoppe Stamps
Shop at:
Sunny Studio
Cupcake Shape Dies
Cupcake Shape Dies
Shop at:
Sunny Studio
Gift Card Pocket
Gift Card Pocket
Shop at:
Sunny Studio
Build-A-Tag #2 Dies
Build-A-Tag #2 Dies
Shop at:
Sunny Studio

Wednesday, June 23, 2021

Gift Card Pocket Focused Cards with Julia and Franci

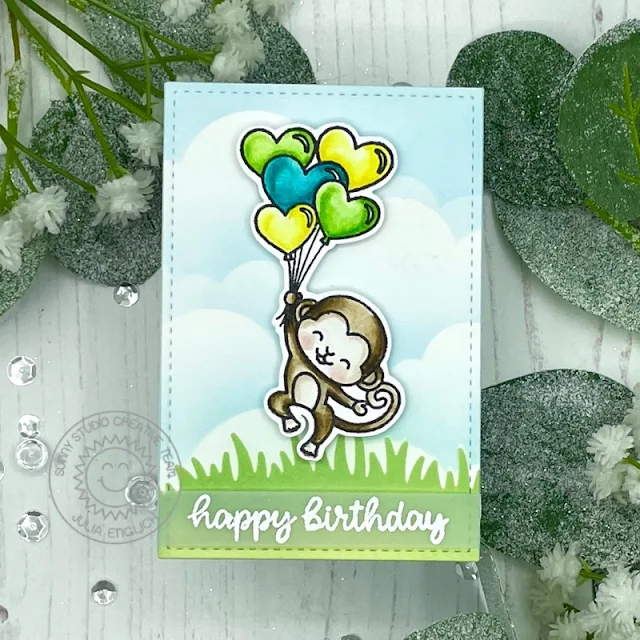
Hey crafty friends! It’s Julia here with super fun mini birthday card!

Sunny Studio Stamps: Gift Card Pocket Dies Love Monkey Inside Greetings Birthday Card by Julia Englich

I wanted to create a tiny card that would perfectly fit a gift card, so this is what I came up with! I stamped out the image from Love Monkey onto Strathmore Bristol smooth paper and colored it in using Zig Clean Color Real Brush Markers. Then, I die cut the smallest of the Stitched Rectangle dies and I ink blended the background using a grass and cloud stencil and Distress Oxide Inks. I heat embossed the sentiment from Inside Greetings Birthday in white onto vellum and layered it over the grass.

Inks used: Tumbled Glass, Bundles Sage, Shabby Shutters, Mowed Lawn. Zig Markers used:  999, 74, 68, 64, 66; 28; 45, 41; 33, 42; 50, 51, 55.

Sunny Studio Stamps: Gift Card Pocket Dies Love Monkey Inside Greetings Birthday Card by Julia Englich


To create the card base for my mini card, I cut a strip of light blue cardstock to 2 1/2 x 7 1/2" and I scored it at 3 3/4". I added the background to my little card base and then attached the 
Gift Card Pocket to the inside. 

Sunny Studio Stamps: Gift Card Pocket Dies Love Monkey Inside Greetings Birthday Card by Julia Englich


I also die cut the word dies that come with the Gift Card Pocket die set out of teal cardstock and added the words "for you" to the front of the pocket. To finish off my mini card, I added some sparkly Aquamarine Jewels to the gift card pocket!

Thank you so much for stopping by today! Have a wonderful week!

---------------------------------------------

Happy Wednesday crafty friends! It's Franci here with you today, with a cute new yummy project.

Sunny Studio Stamps: Gift Card Pocket Dies, Cupcake Shape & Slice Of Summer Birthday Card by Franci Vignoli

First of all I die cut all the cupcake elements out of colored cardstocks and patterned papers from these sets: Classic GinghamSummer Splash and Dots & Stripes. I also cut out the lemon using the Slice of Summer coordinated dies and glued my cupcake together with liquid glue.

Sunny Studio Stamps: Gift Card Pocket Dies, Cupcake Shape & Slice Of Summer Birthday Card by Franci Vignoli

Then I die cut all the elements from the new Gift Card Pocket die set, glued the sentiment on the front and the little pocket on the back - turning this cute cupcake into a little gift tag! 

Thanks a lot for stopping by today and have a lovely day! 

Sunny Studio Supplies Used:

Gift Card Pocket
Gift Card Pocket
Shop at:
Sunny Studio
Stitched Rectangle Dies
Shop at:
Sunny Studio
Classic Gingham 6x6 Paper
Shop at:
Sunny Studio
Dots & Stripes Jewel Tones 6x6 Paper
Shop at:
Sunny Studio
Love Monkey Stamps
Love Monkey Stamps
Shop at:
Sunny Studio
Love Monkey Dies
Love Monkey Dies
Shop at:
Sunny Studio
Slice of Summer Dies
Shop at:
Sunny Studio
Summer Splash 6x6 Paper
Shop at:
Sunny Studio
Inside Greetings Birthday
Shop at:
Sunny Studio