Saturday, April 9, 2022

Guest Designer Spotlight: Cards with Linda van Wely

Hi everyone! Linda here today from Stampin with Liz Design! I'm so excited to be a guest designer at Sunny Studio Stamps!

Sunny Studio Stamps: Passionate Penguins Card by Linda van Wely

For my first project I am sharing an adorable card with you all today that I created with the amazing Passionate Penguins stamp set!

I started this card with a white card base in A2 size on which I added a front panel. I used a scalloped stitched die for my panel and then blended a fun background on this piece. I used different colours of Ranger Distress Oxide ink and a cloud stencil to blend with.

Sunny Studio Stamps: Passionate Penguins Card by Linda van Wely

I then added loads of splatters to my background, which I love doing! It makes a background so much more fun! I then stamped, die-cut and coloured the super cute penguins from the stamp set. Aren't they adorable driving their car?

Sunny Studio Stamps: Sea You Soon Card by Linda van Wely

For my next card I created this fun underwater scene with the amazing Sea You Soon stamp set!

I started this card with a white card base in A2 size and then added a front panel, which I die-cut with a Wonky Stitched die. I then blended a fun background on this piece, using different colours of Ranger Distress Oxide ink. I created a mask, using the amazing Bursting Hearts die!

Sunny Studio Stamps: Sea You Soon Card by Linda van Wely

After blending my background, I added some white splatters to make it a bit more fun. I added the fun sentiment 'Sea you soon' at the bottom of the ocean and then added the fun underwater critters from the Sea You Soon stamp set!

Thank you so much for watching today!

Sunny Studio Supplies Used:

Sea You Soon Stamps
Sea You Soon Stamps
Shop at:
Sunny Studio
Sea You Soon Dies
Sea You Soon Dies
Shop at:
Sunny Studio
Bursting Heart Die
Bursting Heart Die
Shop at:
Sunny Studio
Passionate Penguins Stamps
Shop at:
Sunny Studio
Passionate Penguins Dies
Shop at:
Sunny Studio

Friday, April 8, 2022

Little Birdie Cards with Vanessa and Audrey

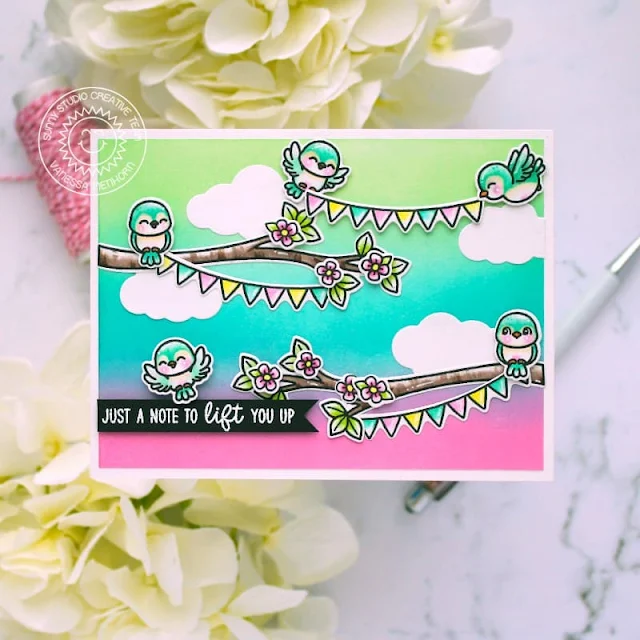
Hello to you! Vanessa here with a cute card to lift up your spirits using Little Birdie.

Sunny Studio Stamps: Little Birdie Card by Vanessa Menhorn (featuring Balloon Rides, Chickie Baby)

I first inked a panel of white cardstock with Kitsch Flamingo, Peacock Feathers and Cracked Pistachio Distress Oxide inks and adhered it to the white card base. Now I stamped all my images, colored the pieces with Copics, die-cut everything with the matching dies and adhered the elements to the card, raising some with foam tape. 

For this card, the following sets were used:
Little Birdie stamps + dies
Balloon Rides stamps + dies
Chickie Baby stamps + dies

Sunny Studio Stamps: Little Birdie Card by Vanessa Menhorn (featuring Balloon Rides, Chickie Baby)

Finally, I stamped the sentiment onto a strip of black cardstock, heat-embossed it with white embossing powder, trimmed it and adhered the strip to the card.

Sending out happiness to your part of the world! Have a lovely weekend!

-----------------------------------------

Hello friends! Audrey here with a sweet card using the adorable Little Birdie stamp set! 

Sunny Studio Stamps: Little Birdie Card by Audrey Tokach

To create this card, I started off by watercoloring a piece of watercolor paper cut to 4" x 5.25" with Broken China Distress ink. I added several layers of color, drying each layer with a heat tool before adding the next. I concentrated the color to the top left of the panel knowing that I wanted to keep my scene in that space. I stamped and colored several images from the Little Birdie stamp set, and diecut them with the coordinating Little Birdie dies

Sunny Studio Stamps: Little Birdie Card by Audrey Tokach

Then, I stamped a sentiment from the set on a diecut banner and popped everything up with foam tape. The panel was popped up on an A2 card base. To finish off this card, I added a few tiny clay hearts and some white gel pen accents.

Sunny Studio Supplies Used:

Chickie Baby Stamps
Chickie Baby Stamps
Shop at:
Sunny Studio
Chickie Baby Dies
Chickie Baby Dies
Shop at:
Sunny Studio
Balloon Rides Stamps
Shop at:
Sunny Studio
Balloon Rides Dies
Balloon Rides Dies
Shop at:
Sunny Studio
Little Birdie Stamps
Shop at:
Sunny Studio
Little Birdie Dies
Little Birdie Dies
Shop at:
Sunny Studio

Thursday, April 7, 2022

Out on a Limb Cards with Anja and Marine

Hi everyone, Anja here and today I'm featuring the Out on a Limb Dies which go perfectly with the Cherry Blossoms layering stamp set.

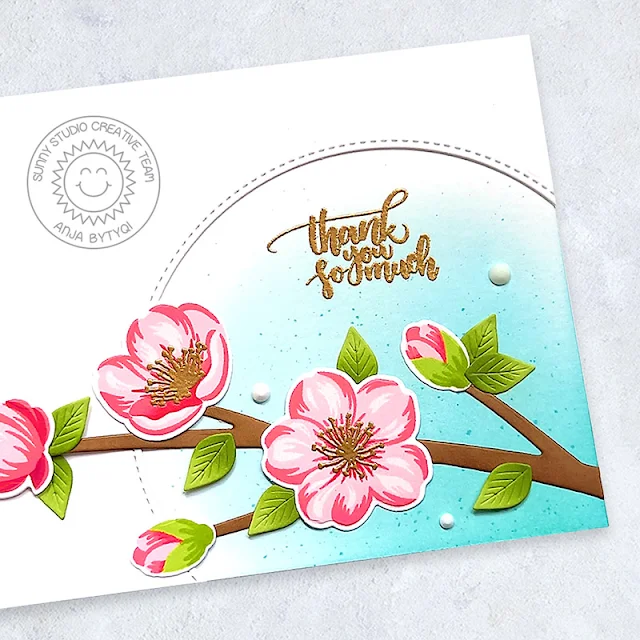
Sunny Studio Stamps: Out on a Limb Card by Anja Bytyqi (featuring Cherry Blossoms)

First, I cut and scored a white A2 landscape card base. From the right bottom corner, I started blending the Distress Oxide Inks Salvaged Patina and Tumbled Glass in circular motions. I let it fade into white and added small ink splatters with a paint brush.

I cut out a window opening from another A2 white cardstock panel using the largest of the Stitched Semi-Circle Dies. The sentiment was stamped in VersaMark Ink and heat embossed with Gold embossing powder.

Sunny Studio Stamps: Out on a Limb Card by Anja Bytyqi (featuring Cherry Blossoms)

Next, I die cut the tree branch and leaves from brown and green cardstock. I added a little shading with a darker tone of ink. The cherry blossoms were stamped with dye inks and I heat embossed the pistils in Gold. I used the coordinating dies to cut everything out.

I adhered the branch, leaves and blossoms to the card and finished it off with three white Pure White Jewels.

Thank you so much for stopping by! Have a wonderful day!

---------------------------------------------

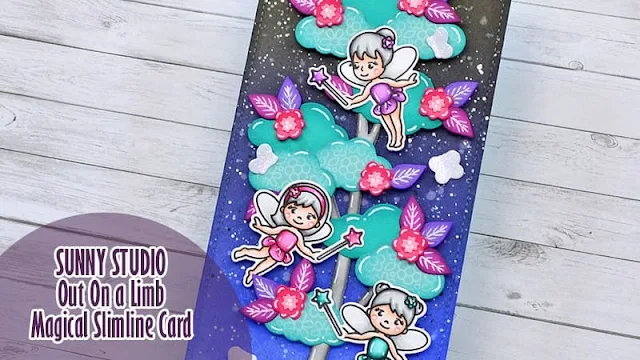
Hey crafty friends, Marine here, I'm back with a magical slimline card featuring an enchanted tree I created using Out on a Limb. I also brought more magic to my card by adding three cute fairies from Garden Fairy, and I started off by stamping those images using an alcohol marker friendly black ink and coloring them using my alcohol markers. I cut them all using the coordinating dies, and moved on to the background.
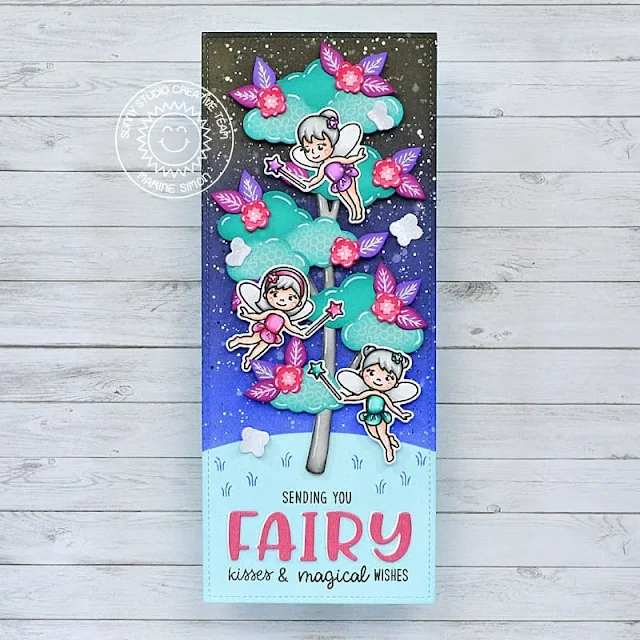
Sunny Studio Stamps: Out on a Limb Card by Marine Simon (featuring Garden Fairy, Chloe Alphabet Dies)

I cut an 8,5 x 3,5" bristol panel, taped a hill stencil at the bottom and created a night sky using blueprint sketch, chipped sapphire and black soot oxide inks. I applied the colors from the lightest at the bottom to the darkest towards the top of the panel, and as always I went back and forth with my blending tools to get a nice blending. Next I added a whole lot of texture and details to make this night sky all shiny with many stars. And to finish my background, I added tumbled glass oxide ink on the bottom part.

Sunny Studio Stamps: Out on a Limb Card by Marine Simon (featuring Garden Fairy, Chloe Alphabet Dies)

Next I created the enchanted tree. I cut all the pieces out of different colored cardstock, and added shadows to each element using distress inks.

To sum up, the tree trunk + leaves are from Out On A Limb, I used clouds coordinating dies from Balloons Rides to make the foliage, butterflies coordinating dies from Bunnyville, and created flowers using dies from Pristine Poinsettia + Botanical Backdrop. Once all the pieces were done, I assembled the tree on my night sky panel using liquid glue and foam squares.

Sunny Studio Stamps: Out on a Limb Card by Marine Simon (featuring Garden Fairy, Chloe Alphabet Dies)

I like to create custom sentiments, so I did it again on today's card. I created the word "Fairy" using the Chloe Alphabet die set, and picked some words from different sets to build my phrase: "Sending You" + "Wishes" from Happy Harvest, "Kisses" + "&" from Harvest Mice, and "Magical" from Garden Fairy. I stamped the words and attached the letters at the bottom of my card to read "Sending you fairy kisses & magical wishes", and then I stuck the fairies and wands.

Sunny Studio Stamps: Out on a Limb Card by Marine Simon (featuring Garden Fairy, Chloe Alphabet Dies)

At the end I stamped a few grass sprigs from Harvest Mice on the bottom part using blueprint sketch oxide ink, I added white details and highlights on the images and die cuts, and finally added some clear glitter on the fairies wings. And that's it, I hope that you like this magical scene with this enchanted tall tree and cute fairies. As always, you are more than welcome to check the process video if you need more details and information - just click on the image above. Thanks for stopping by, and see you next time! 

Sunny Studio Supplies Used:

Chloe Alphabet Dies
Chloe Alphabet Dies
Shop at:
Sunny Studio
Happy Harvest Stamps
Shop at:
Sunny Studio
Botanical Backdrop Die
Shop at:
Sunny Studio
Stitched Semi-Circle Dies
Shop at:
Sunny Studio
Harvest Mice Stamps
Harvest Mice Stamps
Shop at:
Sunny Studio
Balloon Rides Dies
Balloon Rides Dies
Shop at:
Sunny Studio
Garden Fairy Stamps
Garden Fairy Stamps
Shop at:
Sunny Studio
Garden Fairy Dies
Garden Fairy Dies
Shop at:
Sunny Studio
Pristine Poinsettia Dies
Shop at:
Sunny Studio
Bunnyville Dies
Bunnyville Dies
Shop at:
Sunny Studio
Cherry Blossoms Stamps
Shop at:
Sunny Studio
Cherry Blossoms Dies
Shop at:
Sunny Studio
Out on A Limb Dies
Out on A Limb Dies
Shop at:
Sunny Studio

Wednesday, April 6, 2022

Charming City Cards with Franci and Gladys

Happy Wednesday everyone! It's Franci here, sharing a colorfull rainbow card showcasing the Charming City set by Sunny Studio.

Sunny Studio Stamps: Charming City Card by Franci Vignoli

First I stamped all the houses with colorfull inks onto some white cardstock, then die cut them all out with their coordinated dies and ink blended them up with the same colors used before.

I created my cardbase out of white cardstock and glued my houses onto the front to create this fun rainbow stack. 

Sunny Studio Stamps: Charming City Card by Franci Vignoli

Then I stamped my sentiment onto a tiny white rectangle and added that at the bottom. Finally I added a few little hearts I previously die cut from red cardstock and this card is finished!

I'm so happy about how it turned out and I hope you like it too, thanks a lot for stopping by today!

----------------------------------------------

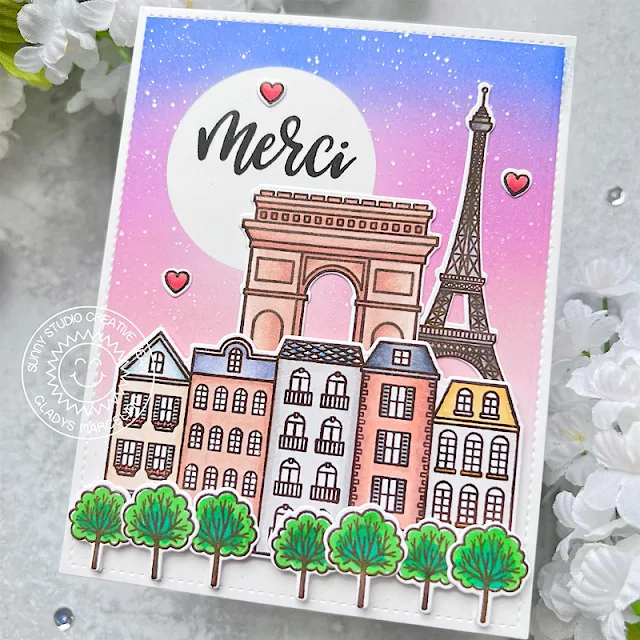
Hello friends! Gladys here with another Paris themed card using the Charming City stamp set. 

Sunny Studio Stamps: Charming City Card by Gladys Marcelino (featuring Paris Afternoon)

First I stamped and colored some images from Charming City and Paris Afternoon onto 110lb cardstock. These sets are great to have because you can use them with other sets in your stash to build scenes. My fellow design team have also used them in clean and simple designs and looks amazing! And of course who doesn't love Paris!! Once I was done coloring I used the coordinating dies to cut them out.

Next I cut an A2 size panel from Bristol smooth cardstock. I used a circle die to cut a mask for the moon. Then I ink blended the background using distress oxide inks in blueprint sketch, picked raspberry and saltwater taffy. For interest I used Gansai Tambi starry colors to splatter some stars onto the panel.

Sunny Studio Stamps: Charming City Card by Gladys Marcelino (featuring Paris Afternoon)

Once the panel was dry I used liquid glue to adhere the Eiffel tower and Arch de Triomphe images. Then I foam mounted the rows of buildings and trees in the forground. For the sentiment I stamped it in the moon and a scatter of tiny hearts to complete the scene.

I hope you enjoy my card today. Thanks for joining me and have a great day!

Sunny Studio Supplies Used:

Charming City Stamps
Shop at:
Sunny Studio
Charming City Dies
Charming City Dies
Shop at:
Sunny Studio
Paris Afternoon Stamps
Shop at:
Sunny Studio
Paris Afternoon Dies
Shop at:
Sunny Studio

Tuesday, April 5, 2022

Bunnyville Cards with Isha and Kavya

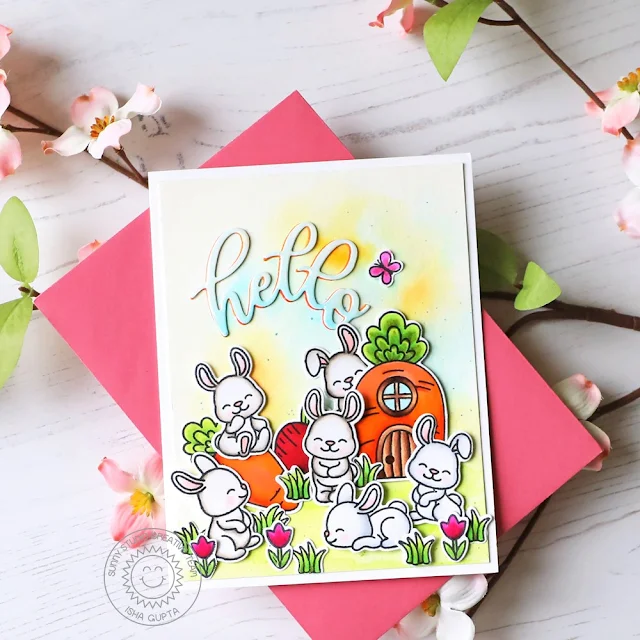
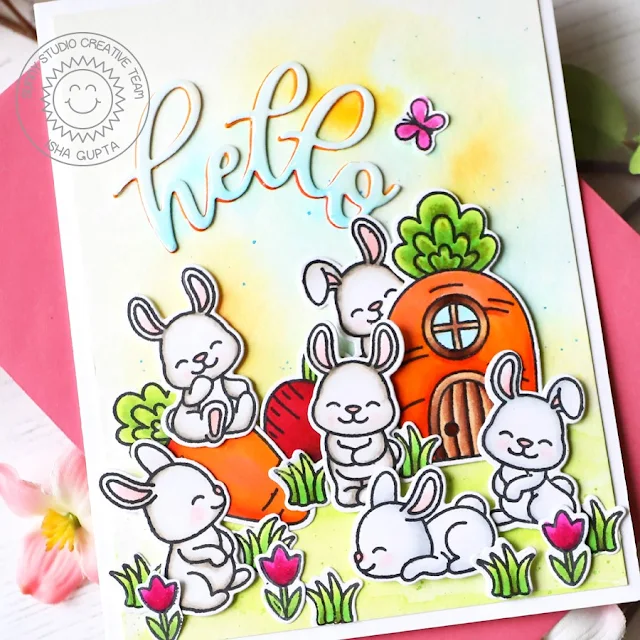
Hello everyone, Isha here today sharing a fun and playful spring theme HELLO card featuring our new Bunnyville stamps and dies. I really like how happy and playful these bunnies are and they give me a huge smile :)

Sunny Studio Stamps: Bunnyville Card by Isha Gupta (featuring Slimline Dies)

To start, I created the background using watercolors. Next, stamp images from the Bunnyville stamp, colour them using copic markers and die-cut using the coordinating dies.

Sunny Studio Stamps: Bunnyville Card by Isha Gupta (featuring Slimline Dies)

Adhere the images to the mat layer to create a fun scene. Next, I die-cut the word HELLO twice from the white card using the Slimline Scalloped Frame die. Colour one with copics in blue ombre and second in orange ombre. Adhere the orange behind the blue in slight off-set. Adhere to the card. To finish, add Nuvo crystal glaze to the word.

Thank you for dropping by. Have a nice day!

------------------------------------------------

Hi folks, Kavya here. I am back on the blog with another fun project. With Easter around the corner, I thought I’d create a card by combining a bunch of older and newer releases.

Sunny Studio Stamps: Bunnyville Card by Kavya (featuring Chubby Bunny, Chickie Baby, Little Birdie)

I first started off by stamping and coloring a bunch of images from BunnyvilleLittle BirdieChubby Bunny and Chicky Baby stamps. Then I created my background by ink blending Speckled Egg and Dusty Concord distress oxide inks and used green cardstock for the grass. 

Sunny Studio Stamps: Bunnyville Card by Kavya (featuring Chubby Bunny, Chickie Baby, Little Birdie)

Finally, I arranged all the elements on the background to finish my card! 

I hope this inspires you to pull out your older sets ;) Happy Crafting!

Sunny Studio Supplies Used: 

Chubby Bunny Stamps
Chubby Bunny Stamps
Shop at:
Sunny Studio
Chubby Bunny Dies
Chubby Bunny Dies
Shop at:
Sunny Studio
Chickie Baby Stamps
Chickie Baby Stamps
Shop at:
Sunny Studio
Chickie Baby Dies
Chickie Baby Dies
Shop at:
Sunny Studio
Slimline Scalloped Frame
Shop at:
Sunny Studio
Bunnyville Stamps
Bunnyville Stamps
Shop at:
Sunny Studio
Bunnyville Dies
Bunnyville Dies
Shop at:
Sunny Studio
Little Birdie Stamps
Shop at:
Sunny Studio
Little Birdie Dies
Little Birdie Dies
Shop at:
Sunny Studio