Wednesday, February 3, 2021

Garden Fairy Cards and Video Tutorial with Franci and Julia

Happy Wednesday everyone! It's Franci here with you, with a magical card featuring the new Garden Fairy set. I fell in love immediately with these super cute images, so adorable!

Sunny Studio Stamps: Garden Fairy Spring Shower Birthday Card by Franci Vignoli

First of all I stamped all my images, adding some clouds from the Spring Shower set, colored them with Copics and die cut them out. I went for a super soft look and I also added some details with a white gel pen.

Sunny Studio Stamps: Garden Fairy Spring Shower Birthday Card by Franci Vignoli

Then I created my card out of white cardstock, masked the front bottom and inked the top with the Worn Lipstick Distress ink oxide. I glued all my images down with a combo of liquid glue and foam adhesive and I also added some googly eyes to my little snail. Then I stamped my sentiment and added a few clear sequins here and there to finish my design.

I'm so in love with this clean and simple card!! Hope you like it too and thanks a lot for stopping by today!

----------------------------------------------

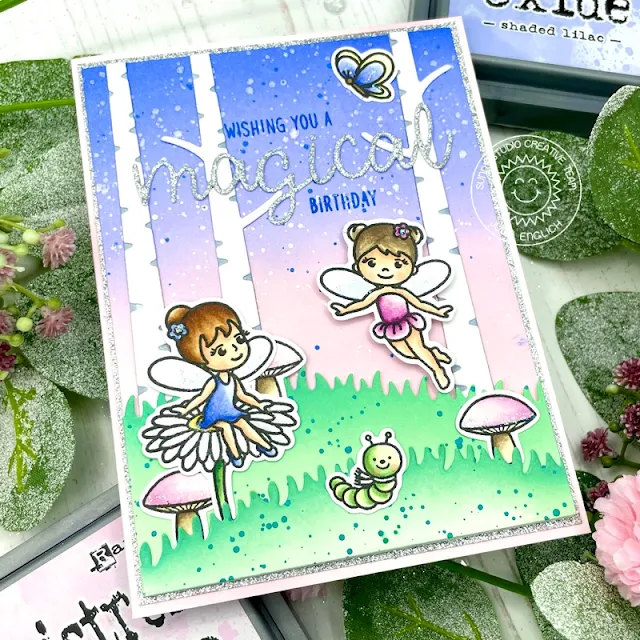
Hello crafty friends! I hope you are doing well! It’s Julia here - this time with a magical birthday card. I don't know about you, but I am always running low on birthday cards. So this year I am determined to make lots of them! I created this magical forest featuring the super adorable Garden Fairy stamp set! Those fairies really are just the cutest!

Sunny Studio Stamps: Garden Fairy Rustic Winter Dies Home Sweet Gnome Birthday Card by Julia Englich


To build my scene I also used the little mushrooms, the cute little caterpillar and birdie from Home Sweet Gnome stamp set, as well as the Slimline Nature Borders and Rustic Winter dies!

Sunny Studio Stamps: Garden Fairy Rustic Winter Dies Home Sweet Gnome Birthday Card by Julia Englich

For my sentiment I used the Santa Clause Lane and Garden Fairy stamp sets and also my new favorite alphabet dies: the Loopy Letters!

If you would like to see how this card came together, you can watch the video below - or on my YouTube channel, Craft Room Adventures.


Inks used: background: Spun Sugar, Shaded Lilac and Blueprint Sketch Distress Oxide. Grass: Cracked Pistachio and Pine Needles Distress Oxide. Copic Markers used: Y000, Y00, Y11; E000, E00, E11, R20; E30, E31, E33, E35; E40, E41, E43, E44; G20, G21, G24, G28; C0, C2; BG0000, BG10, BG11; B60, B63, B66; RV0000, RV000, RV63, RV66.

Thank you so much for spending this time with me today! Have a wonderful week!

Sunny Studio Supplies Used:

Home Sweet Gnome Stamps
Shop at:
Sunny Studio
Home Sweet Gnome Dies
Shop at:
Sunny Studio
Loopy Letters Dies
Loopy Letters Dies
Shop at:
Sunny Studio
Rustic Winter Dies
Rustic Winter Dies
Shop at:
Sunny Studio
Santa Claus Lane Stamps
Shop at:
Sunny Studio
Spring Showers Stamps
Shop at:
Sunny Studio
Spring Showers Dies
Spring Showers Dies
Shop at:
Sunny Studio
Slimline Nature Borders
Shop at:
Sunny Studio
Garden Fairy Stamps
Garden Fairy Stamps
Shop at:
Sunny Studio
Garden Fairy Dies
Garden Fairy Dies
Shop at:
Sunny Studio

Tuesday, February 2, 2021

My Otter Half Cards with Isha and Kavya

Hello everyone, Isha with you. Today I am  featuring the My Otter Half stamp and dies. I love these two cute otter images with a lovely and happy smile :)

Sunny Studio Stamps: My Otter Half Country Scenes Slimline Dies Love Themed Otter Cards by Isha Gupta

I started by die-cutting a white panel using the wave die from the Slimline Nature Border dies. Sponge the panels using various distress inks. Next, die-cut the frame using the Fancy Frames Rectangle dies in white. Adhere the background panel behind the frame.

Stamp the otter image using the My Otter Half stamp set, color with Copic markers and die-cut using the coordinating diesStamp the rest of the images from the Country Scenes stamp set, color and die-cut using the coordinating dies.

Sunny Studio Stamps: My Otter Half Country Scenes Slimline Dies Love Themed Otter Cards by Isha Gupta

Die-cut the word Otter, apply Versamark ink, sprinkle with WOW! Razzleberry embossing glitter and heat emboss. Adhere the background to the card. Stamp the sentiment. 

Assemble all the images as per the card photo. To finish add some Nuvo clear drops.

---------------------------------------------

Hi folks, Kavya here. I am back on the blog today with another card using the new adorable My Otter Half stamp set. There are so many sweet sentiments that can be paired in many ways. I made this keeping my mom in mind! 

Sunny Studio Stamps: My Otter Half Country Scenes Slimline Dies Rustic Winter Dies Love Themed Otter Card by Kavya

I first started off by die cutting some ‘waves’ using dies from Slimline Nature Borders using white cardstock and ink blended them using shared of blue and mint. I then die cut some grass and ‘tree top’ using green card stock and ink blended the edges using matching green dye ink. For the tree branches, I used the Rustic Winter Die to cut using cream card stock. 

Sunny Studio Stamps: My Otter Half Country Scenes Slimline Dies Rustic Winter Dies Love Themed Otter Card by Kavya

Later, I ink blended the sky using shades of purple and pink ink. I placed all the die cuts as shown above in my card. I stamped the otters and various flora like cattails and water lily from My Otter Half and Country Scene stamps set. Finally, I die cut the ‘otter’ from purple cardstock and stamped the sentiments using purple ink. 

I hope you like this card! Be sure to check back tomorrow for more inspiration!

Sunny Studio Supplies Used:

Fancy Frames- Rectangles
Shop at:
Sunny Studio
Rustic Winter Dies
Rustic Winter Dies
Shop at:
Sunny Studio
Slimline Nature Borders
Shop at:
Sunny Studio
Country Scenes Stamps
Shop at:
Sunny Studio
Country Scenes Dies
Country Scenes Dies
Shop at:
Sunny Studio
My Otter Half Stamps
Shop at:
Sunny Studio
My Otter Half Dies
My Otter Half Dies
Shop at:
Sunny Studio

Monday, February 1, 2021

Stitched Circle Die Focused Cards with Ashley and Mayra

Hello friends! It's Ashley with a card using the new Stitched Circles dies! These dies are such a great staple and the large set plus the small set give you every size you could possibly need! I used the Stitched Circle Small dies today to make a wreath for some pretty Pink Peonies!

Sunny Studio Stamps: Stitched Circle Dies Pink Peonies Friendship Card by Ashley Ebben

I made the base of the wreath by using the two biggest Stitched Circle Small dies on kraft cardstock to make a circle frame. I added this to a piece of grey polka dot paper from the Subtle Grey Tones pack that I die cut with the frame from Frilly Frames Hexagon. I adhered the die cuts to a kraft card base and set aside.

Sunny Studio Stamps: Stitched Circle Dies Pink Peonies Friendship Card by Ashley Ebben

I stamped several flowers and leaves from Pink Peonies in Lawn Fawn Jet Black ink and colored with Copics. I cut them out with the matching dies, then arranged them on my wreath in one corner. In the opposite corner, I made a bow from some light brown twine. For my sentiment, I die cut the Hello Word die twice from white cardstock and once from kraft. I glued the layers together for a dimensional word and added it to the center of my wreath.

Thank you so much for stopping by! Have a wonderful day!

---------------------------------------------

Hello everyone, happy February!! Mayra here with you today. I have a Valentine card and tag set to share with you. 

Sunny Studio Stamps: Stitched Circle Dies Harvest Mice Scalloped Tag Dies Friendship Card by Mayra Duran-Hernandez

I began by coloring the adorable mice and cheese from the Harvest Mice, and the hearts from the Meow & Furever stamp sets. I used Copic markers to color the images in. For the mice, I used E40, E81, E41, E31, E55, and E35. For the pink areas, I used R22 and R00. For the cheese, Y11, Y08, Y19, YR24, and a bit of E35. 

Next, I used the brand new, really awesome Stitched Circle Small dies and the Stitched Circle Large dies to create the cheese effect for these Valentine's.  I used the smaller sized circles in the sets to die cut the holes onto the yellow cardstock panel. I then used Distress Oxide inks in the colors Scattered Straw and Mustard Seed to add colors to all of the die-cut circles and the card panel, and tag. To create the tag and the centerpiece circle for the card, I used the Scalloped Circle Mat 1  dies set. Next, I die cut the smaller of the Scalloped Tag Square dies and trimmed off a bit. Then, I adhered it to the back of the scalloped circle tag.

Sunny Studio Stamps: Stitched Circle Dies Harvest Mice Scalloped Tag Dies Friendship Card by Mayra Duran-Hernandez

I used the sentiments from the beautiful Inside Greetings Birthday stamp set. For the 'enjoy' sentiment, I used one of the speech bubbles from the Comic Strip Speech Bubbles dies set. 

I hope you enjoy the set I created to share with you today. Thank you so much for stopping by. I hope you each have a wonderful and blessed day. 

Sunny Studio Supplies Used:

Hello Word Die
Hello Word Die
Shop at:
Sunny Studio
Comic Strip Speech Bubble Dies
Shop at:
Sunny Studio
Frilly Frames Hexagon Dies
Shop at:
Sunny Studio
Subtle Grey Tones Paper
Shop at:
Sunny Studio
Scalloped Tags-Square
Shop at:
Sunny Studio
Pink Peonies Stamps
Pink Peonies Stamps
Shop at:
Sunny Studio
Pink Peonies Dies
Pink Peonies Dies
Shop at:
Sunny Studio
Harvest Mice Stamps
Harvest Mice Stamps
Shop at:
Sunny Studio
Harvest Mice Dies
Harvest Mice Dies
Shop at:
Sunny Studio
Inside Greetings Birthday
Shop at:
Sunny Studio
Meow & Furever Stamps
Shop at:
Sunny Studio
Meow & Furever Dies
Meow & Furever Dies
Shop at:
Sunny Studio
Scalloped Circle Mat 1 Dies
Shop at:
Sunny Studio
Stitched Circle Small Dies
Shop at:
Sunny Studio
Stitched Circle Large Dies
Shop at:
Sunny Studio

Sunday, January 31, 2021

Snail Mail Friendship Valentine's Day Card with Mendi

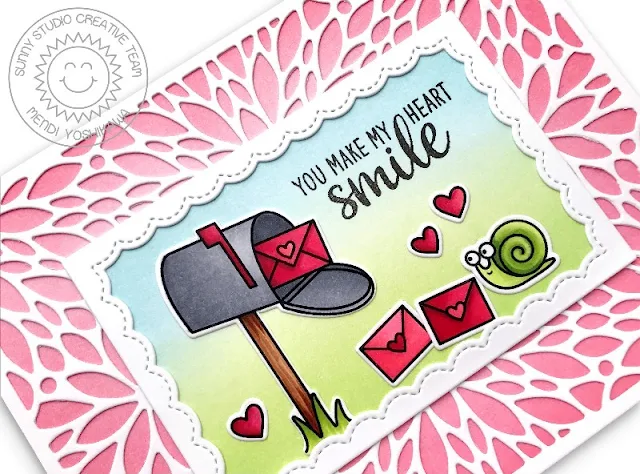
Hello there!  I hope you've been enjoying a wonderful weekend so far!  I just wanted to pop in with another card using our new Snail Mail Stamps and dies that would be perfect for sending a friend this Valentine's Day.

I had colored and cut out all these pieces to create this card prior to our sneak peek week, but in the frenzy of my cardmaking they were buried and lost under a large pile on my desk. When I was tidying things up a bit I came across them, along with some other pieces sitting on my desk and thought it would be fun to take a creative break from the rest of my "to do" list and create this little card.

Sunny Studio Stamps: Snail Mail You Make My Heart Smile Friendship Valentine's Day Card with Mendi

I paired the images from the Snail Mail set with our Blooming Frames Dies, inking behind it with some Worn Lipstick Distress ink using my Jumbo Dauber. I then colored a separate cardstock panel with some Tumbled Glass and Twisted Citron distress ink and topped it with our Fancy Frames Rectangle Dies which perfectly layer for this petal frame die-cut.

Sunny Studio Stamps: Snail Mail You Make My Heart Smile Friendship Valentine's Day Card with Mendi

Thank you so much for joining me today. I hope I've inspired you to look around your desk to see what scraps you have left to turn into a card and send to someone you love. It's a super fun challenge and I find it always gets my creative juices flowing.


Supplies Used:

Tsukineko Jumbo Dauber
Shop at:
Sunny Studio
Versafine Onyx Black Ink
Shop at:
Sunny Studio
Fancy Frames- Rectangles
Shop at:
Sunny Studio
Blooming Frame Die
Blooming Frame Die
Shop at:
Sunny Studio

Snail Mail Stamps
Snail Mail Stamps
Shop at:
Sunny Studio
Snail Mail Dies
Snail Mail Dies
Shop at:
Sunny Studio