Friday, March 22, 2019

Botanical Backdrop Cards with Lexa and Rachel

Hi everyone! Lexa here 
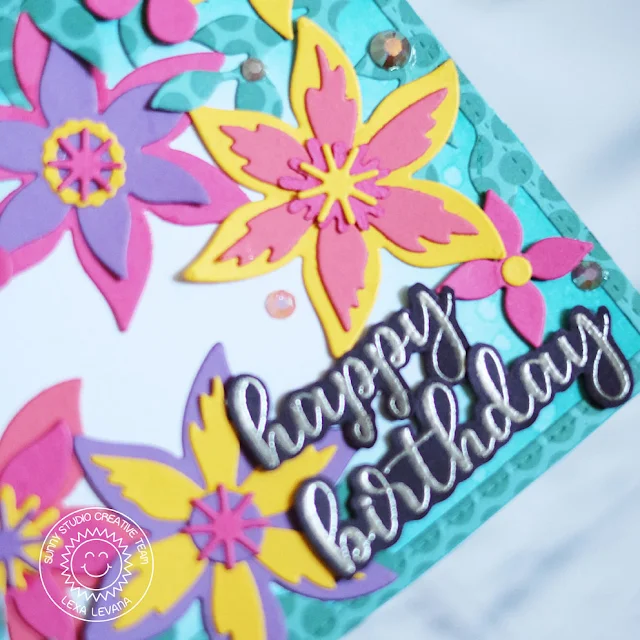
today with a birthday card highlighting Botanical Backdrop Dies. This set comes with leafy stitched frame and endless layered flowers to play with. Let's get started right away!

Sunny Studio Stamps: Botanical Backdrop Dies Everyday Greetings Happy Birthday Card by Lexa Levana

First, I blend Peacock Feather Distress Ink all around the edges. Then I die cut the leafy frame on a matching teal patterned paper from Polka-dot Parade Paper

Sunny Studio Stamps: Botanical Backdrop Dies Everyday Greetings Happy Birthday Card by Lexa Levana

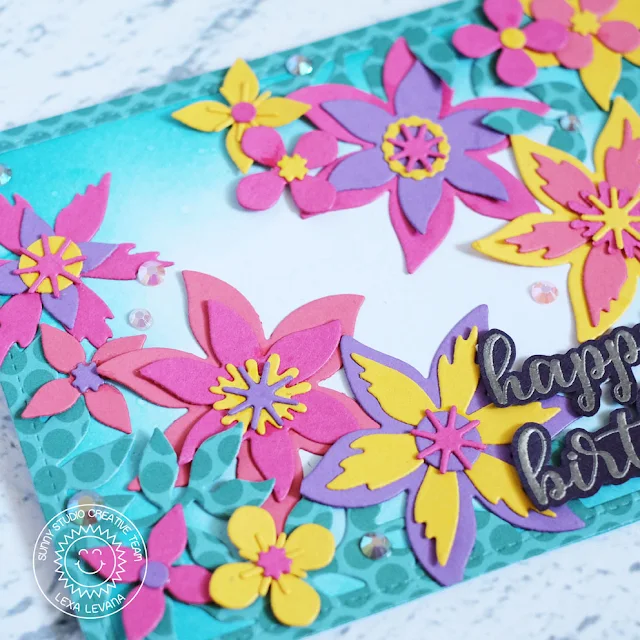
I decided to use four color combination for the flowers, which are pink, fuchsia, purple and yellow. Using the flower dies, I randomly die cut bunch of flowers and layer them together one by one. It was so much fun.

Sunny Studio Stamps: Botanical Backdrop Dies Everyday Greetings Happy Birthday Card by Lexa Levana

After I finished with the flowers, I arrange and adhere them on my card using glue and foam tapes for dimensions. I use "happy birthday" from my favorite Everyday Greetings Stamp for the sentiment, I silver embossed it on an eggplant color paper so it will pop up more. Last but not least, I add pink jewels from Pretty Pink Posh to add some sparkles.

Thank you so much for stopping by today! I hope you all like my card and have an amazing day.

--------------------------------------------------------

Hello friends!  It's Rachel here and I am sharing two cards today that feature the gorgeous Botanical Backdrop Die.

Sunny Studio Stamps: Botanical Backdrop Dies Magical Mermaids Hello Word Die Cards by Rachel Alvarado

Sunny Studio Stamps: Botanical Backdrop Dies Magical Mermaids Hello Word Die Cards by Rachel Alvarado

For my first card, I created a fun shaker card and combined the Botanical Backdrop Die with the cute Magical Mermaids Stamp Set. I thought that the leafy frame could pass as some ocean foliage and nicely frame a little underwater scene. I colored all of my images with Copic Sketch Markers and used the coordinating dies to cut them out.

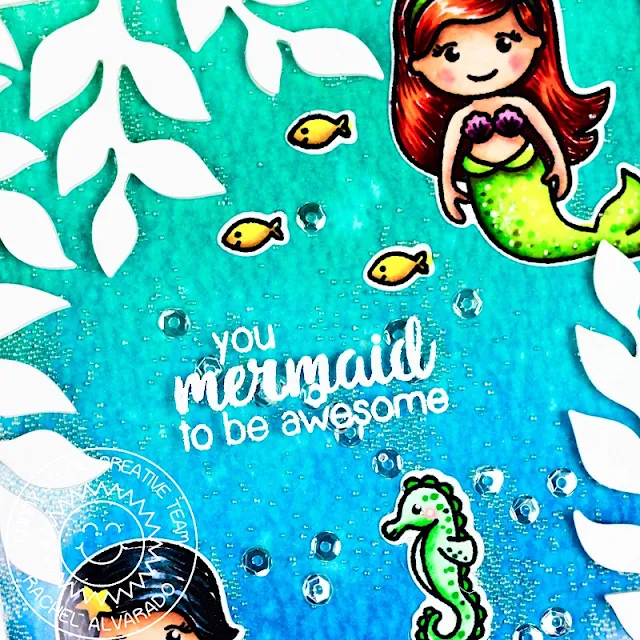
For the underwater background, I blended some Distress Inks (Peacock Feathers, Mermaid Lagoon, Wilted Violet, and Dusty Concord) onto a sheet of Ranger White Watercolor Paper.  I then spritzed this panel lightly with water, blotted it dry with a paper towel and then set it aside to completely dry.

Sunny Studio Stamps: Botanical Backdrop Dies Magical Mermaids Hello Word Die Cards by Rachel Alvarado

Once my background was ready, I added some 3D Foam Adhesive Tape around the edges and added my embellishments. I heat embossed my sentiment with Super Fine Detail White Embossing Powder onto a sheet of Heat Resistant Acetate. Once I attached the acetate, I then glued the final frame onto the outside of the card.

Sunny Studio Stamps: Botanical Backdrop Dies Magical Mermaids Hello Word Die Cards by Rachel Alvarado

For my second card, I didn't do any stamping at all. I simply die cut my images and lightly blended them with some ink. I used the Colorbox Ocean Ink for the green/blue tint and the Colorbox Lemonade Ink for the small yellow flowers.

Sunny Studio Stamps: Botanical Backdrop Dies Magical Mermaids Hello Word Die Cards by Rachel Alvarado

I added a sheet of the Gingham Pastels Paper Pack to the background and then adhered a 3D version of the sentiment "Hello" by die cutting it 5 times.

I hope you enjoyed my cards today! Wishing you all the best weekend!

Sunny Studio Supplies Used:

Magical Mermaid Dies
Shop at:
Sunny Studio
Magical Mermaid Stamps
Shop at:
Sunny Studio
Hello Word Die
Hello Word Die
Shop at:
Sunny Studio
Polka-dot Parade 6x6 Paper
Shop at:
Sunny Studio
Gingham Pastels 6x6 Paper
Shop at:
Sunny Studio
Botanical Backdrop Die
Shop at:
Sunny Studio
Everyday Greetings Stamps
Shop at:
Sunny Studio

Thursday, March 21, 2019

Puppy Dog Kisses Cards with Vanessa and Anja

Hi everybody! Vanessa here with a card using the adorable Puppy Dog Kisses Stamps. I am still in the mood for spring, so my puppies are standing in a bed of flowers.

Sunny Studio Stamps: Puppy Dog Kisses Fancy Frames Dies Woodland Borders Dies Happy Birthday Card by Vanessa Menhorn

First, I inked the front of a white card base with a cloud stencil and Distress Oxide Inks. Then I die-cut the Woodland Borders Die from green cardstock and adhered it. Now I die-cut the Fancy Frames Rectangle Dies from pink patterned paper from the Flirty Flowers Paper and adhered the frames. 

Sunny Studio Stamps: Puppy Dog Kisses Fancy Frames Dies Woodland Borders Dies Happy Birthday Card by Vanessa Menhorn

After I had stamped the sentiment from the Party Pups set, I stamped the flowers and dogs onto white cardstock. I colored the images with Copics, die-cut them with the matching dies and adhered everything, popping up some parts with foam tape.

These cuties are adorable, don't you agree? Love their faces :) Thank you for visiting, see you next week!

--------------------------------------------------

Hello everyone, Anja here today with an interactive card. I rarely create these kind of cards but the Sliding Window Die makes it soo easy!

Sunny Studio Stamps: Puppy Dog Kisses Fancy Frames Dies Sliding Window Dies Happy Birthday Card by Anja Bytyqi

First, I created an A2 card base from aqua cardstock. I die cut a stitched rectangle from the violet grid patterned paper (Gingham Pastels 6x6 Paper) which is slightly smaller. Next, I used the sliding window die to create the interactive part. It's a flap with three folds that can be popped up – but the card can be mailed flat into an envelope. Make sure to only put adhesive to the outside frame when adhering it to your card.

Sunny Studio Stamps: Puppy Dog Kisses Fancy Frames Dies Sliding Window Dies Happy Birthday Card by Anja Bytyqi

I kept the design of my card front pretty simple and decorated it with a white heat embossed birthday sentiment (Everyday Greetings Stamps), a cake (Make A Wish Stamps) and three die cut hearts (Basic Mini Shape Dies).

Sunny Studio Stamps: Puppy Dog Kisses Fancy Frames Dies Sliding Window Dies Happy Birthday Card by Anja Bytyqi

When you fold the flap up, the inside will be revealed. And here is my fun surprise – the two cute dogs from the Puppy Dog Kisses set are ready to celebrate and they brought a pile of gifts, too.

Sunny Studio Stamps: Puppy Dog Kisses Fancy Frames Dies Sliding Window Dies Happy Birthday Card by Anja Bytyqi

The gifts are from two other stamp sets (Alpaca Holiday Stamps and Foxy Christmas Stamps). I stamped all images in Memento Tuxedo Black Ink and colored them with Copic Markers. In the background, I blended together two Distress Oxide Inks (Shaded Lilac and Tumbled Glass) on a piece of Strathmore Bristol Smooth Cardstock.

I loved creating this interactive card – it looks really sweet on display :-) Thank you so much for stopping by! Have a wonderful day!

Sunny Studio Supplies Used:

Fancy Frames- Rectangles
Shop at:
Sunny Studio
Party Pups Stamps
Party Pups Stamps
Shop at:
Sunny Studio
Party Pups Dies
Party Pups Dies
Shop at:
Sunny Studio
Happy Harvest Stamps
Shop at:
Sunny Studio
Happy Harvest Dies
Happy Harvest Dies
Shop at:
Sunny Studio
Sliding Window Dies
Sliding Window Dies
Shop at:
Sunny Studio
Woodland Borders Dies
Shop at:
Sunny Studio
Mini Basic Shape Dies
Shop at:
Sunny Studio
Alpaca Holiday Stamps
Shop at:
Sunny Studio
Alpaca Holiday Dies
Alpaca Holiday Dies
Shop at:
Sunny Studio
Foxy Christmas Stamps
Shop at:
Sunny Studio
Foxy Christmas Dies
Foxy Christmas Dies
Shop at:
Sunny Studio
Gingham Pastels 6x6 Paper
Shop at:
Sunny Studio
Flirty Flowers 6x6 Paper
Shop at:
Sunny Studio
Make A Wish Stamps
Make A Wish Stamps
Shop at:
Sunny Studio
Make A Wish Dies
Make A Wish Dies
Shop at:
Sunny Studio
Puppy Dog Kisses Stamps
Shop at:
Sunny Studio
Puppy Dog Kisses Dies
Shop at:
Sunny Studio
Everyday Greetings Stamps
Shop at:
Sunny Studio

Wednesday, March 20, 2019

Staggered Circles Dies Cards with Franci and Mona

Hello there! Franci here with you today with a happy card featuring the Staggered Circles set. I decided to create a rainbow inspired card with these fun circles and I'm so happy about how it turned out!

Sunny Studio Stamps: Staggered Circle Dies Rainbow Word Die Over The Rainbow Card by Franci Vignoli

First of all I created a standard size card and I cut down a coordinated panel both out of white cardstock. I placed the die onto my panel at an angle and passed it through my big shot machine. Then I colored all my circles in rainbow colors with Distress inks and I also inked the backs of all my "circle windows" onto the front of my card to make it even more colorful :)

Sunny Studio Stamps: Staggered Circle Dies Rainbow Word Die Over The Rainbow Card by Franci Vignoli

I glued down all my circles and the panel with foam adhesive then I die cut the Rainbow word and these little hearts out of some Preppy Prints paper and added them to my design.

Finally I stamped my sentiment from the Over the Rainbow stamp set and the card is complete! Hope you like it too and thank you so much for stopping by today, have a lovely day! 

-------------------------------------------------

Hi crafty friends! It's Mona here, today I am showing you a sweet card featuring Breakfast Puns Stamp Set and Staggered Circle Dies.

Sunny Studio Stamps: Staggered Circle Dies Breakfast Puns Punny Card by Mona Toth

I started the cardmaking with die-cutting. I used the Staggered Circle Dies to create a fun look in the background. When it was done I made dry-embossing with Dapper Diamonds Embossing Folder. When it was done I colored it with brown watercolors and it turned to ice cream wafer.


Sunny Studio Stamps: Staggered Circle Dies Breakfast Puns Punny Card by Mona Toth

Next I made ink blending in the background. I used my Distresses in the following order: Festive Berries, Picked Raspberry, Spun Sugar and the result is a fresh "jelly" color look in the background.

The next step was heat embossing. I stamped the sentiment to the background from the Breakfast Puns and heated with white embossing powder.


Sunny Studio Stamps: Staggered Circle Dies Breakfast Puns Punny Card by Mona Toth

The last process on my card was stamping and coloring. I stamped many cute strawberries hearts and cute toasts with the Breakfast Puns Stamp Set and colored them with Copic Markers.

Copic Markers used: 0, RV52, RV02, RV04, RV06, RV55, RV66, R20, R24, R29, R59, YG01, YG03, YG93, E42, E43, E30, E33, E35, E44, E47


Sunny Studio Stamps: Staggered Circle Dies Breakfast Puns Punny Card by Mona Toth

I styled my card, adhered the parts together and finished my card. In the end I added a little sparkle to the white die-cuts with Wink of Stella clear brush marker. 

Thank you very much for reading through my post, I hope that you have enjoyed it and I have inspired you! If you like my creations let's be friends on Instagram. :)

Sunny Studio Supplies:

Breakfast Puns Stamps
Shop at:
Sunny Studio
Breakfast Puns Dies
Breakfast Puns Dies
Shop at:
Sunny Studio
Preppy Prints 6x6 Paper
Shop at:
Sunny Studio
Dapper Diamonds Embossing
Shop at:
Sunny Studio
Over The Rainbow Stamps
Shop at:
Sunny Studio
Rainbow Word Die
Rainbow Word Die
Shop at:
Sunny Studio
Staggered Circles Die
Shop at:
Sunny Studio