
Hello friends! It's Juliana
Michaels here and today I'm sharing a birthday card featuring the Puppy
Parents Stamp Set.


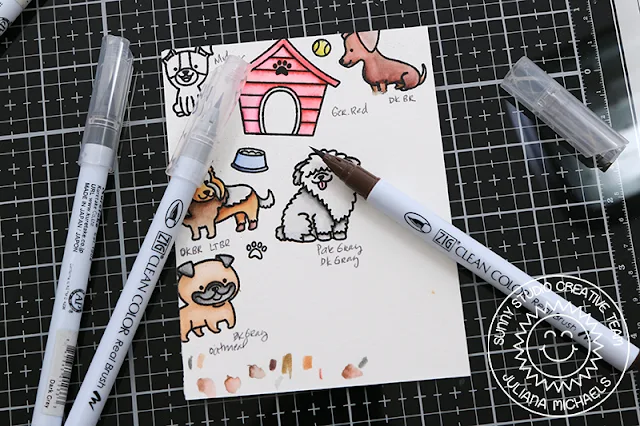
To get started, I took a piece of watercolor paper and
randomly stamped images from the Puppy
Parents Stamp Set to create my own background paper.


I stamped them using Ranger Ink Grey Embossing Ink. This ink
is colored so you can see where you are stamping! I then sprinkled the images
with black embossing powder and heat set them with a heat gun.

Next, I colored the images using Zig Clean Color Real Brush Markers. I did some test coloring on my first attempt at the creating the background. You'd be surprised how many times I start something before I actually have the finished card to share with you!
Once the background was finished, I worked on the sentiment piece. I die cut a label from green cardstock using the stitched bracket label from the Sliding Window Die Set.

I then stamped the phrase using a combination of stamps from the Puppy Parents Stamp Set and the Party Pups Stamp Set.


Next, I colored the images using Zig Clean Color Real Brush Markers. I did some test coloring on my first attempt at the creating the background. You'd be surprised how many times I start something before I actually have the finished card to share with you!

Once the background was finished, I worked on the sentiment piece. I die cut a label from green cardstock using the stitched bracket label from the Sliding Window Die Set.

I then stamped the phrase using a combination of stamps from the Puppy Parents Stamp Set and the Party Pups Stamp Set.

To finish off the card I tied on a black and white stitched
ribbon. I then adhered everything to a piece of green patterned paper from the Classic
Gingham 6x6 Paper Pad.
-----------------------------------------------------
-----------------------------------------------------
Happy Tuesday friends!
Angelica here, and today I'm sharing a card showcasing the adorable stamp
set Puppy Parents.


My first step was stamping
and coloring the images. I used the following Copic colors for the puppies and
house: Puppies: E40, E42, E43, E44
for fur; E70, E71, E74, E77 for ears and face; House: R59, R29, R24, R22 for siding; N6, N8 for trim; N3, N1, N0 for door


After coloring, I used
the coordinating dies to cut them out. Next, I
die-cut an outdoor scene using dies from the Comic Strip Everyday Dies. I die-cut the grass
and sun out of papers from the Gingham Pastels Paper Pack. The rest of the die cuts I
used random pieces of card stock scraps. I cut the clouds out of two different
greens to make a bush behind the doghouse.
To assemble the card, I started by ink-blending Mermaid Lagoon and Tumbled glass Distress Oxide inks onto a white card stock panel. I glued three layers of grass to the bottom, using both sides of the Gingham Pastels paper for different textures. I glued the tree and bushes on, then added the rest of the images with thin adhesive squares.

I picked out words from the stamp set to make the sentiment, and stamped them onto black card stock with embossing ink. I heat embossed with white embossing powder before trimming each word down to their own block. After adding the words to the card front, I attached the panel to red card stock, then backed it with craft foam. My last step was adding it to an A2 size card base.
That's all that I have for today. Thanks for stopping by!
Sunny Studio Supplies Used:
 Party Pups Stamps Shop at: Sunny Studio |
 Party Pups Dies Shop at: Sunny Studio |
 Classic Gingham 6x6 Paper Shop at: Sunny Studio |
 Comic Strip Everyday Dies Shop at: Sunny Studio |
 Sliding Window Dies Shop at: Sunny Studio |
 Gingham Pastels 6x6 Paper Shop at: Sunny Studio |
 Puppy Parents Stamps Shop at: Sunny Studio |
 Puppy Parents Dies Shop at: Sunny Studio |


