Friday, March 24, 2017

Froggy Friends Happy Birthday Card with Lexa

Hello everyone! Lexa here to share a card featuring Froggy Friends stamps and it's coordinating dies. Many of you may have seen couple of inspirations using this stamp set. Since it's really so much fun, I can't resist to play with these adorable Froggy Friends once more. The little elements in this stamp set are perfect to build scenes, it has everything you need.

Sunny Studio Stamps: Froggy Friends Happy Birthday Wiggly Frog Card by Lexa Levana

​I started my card with a 4"x5.25" panel and start to blend some inks to create the scene. I use several Distress Inks, Salty Ocean for the pond, Mowed Lawn for the grass and Tumbled Glass for the sky. I stamp the grassy border from SunnySentiment stamp with green dye ink, the smiley sun and the bee are also from the same stamp set. I also use the bee's trail from Backyard Bug stamp, and yes I mix three stamp sets for this card. 


Sunny Studio Stamps: Froggy Friends Happy Birthday Wiggly Frog Card by Lexa Levana

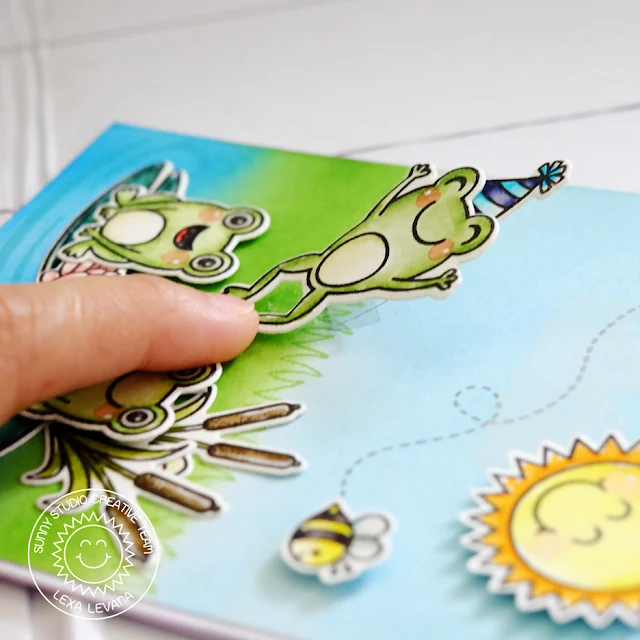
The hopping frog can actually wiggle because I adhere him to a piece of tri-folded acetate. I hope you got the idea after see this picture below.

Sunny Studio Stamps: Froggy Friends Happy Birthday Wiggly Frog Card by Lexa Levana

I stamped all my images with Versafine black ink and watercolor them with Distress Markers. I also add some dimensions with glossy accent on some details. I think a happy card like this will make anyone's day.

Thank you so much for stopping by today. I wish you an awesome day!

Sunny Studio Supplies Used:
      

Thursday, March 23, 2017

Sun Ray Dies Rainbow Card with Vanessa

Hi everybody! Vanessa here with a colorful rainbow card using the Sun Ray Dies. I really love ink blending, so I decided to use the negative space of the dies to apply some ink through it.

Sunny Studio Stamps: Sun Ray and Color Me Happy Rainbow Card by Vanessa Menhorn

I die-cut a ray from a scrap of paper, placed it above my cardstock panel and applied ink with an ink blending tool. Then I shifted my mask and applied the next color. I repeated this with all the colors and removed the mask. Now I stamped the sentiment from Color Me Happy and adhered the panel to the purple card base. 

Sunny Studio Stamps: Sun Ray and Color Me Happy Rainbow Card by Vanessa Menhorn

I stamped the ice cone from Sweet Shoppe onto a piece of white cardstock, colored it with Copics and fussy-cut it. After I had adhered the image with foam tape, I added matching sequins to the rays. 

Yum, I so love this cute stamp set! I hope your day is filled with rainbows! Thank you for stopping by today!

Sunny Studio Supplies Used:
      

Wednesday, March 22, 2017

Daffodil Dreams and Vintage Jar Thank You Card with Amy

Hello everyone! Amy here to share a card that features the Daffodil Dreams and Vintage Jar stamp sets. These layering stamps are wonderful for making beautiful flower themed cards for any occasion. 

Sunny Studio Stamps: Daffodil Dreams and Vintage Jar Thank You Card by Amy Yang

I stamped my daffodils with three shades of pink, and the leaves with two shades of green using dye inks. I die cut them with the coordinating dies. Then, I stamped the flower stems, and on top of that I stamped the Vintage Jar using two shades of light blue. I colored the bottom half of the jar with my light blue Copic marker to represent water. I die cut the jar using the coordinating die and wrapped twine around the top to add dimension and interest.

Sunny Studio Stamps: Daffodil Dreams and Vintage Jar Thank You Card by Amy Yang

To create my front panel, I trimmed cardstock to 5"X 4" and blended the bottom using the same inks I used for the flowers. I added a splatter of the same colors to go diagonally across the cardstock. I even colored the word 'thanks' (from the vintage jar dies) using the same ink so that everything matched. Lastly, I assembled the die cut images onto the the front panel using foam adhesive and added it to a folded note card. 

Sunny Studio Stamps: Daffodil Dreams and Vintage Jar Thank You Card by Amy Yang

I hope you like today's card and I have inspired you in some way.  Thank you for stopping!!!

Sunny Studio Supplies Used:
      

Tuesday, March 21, 2017

Timeless Tulips Vellum Wrapped Tulip Bouquet Card with Emily

Hey everyone, it's Emily here. Today's card features the stunning Timeless Tulips stamp set and coordinating dies. These were so easy to stamp and I didn't even use a stamp positioner for these. I stamped them in reverse order using an acrylic block!


Sunny Studio Stamps: Timeless Tulips Vellum Wrapped Tulip Bouquet Card by Emily Leiphart

Sunny Studio Stamps: Timeless Tulips Vellum Wrapped Tulip Bouquet Card by Emily Leiphart

I used Fishtail Banners II dies to create a vellum wrap for the bundle of tulips and died it off with some burlap string and a tag created with the Semi Circles dies and Tag Topper Crescent dies.


Sunny Studio Stamps: Timeless Tulips Vellum Wrapped Tulip Bouquet Card by Emily Leiphart

Thanks so much for stopping by!

Sunny Studio Supplies Used:
        

Monday, March 20, 2017

Color Me Happy Rainbow Window Card with Eloise

Hello everyone! Eloise here and today I have a fun rainbow card to share with you using the Color Me Happy stamp set along with a few other sets also!

Sunny Studio Stamps: Color Me Happy Rainbow Window Card by Eloise Blue

To begin my card today I went ahead and pulled several stamp sets with images I could colour for the whole rainbow. So I pulled Tropical Paradise, Fresh and Fruity, Sunny Sentiments, Froggy Friends, Sweet Shoppe and Stars and Stripes and stamped out one of the images out of each set onto some white cardstock, and used various Copic Markers to colour them in. I then used the coordinating dies to cut them all out. Once my images were ready I would on my window portion. 

I've done this for a previous card before, so I had the template all ready to go, I just lined up the template on another piece of white cardstock, taped it into place and placed the die in the slots to cut them out. For the circles I used the orange slice die from Fresh and Fruity. Once I had cut all six circles, I could work on the background. 

Sunny Studio Stamps: Color Me Happy Rainbow Window Card by Eloise Blue

I masked off the circles behind the window panel and used various colours of Distress Inks to ink blend the background. I did each circle a colour of the rainbow in order. I then used foam adhesive to adhere down the window frame on top of the coloured background piece. I used tape adhesive and glued down my images into their coordinating coloured circle. Once my images were adhered I moved into my sentiment.

I used the 'You Fill My Days with Rainbows' sentiment from the Color Me Happy stamp set and white heat embossed that onto some black cardstock with white embossing powder. I cut down the strip and foam mounted it to the panel. For my card base I added a pink piece of cardstock to the card base and then adhered my panel on top. For a very last finishing touch I used some sequins to add into the circles in coordinating colours.

Thanks for stopping by today, I hope you enjoyed and make sure you check back on the blog for more inspiration this week!

Sunny Studio Supplies Used: