Friday, February 24, 2017

Color Me Happy Rainy Day Rainbow Card with Lexa

Hi everyone! Lexa here today with a colorful card to brighten your day. I'm showcasing the new Color Me Happy Stamps, It's such a great set with various sentiments that you can use all year around. I love how cheerful and positive all the sentiments are.

Sunny Studio Stamps: Color Me Happy Rainbow Rainy Day Card by Lexa Levana

I mixed up two stamp set for this card, Rain or Shine and Color Me Happy. I'm so glad to find out that the older stamp sets could coordinate well with the new ones. My card tells a story about how there's a rainbow after rains, so don't you worry about a thing. I started with a 4.25" x 5.5" white card base and blended them with Pumice Stone, Shaded Lilac, Tumbled Glass Distress Inks. I also sprayed some water to create faded colors on some spot. 

Sunny Studio Stamps: Color Me Happy Rainbow Rainy Day Card by Lexa Levana

I stamped all my images with Versafine black ink on a piece of watercolor paper and colored them all with Distress Markers. To create a bokeh effect, I die cut circles using Sun Ray Dies on vellum. I stamped some raindrops with blue dye inks to complete my story that the rain just stopped and a beautiful rainbow appear.

Thank you so much for stopping by today. I hope you all have a wonderful day!

Sunny Studio Supplies Used:
      

Thursday, February 23, 2017

That Sucks Polka Dot Vacuum Card with Vanessa

Hi everybody! Vanessa here with a card using the hilarious set, That Sucks. Honestly, I never thought I would need a stamp set with a vacuum cleaner - until I saw this set! It's so fun and I love this cute cleaner! Who would have thought an household item could be so much fun?

Sunny Studio Stamps: That Sucks Polka Dot Vacuum Card by Vaness Menhorn

For my card, I adhered a piece of patterned paper to the left side of the card base. Now I trimmed a strip of pink cardstock and added it to the edge of the patterned paper. I stamped the sentiment onto a strip of grey cardstock and adhered it. Then I stamped the image onto white cardstock and onto patterned paper. I colored the cardstock cleaner with Copics and fussy-cut both images. 

Sunny Studio Stamps: That Sucks Polka Dot Vacuum Card by Vaness Menhorn

Now I paper-pieced the cleaner and adhered it to the card with foam tape. Finally, I die cut the tiny hearts, using the coordinating That Sucks dies, from the same patterned paper and adhered them. I wish my vacuum cleaner would look like this :) I would definitely have more fun using it!

Thank you for stopping by today! I hope to see you next week!

Sunny Studio Supplies Used:
  

Wednesday, February 22, 2017

Friends & Family Floral Wreath Card With Lindsey

Hi, Lindsey here today sharing a card using the new Friends & Family stamps. This set has tons of sentiment options as well as some simple yet versatile solid stamp flowers. This set was a lot of fun to play with. Let's get started on how I created this bright and springy card.

Sunny Studio Stamps: Friends and Family Flower Card by Lindsey Sams

To begin, I cut a plaid patterned piece of paper to an A2 sized card base. Next I cut a smaller stitched rectangle from some Kraft card stock. This is the layer I did my stamping on. I began by stamping the sentiment in black in the center of the rectangle. Then, I traced the outline of a circle around the sentiment using a very light pencil line. This would give me a guide to do my flower stamping on so the wreath would end up a perfect circle. 

Sunny Studio Stamps: Friends and Family Flower Card by Lindsey Sams

I used a bunch of different colors of dye ink to stamp the flowers. I love how colorful the wreath is with all the sweet little flowers. To add a little something extra to the flowers, I used a white gel pen to add some details and highlights. I put a scalloped piece of pink card stock behind the stamped panel and popped it up on the plaid card base. To finish off the card, I added a few sparkly sequins. That's it!

This card is so bright and cheery and is perfect for spring. I hope you'll give this set a try and create your own Family and Friend cards. It really is a fun set to play with. I look forward to seeing what you create. Thanks for reading and have a great day!

Sunny Studio Supplies Used:


Tuesday, February 21, 2017

Sun Ray Dies and Friends & Family Floral Card with Emily

Hi everyone, Emily here. Today's card features a unique way to use the Sun Ray Dies.

Sunny Studio Stamps: Sun Ray Dies and Friends & Family Floral Card by Emily Leiphart

First, I used the largest of the three circles and die cut a circle in the center of the front panel. Then I used the Friends & Family stamp set to stamp a wreath around the circle. I created masks for the flowers and leaves so I could overlap them without muddling the colours together.

Sunny Studio Stamps: Sun Ray Dies and Friends & Family Floral Card by Emily Leiphart

After the wreath was fully stamped, I used the individual ray dies to partially die cut the bands around the open circle. I die cut them one at a time so I could use my cutting plate to control where they stopped cutting near the edges of the panel.

Sunny Studio Stamps: Sun Ray Dies and Friends & Family Floral Card by Emily Leiphart

Finally, I stamped the smaller words inside the circle, directly on the card base, and layered the die cut word from the Friends & Family Word Dies, silver on black to create a shadow, and adhered the two ends on the popped up panel. It worked out well that the 'O' from 'so' is the dot over the 'i' since the dot from the die itself would've interfered with the stamped part of the sentiment.

Thanks so much for stopping by!

Sunny Studio Supplies Used:
    

Monday, February 20, 2017

Easter Wishes Easter Blessings Card with Eloise

Hi everyone, Eloise here and today I'm sharing a card I made with the Easter Wishes stamp set. This set is super cute, I love all the little critters you get in the stamp set and all the other images too, such a great set to create scenes.

Sunny Studio Stamps: Easter Wishes Easter Blessing Critter Card by Eloise Blue

To begin my card I stamped out all my images onto some watercolour paper. I used Versafine Onyx black ink and then clear heat embossed over it. I used my Zig Clean Colour Markers to do my colouring today, they're super fun and easy to use. Once all my colouring was done I dried my images and used all the coordinating Easter Wishes dies to die cut them out. 

Sunny Studio Stamps: Easter Wishes Easter Blessing Critter Card by Eloise Blue

For my background I used the Sunny Semi Circles dies and die cut a hill into another panel of watercolour cardstock. I then used two green Distress Inks to colour the grass and then with the remaining piece of watercolour paper I used various colours to create a sun-setting sky. I used Mustard Seed, Spiced Marmalade, Ripe Persimmon, Picked Raspberry, Wilted Violet and Dusty Concord, this creates a gorgeous sunset sky! I then flicked a little water onto both pieces to give a little water splotch effect. 

Once by background was done I taped the pieces together and stuck together my scene. I used foam tape on all the images to give the card some nice dimension. I popped up the entire panel on fun foam and adhered it to a white card base and the card was complete.

I hope you enjoyed my card today and got inspired. I really love making different backgrounds with Distress Inks, it's super fun! Make sure you check back the rest of the week for more inspiration. 

Sunny Studio Supplies Used:
    

Saturday, February 18, 2017

Timeless Tulips & Froggy Friends Birthday Cards with Amy

Hello everyone! Amy here to share with you a card I made using the Timeless Tulips and Color Me Happy stamp sets. This was only my second time using a layering set, but after making this card I've become a fan of the style.

Sunny Studio Stamps: Timeless Tulips You Color My World Card by Amy Yang

As I mentioned before, I don't make cards with layering stamps. Therefore, I don't own any dye inks with coordinating colors, or that will produce a crisp stamped image. However, I do have a whole collection of Distress inks and I thought I'd give them a try. The images can be crisper and stamped better but I think they still turned out pretty, do you agree?

Sunny Studio Stamps: Timeless Tulips and Froggy Friends Birthday Cards by Amy Yang

The sentiment says "You color my world" so I wanted this card to be colorful. I used various Distress Inks to stamp all different style tulips you find in this set, along with three stems and leaves. Next, I fussy cut them out. Then, I stamped three stems and leaves again, this time directly onto front panel, leaving space between them. At this point I also stamped the sentiment and added the cute little bugs. Finally, I adhered the other stems and leaves in the open spaces. I added foam adhesive behind all the tulip buds and added them to the front panel.

Sunny Studio Stamps: Timeless Tulips and Froggy Friends Birthday Cards by Amy Yang

I really enjoyed working with the Timeless Tulip stamp set; it produces really pretty flowers. It also inspired me to pick up some dye inks that are meant for layering. I can't wait to try them out with this stamp set again. Maybe I can share those with you next time. 

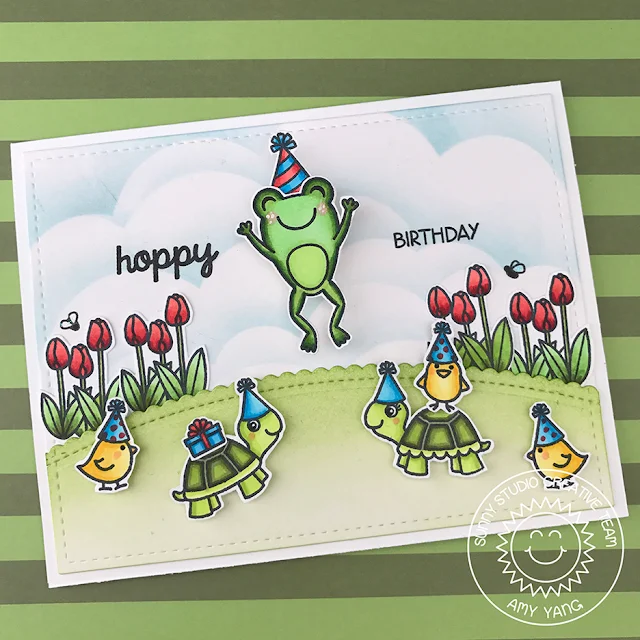
I also created a cheerful and fun birthday card I made by combining three stamp sets together: Froggy FriendsTurtley AwesomeEaster Wishes. These adorable critters are here to wish someone a very Hoppy Birthday.

Sunny Studio Stamps: Timeless Tulips and Froggy Friends Birthday Cards by Amy Yang

To create my front panel, I used a cloud stencil to color the background using Distress ink in Stormy Skies. I also colored the die cut hill using Twisted Citron and added it to the front panel using foam adhesive (for dimension).

Sunny Studio Stamps: Timeless Tulips and Froggy Friends Birthday Cards by Amy Yang

To add the party hats to the turtles and the chicks for a cleaner and more seamless look, I used the masking technique. Masking is a simple technique where you cover a stamped image so that the other images may be placed over it. First, I stamped the party hat on masking paper and cut it out. Next, I stamped a couple of hats on white card stock. I adhered the mask over the corresponding images. Then, I stamped the the turtles and the chicks over each hat. Finally, I stamped the rest of the images I used on the card and colored them with Copic markers.

Sunny Studio Stamps: Timeless Tulips and Froggy Friends Birthday Cards by Amy Yang

Isn't the frog on this card the cutest thing? His expression just makes me smile. Since this frog is a jumping image, I thought it would be clever to make him wobble. So I made my own wobble spring using some craft wire and tape.

Sunny Studio Supplies Used:
        

Friday, February 17, 2017

Turtley Awesome Birthday Shaker Card With Lexa

Hello everyone! Lexa here today with a card starring Turtley Awesome. It's a mini stamp set but not less cuter than other ones. Both turtles are looking at each other, absolutely versatile for any occasions. As for my card today, I mixed it with Easter Wishes to build up the scene around the turtles.

Sunny Studio Stamps: Turtley Awesome Turtle Birthday Shaker Card by Lexa Levana

I created a three windows shaker card with different colors, and I blended the background with Salty Ocean, Wild Honey, and Twisted Citron Distress Inks. I choose matching sequins for each window. I stamped all my images with Versafine black ink and watercolored them with Distress Markers. After I finished with the coloring, I die cut all of the images using the coordinating Turtley Awesome dies and Easter Wishes dies. 

Sunny Studio Stamps: Turtley Awesome Turtle Birthday Shaker Card by Lexa Levana

The turtles are wearing birthday hats and one of them carrying present on his back. Adorable! I also add googly eyes for both of them. I adhere the shaker panel on a piece of 4.25" x 5.5" patterned paper with matching colors. Here's a closer look.


That's all for today, thank you so much for stopping by. I hope you have a wonderful day!

Sunny Studio Supplies Used: