Showing posts with label Sunny Borders. Show all posts

Wednesday, January 11, 2017

Inspiration Week: Introducing Friends & Family Stamps & Dies

Hello there!  We're officially mid-way through the sneak peeks.  Thank you so much for all your love and support over the past two days.  Your outpouring of sweet feedback means the world to me!  

Today I'm sharing ideas using a new set called Friends & Family.  It combines over 12 mix & match sentiments with a number of bold layering flowers perfect for Spring.

Up first is a card whose design was directly inspired by a gorgeous card by Heather Campbell.  I loved her idea of having flowers blooming out from below the sentiment strip so I just had to try it myself!
Sunny Studio Stamps: Friends & Family Flower Border Card by Mendi Yoshikawa

This set comes with four stems that are attached as part of one stamp image that are perfect for repeatedly stamping as a continuous border for flower borders such as this one.  They were spaced to work well with the daffodil, tulip, daisy and posies from the set, each coming with their own unique leaves.  The daffodil flower layers with three separate stamps to complete the look.
Sunny Studio Stamps: Friends & Family Daffodil Border Card by Mendi Yoshikawa

For my next card, I used the exact same design, but this time substituted the daffodils for tulips.  The tulip flower comes with two separate images to layer.  These bold images are super easy to layer quickly by hand so no positioning tool is needed, making them a great option for creating card sets with.
Sunny Studio Stamps: Friends & Family Tulip Border Card by Mendi Yoshikawa

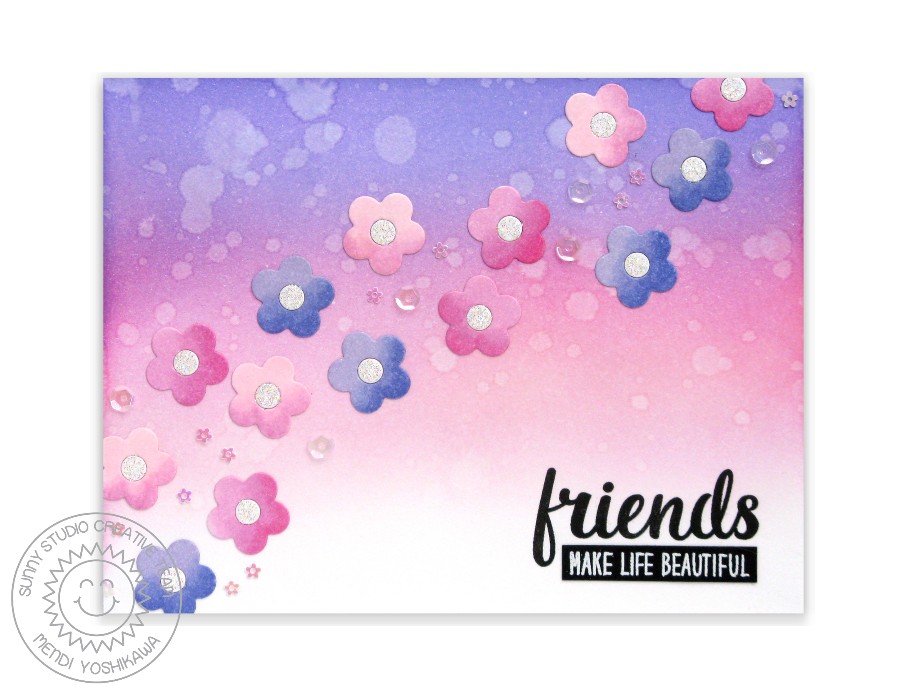
For my next card I layered all the daisies from the set for a bright and colorful border to frame my sentiment.  I also love the opposite phrase that says "friends are the family we chose".
Sunny Studio Stamps: Friends & Family Daisy Flower Border Card by Mendi Yoshikawa

For my last card, I created a bouquet of mixed flowers using the standalone stem from the set.  I was able to length it by hiding the seam behind the layered bow from our Holiday Style set.
Sunny Studio Stamps: Friends & Family Flower Bouquet Card by Mendi Yoshikawa

I didn't have room for the sentiment on the outside so I continued the design to the inside with an extra flower I had stamped earlier for my bouquet and didn't end up using.


Sunny Studio Stamps: Friends & Family Flower Bouquet Card by Mendi Yoshikawa

I love offering freebies so for this release (starting on January 13th) a free 5/8" flower die will automatically be included with each order, while supplies last.


I have created a card idea using the bonus flower die which I am offering as a make-n-take with step-by-step directions that you can print out & recreate at home.  Just click on the image above to download.  :)
Sunny Studio Stamps: Friends & Family Flower Card by Mendi Yoshikawa

Here's a graphic showing all the different sentiment combinations you can create using the Friends and Family stamps & coordinating word dies...  I imagine you can even come up with more by trading which friend or family word you use.  ;)

Sunny Studio Stamps: Introducing Friends & Family Stamps & Dies Examples

And here's a look at the new Friends & Family stamps and coordinating dies...

Sunny Studio Stamps: Introducing Friends & Family Photo-polymer Clear Stamps    Sunny Studio Stamps: Introducing Friends & Family Flower Die Set releasing January 2016    Sunny Studio Stamps: Introducing Friends & Family Word Die Set releasing January 2016

I hope you've enjoyed today's sneak peek.  Would you like to win a $25 gift code to our online store to spend on some of the new sets?  Use the rafflecopter below to enter to win.  We will be giving away a new gift code each day for a total of five chances to win!  Contest closes on January 14th at Midnight PST.  Winners will be announced on Sunday, January 15th.  :)

a Rafflecopter giveaway
Make sure to check back tomorrow when I will be sharing two fun new sets that I'm hoping you'll fall in love with as much as I have. ;)

Other Sunny Studio Supplies Used Today:
   

Tuesday, August 16, 2016

A Sneak Peek of some Fall Cards Created for Simon Says Stamp

I'm on the Simon Says Stamp blog today with a couple more cards using our newest stamps.  I hope you will swing by to see the full reveal.  ;)


Sunny Studio Stamps: Happy Birthday From The Whole Gang Card (using Woodsy Creatures, Comfy Creatures, Birthday Smiles & Sunny Borders)

Sunny Studio Stamps: Halloween Cuties Hello Pumpkin Card by Mendi Yoshikawa

I used the following sets to create my projects:


Also make sure to keep scrolling down to see Anni's wonderful card today.  :)

Wednesday, August 10, 2016

Inspiration Week: Introducing Autumn Splendor Fall Leaves Set

Hello there!  Welcome to day 2 of our Fall Release Inspiration week!  Today I'm showcasing our new Autumn Splendor set coming out on Friday!  :)

I've been itching to do a solid stamp set for awhile now and I love the idea of a bold layering set that is perfect for so many different techniques (I promise you'll want to tune in on Friday when there will be loads more ideas for it).  ;)

For my first card I wanted to create a pretty border showing the set in all it's glory.  As an accent next to the sentiment I used one of my favorite images from the entire set: the little acorn!  I love how it looks when it's all layered together!

Sunny Studio Stamps: Autumn Splendor Fall Leaves Thank You Card by Mendi Yoshikawa

For my next card I started by cutting two V's using the Fishtail Banner and Fishtail Banner II dies.  I then layered the images from the set to create a bouquet of sorts for the center of my card.

This set comes with two sets of berry images with shadows on each side of the berry depending on how you plan to use it.  Sadly please ignore the fact that I should have adhered them the opposite way on my own card though--Oops!  ;)

Sunny Studio Stamps: Autumn Splendor Fall Leaves Thank You Card by Mendi Yoshikawa

For my next card I wanted to do something light and airy with a clean & simple design.  I used the alternate interior layering pieces for my two leaf sizes.  For the bottom of my card, I stamped the base using one of the scalloped borders from our Sunny Borders Stamp set and then die-cut it with the coordinating dies.

I then inked up the middle portion on the left side of the card with some Tumbled Glass distress ink to highlight the leaves and make them stand out. I finished my card by adding a jewel to the center for a touch of bling.

Sunny Studio Stamps: Autumn Splendor Fall Leaves Thank You Card by Mendi Yoshikawa

For my last card today I chose to forgo the shadow portion of the images and to heat emboss my stems in gold for a classy look.  It hard to tell in this picture, but I love the way the gold stems look in person!   I finished off my card by die-cutting my panel with our Fishtail Banner II dies and inking up the bottom portion of the card with a a color to match my red leaves.
Sunny Studio Stamps: Autumn Splendor Fall Leaves Falling For You Card by Mendi Yoshikawa

While I ran out of time to make a video, I did snap a couple quick pictures sharing my favorite way for stamping a bunch of leaves at once.  I started by die-cutting each leaf from a piece of scratch paper as a template.  I found that stamping onto the die-cut gave me an extra way to help line up my stem which was especially helpful for the berries (vs. stamping and then die-cutting).  


I then used my template in my MISTI stamp positioner so I could pop in my actual die-cut and position my stamp for quick assembly line style stamping.  You can take this concept one step further and stamp 4 templates all at once with one in each corner.  I had a blast cutting out & stamping a bunch of leaves in different colors for all my cards in one sitting (with plenty of extras for a rainy day).  


Here's a full look at the Autumn Splendor stamps and coordinating dies...


Sunny Studio Stamps: Introducing Autumn Splendor Fall Leaves Stamp Set   Sunny Studio Stamps: Introducing Autumn Splendor Fall Leaves Die Set

And here's a little visual I put together to show all the ways the stamps can be layered since I know they can look a bit strange on the stamp sheet without all the pretty colors. 


For those who are curious about which color combos I used on my leaves today, I actually picked from a variety of ink brands in my stash which I've listed below.  Luckily you really only have to find two colors that look good together so your options are truly endless.  ;)

Red Leaves:

Hero Arts Red Royal Shadow Ink
Ranger Adirondack Cranberry

Orange Leaves & Berries
Stampin' Up Pumpkin Pie
Hero Arts Just Rust Shadow Ink

Yellow Leaves:
Stampin' Up Daffodil Delight
Stampin' Up Crushed Curry

Green Leaves:

Hero Arts Green Hills Shadow Ink
Simon Says Stamp Green Leaf

Red Berries:
Stampin' Up Strawberry Slush
MFT Cherry Crisp

Stems:
Simon Says Stamp Dark Chocolate (for the lighter version)
Stampin' Up Chocolate Chip (for darker version)

Acorns:
VersaFine Vintage Sepia (for bottom portion base)
Close To My Heart Oak Brown (for bottom shadow and top base)
Stampin' Up Chocolate Ship (for top shadow)

I would love to hear your first impressions.  Thanks so much for stopping by.  


Thursday, June 30, 2016

Inspiration Week: Introducing Sock Hop 1950's Inspired Set

I thought today when never arrive.  I have been so excited to finally share some cards using one of my favorite stamp sets from the release (who am I kidding though, they're all my favorites).  The set is called Sock Hop and it includes iconic pop culture images from the 50's with a playful twist.

Up first is a card focusing on the poodle skirt wearing dog, the Letterman sweater wearing cat and the little ice cream soda images from the set.  I didn't have room to include a table when creating the stamps so I created my own table by using the tree trunk from Summer Picnic as my table base and tracing two oval shadow die-cuts with a sharpie from the Sunny Borders die set to form my table top.  For my black and white tile I drew my own floor using this post by Sandy Allnock as inspiration.

I heat embossed a scalloped border in white on black cardstock using the Sunny Borders Stamps and Dies and then repeated the ice cream soda motif on some cardstock inked up with Spun Sugar Distress Ink.


Sunny Studio Stamps: Sock Hop 1950's Inspired Card by Mendi Yoshikawa

Up next is a card focusing on the fun car from the set.  I love that it can fit the critters in the car--They almost remind me of a set of kids riding along in a 1950's Pedal Car.
To set my scene I loosely sketched out my street in pencil, fussy cut it out, erased the pencil lines and then inked it up with Black Soot Distress ink.  Before adhering it to my card I inked up a panel in Twisted Citron and Mowed Lawn and then added some texture with my Copic Markers.  When I was done I cut off a little wavy portion along the top to form my horizon and adhered it to my card base which had been inked up Tumbled Glass ink.  To complete my scene I added trees to the background from our Happy Home stamp set.
Sunny Studio Stamps: Sock Hop 1950's Inspired Card by Mendi Yoshikawa

Up next is a card spotlighting the cute jukebox from the set.  I thought it would be fun to use the checkered blanket from our Summer Picnic set to form my black & white tiled floor.  This is a great option if you're nervous drawing your own.  I'm sure there is a great way to mask it off to repeat the design, but in the end I decided to stamp 4 of them and just cut them out (which is so easy to do with the straight lines) and then to adhere them on the card so that they formed one continuous design.  


Sunny Studio Stamps: Sock Hop 1950's Inspired Card by Mendi Yoshikawa

For my last card I used Silhouette's Circle Burst cutting file.  I opened it up in the Silhouette software and then added a 4.25 x 5.5 rectangle over the top.  I used the align commands to center them together and then trimmed it to leave just the areas where the two shapes overlapped. It left me with these rays which were so easy to quickly cut out and apply to my card panel.  

I then stitched through the center of each ray with my sewing machine and covered up the messy intersection with a 3-1/2" wide circle cut from white cardstock.  For my kitty image I added the sunglasses and guitar accessories from the set and one of the fun retro sentiments from the set.
Sunny Studio Stamps: Sock Hop 1950's Inspired Card by Mendi Yoshikawa

Here's an official look at the new Sock Hop set with the coordinating dies.  I spent quite a bit of time researching popular catch phrases from the decade and had a blast creating this one.  I hope you like it.  :)


Sunny Studio Stamps: Introducing New Sock Hop 1950's Stamp Set     Sunny Studio Stamps: Introducing New Sock Hop 1950's Die Set

Thanks much for swinging by today.  Stay tuned tomorrow for one last new release, but before you go make sure to sign up for your chance to win a $20 gift certificate to our store using the rafflecopter below.  

We will be giving away one $20 gift certificate each day for a total of five lucky winners this week. The contest for each post closes at Midnight EST on Friday, July 1st with winners announced on Saturday, July 2nd.  :)

a Rafflecopter giveaway

Wednesday, June 29, 2016

Inspiration Week: Introducing Sweet Shoppe Stamps & Word Die

Hello there!  Welcome to day 3 of our inspiration week!  Today I am sharing ideas using our new Sweet Shoppe stamps and dies!  :)

Up first is a card focusing on the soft serve ice cream cone from the set.  I started by coloring one of the ice creams blue for fun which sparked the idea of coloring them in a rainbow of bright colors (your guess is as good as mine what flavors they are).  To add a little personality I stamped a happy face from the set onto one of the cones and then added glossy accents to the ice cream portion of each cone.

For my card panel, I inked the bottom portion up with Tumbled Glass Distress ink using a jumbo dauber.  I finished off my card with a sassy sentiment from the set. 
Sunny Studio Stamps: Sweet Shoppe Ice Cream Cone Card by Mendi Yoshikawa

For my next card I inked up my background with Picked Raspberry, Carved Pumpkin, Mustard Seed, Twisted Citron, Peacock Feathers and Broken Glass distress inks.  I then used those same inks to stamp a trio of sprinkles to form a subtle repeated pattern on my background.

I cut a 3" circle from white cardstock and stamped my sentiment using a MISTI tool and coordinating colors of distress inks.  By using the MISTI I could repeatedly ink up the individual letters until they stamped a solid image.  I then colored each of my candies with Copic Markers, arranged them around my circle (popping some up with foam tape) and then coated the centers of each with glossy accents.
Sunny Studio Stamps: Sweet Shoppe Rainbow Candy Card by Mendi Yoshikawa


For my third card I lightly drew diagonal lines across my black cardstock panel 3/4" apart and then repeatedly stamped the word "sweet" using clear VersaMark ink. I then sprinkled a rainbow of different embossing powders starting with red and working my way to the opposite corner.  If you don't have a lot of embossing powders on hand, you could also heat emboss in white and then use an alcohol based marker to color over the top.

For my sentiment I cut the word "sweet" using the Sweet Word die and colored it in coordinating colors with my Copic Markers.  I then cut 4 more sweet words from black cardstock to layer under the rainbow one.  It pops up the word and gives it a cool look when viewing it from an angle.  I completed my card with some simple machine stitching along the top and bottom of my sentiment panel, adding a simple cupcake with rainbow sprinkles.
Sunny Studio Stamps: Sweet Shoppe Sweet Sixteen Birthday Card by Mendi Yoshikawa


For my fourth card I completely switched gears and went with a Neapolitan ice cream color scheme.  I adore pink and brown together, don't you?  To give my cones some sparkle I colored over the ice cream portion with a Wink of Stella clear glitter pen and then went over the top with glossy accents which really magnifies the sparkle.  For my pink scalloped edge, I stamped and die-cut the edge using our Sunny Borders Stamps and coordinating dies. I completed my card with a sentiment heat embossed in white and a sprinkling of some pale pink iridescent sequins. 
Sunny Studio Stamps: Sweet Shoppe Ice Cream Cone Thank You Card by Mendi Yoshikawa


For my last card I wanted to do a partial die-cut treatment of the sweet word die so I hung the bottom of the word off the edge of the cutting plates so that when I ran my sandwich through the machine it wouldn't cut along the bottom edge.  I then took my craft knife and a ruler and trimmed along the edge to form a small strip below then word.  I then trimmed one end off of using our Fishtail Banner dies.

The Sweet shoppe set comes with a stamp of 12 connected sprinkles that were designed to stamp on half the doughnut and then flip around and stamp on the second half of the doughnut. This allows for quick and easy decorating of the donuts, cupcakes and ice cream while still saving some space on the set for more images.

For the jelly filled doughnut, I cover the doughnut hole on my stamp with a bit of scotch tape, inked up my stamp, peeled off the tape and then stamped my image.  I then was able to stamp the swirl of frosting in the center.  I completed my card by giving the bottom edge a decorative scalloped edge with our Sunny Border dies.
Sunny Studio Stamps: Sweet Shoppe Donuts Card by Mendi Yoshikawa

This set can create 15 unique sentiments perfect for both card making and scrapbooking.  The sprinkles and toppings in the set can also mix and match for endless customized cupcakes and donuts.


Sunny Studio Stamps: Introducing New Sweet Shoppe Stamp Set


And here's a full look at the new Sweet Shoppe stamp set, coordinating dies and Sweet Word die.


Sunny Studio Stamps: Introducing New Sweet Shoppe Stamp Set     Sunny Studio Stamps: Introducing New Sweet Shoppe Die Set 

Sunny Studio Stamps: Introducing New Sweet Shoppe "Sweet" Word Die


Thanks much for swinging by today.  I hope you enjoyed this look at our newest set.  Please join us again tomorrow for the full reveal of our fourth stamp set, but before you go make sure to sign up for your chance to win a $20 gift certificate to our store using the rafflecopter below.  

We are giving away one $20 gift certificate each day for a total of five lucky winners this week. The contest for each post closes at Midnight PST on Friday, July 1st with winners announced on Saturday, July 2nd.  :)