Showing posts with label Stitched Scallop Dies. Show all posts

Monday, February 4, 2019

Over The Rainbow Cards with Eloise and Leanne

Hello friends, Eloise here and today I have a rainbow card to share with you all using the Over The Rainbow Stamp Set and Rainbow Word Dies. I also used some of the gorgeous new patterned paper along with the Stitched Scallop Dies to add in the rainbow element.

Sunny Studio Stamps: Over The Rainbow Stitched Scallops Rainbow Word Die Rainbow Themed Card by Eloise Blue

To start off my project today I cut 1” strips from the Dots & Stripes Pastels Patterned Paper Pack and cut the Stitched Scallop Dies from each of the colours. I added foam tape to the backs of each of the strips and adhered them to a card base.

Sunny Studio Stamps: Over The Rainbow Stitched Scallops Rainbow Word Die Rainbow Themed Card by Eloise Blue

For my sentiment, I white heat embossed the words ‘Wishing You A’ and ‘Of Happiness’ from Over The Rainbow onto strips of grey cardstock. 

Sunny Studio Stamps: Over The Rainbow Stitched Scallops Rainbow Word Die Rainbow Themed Card by Eloise Blue

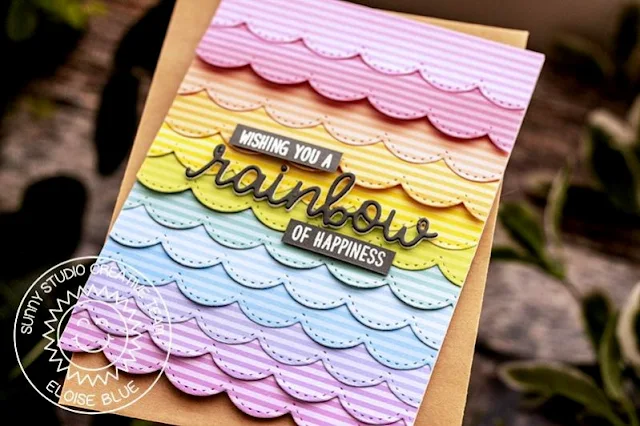
I also die cut the Rainbow Word Die from the same grey and out of foam as well. I adhered the two together and adhered the die cut word and additional sentiments into the centre of the card.

Thanks so much for stopping by today and I’ll see you next time.

--------------------------------------------------------

Happy Monday everyone! Leanne here and I have a very fun and colorful card to share today. This is an interactive sliding window card featuring a rainbow scene and coordinating sentiment. This was my first sliding window card and I was pleasantly surprised how easy it was to do with the help of the Sliding Window die. I have used an encouraging sentiment here but this card design could be used for other occasions like birthdays or get well wishes.


Sunny Studio Stamps: Over The Rainbow Sliding Window Die Rainbow Word Die Rainbow Themed Card by Leanne West

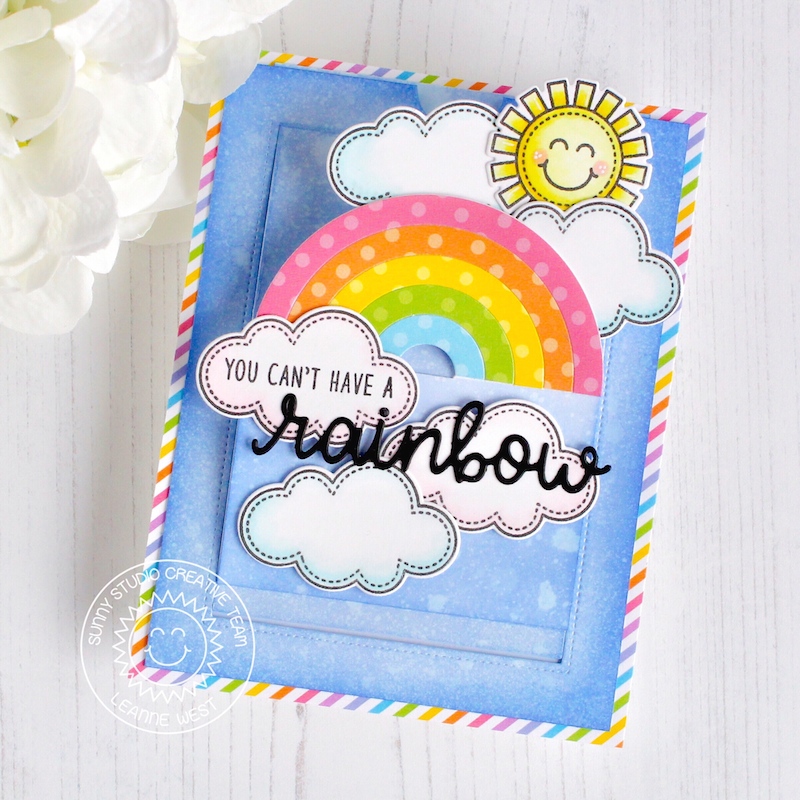
I started by blending a combination of Blueprint Sketch and Stormy Sky Distress Oxide Ink onto some Bristol Smooth card stock. I cut out all the pieces for the slider window from the inked card stock. I used the Sunny Semi Circle die to die cut the rainbow. 


Sunny Studio Stamps: Over The Rainbow Sliding Window Die Rainbow Word Die Rainbow Themed Card by Leanne West

The polka dot pattern is from the Dots & Stripes Pastels paper pack. Since the rainbow will be free standing when the window slider is opened, I’ve backed it with heavy weight white card stock.  


Sunny Studio Stamps: Over The Rainbow Sliding Window Die Rainbow Word Die Rainbow Themed Card by Leanne West

I stamped and Copic colored the sun and clouds which are from Sunny Sentiments. I cut them out with the coordinating Sunny Sentiments dies. I used the sun and 5 of the cloud images to help set the scene around the rainbow. I built a custom sentiment using the Over The Rainbow stamps and the Rainbow Word die


Sunny Studio Stamps: Over The Rainbow Sliding Window Die Rainbow Word Die Rainbow Themed Card by Leanne West

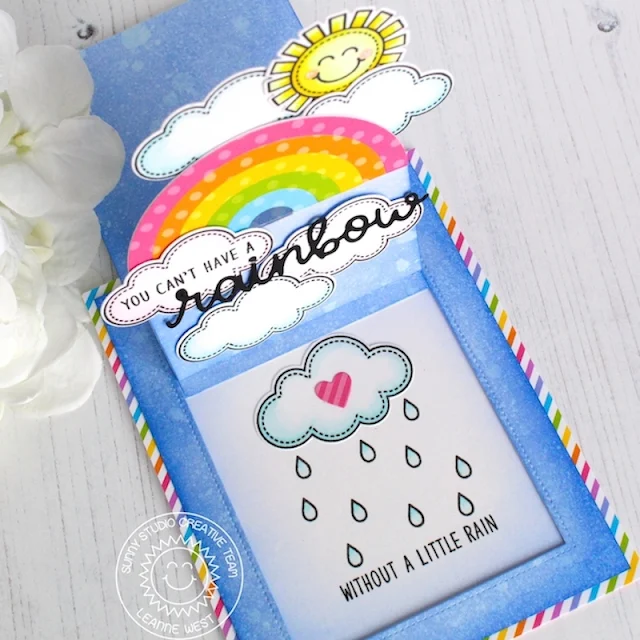
On the inside, I’ve stamped the second half of the sentiment and added another cloud with raindrops. I also added a die cut heart to the center of the cloud. This little heart comes from the Basic Mini Shape Dies II. I covered an A2 card base with some rainbow diagonal stripe paper from the Spring Sunburst paper pack. I adhered the window slider over top of the stripe paper and my card is complete.  

Sunny Studio Supplies Used:

Sunny Semi Circles Dies
Shop at:
Sunny Studio
Sunny Sentiments Dies
Shop at:
Sunny Studio
Sunny Sentiments Stamps
Shop at:
Sunny Studio
Sliding Window Dies
Sliding Window Dies
Shop at:
Sunny Studio
Dots & Stripes Pastels 6x6 Paper
Shop at:
Sunny Studio
Over The Rainbow Stamps
Shop at:
Sunny Studio
Rainbow Word Die
Rainbow Word Die
Shop at:
Sunny Studio
Mini Basic Shape Dies II
Shop at:
Sunny Studio

Sunday, December 30, 2018

A Birds Life Everyday Card with Eloise

Hello friends, Eloise here and today I have a card to share with you all using the A Birds Life stamp set, an oldie but a goodie. I love this set so much and thought it would be perfect to make an everyday card.

Sunny Studio Stamps: A Bird's Life Stitched Scallop Dies Everyday Card by Eloise Blue

I started off stamping out my images from the A Birds Life stamp set and colouring them in with Copic Markers. I then used the coordinating dies to cut them out.

(Copic Markers Used: Y21, YR12, YR15 / YG61, YG63, YG67 / E53, E55, E57 / R81, R83, R85 / RV13, RV25, RV19 / 0 / BG11, BG13, BG49 / Y11, Y15, Y19 / C1, C3, C5)

Next up I took a Cloud Border Die, I used one from another brand but you could cut your own or use the Stitched Scallop Dies at an angle to get a similar effect. I cut the die from white cardstock and stamped the 'from our nest to yours' sentiment on it with black ink.

Sunny Studio Stamps: A Bird's Life Stitched Scallop Dies Everyday Card by Eloise Blue

I then ink blended some blue Distress Inks onto a piece of watercolour cardstock and flicked it with some water. I dried it off with a heat tool and adhered all my pieces into place. I tied some white hemp cord around the branch to "attach" my bird house and my card was complete.

Thanks so much for stopping by today and I'll see you in the new year!

Sunny Studio Supplies Used:

A Bird's Life Stamps
Shop at:
Sunny Studio
A Bird's Life Dies
A Bird's Life Dies
Shop at:
Sunny Studio
Stitched Scallop Dies
Shop at:
Sunny Studio

Saturday, December 8, 2018

Guest Designer Spotlight: Winter Themed Cards with Leanne West

Hi everyone! Leanne West here with you today and for my last guest post of the year I’m sharing three projects that are very die-cut dominant. In fact only the sentiments are stamped. I put some the newest stand alone dies and Holiday Cheer paper pack to good use so let’s get started.

Sunny Studio Stamps: Build-A-Tag Warm & Cozy Fancy Frames Mug Hugs Sweater Vest Loopy Letter Dies Winter Themed Cards by Leanne West

First up is a decorative tag. I always like to dress up little gifts such as this fun cocoa mix and marshmallow filled cone. I used the Build-A-Tag #1 dies (with rounded tops) to create two tags that I layered together slightly askew. I decorated the tag with the mug and mittens which are from the Warm & Cozy die set. I die cut the mug from kraft card stock. To lighten the kraft color, I sponged on some white pigment ink over mug.  


Sunny Studio Stamps: Build-A-Tag Warm & Cozy Fancy Frames Mug Hugs Sweater Vest Loopy Letter Dies Winter Themed Cards by Leanne West

All pattern paper for my tags is from the Holiday Cheer paper pack except for the mittens.  The blue gingham paper I used for the mittens is from the Classic Gingham paper pack. I die cut a little banner for the sentiment. This die comes from the Fancy Frames Rectangle die set. I white heat embossed the sentiment which is from the Mug Hugs stamp set. I punched a hole in the sentiment banner and tied it plus the layered tags to the top of the cocoa mix cone with baker’s twine.  


Sunny Studio Stamps: Build-A-Tag Warm & Cozy Fancy Frames Mug Hugs Sweater Vest Loopy Letter Dies Winter Themed Cards by Leanne West

For my second project I made a quick and easy shaped card using the Sweater Vest dies. I think this type of card will be perfect to enclose a gift card to the recipient’s favorite clothing store. Again I used pattern paper from the Holiday Cheer paper pack and some plain card stock for the white trim. That argyle works perfectly to adorn the front of the sweater and serves as ground for the sentiment. I stamped and heat embossed the sentiment which is from the Alpaca Holiday stamp set.  


Sunny Studio Stamps: Build-A-Tag Warm & Cozy Fancy Frames Mug Hugs Sweater Vest Loopy Letter Dies Winter Themed Cards by Leanne West

For my final project today I wanted to create a colorful holiday card using the adorable stocking hat in the Warm & Cozy die set. I started with a card base that measures 4 inches wide by 8.5 inches long. I cut a panel of light blue card stock that’s just a half inch narrower than the width of the card. I die cut a decorative border with one of the Stitched Scalloped dies and the multi color stripe pattern from the Holiday Cheer paper pack.  


Sunny Studio Stamps: Build-A-Tag Warm & Cozy Fancy Frames Mug Hugs Sweater Vest Loopy Letter Dies Winter Themed Cards by Leanne West

I die cut all the components for the stocking hat to create five hats in different colors. I die cut the pom pom and trim out of white card stock and then sponged on a coordinating ink to make four of the hats monochromatic. I wanted the fifth hat to stand out so I used the same stripe as the border and added some die cut holly.  

I added a stamped and die cut sentiment. The stamped part of the sentiment is from the Festive Greetings stamp set which I white heat embossed on a thin strip of pink card stock.  From the same pink card stock I die cut letters using the Loopy Letters alphabet dies to spell out “warm & cozy”. Lastly I die cut several tiny snowflakes to embellish the top half of the card.  

Thanks for joining me today. I hope you all have a wonderful and crafty holiday season! 

Sunny Studio Supplies Used:


Mug Hugs Dies
Mug Hugs Dies
Shop at:
Sunny Studio
Mug Hugs Stamps
Mug Hugs Stamps
Shop at:
Sunny Studio
Stitched Scallop Dies
Shop at:
Sunny Studio
Festive Greetings Stamps
Shop at:
Sunny Studio
Fancy Frames- Rectangles
Shop at:
Sunny Studio
Classic Gingham 6x6 Paper
Shop at:
Sunny Studio
Holiday Cheer 6x6 Paper
Shop at:
Sunny Studio
Alpaca Holiday Stamps
Shop at:
Sunny Studio
Alpaca Holiday Dies
Alpaca Holiday Dies
Shop at:
Sunny Studio
Build-A-Tag #1 Dies
Build-A-Tag #1 Dies
Shop at:
Sunny Studio
Loopy Letters Dies
Loopy Letters Dies
Shop at:
Sunny Studio
Sweater Vest Dies
Sweater Vest Dies
Shop at:
Sunny Studio
Warm & Cozy Dies
Warm & Cozy Dies
Shop at:
Sunny Studio

Saturday, March 3, 2018

Guest Designer Spotlight: Cards with Karin Akesdotter

Hi everyone! It's Karin Akesdotter here from Peppermintpatty's Papercraft. I'm so excited to share a new card that I've created with Sunny Studio Stamp's spring 2018 release!

Sunny Studio Stamps: Tiny Dancers Purrfect Birthday Birthday Cards by Karin Akesdotter

I made a panel by layering striped and polka dot paper. I also added a lacy edged die cut using the Stitched Scallop dies. I die cut the Wishes Word die from white cardstock and adhered a few layers of that to create dimension.

I then stamped, colored and die cut the adorable ballerinas and some sweet roses before adhering them to the card with foam adhesive and adhesive tape. Finally I made a card base and adhered the panel to it with foam adhesive.

Sunny Studio Stamps: Tiny Dancers Purrfect Birthday Birthday Cards by Karin Akesdotter

For this card I matted a white card base with green polka dot patterned paper and then die cut a panel from Neenah solar white cardstock. I stamped my cats and then masked them so I could ink the background. 

Sunny Studio Stamps: Tiny Dancers Purrfect Birthday Birthday Cards by Karin Akesdotter

When I was done inking I spattered the background before I removed the masking. I used Copics for the coloring and then added some adhesive dots. I adhered the panel to the card using foam adhesive.

Sunny Studio Stamps: Tiny Dancers Purrfect Birthday Birthday Cards by Karin Akesdotter

I made a panel from striped paper and adhered it to a scalloped black card base. I also added a lacy edge die cut with Stitched Scallop dies. I die cut the Wishes Word die from white cardstock and adhered a few layers of that to create dimension.

I then stamped, colored and fuzzy cut the adorable ballerina, two pairs of ballerina shoes and some sweet roses before adhering them to the card with foam adhesive and adhesive tape. Finally I made a card base and adhered the panel to it with foam adhesive.

Sunny Studio Supplies Used:

Stitched Scallop Dies
Shop at:
Sunny Studio
Wishes Word Die
Wishes Word Die
Shop at:
Sunny Studio
Tiny Dancers Stamps
Tiny Dancers Stamps
Shop at:
Sunny Studio
Tiny Dancers Dies
Tiny Dancers Dies
Shop at:
Sunny Studio
Purrfect Birthday Stamps
Shop at:
Sunny Studio
Purrfect Birthday Dies
Shop at:
Sunny Studio

Monday, February 5, 2018

Cascading Hearts Froggy Valentine Card with Eloise

Hi everyone, Eloise here today using the new Cascading Hearts stamp set along with Froggy Friends, Sunny Sentiments, Comfy Creatures and the Stitched Scallop Dies to create a Valentine's Day card.

Sunny Studio Stamps: Cascading Hearts Froggy Valentine Card by Eloise Blue

To begin, I used some Coral Berry ink from Altenew to stamp the Cascading Hearts stamp onto a piece of watercolour cardstock twice. This stamp is super easy to line up next to each other and combines nicely. Once I stamped it twice, I went ahead and cut a piece of masking tape into a hill shape, adhered down the positive piece at the bottom of the cardstock and blended some Picked Raspberry and Spun Sugar Distress Ink onto the background, going super light at the bottom as it reaches the hill. 

Next, I removed the mask, replaced it with the negative piece and blended some Mermaid Lagoon and Cracked Pistachio ink onto the bottom half. Once all my ink blending was done, I used the Froggy Friends stamp set and stamped the water ripple stamp into the blue ink blended piece with some Volcano Lake ink from Altenew. Next, I stamped out all my images from Froggy Friends and Sunny Sentiments, adding in little hearts to the tummies of the frogs and eyelashes to the female frogs also and coloured them in with Copic Markers. Once they were coloured, I cut them out with their coordinating dies.

Sunny Studio Stamps: Cascading Hearts Froggy Valentine Card by Eloise Blue

Next up, I added foam tape and adhesive to all my images and adhered them down in the water ripple. Then, I used the Comfy Creatures stamp set to stamp 'Happy' into the centre of the cloud, then used the 'Valentine's Day' sentiment from Froggy Friends underneath Happy to complete my sentiment. Then I popped it up on foam tape and adhered it above my scene cluster. Lastly, I adhered my entire panel onto a card base, then used the Stitched Scallop Dies and cut out two borders using white cardstock and adhered them on the top and bottom of my card to frame it off.

Thanks so much for stopping by today and I'll catch you next time.

Sunny Studio Supplies Used:

Comfy Creatures Stamps
Shop at:
Sunny Studio
Froggy Friends Dies
Froggy Friends Dies
Shop at:
Sunny Studio
Froggy Friends Stamps
Shop at:
Sunny Studio
Sunny Borders Dies
Sunny Borders Dies
Shop at:
Sunny Studio
Sunny Sentiments Dies
Shop at:
Sunny Studio
Sunny Sentiments Stamps
Shop at:
Sunny Studio
Cascading Heart Stamps
Shop at:
Sunny Studio