Showing posts with label Stitched Circle Dies. Show all posts

Sunday, October 1, 2023

Too Cute To Spook Card with Tammy

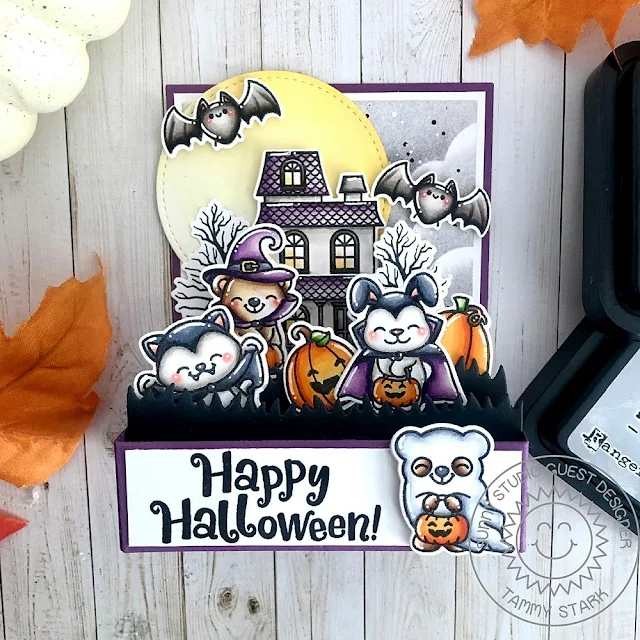
Hi friends! Tammy here with a fun Halloween box card featuring the adorable set, Too Cute To Spook. 

Sunny Studio Stamps: Too Cute To Spook Halloween Card by Tammy Stark (featuring Picket Fence Border Dies, Stitched Circle Dies)

To begin, I stamped the images from Too Cute To Spook, colored with Copic markers, and die cut using the Too Cute To Spook Dies. Next, I created a basic rectangle base using purple cardstock. I then cut the back panel pieces from Purple, white, and Bristol smooth cardstock. I created a cloudy background on the Bristol cardstock with Hickory Smoke and Lost Shadow Distress Oxide inks, adding white and black paint splatters. Once dry, I layered the back pieces together and attached to the inside of the box. I die cut three grassy borders from black cardstock using the Picket Fence Border Die and attached them to the inside of the box.

Sunny Studio Stamps: Too Cute To Spook Halloween Card by Tammy Stark (featuring Picket Fence Border Dies, Stitched Circle Dies)

I die cut the moon from Bristol cardstock using the Stitched Circle Large Dies, lightly inking the edges with Scattered Straw Distress Oxide ink, before attaching to the back of the card.

Sunny Studio Stamps: Too Cute To Spook Halloween Card by Tammy Stark (featuring Picket Fence Border Dies, Stitched Circle Dies)

Next, I attached the die cut images to the box, using foam tape for dimension and stability. I cut a piece of white cardstock to fit the front of the box and stamped the 'Happy Halloween' sentiment in black ink. I then attached the cute ghost to the front with foam tape to complete my card!

Thanks so much for stopping by! Hugs!

Sunny Studio Supplies Used:

Picket Fence Border Dies
Shop at:
Sunny Studio
Stitched Circle Large Dies
Shop at:
Sunny Studio
Too Cute To Spook Stamps
Shop at:
Sunny Studio
Too Cute To Spook Dies
Shop at:
Sunny Studio

Monday, June 19, 2023

Summer Sweets Card with Bobbi

Bobbi here with you today! Summertime is the season for sweet and cool treats like popsicles, ice cream cones and sandwiches, iced-tea, a favorite-flavored soda and a sundae. Sunny Studio Stamps has thought of all the favorite treats in this “cool” set called, “Summer Sweets.” I’m using the Summer Sweets stamp set and dies for this 5″ X 7″ card.

Sunny Studio Stamps: Summer Sweets Card by Bobbi Lemanski (featuring Stitched Circle Dies)

For this card, I created a “pattern” background by stamping all the cute treats and a few of the sentiments from the set in black on white cardstock. I splattered bright ink colors over the black and white using my Kuretake Gansai Tambi watercolor paints and a small fan brush. I also added some more bolder tiny squares of color using my Copic Markers. I used a very random pattern when adding the squares.

Sunny Studio Stamps: Summer Sweets Card by Bobbi Lemanski (featuring Stitched Circle Dies)

For the focal point, I stamped individual sweets (some of my favorites) and three tiny cherries and cut them using the coordinating dies. I colored them using Copic markers.  I attached them to a circle of watercolor paper that was also splattered and color washed with color.  I used foam tabs behind the three center treats – iced tea, soda and popsicle – to make them stand out. I stamped the sentiment, “You’re the Coolest” right under the treats using black ink. I added an aqua outline by attaching a larger circle of color around the watercolor circle (both using the Stitched Circle Large Dies and attached it to the middle of the card front panel. The entire panel was adhered to a white card base to complete the card.

Thanks for stopping by today. If you want to see more ideas and inspiration from me, subscribe to my blog, BobbiHartDesign.com. I’ll send you updates on new posts! You can also find me on Instagram as @BobbiHartDesign and on Facebook as BobbiHartDesign.

Sunny Studio Supplies Used:

1
1
Shop at:
Sunny Studio
Summer Sweets Dies
Summer Sweets Dies
Shop at:
Sunny Studio
Stitched Circle Large Dies
Shop at:
Sunny Studio

Thursday, May 4, 2023

Scrumptious Cupcakes Card with Marine

Hi crafty friends, Marine here today to offer you a delicious cupcake from Scrumptious Cupcakes! I created this birthday shaker card using bits and pieces from different sets, and the first thing I did was to create the background. 

Sunny Studio Stamps: Scrumptious Cupcakes Birthday Card by Marine Simon (featuring Bursting Hearts Dies, Scalloped Circle Mat Dies, Stitched Circle Dies)

I cut a 5,5 x 4,25 inches Strathmore bristol smooth panel, and used distress oxide inks to color it. From the center: kitsch flamingo, squeezed lemonade and salvaged patina. As always I splattered the panel with water and white ink to make it less flat, and set it aside to dry.

Next I worked on the shaker panel. I cut a white Bursting Hearts panel, as well as a white frame using a die from my stash. I attached the frame on the front of the bursting hearts panel, and at the back I stuck an acetate panel. Still at the back of the bursting hearts panel, I attached foam strips all along the four edges, added golden heart sequins on the acetate, and then stuck my oxide ink panel on the foam strips to close my shaker panel. I attached it on a card base, and then moved on to the cupcake.

I created it using Lawn Fawn Inks. For the cupcake case I used butter + lemonade + sunflower inks, for the cupcake itself I used doe ink, and for the frosting I used ballet slippers + peachy keen + wild rose inks.

Sunny Studio Stamps: Scrumptious Cupcakes Birthday Card by Marine Simon (featuring Bursting Hearts Dies, Scalloped Circle Mat Dies, Stitched Circle Dies)

I cut each element using the coordinating dies, and set them aside for a minute because I wanted to add a small background behind my cupcake. As a base I cut a scalloped circle out of a Dots & Stripes Pastels pattern paper using a Scalloped Circle Mat 1 die, and then I cut a gold glitter frame using the same Scalloped Circle Mat 1 die as well a Stitched Circle Large die to create a frame that I attached on the scalloped circle.

I stuck my scalloped element in the middle of the Bursting Hearts panel, and then the cupcake on top using 1mm foam squares. Next I white heat embossed my greeting on a Notebook Photo Corners black banner combining words from Garden Fairy and Panda Party, and I attached the banner below the cupcake.

And that's it! Thank you so much for stopping by, and see you next week!

Sunny Studio Supplies Used:

Dots & Stripes Pastels 6x6 Paper
Shop at:
Sunny Studio
Garden Fairy Stamps
Garden Fairy Stamps
Shop at:
Sunny Studio
Scalloped Circle Mat 1 Dies
Shop at:
Sunny Studio
Stitched Circle Large Dies
Shop at:
Sunny Studio
Bursting Heart Die
Bursting Heart Die
Shop at:
Sunny Studio
Panda Party Stamps
Panda Party Stamps
Shop at:
Sunny Studio
Notebook Photo Corners Dies
Shop at:
Sunny Studio
Scrumptious Cupcakes Stamps
Shop at:
Sunny Studio
Scrumptious Cupcakes Dies
Shop at:
Sunny Studio

Wednesday, March 1, 2023

Hayley Alphabet Die Focused Cards with Catherine and Marie

Hello Crafty Friends! Catherine here, today I am sharing a rainbow card featuring Hayley Uppercase Alphabet Dies and Hayley Lowercase Alphabet Dies.

Sunny Studio Stamps: Hayley Alphabet Die Focused Rainbow Card by Catherine Cohen (featuring Panda Party, Stitched Circle Dies)

To start, I ink blended the cloudy background with a stencil made using Fluffy Cloudy Border Dies with Tumbled Glass Distress Oxide on to A2 size cardstock. I splattered some blue watercolor onto the card for added interest.

Next, I die cut four more cloudy borders for the top and bottom of the card. Two out of white cardstock and two out of pearlescent vellum. I lightly inked the edges of the two white cloudy borders with the same ink. I layered the cloudy borders onto the top and bottom of the card with foam tape.

To make the rainbow, I used the circle dies from Stitched Circle Large Dies and Stitched Circle Small Dies. I nested the smaller circles inside the larger circles and ran it through my die cut machine and cut the circles into an arch. I tucked the rainbow into the cloudy border and adhered it onto the background with glue. I used the bright and cheery paper from Spring Sunburst Paper. I added a sun using Sunny Sentiments Dies and a stitched circle from Stitched Circle Large Dies using paper from Classic Gingham 6x6 Paper.

Sunny Studio Stamps: Hayley Alphabet Die Focused Rainbow Card by Catherine Cohen (featuring Panda Party, Stitched Circle Dies)

For the sentiment “Bright,” I die cut the letters twice  with Hayley Uppercase Alphabet Dies and Hayley Lowercase Alphabet Dies out of white card stock and once out of scrap colored cardstock. I adhered the white letters together and then the colored letters on top and added highlights with a white gel pen.

I added a few more clouds from Balloon Rides Dies and I couldn’t resist but to add a panda from Panda Party StampsI finished off the card with a colorful sentiment Happy Thoughts Stamps using the following Altenew Inks: Fresh Lemon, Pinkalicious, Deep Iris, and Firefly.

Thank you so much for stopping buy! Have a wonderful day!

---------------------------------------

Hello Crafty Friends, Marie here! Today I am back sharing a very simple Easter card featuring Sunny Studio Stamps' Hayley Lowercase Alphabet Dies and Hayley Uppercase Alphabet Dies as well as some super cute images from their Chubby Bunny Stamps and Bunnyville Stamps. This adorable chubby bunny has been blessed with tons of Easter treats and it doesn't look like he's about to share anytime soon! 

Sunny Studio Stamps: Hayley Alphabet Die Focused Bunnyville Easter Card by Marie Marco (featuring Chubby Bunny)

To create this simple and sweet Easter card, I first start off by die cutting my A2 sized card base from 110 lb. heavyweight cardstock. I die cut another A2 sized panel of bright yellow pattern paper from the new Spring Fever Paper. I then attached my pattern paper to my card base using a double sided tape adhesive. To create my background, I die cut a smaller sized panel from bristol smooth cardstock because inks glides smoothly with this type of paper. I used distress ink in the color Salvaged Patina to ink blend my sky and Twisted Citron for my grass. I centered my background panel and attached it to my card front with Bearly Art Precision craft glue.

For my Easter Blessings sentiment, I combined the Hayley Uppercase Alphabet Dies with the Hayley Lowercase Alphabet Dies. I cut out all my alphas from  Neenah Solar White cardstock. I just love the typography of these dies! It's whimsical and elegant at the same time, and I absolutely love how you can create your own sentiments. 

Sunny Studio Stamps: Hayley Alphabet Die Focused Bunnyville Easter Card by Marie Marco (featuring Chubby Bunny)

For my images, I used both the Chubby Bunny Stamps and the Bunnyville Stamps. I stamped out all the images onto watercolor paper using Distress Ink in Antique Linen. I colored all my images using watercolor pencils. I cut all my images using the Chubby Bunny Dies and the Bunnyville Dies

Finally, I adhered my sentiment and all my images using a combination of craft glue, tape adhesive, and foam tape. There you have it friends, a very simple Easter card that could be mass produced! Thanks so much for joining me for this week's card inspiration! Until next time, have fun crafting and creating! 

Sunny Studio Supplies Used:

Sunny Sentiments Dies
Shop at:
Sunny Studio
Classic Gingham 6x6 Paper
Shop at:
Sunny Studio
Happy Thoughts Stamps
Shop at:
Sunny Studio
Spring Sunburst 6x6 Paper
Shop at:
Sunny Studio
Chubby Bunny Stamps
Chubby Bunny Stamps
Shop at:
Sunny Studio
Chubby Bunny Dies
Chubby Bunny Dies
Shop at:
Sunny Studio
Fluffy Clouds Border Dies
Shop at:
Sunny Studio
Balloon Rides Stamps
Shop at:
Sunny Studio
Balloon Rides Dies
Balloon Rides Dies
Shop at:
Sunny Studio
Stitched Circle Small Dies
Shop at:
Sunny Studio
Stitched Circle Large Dies
Shop at:
Sunny Studio
Bunnyville Stamps
Bunnyville Stamps
Shop at:
Sunny Studio
Bunnyville Dies
Bunnyville Dies
Shop at:
Sunny Studio
Panda Party Stamps
Panda Party Stamps
Shop at:
Sunny Studio
Panda Party Dies
Panda Party Dies
Shop at:
Sunny Studio
Hayley Lowercase Alphabet Dies
Shop at:
Sunny Studio
Hayley Uppercase Alphabet Dies
Shop at:
Sunny Studio
Spring Fever Paper
Spring Fever Paper
Shop at:
Sunny Studio

Monday, February 20, 2023

Easter Cards with Bobbi and Cathy

Hello friends, Bobbi here! Today, I’m sharing a card for the Easter holiday. I’m using the Chickie Baby stamps (coordinating dies here) and a few carrot images from the Bunnyville stamps set (coordinating dies here). I’m also using the Slimline Nature Borders Dies for the grassy hills and the Spring Fever paper pad for the grass.

Sunny Studio Stamps: Chickie Baby Easter Card by Bobbi Lemanski

This card measures 6″ wide  X 5″ tall and fits inside a 5″ X 7″ envelope. I used this shorter width so that my 6″ square Spring Fever paper covered the full width at the bottom. This card could also be made into the popular, A2-size card with no seams, too. I just happen to like a bigger card to give.

I started by splattering my card front panel with watercolors. Using the grassy border from the Slimline Nature Borders dies and the grass pattern paper from the Spring Fever paper pad, I cut a couple rolling hills. I used two layers to make a foreground and background in the scene. I blended on some green Mowed Lawn Distress Oxide ink at the bottom for interest.

Sunny Studio Stamps: Chickie Baby Easter Card by Bobbi Lemanski

Next I stamped, colored (see colors below) and cut out my chicks, basket and the carrot images. I turned the large carrot on its side, punched out half of a 5/8″ circle and added two 3/8″ black wheels to make the carrot into a car. Now my chick fits inside perfectly and is ready to travel home for the holidays! Do you see his home?!

Copic Sketch Marker Colors used to color the images:
Carrots: YR07, YR68, YR65, YG67, YG17, YG03, YG01
Chicks: YR19, YR15, YR13, YR08, YR68, Y38, white Gelly Roll Pen for cheek highlights
Eggs: RV55, RV02, RV00, G00, G000, Y13, Y08, BG02, BB00, B000
Basket and bow: B04, B02, B00, RV17, RV55, RV02
Bunny Ears/Door: Bg01, B00, RV55, RV02
Shading: W4, W2, W1

Sunny Studio Stamps: Chickie Baby Easter Card by Bobbi Lemanski


All the cute images were set and glued in place. I added a black string to the carrot balloon. I stamped the “Happy Easter” phrase in the upper left corner to finish the card.

Thanks for stopping by today. If you want to see more ideas and inspiration from me, subscribe to my blog, BobbiHartDesign.com. I’ll send you updates on new posts! You can also find me on Instagram as @BobbiHartDesign and on Facebook as BobbiHartDesign.

-----------------------------------------------

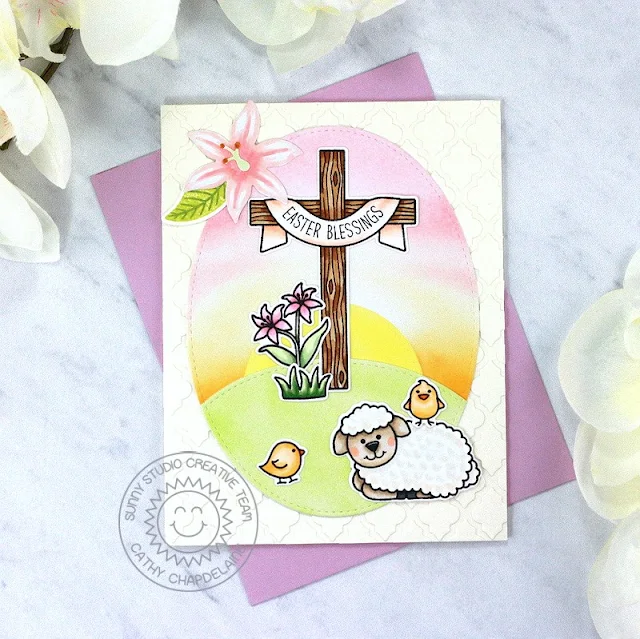
Hey friends! Cathy here today and I’ve got a sweet Easter card to share with you using the beautiful Easter Wishes Stamps.

Sunny Studio Stamps: Easter Wishes Easter Card by Cathy Chapdelaine

I started this card with a soft embossed look to the card front using the Frilly Frames Quatrefoil Dies. This technique takes a little bit of time, but I think the results are worth it. First, I cut an A2 sized piece of ivory cardstock and die-cut a second piece of ivory cardstock twice using the quatrefoil portion of the dies. I placed a die-cut quatrefoil frame over the A2 cardstock piece as a guide and began adhering the inner quatrefoil pieces to the cardstock. I moved the frame as needed until I had completely covered the A2 piece. Where pieces overlapped the edges, I carefully trimmed them along the edges of the A2 piece with scissors. I then adhered the cardstock to an A2 card base.

Next, I worked on a sunrise sky. I die-cut a piece of white cardstock using a Stitched Oval Die and then I die-cut a Stitched Circle Small Die from Eclipse masking tape. I placed the circle towards the bottom of the oval die-cut as a mask for the sun and inked from the bottom working up to the top of the oval with Spiced Marmalade, Fossilized Amber, Scattered Straw, Tattered Rose and Saltwater Taffy Distress inks. I then removed the circle, placed the negative portion of the circle die-cut masking tape over the sky and inked the sun with Squeezed Lemonade Distress ink.

Sunny Studio Stamps: Easter Wishes Easter Card by Cathy Chapdelaine

For the bottom grass portion, I die-cut a second piece of white cardstock with the same Stitched Oval Die and inked the bottom half of the oval with Twisted Citron Distress ink. I placed a smaller Stitched Oval Die across the bottom third of the oval and die-cut the piece. I then adhered it to the bottom of the oval sky piece.


Next, I stamped the images from the Easter Wishes Stamps on Neenah Classic Crest 80lb solar white cardstock, colored them with Copics and die-cut them using the coordinating diesTo finish, I die-cut a flower from the Botanical Backdrop Die from white cardstock, colored it with Copics and added a stamped/die-cut leaf from the Cherry Blossoms Stamps and Dies.


I hope you enjoyed and thanks for stopping by today! For more inspiration, please visit my blog www.inkredibleadventures.com and you can also find me on Instagram as @cathy.chapdelaine.


Sunny Studio Supplies Used:


Easter Wishes Dies
Easter Wishes Dies
Shop at:
Sunny Studio
Easter Wishes Stamps
Shop at:
Sunny Studio
Stitched Oval Dies
Stitched Oval Dies
Shop at:
Sunny Studio
Botanical Backdrop Die
Shop at:
Sunny Studio
Chickie Baby Stamps
Chickie Baby Stamps
Shop at:
Sunny Studio
Chickie Baby Dies
Chickie Baby Dies
Shop at:
Sunny Studio
Frilly Frames Quatrefoil
Shop at:
Sunny Studio
Slimline Nature Borders
Shop at:
Sunny Studio
Stitched Circle Small Dies
Shop at:
Sunny Studio
Bunnyville Stamps
Bunnyville Stamps
Shop at:
Sunny Studio
Bunnyville Dies
Bunnyville Dies
Shop at:
Sunny Studio
Cherry Blossoms Stamps
Shop at:
Sunny Studio
Cherry Blossoms Dies
Shop at:
Sunny Studio
Spring Fever Paper
Spring Fever Paper
Shop at:
Sunny Studio