Showing posts with label Slimline Dies. Show all posts

Tuesday, August 8, 2023

Purrfect Birthday Card with Isha

Hello everyone, I am Isha with a clean and simple card featuring the adorable cat image from the Purrfect Birthday stamp set. Even if this is a birthday stamp, I decided to create a fun and happy non-birthday card for a friend just to let her know that she makes me happy :)

Sunny Studio Stamps: Purrfect Birthday Card by Isha Gupta (featuring Slimline Dies, Home Sweet Gnome, Lovey Dovey, Garden Fairy)

I started by sponging a white card for the sky using kitsch flamingo, wilted violet and scattered straw distress oxide inks. Flick some water for some texture. Die-cut the front panel using the cloud die from the Slimline Nature Border dies. Adhere both the pieces to a white card base. Stamp the sentiment from the Lovey Dovey stamp using grey inks by Altenew to give an ombrè effect. 

Sponge the grass area by masking it using a post-it. Stamp the images, color using copic markers and die-cut using the coordinating dies. Adhere to the card using 3d foam and liquid glue.

Sunny Studio Stamps: Purrfect Birthday Card by Isha Gupta (featuring Slimline Dies, Home Sweet Gnome, Lovey Dovey, Garden Fairy)

Cat - Purrfect Birthday stamp and dies
Heart - Lovey Dovey stamp
Mushroom house - Garden Fairy stamps and dies
Mushroom - Home Sweet Gnome stamp and dies

To finish I added some Nuvo drops onto the mushroom. Thank you for dropping by and have a nice day!

Sunny Studio Supplies Used:

Purrfect Birthday Stamps
Shop at:
Sunny Studio
Purrfect Birthday Dies
Shop at:
Sunny Studio
Home Sweet Gnome Stamps
Shop at:
Sunny Studio
Home Sweet Gnome Dies
Shop at:
Sunny Studio
Slimline Nature Borders
Shop at:
Sunny Studio
Garden Fairy Stamps
Garden Fairy Stamps
Shop at:
Sunny Studio
Garden Fairy Dies
Garden Fairy Dies
Shop at:
Sunny Studio
Lovey Dovey Stamps
Lovey Dovey Stamps
Shop at:
Sunny Studio

Wednesday, August 2, 2023

Puppy Dog Kisses Card with Catherine

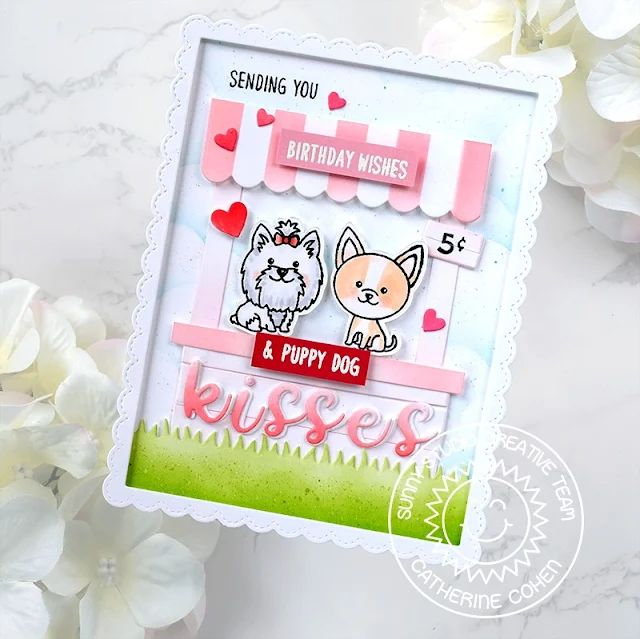
Hello Crafty Friends! Catherine here! Today, I am sharing a birthday card created with the adorable Puppy Dog Kisses.

Sunny Studio Stamps: Puppy Dog Kisses Birthday Card by Catherine Cohen (featuring Picket Fence Border Dies, Fancy Frame Dies, Slimline Dies, Stitched Heart Dies)

To start, I ink blended white cardstock 4”W x 5 ¼”H using Tumbled Glass Distress Oxide with a cloudy stencil made with Slimline Nature Border Dies. I stamped the top left corner of the panel with “Sending You” from Sending Sunshine Stamps.

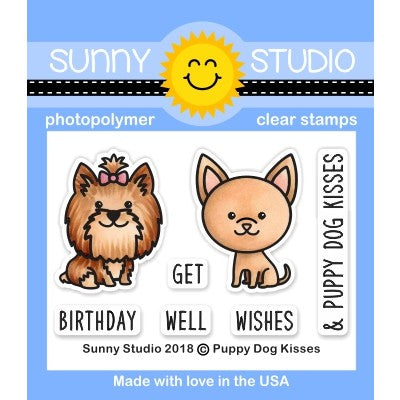
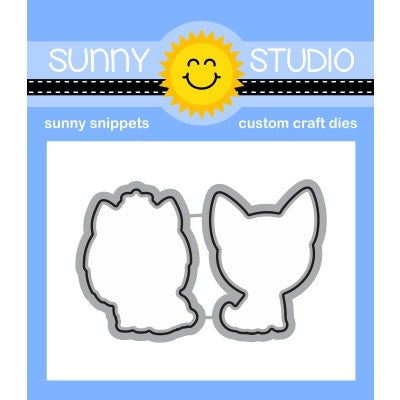
I then die cut the grass border using Picket Fence Border Die. I ink blended the border with Mowed Lawn Distress Oxide and sprayed the border with some water for added detail. I stamped and die cut the cute dogs from Puppy Dog Kisses Stamps and colored with Copic Markers listed in my blog link below.

To make the kissing booth, I die cut the awning from Sweet Treat House Add-On, I trimmed off one panel of the awning. I trimmed white cardstock to the following dimensions for the rest of the kissing booth:

Base: 3” W x 1 ¼”H - x 2 pieces. I trimmed one piece into 3 strips and adhered the strips onto the second piece for a wood effect.

Top: 3 ¼” W x ¼” H - x 1

Side Poles: 3/8” W x 3”H – x 2 pieces

Sunny Studio Stamps: Puppy Dog Kisses Birthday Card by Catherine Cohen (featuring Picket Fence Border Dies, Fancy Frame Dies, Slimline Dies, Stitched Heart Dies)

I inked blended the pieces with Spun Sugar Distress Oxide. I glued the booth together and adhered it onto the background and then I glued the grass border. I die cut two sets of “kisses” out of white cardstock. I ink blended one set with Festive Berries Distress Oxide and adhered it onto the white set for added dimension.

I added White Heat Embossed sentiments from the set, some hearts from Stitched Heart 2 Dies. I finished off the card by adding a border from Fancy Frames Rectangle Dies.

Thanks so much for joining me today! For a list of Copic Markers used, please visit me at Crafti-Cat. Have a wonderful week!

Sunny Studio Supplies Used:

Picket Fence Border Dies
Shop at:
Sunny Studio
Fancy Frames- Rectangles
Shop at:
Sunny Studio
Puppy Dog Kisses Stamps
Shop at:
Sunny Studio
Puppy Dog Kisses Dies
Shop at:
Sunny Studio
Sending Sunshine Stamps
Shop at:
Sunny Studio
Sweet Treats House Add-on
Shop at:
Sunny Studio
Slimline Nature Borders
Shop at:
Sunny Studio
Stitched Heart 2 Dies
Shop at:
Sunny Studio

Sunday, July 23, 2023

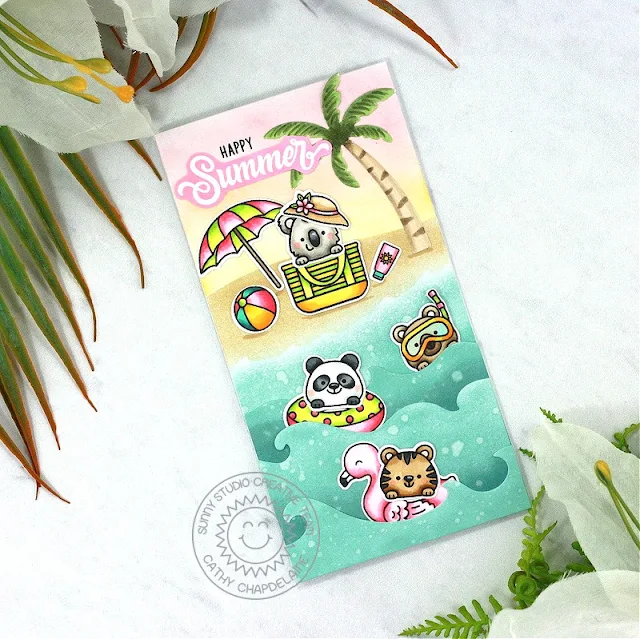
Beach Buddies Card with Cathy

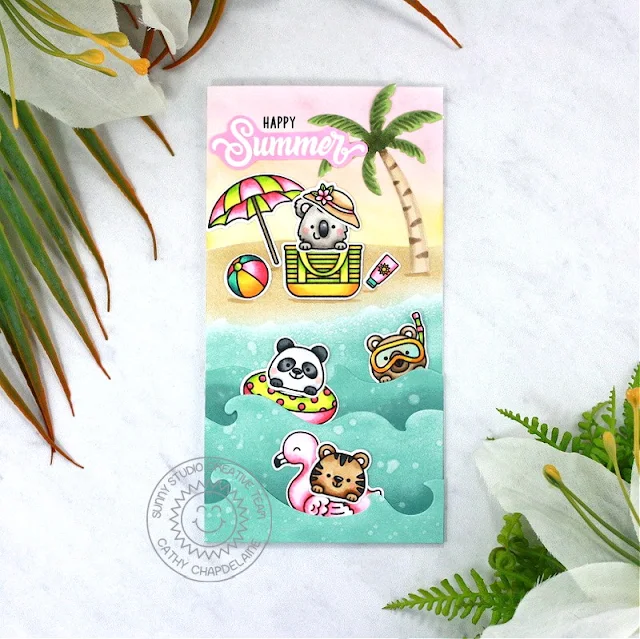
Hey friends! Cathy here today sharing a fun summer card featuring the adorable Beach Buddies Stamps. Summer is my favorite season so making ocean themed/tropical cards is one of my favorite things to do!

Sunny Studio Stamps: Beach Buddies Summer Themed Card by Cathy Chapdelaine (featuring Slimline Dies, Catch A Wave Dies, Tropical Trees Backdrop Dies)

This is a mini slimline card (card base is 6 1/4" x 6 1/2", scored on the 6 1/2" side at 3 1/4" and folded in half) and I started by cutting a 3” x 6” panel from white cardstock for the card front. I die-cut a piece of Eclipse masking tape using a Slimline Nature Borders Die and placed the tape across the panel 2 1/4" from the top edge. I then inked a soft sky with Scattered Straw, Dried Marigold and Spun Sugar Distress inks. I stamped the “happy” sentiment 1/2" below the top edge and 3/4" from the left edge.

Next, I masked the sky and tore a ragged edge on a post-it note. I applied the post-it note 1” below the horizon line and inked the sand with Antique Linen Distress ink. Using Speckled Egg Distress ink, I very lightly inked a few inches below the beach and dotted the shoreline with a white gel pen. I also sprinkled a little water on the Speckled Egg area. I then adhered the panel to the card front.

Sunny Studio Stamps: Beach Buddies Summer Themed Card by Cathy Chapdelaine (featuring Slimline Dies, Catch A Wave Dies, Tropical Trees Backdrop Dies)

For the waves, I cut 3 pieces of white cardstock (1” x 3 1/4", 2 1/8”x 3 1/4", 2 1/2" x 3 1/4") and die-cut the top edge of each piece using the Catch a Wave Dies. I inked them with Evergreen Bough Distress ink at the bottom blended into Speckled Egg Distress ink towards the top of each wave and sprinkled water on them. Since I tucked the critters behind the waves, I set them aside until I had my critters ready to adhere.

I stamped all the images on Neenah Classic Crest 80lb solar white cardstock, colored them with Copics and die-cut them using the coordinating dies. I used the Beach Buddies Stamps/Dies and the Beach Babies Stamps/Dies (umbrella and beach ball). I then adhered the critters and waves to the card front as shown.

To finish, I die-cut a palm tree from the Tropical Trees Backdrop Die from white cardstock, colored it with Copics and adhered it on the beach. I heat embossed the “Summer” sentiment on white cardstock with white embossing powder, inked over it with Kitsch Flamingo Distress ink and fussy cut around it.

I hope you enjoyed and thanks for stopping by today! For more inspiration, please visit my blog www.inkredibleadventures.com and you can also find me on Instagram as @cathy.chapdelaine.

Sunny Studio Supplies Used:

Beach Buddies Stamps
Shop at:
Sunny Studio
Beach Buddies Dies
Beach Buddies Dies
Shop at:
Sunny Studio
Beach Babies Stamps
Beach Babies Stamps
Shop at:
Sunny Studio
Beach Babies Dies
Beach Babies Dies
Shop at:
Sunny Studio
Catch A Wave Dies
Catch A Wave Dies
Shop at:
Sunny Studio
Slimline Nature Borders
Shop at:
Sunny Studio
Tropical Trees Backdrop
Shop at:
Sunny Studio

Wednesday, July 19, 2023

Plane Awesome Card with Catherine

Hello Crafty Friends! Catherine here! Today, I am sharing an uplifting card created with the fun Plane Awesome Stamps!

Sunny Studio Stamps: Plane Awesome Card by Catherine Cohen (featuring Loopy Letter Dies, Fluffy Cloud Border Dies, Floating By, Slimline Dies)

To start, I ink blended a cloudy background on A2 white cardstock with Tumbled Glass Distress Oxide using a stencil I made from the cloud die in Slimline Nature Border Dies. I splattered the background with some blue watercolor. Next, I die cut 4 cloudy borders for the top and bottom of the card using Fluffy Clouds Border Dies. I die cut two out of vellum and two out of white cardstock.

I stamped the images from Plane Awesome Stamps and die cut with Plane Awesome Dies. I added some balloons from Floating By Stamps. I colored all the images with Copic Markers listed in my blog link below. 

Sunny Studio Stamps: Plane Awesome Card by Catherine Cohen (featuring Loopy Letter Dies, Fluffy Cloud Border Dies, Floating By, Slimline Dies)

I added the word “fly” by die cutting two sets from white cardstock with Loopy Letters Dies I ink blended one set with Festive Berries Distress Oxide and I adhered it on top of the second set for dimension. I adhered all the images onto the background. I finished off the card with a White Heat Embossed sentiment from the set.

Thank you so much for joining me today! For a list of Copic Markers used, please visit me at Crafti-Cat. Have a wonderful week!

Sunny Studio Supplies Used:

Loopy Letters Dies
Loopy Letters Dies
Shop at:
Sunny Studio
Plane Awesome Stamps
Shop at:
Sunny Studio
Plane Awesome Dies
Plane Awesome Dies
Shop at:
Sunny Studio
Fluffy Clouds Border Dies
Shop at:
Sunny Studio
Floating By Stamps
Floating By Stamps
Shop at:
Sunny Studio
Floating By Dies
Floating By Dies
Shop at:
Sunny Studio
Slimline Nature Borders
Shop at:
Sunny Studio

Thursday, July 6, 2023

Birthday Cat Card with Marine

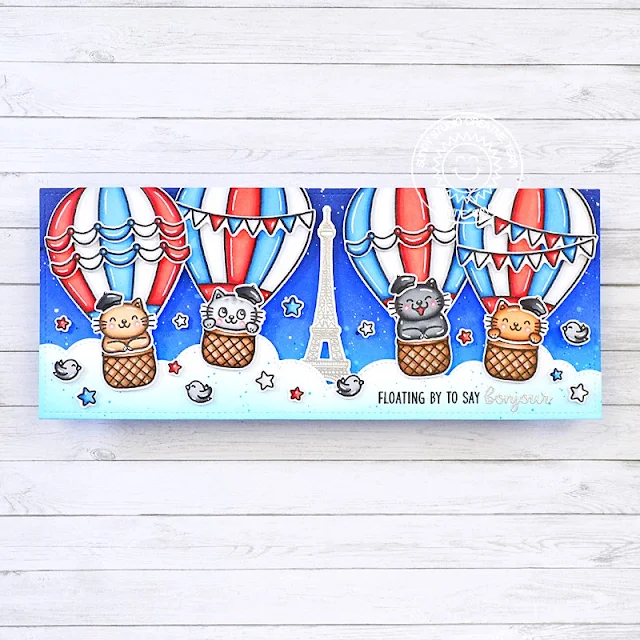
Hello crafty friends, Marine here with you today! In case you don't know, I'm French, and next week on July 14th we will celebrate Bastille Day. I never make cards or anything crafty for this day, so I thought it would be fun to mark the occasion and finally create something to celebrate our National Day. My card features four adorable kitties from Birthday Cat, and to complete my scene, I shopped my entire Sunny Studio collection and found the perfect images that match today's theme.

Sunny Studio Stamps: Birthday Cat Birthday Card by Marine Simon (featuring Slimline Dies, Balloon Rides, Paris Afternoon)

So I started off with the coloring. I stamped the images on Transotype perfect coloring paper using an alcohol marker friendly black ink, as always I cut them all using the coordinating dies, and then colored everything using my Spectrum Noir Illustrator markers and Graph'it Brush markers. Of course I went for a blue, white and red color palette to match the French flag, and in addition to the kitties from Birthday Cat, I picked:

- the hot air balloon + banners from Balloon Rides
- the Eiffel tower + beret from Paris Afternoon
- the stars from North Pole
- the birds from Seasonal Trees

Sunny Studio Stamps: Birthday Cat Birthday Card by Marine Simon (featuring Slimline Dies, Balloon Rides, Paris Afternoon)

I silver heat embossed the Eiffel tower from Paris Afternoon on the same paper as the images, and then I worked on the background. To fit the four hot air balloons, I went for a slimline design and cut an 8,5 x 3,5 inches Strathmore bristol smooth panel that I colored using salty ocean + blueprint sketch + chipped sapphire oxide inks. I splattered my panel with copic opaque white ink, as well as a mix of black soot oxide ink and water.

Sunny Studio Stamps: Birthday Cat Birthday Card by Marine Simon (featuring Slimline Dies, Balloon Rides, Paris Afternoon)

I cut another 8,5 x 3,5 inches Strathmore bristol smooth panel, and cut a cloud border out of it using a die from the Slimline Nature Borders die set. I added a little bit of color to that border using tumbled glass oxide ink, and then I stamped my sentiment on the right side. I stamped the words "Floating by to say" from Floating By in black, and I silver heat embossed the word "Bonjour" from Charming City.

I attached everything on my dark blue panel using 1mm and 2mm foam squares, and finally added highlights and details to the images using a white gel pen. And that's it! I really had a lot of fun creating this card, I love how it turned out, and I hope you like it too! Thank you so much for stopping by, and see you next week!

Sunny Studio Supplies Used:

Seasonal Trees Stamps
Shop at:
Sunny Studio
Seaonal Trees Dies
Seaonal Trees Dies
Shop at:
Sunny Studio
Floating By Stamps
Floating By Stamps
Shop at:
Sunny Studio
Slimline Nature Borders
Shop at:
Sunny Studio
North Pole Stamps
North Pole Stamps
Shop at:
Sunny Studio
Balloon Rides Stamps
Shop at:
Sunny Studio
Balloon Rides Dies
Balloon Rides Dies
Shop at:
Sunny Studio
Charming City Stamps
Shop at:
Sunny Studio
Paris Afternoon Stamps
Shop at:
Sunny Studio
Paris Afternoon Dies
Shop at:
Sunny Studio
Birthday Cat Stamps
Birthday Cat Stamps
Shop at:
Sunny Studio
Birthday Cat Dies
Birthday Cat Dies
Shop at:
Sunny Studio

Friday, June 2, 2023

Scrumptious Cupcakes Card with Tina

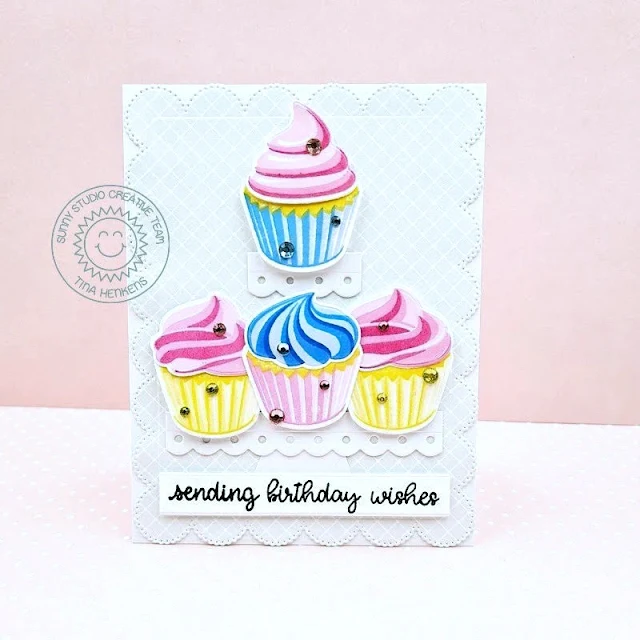
Hello crafty friends, Tina here and today I am featuring the sweet and delicious Scrumptious Cupcakes stamp and die set. With this set you can create several shapes of yummy cupcakes and because these are layering stamps, you get very realistic results!

Sunny Studio Stamps: Scrumptious Cupcakes Birthday Card by Tina Henkens (featuring Happy Thoughts, Frilly Frame Dies, Slimline Dies)

I placed my cupcakes on a tiered cake stand, which I created by cutting two borders with a scalloped Slimline Basic Border from white Neenah card stock. Next, I cut a simple rectangle shape from the same paper, this will be the base of the stand. For my cupcakes, I went with happy bright colors, I used the plastic sheet that the stamps come on as my guide to help me position the layers.

Since I have such vibrant images, I wanted the background to be subtle and muted. The Subtle Grey Tones paper pad is perfect when you want to add a little interest to your card but not a ton! I cut the card panel with the Frilly Frames Eyelet Lace die and glued it directly to a white card base.

Sunny Studio Stamps: Scrumptious Cupcakes Birthday Card by Tina Henkens (featuring Happy Thoughts, Frilly Frame Dies, Slimline Dies)

The sentiment from Happy Thoughts was stamped with Versafine Onyx Black ink onto a small white strip. This stamp set lets you create a bunch of custom sentiments, it’s a staple piece in my stash!

To assemble the card, I started by adding the sentiment to the bottom of the panel, then I placed the cake stand and cupcakes to figure out the best lay-out. I fiddled a bit with the height of the tiers and once I was happy with the design, I could adhere all the elements. Every cupcakes needs some sprinkles, so I added a few Pastel Mix Jewels for that extra bling!

I hope you will have fun too with this Scrumptious Cupcakes stamp and die setThank you for visiting the blog and happy crafting!

Sunny Studio Supplies Used:

Happy Thoughts Stamps
Shop at:
Sunny Studio
Subtle Grey Tones Paper
Shop at:
Sunny Studio
Frilly Frames-Eyelet Lace
Shop at:
Sunny Studio
Slimline Basic Borders
Shop at:
Sunny Studio
Scrumptious Cupcakes Stamps
Shop at:
Sunny Studio
Scrumptious Cupcakes Dies
Shop at:
Sunny Studio

Saturday, May 27, 2023

Guest Designer Spotlight: Birthday Cards with Rachel Alvarado

Hello crafty friends! It's Rachel here from RachelAlvaradoDesigns.com. I am happy to be back on the Sunny Studio Blog with some projects featuring items from the newest release.

Sunny Studio Stamps: Birthday Cat Birthday Card by Rachel Alvarado (featuring Fancy Frame Circle Dies, Slimline Scalloped Frame Dies)

For my first project, I created a slimline birthday card featuring the adorable Birthday Cats Stamp Set. To start my card, I first stamped all of my images with Memento Tuxedo Black Ink onto a sheet of Neenah Solar White 110lb Card Stock. I then used the Birthday Cats Die Set to cut them out. I set my images aside and die cut some white and teal pieces of card stock with the Slimline Scalloped Frame Dies to create my slimline card base.

Sunny Studio Stamps: Birthday Cat Birthday Card by Rachel Alvarado (featuring Fancy Frame Circle Dies, Slimline Scalloped Frame Dies)

Next, I die cut three white scalloped circles using the Fancy Frame Circle Dies. Before adding them to my card base, I used a basic circle die to cut three more circles from a piece of smooth white card stock. I added some Salvaged Patina to each circular piece before then splattering it with some diluted Copic Opaque White Paint. Once dry, I then layered these ink-blended pieces with the scalloped circle sections and then adhered them to my card base with double-sided adhesive. Lastly, I heat embossed my sentiment pieces with Fine Detail White Embossing Powder and then added my images with some 3D Foam Adhesive Tape for extra dimension.

Sunny Studio Stamps: Birthday Mouse Birthday Card by Rachel Alvarado

For my second project, I created a sweet, single layered birthday card featuring the new Birthday Mouse Stamp Set. I first stamped my images to a 4"x 5.25" piece of Neenah Solar White 110lb Card Stock and then stamped them a second time onto a piece of Gina K. Designs Masking Magic Sheets. I fussy cut my images from the masking paper and used them to cover/mask the images that I had just stamped onto my card base. 

Sunny Studio Stamps: Birthday Mouse Birthday Card by Rachel Alvarado

Once covered, I then lightly blended the background with some Milled Lavender Distress Oxide Ink, removed the masking pieces, and then added some diluted white ink spatters to my ink-blended portion for some added interest. Once dry, I then colored all of my images with Copic Markers. I finished my card by stamping my sentiment and adding this piece to a standard, top-folding, A2 sized card base.

Copic Colors Used:

  • Mouse: W00, W1, W3, W5
  • Purples: V01, V04, V15, V09
  • Indigo: V20, V22, V25, V28
  • Butterfly: B60, B63

I hope you enjoyed my card today! Thanks so much for taking the time to stop by! If you liked this card and want some more crafty inspiration, please feel free to check out my INSTAGRAM feed! Wishing you all a lovely day!

Sunny Studio Supplies Used:
 

Fancy Frames-Circle Dies
Shop at:
Sunny Studio
Slimline Scalloped Frame
Shop at:
Sunny Studio
Birthday Cat Stamps
Birthday Cat Stamps
Shop at:
Sunny Studio
Birthday Cat Dies
Birthday Cat Dies
Shop at:
Sunny Studio
Birthday Mouse Stamps
Shop at:
Sunny Studio