Thursday, July 15, 2021

Designer Choice Cards with Vanessa and Anja

Hello to you! Vanessa here with a fun cacti card combining various products:

Sunny Studio Stamps: Comic Strip Everyday Dies Looking Sharp Chloe Alphabet Dies Card by Vanessa Menhorn

I started with the Comic Strip Everyday Die and die-cut the pieces from white cardstock and patterned paper. After I had adhered the background, I stamped the images, colored them with Copic markers, die-cut the elements with the matching dies and adhered everything to the card with foam tape.

Now I die-cut the letters from black cardstock, spelled "sharp" and added details with a white gel pen. Finally, I stamped and heat-embossed the "looking" onto a strip of black cardstock, trimmed it and adhered it.

Sunny Studio Stamps: Comic Strip Everyday Dies Looking Sharp Chloe Alphabet Dies Card by Vanessa Menhorn

These adorable images always make me smile! This is the list of the products used today:

Looking Sharp stamps + dies
Chloe Alphabet Dies
Comic Strip Everyday Dies
Polka Dot Parade Paper Pad

Thanks for visiting and have a happy day!

----------------------------------------------

Hi everyone, Anja here today. The sweet retro trailer from the Happy Camper set makes me dream of a little summer vacation somewhere in the middle of nature, maybe at a lake with the mountains in the background. So I came up with this little scene where I added images from the Spring Scenes stamp set and Comic Strip Everyday die-cuts.

Sunny Studio Stamps: Comic Strip Everyday Dies Stitched Semi-Circle Dies Happy Camper Spring Scenes Card by Anja Bytyqi

First, I cut out a window with the largest of the Stitched Semi-Circle Dies from a white woodgrain cardstock panel. I did some Distress Oxide ink blending on smooth Bristol cardstock to create the sky background (Tumbled Glass, Spun Sugar, Kitsch Flamingo) and the grass (Bundled Sage, Mowed Lawn, Rustic Wilderness) as well. I used the grass border die to trim the top of the green ink blended piece. At the left, I stamped the sentiment in VersaMark Ink and heat embossed it with white embossing powder.

Sunny Studio Stamps: Comic Strip Everyday Dies Stitched Semi-Circle Dies Happy Camper Spring Scenes Card by Anja Bytyqi

Next, I stamped the images in Memento Tuxedo Black Ink and colored them with Copic Markers. I used the coordinating dies to cut out the trees and mountains. Since I don't have the matching die, I fussy cut the trailer with scissors. I adhered the woodgrain panel with foam tape and arranged the scene inside the window.


Thank you so much for stopping by! Have an awesome day!

Sunny Studio Supplies Used:

Looking Sharp Stamps
Shop at:
Sunny Studio
Looking Sharp Dies
Looking Sharp Dies
Shop at:
Sunny Studio
Chloe Alphabet Dies
Chloe Alphabet Dies
Shop at:
Sunny Studio
Happy Camper Stamps
Happy Camper Stamps
Shop at:
Sunny Studio
Happy Camper Dies
Happy Camper Dies
Shop at:
Sunny Studio
Polka-dot Parade 6x6 Paper
Shop at:
Sunny Studio
Comic Strip Everyday Dies
Shop at:
Sunny Studio
Spring Scenes Stamps
Shop at:
Sunny Studio
Spring Scenes Dies
Spring Scenes Dies
Shop at:
Sunny Studio
Stitched Semi-Circle Dies
Shop at:
Sunny Studio

Wednesday, July 14, 2021

Designer Choice Cards with Franci and Julia

Hello! Franci here with you today, with a special little project. I made little clothespins!! 

Sunny Studio Stamps: Looking Sharp Altered Project by Franci Vignoli

So, I'm growing into gardening and plants and flowers more and more lately. I don't have a garden myself ... but I have a little balcony, and during the last lockdown I planted some veggie seeds (my pride and joy! Ha!). So I needed some cute little clothespins to keep all my extra seeds tidy and organized ... and that's it!

To make these you just need some little clothespins, some white craft foam and the new Looking Sharp set + it's coordinated diesFirst of all I stamped, colored with Copics and die cut all my little plants, then added some details with a white gel pen and die cut some more plants out of white cardstock and foam.

Sunny Studio Stamps: Looking Sharp Altered Project by Franci Vignoli

I glued my colored image to a craft foam die cut one and added another white cardstock one on the back, then glued this little sandwich to the clothespin itself.  

Little projects like these are so dear to me. Sometime creating little things like these brings so much joy into your everyday life! I hope you are now inspired to create something special with your Sunny Studio goodies, have fun!

-----------------------------------------------

Hey crafty friends! It’s Julia here with a fun "any occasion" card!

Sunny Studio Stamps: Plane Awesome A Bird's Life Slimline Dies Everyday Card by Julia Englich

First, I stamped my images from Plane Awesome, Balloon Rides, Seasonal Tree, A Bird's Life and Meow & Furever onto Bristol Smooth cardstock and then I used my Zig Clean Color Real Brush Markers to color them in. I stamped the first part of the sentiment "flying by to say.." straight onto the little banner. I love having cards for different occasions on hand, so I just left the inside of the card blank and I can stamp the second part of the sentiment to match the occasion I want to use it for later when I am sending the card!

Inks used: Tumbled Glass, Shaded Lilac, Kitsch Flamingo. Zig Markers used: 999; 202; 64, 68; 52, 31, 37; 803, 80; 904, 95.

Sunny Studio Stamps: Plane Awesome A Bird's Life Slimline Dies Everyday Card by Julia Englich

I die cut the Slimline Scalloped Frame dies out of Bristol cardstock as well. I added the scalloped piece to a card base that is slightly smaller, so that the scalloped edge stands out more. Then, I ink blended the stitched panel using Distress Oxide inks and a cloud stencil! I added shimmery splatters, as well as colored splatters for more interest.

I adhered my background to my card and then I added all my cute images! Finally, to add lots of shine, I added Stickles to all the little clouds!

Thank you so much for stopping by today! Have a wonderful day!

Sunny Studio Supplies Used:

A Bird's Life Stamps
Shop at:
Sunny Studio
A Bird's Life Dies
A Bird's Life Dies
Shop at:
Sunny Studio
Looking Sharp Stamps
Shop at:
Sunny Studio
Looking Sharp Dies
Looking Sharp Dies
Shop at:
Sunny Studio
Seasonal Trees Stamps
Shop at:
Sunny Studio
Seaonal Trees Dies
Seaonal Trees Dies
Shop at:
Sunny Studio
Plane Awesome Stamps
Shop at:
Sunny Studio
Plane Awesome Dies
Plane Awesome Dies
Shop at:
Sunny Studio
Slimline Scalloped Frame
Shop at:
Sunny Studio
Balloon Rides Stamps
Shop at:
Sunny Studio
Balloon Rides Dies
Balloon Rides Dies
Shop at:
Sunny Studio
Meow & Furever Stamps
Shop at:
Sunny Studio
Meow & Furever Dies
Meow & Furever Dies
Shop at:
Sunny Studio

Tuesday, July 13, 2021

Designer Choice Cards with Isha and Kavya

Hello everyone! Isha here with a floral card. This week is the designer's choice so I decided to play with layers using various patterns from the pattern papers, dies, stamps.

Sunny Studio Stamps: Pink Peonies Frilly Frame Dies Stitched Circle Dies Best Wishes Card by Isha Gupta

I started by a mat layer using the floral pattern from the Subtle Grey Tones pattern paper. I then cut a stripe of teal paper from the Sleek Stripes paper pad. Die-cut the lattice using the Frilly Frame Lattice die from white cardstock. Cut the lattice as per the design requirement using scissors. Add green color to some places using watercolor. 

Cut a watercolor paper stripe, add pink watercolor to it and let it dry. Adhere all the layers as per the card photo. Adhere to the card base. Die-cut a white circle from the Stitched Circle Small dies. Die-cut a white Scalloped Circle Mat 3 die. 

Sunny Studio Stamps: Pink Peonies Frilly Frame Dies Stitched Circle Dies Best Wishes Card by Isha Gupta

Stamp the sentiment onto the circle. Adhere the scallop circle slightly showing through onto the right behind the circle die. Stamp the flowers and the leaves from the Pink Peonies stamp set onto watercolor paper. Add color using watercolors. Die-cut using the coordinating dies. Adhere the circle layers and the images onto the card. Flick some white and pink paint to the card. To finish, adhere a few Crystal Clear Jewels.

Thanks for dropping by. Have a nice day!

---------------------------------------------------

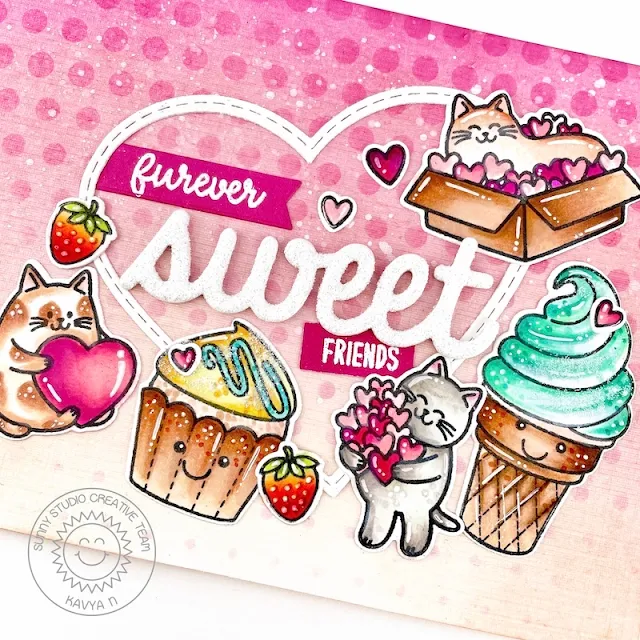
Hi folks! Kavya here with another fun color fun card! I am always looking for fun ways to combine stamp sets… I mean who doesn’t like stretching supplies? Here is a fun little card for a best friend!

Sunny Studio Stamps: Sweet Word Die Sweet Shoppe Meow & Furever Friendship Card by Kavya

I first started off by creating a cute polka dot background for my card. I first started off by ink blending an A2 panel using shades of pink and peach dye ink. I then used a polka dot stencil and pink ink to stencil the top half of the cardstock. Next, I stamped and colored a bunch of images from Sweet Shoppe and Meow and Furever using alcohol makers and colored pencils. I then used two heart dies to create a ‘heart frame’.

Sunny Studio Stamps: Sweet Word Die Sweet Shoppe Meow & Furever Friendship Card by Kavya

For the sentiment, I stacked a bunch of Sweet Word die cuts and applied some PVA glue on top. Then, I dipped it in some white glitter for some extra kick. I also applied some white glitter on the sweets! Finally, I heat embossed the rest of the sentiments from Meow and Furever to finish off the card.

That’s about it! I hope you liked this cute card … I sure had fun making it! Check back tomorrow for more inspiration from rest of the team. Happy Crafting!

Sunny Studio Supplies Used: 

Sweet Shoppe Dies
Sweet Shoppe Dies
Shop at:
Sunny Studio
Sweet Shoppe Stamps
Sweet Shoppe Stamps
Shop at:
Sunny Studio
Sweet Word Die
Sweet Word Die
Shop at:
Sunny Studio
Poppy Fields Stamps
Poppy Fields Stamps
Shop at:
Sunny Studio
Poppy Fields Dies
Poppy Fields Dies
Shop at:
Sunny Studio
Frilly Frames Lattice Dies
Shop at:
Sunny Studio
Subtle Grey Tones Paper
Shop at:
Sunny Studio
Sleek Stripes Paper
Sleek Stripes Paper
Shop at:
Sunny Studio
Meow & Furever Stamps
Shop at:
Sunny Studio
Meow & Furever Dies
Meow & Furever Dies
Shop at:
Sunny Studio
Scalloped Circle Mat 3 Dies
Shop at:
Sunny Studio
Stitched Circle Small Dies
Shop at:
Sunny Studio

Monday, July 12, 2021

Designer Choice Cards with Ashley and Mayra

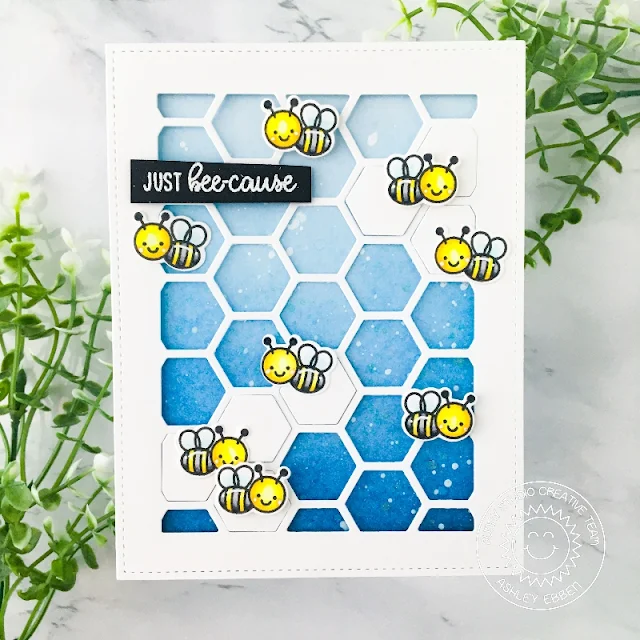
Hi friends! It's Ashley and this week on the Sunny Studio blog it is designer's choice! I love these weeks, because I can pull out old favorites and share them with you all over again! Today, I grabbed the adorable bees and the Just Bee-cause set! I have gotten my ten dollars worth several times over with this one! It is one of my all time favorite sets from any company!

Sunny Studio Stamps: Just Bee-Cause Frilly Frame Dies Everyday Card by Ashley Ebben

I started this card by blending Pinkfresh Studio Morning Sky ink cubes onto light blue cardstock for a lovely ombre. I splattered the piece with watered down white acrylic paint and some shimmery ink. While that dried, I ran some white cardstock through my die cutting machine with the frame from Frilly Frames Quatrefoil and the hexagon background from Frilly Frames Hexagon, making sure to save the hexagon cut outs. I added my new frame on top of the ink blended piece with foam tape, then used a bit more tape to add some of the hexagons back in. I think it gives the whole piece an interesting almost unfinished look.

Sunny Studio Stamps: Just Bee-Cause Frilly Frame Dies Everyday Card by Ashley Ebben

I stamped several bees from Just Bee-cause onto white cardstock in Lawn Fawn Jet Black ink and colored with Copics. I added a few details with a white gel pen, then cut them out with the matching dies. I spaced the bees out around the card front, popping a few up with foam tape for more dimension. I finished with a sentiment from Just Bee-cause. I stamped it in VersaMark ink onto black cardstock and embossed with white. I cut the strip out then added it to the corner of my card with foam tape.

Thank you so much for stopping by! Have a wonderful day!

---------------------------------------------

Hello and happy Monday everyone! Mayra here with you today. I am sharing this card using the adorable Tiki Time stamp set.

Sunny Studio Stamps: Stitched Rectangles Tiki Time Tropical Card by Mayra Duran-Hernandez

I began by coloring the images from the set using Copic markers. I used C0, W1, W3, W5, and W7. For the pink, I used RV21, RV23, RV00, and RV52. For the yellow, I used Y08, Y11, Y19, and YR24. For the orange area, I used YR14, YR07, and YR16. For the green, I used YG01, YG17, YG67, and G28.

Sunny Studio Stamps: Stitched Rectangles Tiki Time Tropical Card by Mayra Duran-Hernandez

I then used the largest of the Stitched Rectangles die to die cut the base panel for the card. I added color to the panel using Distress Oxide inks. I used Squeezed Lemonade, Wild Honey, and Picked Raspberry.

I hope you enjoy the card I created to share with you today. Thank you so much for taking the time to stop by. I hope you each have a wonderful and blessed day.

Sunny Studio Supplies Used:

Tiki Time Stamps
Tiki Time Stamps
Shop at:
Sunny Studio
Tiki Time Dies
Tiki Time Dies
Shop at:
Sunny Studio
Stitched Rectangle Dies
Shop at:
Sunny Studio
Just Bee-cause Stamps
Shop at:
Sunny Studio
Just Bee-cause Dies
Just Bee-cause Dies
Shop at:
Sunny Studio
Frilly Frames Hexagon Dies
Shop at:
Sunny Studio
Frilly Frames Quatrefoil
Shop at:
Sunny Studio